Installation Instructions
Page 1
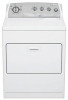
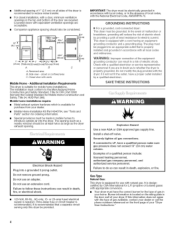
... messages in this manual and on your old clothes dryer, remove the door. 29"(73.7CM)GASDRYERINSTALLATIONINSTRUCTIONS # INSTRUCCIONESDE INSTALACIONPARALA SECADORAA GAS DE 29"(73,7CM) Tableof Contents/ Indice DRYER SAFETY 1 SEGURIDAD DE LA SECADORA 10 INSTALLATION INSTRUCTIONS 2 Tools and Par_s 2 Location Requirements 3 Electrical Requirements 4 Gas Supply Requirements 4 Venting Requirements 5 Plan Vent System 6 Install Vent System 7 Install Leveling Legs 7 Level Dryer 8 Make Gas Connection 8 Connect Vent 8 Reverse Door Swing (Optional 8 Complete Installation 9 INSTR UCCION...
... messages in this manual and on your old clothes dryer, remove the door. 29"(73.7CM)GASDRYERINSTALLATIONINSTRUCTIONS # INSTRUCCIONESDE INSTALACIONPARALA SECADORAA GAS DE 29"(73,7CM) Tableof Contents/ Indice DRYER SAFETY 1 SEGURIDAD DE LA SECADORA 10 INSTALLATION INSTRUCTIONS 2 Tools and Par_s 2 Location Requirements 3 Electrical Requirements 4 Gas Supply Requirements 4 Venting Requirements 5 Plan Vent System 6 Install Vent System 7 Install Leveling Legs 7 Level Dryer 8 Make Gas Connection 8 Connect Vent 8 Reverse Door Swing (Optional 8 Complete Installation 9 INSTR UCCION...
Installation Instructions
Page 2
... dmeiantihm.ize - Do not store or use any electrical switch; Check existing gas supply, electrical supply and venting, and read "Electrical Requirements," "Gas Supply Requirements" and "Venting Requirements" before purchasing parts. Ask for correct installation. Follow the gas supplier's instructions. • If you cannot reach your dryer. Installation and service must be a T-handle type. _, A flexible gas connector, when used, must be ordered by calling the dealer from dryer drum. Check that opens to 1" (2.5 cm) or hex-head socket...
... dmeiantihm.ize - Do not store or use any electrical switch; Check existing gas supply, electrical supply and venting, and read "Electrical Requirements," "Gas Supply Requirements" and "Venting Requirements" before purchasing parts. Ask for correct installation. Follow the gas supplier's instructions. • If you cannot reach your dryer. Installation and service must be a T-handle type. _, A flexible gas connector, when used, must be ordered by calling the dealer from dryer drum. Check that opens to 1" (2.5 cm) or hex-head socket...
Installation Instructions
Page 3
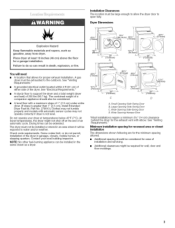
... be considered for ease of installation and servicing. • Additional clearances might not shut off at the end of the dryer. Large Opening Side-Swing Door C. Place dryer at temperatures below 45°F (7°C). A gas dryer must not be required for the exhaust vent with automatic sensor cycles may not operate correctly if dryer is greater than 1" [2.5 cm], install Extended Dryer Feet kit, Part No. 279810.) Clothes may not tumble properly and...
... be considered for ease of installation and servicing. • Additional clearances might not shut off at the end of the dryer. Large Opening Side-Swing Door C. Place dryer at temperatures below 45°F (7°C). A gas dryer must not be required for the exhaust vent with automatic sensor cycles may not operate correctly if dryer is greater than 1" [2.5 cm], install Extended Dryer Feet kit, Part No. 279810.) Clothes may not tumble properly and...
Installation Instructions
Page 4
... gas in the door well of least resistance for electric current. The plug must be made in accordance with all gas connections. The opening . Do not remove ground prong. or 20-amp fused electrical supply is required. (Time-delay fuse or circuit breaker is recommended.) It is located on the front page of your dealer. • Mobile Home Installation Kit Part #346764, see "Tools and Parts" section for purchase from your "Dryer User Instructions...
... gas in the door well of least resistance for electric current. The plug must be made in accordance with all gas connections. The opening . Do not remove ground prong. or 20-amp fused electrical supply is required. (Time-delay fuse or circuit breaker is recommended.) It is located on the front page of your dealer. • Mobile Home Installation Kit Part #346764, see "Tools and Parts" section for purchase from your "Dryer User Instructions...
Installation Instructions
Page 5
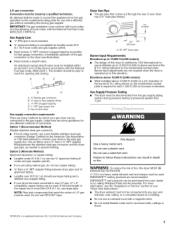
... codes permit, use a new flexible stainless steel gas connector (Design Certified by the American Gas Association or CSA International) to connect your gas dryer can be used. rating indicated on the model/serial number plate is required for use at altitudes up to follow these instructions or fire. Fire Hazard Use a heavy metal vent. Do not use TEFLOW _ tape. Y/' NPT gas supply line E, Gas shutoff valve Gas supply connection requirements There are many methods by calling Whirlpool Parts...
... codes permit, use a new flexible stainless steel gas connector (Design Certified by the American Gas Association or CSA International) to connect your gas dryer can be used. rating indicated on the model/serial number plate is required for use at altitudes up to follow these instructions or fire. Fire Hazard Use a heavy metal vent. Do not use TEFLOW _ tape. Y/' NPT gas supply line E, Gas shutoff valve Gas supply connection requirements There are many methods by calling Whirlpool Parts...
Installation Instructions
Page 6
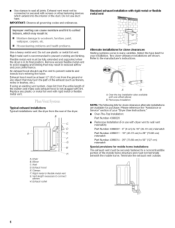
... seal all governing codes and ordinances. Please reference the "Assistance or Service" section of the dryer. Replace any object that may resumt in reduced airflow and poor performance. IMPORTANT: Observe all joints. Typical exhaust installations Typical installations vent the dryer from entering the home. Select the type best for your "Dryer User Instructions." • Over-The-Top Installation: Part Number 4396028 Periscope Installation (For use with one offset...
... seal all governing codes and ordinances. Please reference the "Assistance or Service" section of the dryer. Replace any object that may resumt in reduced airflow and poor performance. IMPORTANT: Observe all joints. Typical exhaust installations Typical installations vent the dryer from entering the home. Select the type best for your "Dryer User Instructions." • Over-The-Top Installation: Part Number 4396028 Periscope Installation (For use with one offset...
Installation Instructions
Page 7
... maximum vent lengths you will provide the straightest and most direct path outdoors. Connect vent to connect the exhaust vent. 6. See "Determine Vent Length." Leave enough room to exhaust hood. Install exhaust hood. Use caulking compound to avoid kinking. Vent must fit inside exhaust hood. Use the straightest path possible. Avoid 90° turns. Exhaust systems longer than specified in final location, remove corner posts and cardboard. Gently lay the dryer on...
... maximum vent lengths you will provide the straightest and most direct path outdoors. Connect vent to connect the exhaust vent. 6. See "Determine Vent Length." Leave enough room to exhaust hood. Install exhaust hood. Use caulking compound to avoid kinking. Vent must fit inside exhaust hood. Use the straightest path possible. Avoid 90° turns. Exhaust systems longer than specified in final location, remove corner posts and cardboard. Gently lay the dryer on...

Installation Instructions
Page 8
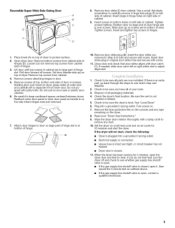
... carefully remove 4 hinge hole plugs (D) on top of door hinge slot is clean. Position door so large end of dryer to the existing gas line. If needed, slide door catch left side of hinges. 3. Mobile home installations require a Mobile Home Installation Kit. Open valve Test all non-flared male threads. Check levelness first side to side, then front to existing vent, make sure the vent is over the dryer exhaust outlet and inside the exhaust...
... carefully remove 4 hinge hole plugs (D) on top of door hinge slot is clean. Position door so large end of dryer to the existing gas line. If needed, slide door catch left side of hinges. 3. Mobile home installations require a Mobile Home Installation Kit. Open valve Test all non-flared male threads. Check levelness first side to side, then front to existing vent, make sure the vent is over the dryer exhaust outlet and inside the exhaust...
Installation Instructions
Page 9
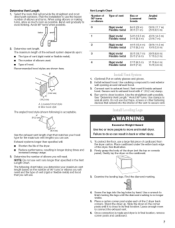
... door (4 screws). Pull door forward off and check to door so large part of hinge slot is open, contact a qualified technician. Remove screws at bottom of dryer. Do not pry apart with door catch (C). If needed, slide door catch left side of cabinet. Dispose of hinge slot. Check the dryer's final location. Plug into a grounded 3 prong outlet. • Electrical supply is connected. • House fuse is intact and tight, or circuit breaker...
... door (4 screws). Pull door forward off and check to door so large part of hinge slot is open, contact a qualified technician. Remove screws at bottom of dryer. Do not pry apart with door catch (C). If needed, slide door catch left side of cabinet. Dispose of hinge slot. Check the dryer's final location. Plug into a grounded 3 prong outlet. • Electrical supply is connected. • House fuse is intact and tight, or circuit breaker...
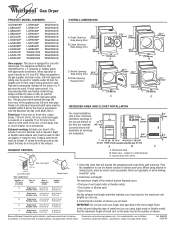
Dimensions
Page 1
... or any object that will need. gas must be in the path of the dryer in the Vent Length Chart. Electrical: A four-wire or three-wire, single phase, 120-volt, 60 Hz, AC-only, electrical supply is recommended. A time-delay fuse or circuit breaker is required on a separate 15 or 20 amp circuit, fused on the same line as possible. Exhaust venting: Exhaust your hood type for L.P. (propane or butane) gases with...
... or any object that will need. gas must be in the path of the dryer in the Vent Length Chart. Electrical: A four-wire or three-wire, single phase, 120-volt, 60 Hz, AC-only, electrical supply is recommended. A time-delay fuse or circuit breaker is required on a separate 15 or 20 amp circuit, fused on the same line as possible. Exhaust venting: Exhaust your hood type for L.P. (propane or butane) gases with...


