

Owners Manual
Page 13
... unable to parts or systems resulting from warranty coverage. 4. Repairs to resolve the problem after checking "Troubleshooting," additional help you obtain assistance or service if you . WHIRLPOOL SHALL NOT BE LIABLE FOR INCIDENTAL OR CONSEQUENTIAL DAMAGES. This limited warranty is ...parts or repair labor on the duration of implied warranties of incidental or consequential damages, so these limitations and exclusions may have other rights that have been removed, altered, or cannot be found by checking the "Assistance or Service" section or by an authorized Whirlpool...
... unable to parts or systems resulting from warranty coverage. 4. Repairs to resolve the problem after checking "Troubleshooting," additional help you obtain assistance or service if you . WHIRLPOOL SHALL NOT BE LIABLE FOR INCIDENTAL OR CONSEQUENTIAL DAMAGES. This limited warranty is ...parts or repair labor on the duration of implied warranties of incidental or consequential damages, so these limitations and exclusions may have other rights that have been removed, altered, or cannot be found by checking the "Assistance or Service" section or by an authorized Whirlpool...

Warranty
Page 1
... these limitations and exclusions may have other than normal, single-family household use your major appliance is located in a remote area where service by Whirlpool. 5. Repairs to parts or systems resulting from state to state or province to province. Expenses for travel and transportation for product service if your major appliance, to...
... these limitations and exclusions may have other than normal, single-family household use your major appliance is located in a remote area where service by Whirlpool. 5. Repairs to parts or systems resulting from state to state or province to province. Expenses for travel and transportation for product service if your major appliance, to...
Installation Instructions
Page 4
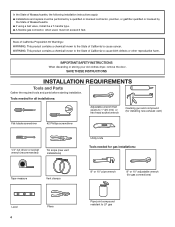
..., it shall be a T-handle type. � A flexible gas connector, when used, must not exceed 3 feet. SAVE THESE INSTRUCTIONS INSTALLATION REQUIREMENTS Tools and Parts Gather the required tools and parts before starting installation. Tools needed for all installations: Adjustable wrench that opens to 1" (25 mm) or hex-head socket wrench Caulking gun and...
..., it shall be a T-handle type. � A flexible gas connector, when used, must not exceed 3 feet. SAVE THESE INSTRUCTIONS INSTALLATION REQUIREMENTS Tools and Parts Gather the required tools and parts before starting installation. Tools needed for all installations: Adjustable wrench that opens to 1" (25 mm) or hex-head socket wrench Caulking gun and...
Installation Instructions
Page 5
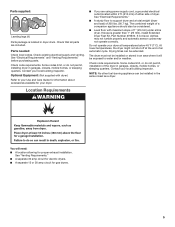
...; If you are included. Check code requirements. Location Requirements You will be installed in the same closet as a dryer. Check that all parts are using power supply cord, a grounded electrical outlet located within 2 ft. (610 mm) of either side of the dryer in an ...area where it will need: ■■ A location allowing for your local building inspector. See "Electrical Requirements" and "Venting Requirements" before purchasing parts. Optional Equipment: (Not supplied with maximum slope of 200 lbs. (90.7 kg). Drying times can be exposed to support dryer and a total...
...; If you are included. Check code requirements. Location Requirements You will be installed in the same closet as a dryer. Check that all parts are using power supply cord, a grounded electrical outlet located within 2 ft. (610 mm) of either side of the dryer in an ...area where it will need: ■■ A location allowing for your local building inspector. See "Electrical Requirements" and "Venting Requirements" before purchasing parts. Optional Equipment: (Not supplied with maximum slope of 200 lbs. (90.7 kg). Drying times can be exposed to support dryer and a total...
Installation Instructions
Page 6
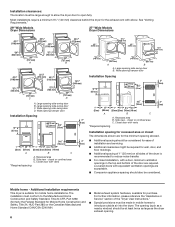
... mm) A B A. Installation clearances: The location must conform to the Manufactured Home Construction and Safety Standard, Title 24 CFR, Part 3280 (formerly the Federal Standard for Mobile Home Construction and Safety, Title 24, HUD Part 280) or the Canadian Manufactured Home Standard CAN/CSA-Z240 MH. ■■ Metal exhaust system hardware, available...
... mm) A B A. Installation clearances: The location must conform to the Manufactured Home Construction and Safety Standard, Title 24 CFR, Part 3280 (formerly the Federal Standard for Mobile Home Construction and Safety, Title 24, HUD Part 280) or the Canadian Manufactured Home Standard CAN/CSA-Z240 MH. ■■ Metal exhaust system hardware, available...
Installation Instructions
Page 7
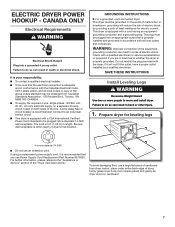
... recommended. place under entire back edge of least resistance for leveling legs 4-wire receptacle (14-30R) ■■ Do not use Power Supply Cord Replacement Part Number 8579325. Connect to do so can result in accordance with the Canadian Electrical Code, C22.1-latest edition and all local codes and ordinances. GROUNDING...
... recommended. place under entire back edge of least resistance for leveling legs 4-wire receptacle (14-30R) ■■ Do not use Power Supply Cord Replacement Part Number 8579325. Connect to do so can result in accordance with the Canadian Electrical Code, C22.1-latest edition and all local codes and ordinances. GROUNDING...
Installation Instructions
Page 11
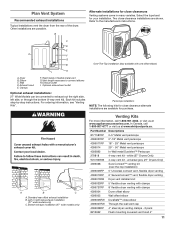
....whirlpoolparts.ca. Plan Vent System Recommended exhaust installations Typical installations vent the dryer from the rear of the dryer. For ordering information, see "Venting Kits". Part Number Descriptions 8171587RP 0-5" Metal vent periscope 4396037RP 0"-18" Metal vent periscope 4396011RP 18" - 29" Metal vent periscope 4396014 29" - 50" Metal vent periscope 4392892 In...
....whirlpoolparts.ca. Plan Vent System Recommended exhaust installations Typical installations vent the dryer from the rear of the dryer. For ordering information, see "Venting Kits". Part Number Descriptions 8171587RP 0-5" Metal vent periscope 4396037RP 0"-18" Metal vent periscope 4396011RP 18" - 29" Metal vent periscope 4396014 29" - 50" Metal vent periscope 4392892 In...
Installation Instructions
Page 14
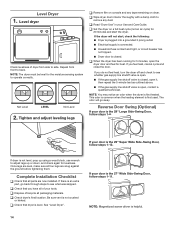
... Guide. q Wipe dryer drum interior thoroughly with a damp cloth to see what was skipped. If you have all parts are snug against the ground before tightening them. If your door is an extra part, go away. q Check that you feel for levelness. Be sure vent is helpful. NOTE: Magnetized screw driver is...
... Guide. q Wipe dryer drum interior thoroughly with a damp cloth to see what was skipped. If you have all parts are snug against the ground before tightening them. If your door is an extra part, go away. q Check that you feel for levelness. Be sure vent is helpful. NOTE: Magnetized screw driver is...

Installation Instructions
Page 15
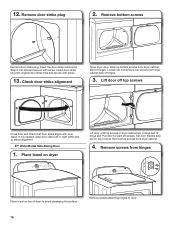
... 4 hinge hole plugs on top of hinges. Lift door off screws. Position door so large end of hinges. 3. Insert and tighten top screws in large part of dryer. Check door strike alignment Lift door until top screws in cabinet are in hinge holes on opposite side of dryer cabinet. Close door...
... 4 hinge hole plugs on top of hinges. Lift door off screws. Position door so large end of hinges. 3. Insert and tighten top screws in large part of dryer. Check door strike alignment Lift door until top screws in cabinet are in hinge holes on opposite side of dryer cabinet. Close door...

Installation Instructions
Page 16
.... Loosen (do not remove) top screws from hinge screws as they are in dryer cabinet are diferent sizes. Lift door until top screws in large part of outer door and lift to inner door panel so handle is on dryer 4. Place towel on the side where hinges were just removed. Be...
.... Loosen (do not remove) top screws from hinge screws as they are in dryer cabinet are diferent sizes. Lift door until top screws in large part of outer door and lift to inner door panel so handle is on dryer 4. Place towel on the side where hinges were just removed. Be...
Installation Instructions
Page 18
Insert the door strike removed in large part of hinge slot. Lift door off screws. If it is needed, slide door catch left or right within slot to door. 18 Set door (handle ...
Insert the door strike removed in large part of hinge slot. Lift door off screws. If it is needed, slide door catch left or right within slot to door. 18 Set door (handle ...


