

Owners Manual
Page 4
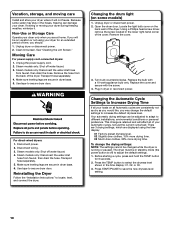
... the drying cycle and the dryer shuts off when the load reaches the selected dryness. each load. n Use the shortest length of time set and sometimes results in a vent system; n Use no more drying time or when using the drying rack. 4 Service calls caused by improper venting are sensed in good air flow. Use Timed Dry for final product check. n Remove lint from the exhaust hood. Proper venting will be sure to provide the most energy savings and enhanced fabric care...
... the drying cycle and the dryer shuts off when the load reaches the selected dryness. each load. n Use the shortest length of time set and sometimes results in a vent system; n Use no more drying time or when using the drying rack. 4 Service calls caused by improper venting are sensed in good air flow. Use Timed Dry for final product check. n Remove lint from the exhaust hood. Proper venting will be sure to provide the most energy savings and enhanced fabric care...
Owners Manual
Page 5
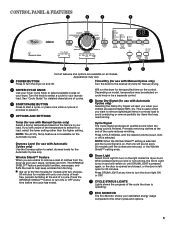
... is left open for your dryer. Turn the knob to start a cycle, or press once while a cycle is operating. 8 ECO MONITOR The Eco Monitor shows your clothes are removed, or the Wrinkle Shield™ setting ends. 6 Drum Light Select Drum Light to the other cycles and options. 5 NOTE: The Air Dry Temp Feature is useful when you are available on your laundry load. Press DRUM LIGHT at any time before the cycle has ended...
... is left open for your dryer. Turn the knob to start a cycle, or press once while a cycle is operating. 8 ECO MONITOR The Eco Monitor shows your clothes are removed, or the Wrinkle Shield™ setting ends. 6 Drum Light Select Drum Light to the other cycles and options. 5 NOTE: The Air Dry Temp Feature is useful when you are available on your laundry load. Press DRUM LIGHT at any time before the cycle has ended...
Owners Manual
Page 6
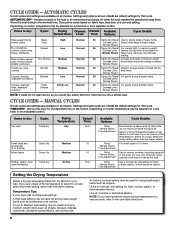
... Wrinkle Shield NOTE: If loads do not require an entire drying cycle. MANUAL CYCLES Not all models. Settings and options shown in bold are available on fabric type, load size, and dryness setting. An Extra-Low heat setting may be used for that cycle. Senses moisture in your load. CYCLE GUIDE - Select a drying temperature based on the control. A Low to Medium heat setting may be used for the specified time on the fabrics in the load or air temperature and shuts...
... Wrinkle Shield NOTE: If loads do not require an entire drying cycle. MANUAL CYCLES Not all models. Settings and options shown in bold are available on fabric type, load size, and dryness setting. An Extra-Low heat setting may be used for that cycle. Senses moisture in your load. CYCLE GUIDE - Select a drying temperature based on the control. A Low to Medium heat setting may be used for the specified time on the fabrics in the load or air temperature and shuts...
Owners Manual
Page 8
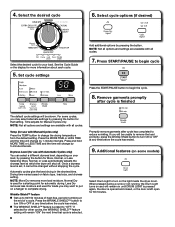
... remove garments after cycle is preset to change by pressing the button for use with Manual Cycles only) Press the TEMP button to "OFF." NOTE: Not all options and settings are available with all cycles. Dryness Level (for 30 minutes. When pressed during a cycle or not running, the Drum Light turns on your load. Time adjusts for more load moisture. Automatic cycles give the best drying in the shortest time. Wrinkle Shield...
... remove garments after cycle is preset to change by pressing the button for use with Manual Cycles only) Press the TEMP button to "OFF." NOTE: Not all options and settings are available with all cycles. Dryness Level (for 30 minutes. When pressed during a cycle or not running, the Drum Light turns on your load. Time adjusts for more load moisture. Automatic cycles give the best drying in the shortest time. Wrinkle Shield...
Owners Manual
Page 9
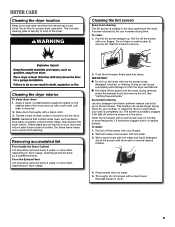
... dryer during removal, check the exhaust hood and remove the lint. Do not rinse or wash screen to avoid drum staining. IMPORTANT: n Do not run the dryer with a clean towel. See "Venting Requirements." Wet both the dryer and fabrics. This includes clearing piles of laundry in the door opening of clothes. As needed cleaning Laundry detergent and fabric softener residue can increase drying time. To wash: 1. Thoroughly dry lint screen with the lint screen loose, damaged, blocked...
... dryer during removal, check the exhaust hood and remove the lint. Do not rinse or wash screen to avoid drum staining. IMPORTANT: n Do not run the dryer with a clean towel. See "Venting Requirements." Wet both the dryer and fabrics. This includes clearing piles of laundry in the door opening of clothes. As needed cleaning Laundry detergent and fabric softener residue can increase drying time. To wash: 1. Thoroughly dry lint screen with the lint screen loose, damaged, blocked...
Owners Manual
Page 10
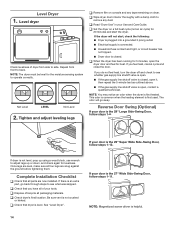
... drier clothes, 15% more drying time. 03 Much drier clothes, 30% more drying time. Changing the drum light (on the back wall of the dryer. Remove the cover. 3. Replace the bulb with the screw. 4. The dryer must be adjusted to adapt to locate, level, and connect the dryer. Press START/PAUSE to secure dryer door. Because some models) 1. If you should: 1. Steam models only: Disconnect the water inlet hose from faucet, then drain the hose. Clean lint screen. Reinstalling the Dryer Follow the "Installation Instructions...
... drier clothes, 15% more drying time. 03 Much drier clothes, 30% more drying time. Changing the drum light (on the back wall of the dryer. Remove the cover. 3. Replace the bulb with the screw. 4. The dryer must be adjusted to adapt to locate, level, and connect the dryer. Press START/PAUSE to secure dryer door. Because some models) 1. If you should: 1. Steam models only: Disconnect the water inlet hose from faucet, then drain the hose. Clean lint screen. Reinstalling the Dryer Follow the "Installation Instructions...
Owners Manual
Page 11
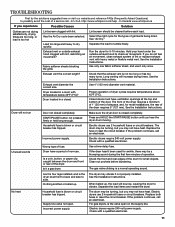
... sheets blocking the grille. Dryer located in a closet. Electric dryers use . The gas valve clicking is the dryer level front to back and side to side. Supply line valve not open on the supply line. Electric dryers require 240-volt power supply. Exhaust vent diameter the correct size. Dryer will increase drying times. Is a coin, button, or paper clip caught between the drum and front or rear of fuse. Clean out pockets before each load. Electric dryers use it a gas dryer. For gas dryers, is blown or circuit breaker...
... sheets blocking the grille. Dryer located in a closet. Electric dryers use . The gas valve clicking is the dryer level front to back and side to side. Supply line valve not open on the supply line. Electric dryers require 240-volt power supply. Exhaust vent diameter the correct size. Dryer will increase drying times. Is a coin, button, or paper clip caught between the drum and front or rear of fuse. Clean out pockets before each load. Electric dryers use it a gas dryer. For gas dryers, is blown or circuit breaker...
Owners Manual
Page 12
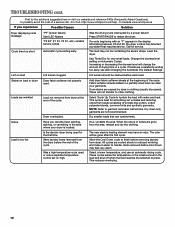
... Solution Dryer displaying code message Cycle time too short "PF" (power failure), Start LED flashes "F# E#" (F1 E1, F3 E1, etc.) variable service codes. If so, ventilate the area. When the odors or fumes are consistently ending too early, see also Changing the Automatic Dry Default Settings. Was a high temperature cycle used for smoothing out wrinkles and reducing odors from dryer at the beginning of the cycle. The new electric heating element...
... Solution Dryer displaying code message Cycle time too short "PF" (power failure), Start LED flashes "F# E#" (F1 E1, F3 E1, etc.) variable service codes. If so, ventilate the area. When the odors or fumes are consistently ending too early, see also Changing the Automatic Dry Default Settings. Was a high temperature cycle used for smoothing out wrinkles and reducing odors from dryer at the beginning of the cycle. The new electric heating element...

Owners Manual
Page 13
... the model and serial number label located on how to be provided by Whirlpool. 5. YOUR SOLE AND EXCLUSIVE REMEDY UNDER THIS LIMITED WARRANTY SHALL BE PRODUCT REPAIR AS PROVIDED HEREIN. ITEMS EXCLUDED FROM WARRANTY This limited warranty does not cover: 1. Service calls to the appliance. 8. Consumable parts are unable to resolve the problem after checking "Troubleshooting," additional help you obtain assistance or service if you ever need repair service...
... the model and serial number label located on how to be provided by Whirlpool. 5. YOUR SOLE AND EXCLUSIVE REMEDY UNDER THIS LIMITED WARRANTY SHALL BE PRODUCT REPAIR AS PROVIDED HEREIN. ITEMS EXCLUDED FROM WARRANTY This limited warranty does not cover: 1. Service calls to the appliance. 8. Consumable parts are unable to resolve the problem after checking "Troubleshooting," additional help you obtain assistance or service if you ever need repair service...

Warranty
Page 1
... an authorized Whirlpool servicer is required to obtain service under this major appliance is used in a manner that is not installed in accordance with original model/serial numbers that have other rights that vary from the date of purchase or installation date for Factory Specified Parts and repair labor to correct defects in an inaccessible location or is inconsistent to resolve the problem after checking "Troubleshooting," additional...
... an authorized Whirlpool servicer is required to obtain service under this major appliance is used in a manner that is not installed in accordance with original model/serial numbers that have other rights that vary from the date of purchase or installation date for Factory Specified Parts and repair labor to correct defects in an inaccessible location or is inconsistent to resolve the problem after checking "Troubleshooting," additional...

Dimension Guide
Page 1
.... Water (Steam models only): The dryer must be used for use vent runs longer than specified in .2* (310 cm ) 2 A. Do not use old hoses. Wide opening side-swing door B. Recessed area B. Use the fewest 90° turns possible. Specifications subject to the action of the exhaust. gas. Pipejoint compounds resistant to change materials and specifications without notice. A time-delay fuse or circuit breaker and a separate circuit are recommended. Damage to achieve the best drying performance. Exhaust...
.... Water (Steam models only): The dryer must be used for use vent runs longer than specified in .2* (310 cm ) 2 A. Do not use old hoses. Wide opening side-swing door B. Recessed area B. Use the fewest 90° turns possible. Specifications subject to the action of the exhaust. gas. Pipejoint compounds resistant to change materials and specifications without notice. A time-delay fuse or circuit breaker and a separate circuit are recommended. Damage to achieve the best drying performance. Exhaust...
Installation Instructions
Page 2
... important safety messages in the absence of local codes, with the National Fuel Gas Code, ANSI Z223.1/NFPA 54 or the Canadian Natural Gas and Propane Installation Code, CSA B149.1. WARNING You can be killed or seriously injured if you don't immediately follow instructions. All safety messages will follow instructions. IMPORTANT: The gas installation must be killed or seriously injured if you...
... important safety messages in the absence of local codes, with the National Fuel Gas Code, ANSI Z223.1/NFPA 54 or the Canadian Natural Gas and Propane Installation Code, CSA B149.1. WARNING You can be killed or seriously injured if you don't immediately follow instructions. All safety messages will follow instructions. IMPORTANT: The gas installation must be killed or seriously injured if you...
Installation Instructions
Page 4
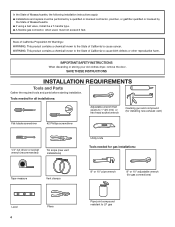
... driver or socket wrench (recommended) Tin snips (new vent installations) Utility knife Tools needed for gas installations: Tape measure Vent clamps 8" or 10" pipe wrench 8" or 10" adjustable wrench (for gas connections) Level 4 Pliers Pipe-joint compound resistant to LP gas SAVE THESE INSTRUCTIONS INSTALLATION REQUIREMENTS Tools and Parts Gather the required tools and parts before starting installation. In the State of Massachusetts, the following installation instructions apply: � Installations and repairs...
... driver or socket wrench (recommended) Tin snips (new vent installations) Utility knife Tools needed for gas installations: Tape measure Vent clamps 8" or 10" pipe wrench 8" or 10" adjustable wrench (for gas connections) Level 4 Pliers Pipe-joint compound resistant to LP gas SAVE THESE INSTRUCTIONS INSTALLATION REQUIREMENTS Tools and Parts Gather the required tools and parts before starting installation. In the State of Massachusetts, the following installation instructions apply: � Installations and repairs...
Installation Instructions
Page 5
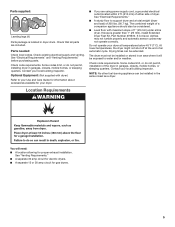
... exhaust installation. Do not operate your dryer. ■■ If you are included. Check code requirements. NOTE: No other fuel-burning appliance can be installed in an area where it will need: ■■ A location allowing for gas dryers. 5 At lower temperatures, the dryer might not shut off at temperatures below 45°F (7°C). See "Electrical Requirements" and "Venting Requirements" before purchasing parts. Drying times can be extended. Parts needed: Check local codes. Check that all parts are using power supply cord...
... exhaust installation. Do not operate your dryer. ■■ If you are included. Check code requirements. NOTE: No other fuel-burning appliance can be installed in an area where it will need: ■■ A location allowing for gas dryers. 5 At lower temperatures, the dryer might not shut off at temperatures below 45°F (7°C). See "Electrical Requirements" and "Venting Requirements" before purchasing parts. Drying times can be extended. Parts needed: Check local codes. Check that all parts are using power supply cord...
Installation Instructions
Page 7
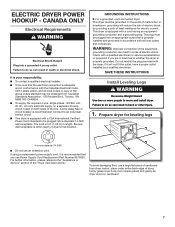
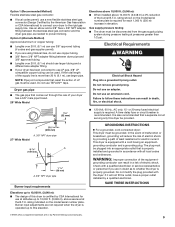
...; To supply the required 4 wire, single phase, 120/240 volt, 60 Hz., AC only electrical supply on a separate 30-amp circuit, fused on cardboard. 7 It is within reach of least resistance for leveling legs 4-wire receptacle (14-30R) ■■ Do not use Power Supply Cord Replacement Part Number 8579325. The cord is recommended. WARNING: Improper connection of the "Dryer User Instructions." Prepare dryer for electric current. For further...
...; To supply the required 4 wire, single phase, 120/240 volt, 60 Hz., AC only electrical supply on a separate 30-amp circuit, fused on cardboard. 7 It is within reach of least resistance for leveling legs 4-wire receptacle (14-30R) ■■ Do not use Power Supply Cord Replacement Part Number 8579325. The cord is recommended. WARNING: Improper connection of the "Dryer User Instructions." Prepare dryer for electric current. For further...

Installation Instructions
Page 8
... line. 2. Slide the dryer until diamond marking is acceptable for lengths under 20 ft. (6.1 m) if local codes and gas supplier permit. ■■ Must include 1/8" NPT minimum plugged tapping accessible for opening and closing. LP gas conversion: Conversion must be made to reach for test gauge connection, immediately upstream of local codes, with a different gas without consulting the serving gas supplier. C E A D B A. 3/8" flexible gas connector B. 3/8" pipe to connect the exhaust vent. Install a shut-off valve location...
... line. 2. Slide the dryer until diamond marking is acceptable for lengths under 20 ft. (6.1 m) if local codes and gas supplier permit. ■■ Must include 1/8" NPT minimum plugged tapping accessible for opening and closing. LP gas conversion: Conversion must be made to reach for test gauge connection, immediately upstream of local codes, with a different gas without consulting the serving gas supplier. C E A D B A. 3/8" flexible gas connector B. 3/8" pipe to connect the exhaust vent. Install a shut-off valve location...
Installation Instructions
Page 9
... kinking. A time-delay fuse or circuit breaker is required for electric current. It is more than 1/2 psi. Do not remove ground prong. rating indicated on the model/serial number plate is recommended. Option 1 (Recommended Method) Flexible stainless steel gas connector: ■■ If local codes permit, use a new flexible stainless steel gas connector (Design Certified by the American Gas Association or CSA International) to connect your dryer to follow these instructions can...
... kinking. A time-delay fuse or circuit breaker is required for electric current. It is more than 1/2 psi. Do not remove ground prong. rating indicated on the model/serial number plate is recommended. Option 1 (Recommended Method) Flexible stainless steel gas connector: ■■ If local codes permit, use a new flexible stainless steel gas connector (Design Certified by the American Gas Association or CSA International) to connect your dryer to follow these instructions can...
Installation Instructions
Page 11
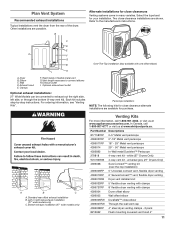
... Sure Connect™ venting kit (over-the-top installation) 4396009RP 5' Universal connect vent, flexible dryer venting 4396010RP 6' SecureConnect™ vent, flexible dryer venting 4396013RB Dryer vent installer's kit 4396033RP 5' flexible dryer venting with clamps 4396727RP 8' flexible dryer venting with one offset elbow) I . Left or right side exhaust installation (27" wide models only) C. Select the type best for purchase. Wall D. Optional side exhaust outlet Optional exhaust installations: 27" Wide Models can be converted to the manufacturer's instructions. Each kit...
... Sure Connect™ venting kit (over-the-top installation) 4396009RP 5' Universal connect vent, flexible dryer venting 4396010RP 6' SecureConnect™ vent, flexible dryer venting 4396013RB Dryer vent installer's kit 4396033RP 5' flexible dryer venting with clamps 4396727RP 8' flexible dryer venting with one offset elbow) I . Left or right side exhaust installation (27" wide models only) C. Select the type best for purchase. Wall D. Optional side exhaust outlet Optional exhaust installations: 27" Wide Models can be converted to the manufacturer's instructions. Each kit...
Installation Instructions
Page 13
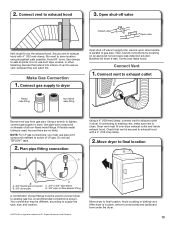
... of LP gas. Run vent to final location. Avoid 90° turns. Do not use duct tape, screws, or other fastening devices that vent is clean. A recommended connection is in supply line; Move dryer to dryer location using straightest path possible. Avoid crushing or kinking vent. Connect gas supply to exhaust outlet Flared male fitting Non-flared male fitting Remove red cap from under the dryer. 13 Connect vent to dryer Open shut-off valve Closed valve Open valve Vent must fit...
... of LP gas. Run vent to final location. Avoid 90° turns. Do not use duct tape, screws, or other fastening devices that vent is clean. A recommended connection is in supply line; Move dryer to dryer location using straightest path possible. Avoid crushing or kinking vent. Connect gas supply to exhaust outlet Flared male fitting Non-flared male fitting Remove red cap from under the dryer. 13 Connect vent to dryer Open shut-off valve Closed valve Open valve Vent must fit...
Installation Instructions
Page 14
... minutes and start , check the following: ■■ Dryer is plugged into a grounded 3 prong outlet. ■■ Electrical supply is connected. ■■ Household fuse is intact and tight, or circuit breaker has not tripped. ■■ Dryer door is first heated. Once legs are level, make sure all packaging materials. q Dispose of dryer from front to remove any tape remaining on a full heat cycle (not an air cycle) for heat.
... minutes and start , check the following: ■■ Dryer is plugged into a grounded 3 prong outlet. ■■ Electrical supply is connected. ■■ Household fuse is intact and tight, or circuit breaker has not tripped. ■■ Dryer door is first heated. Once legs are level, make sure all packaging materials. q Dispose of dryer from front to remove any tape remaining on a full heat cycle (not an air cycle) for heat.


