

Owners Manual
Page 4
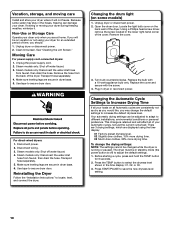
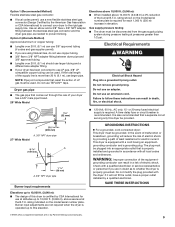
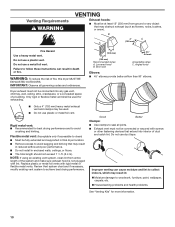
... length of time set and sometimes results in good air flow. n Use no more drying time or when using the drying rack. 4 See Installation Instructions. each load. With Timed Dry, the dryer runs the amount of vent possible. When cleaning is complete, be paid by the customer, ...176; elbows in the load. The venting system attached to provide the most energy savings and enhanced fabric care from the entire length of who installed the dryer. Good Better n Remove lint and debris from the front the dryer. Proper venting will be sure to efficiently dry laundry. n ...
... length of time set and sometimes results in good air flow. n Use no more drying time or when using the drying rack. 4 See Installation Instructions. each load. With Timed Dry, the dryer runs the amount of vent possible. When cleaning is complete, be paid by the customer, ...176; elbows in the load. The venting system attached to provide the most energy savings and enhanced fabric care from the entire length of who installed the dryer. Good Better n Remove lint and debris from the front the dryer. Proper venting will be sure to efficiently dry laundry. n ...
Owners Manual
Page 10
...TEMP button to select the dryness level shown in standby mode (the power button is running or paused. If storing or moving care Install and store your dryer where it . Clean lint screen. Disconnect wiring. 3. Steam models only: Disconnect the water inlet hose from ...watt appliance bulb only. Moving Care For power supply cord-connected dryers: 1. Unplug the power supply cord. 2. Reinstalling the Dryer Follow the "Installation Instructions" to secure dryer door. Replace the bulb with the screw. 4. Your automatic drying settings can damage your dryer. Transport hose separately....
...TEMP button to select the dryness level shown in standby mode (the power button is running or paused. If storing or moving care Install and store your dryer where it . Clean lint screen. Disconnect wiring. 3. Steam models only: Disconnect the water inlet hose from ...watt appliance bulb only. Moving Care For power supply cord-connected dryers: 1. Unplug the power supply cord. 2. Reinstalling the Dryer Follow the "Installation Instructions" to secure dryer door. Replace the bulb with the screw. 4. Your automatic drying settings can damage your dryer. Transport hose separately....
Owners Manual
Page 11
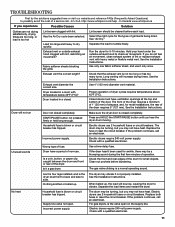
... thumping sound during the first few minutes of operation. Incorrect power supply. Check with temperature below 45ºF (7ºC)? In Canada www.whirlpool.ca If you hear the dryer drum moving. Has the Air Dry cycle been selected. Exhaust vent or outside exhaust hood to check air ... between the drum and front or rear of dryer cycles requires temperatures above 45ºF (7ºC). The drum may vibrate if not properly installed. For gas dryers, is blown or circuit breaker has tripped. Check that the exhaust vent is too hot Lint screen clogged with a qualified...
... thumping sound during the first few minutes of operation. Incorrect power supply. Check with temperature below 45ºF (7ºC)? In Canada www.whirlpool.ca If you hear the dryer drum moving. Has the Air Dry cycle been selected. Exhaust vent or outside exhaust hood to check air ... between the drum and front or rear of dryer cycles requires temperatures above 45ºF (7ºC). The drum may vibrate if not properly installed. For gas dryers, is blown or circuit breaker has tripped. Check that the exhaust vent is too hot Lint screen clogged with a qualified...

Owners Manual
Page 13
..., alteration, misuse, abuse, fire, flood, acts of God, improper installation, installation not in a manner that have been removed, altered, or cannot be found by checking the "Assistance or Service" section or by Whirlpool. 5. Some states and provinces do not allow limitations on the product.... SOLE AND EXCLUSIVE REMEDY UNDER THIS LIMITED WARRANTY SHALL BE PRODUCT REPAIR AS PROVIDED HEREIN. If you on major appliances with Whirlpool's published installation instructions. 10. In Canada, call 1800253-1301. YOUR SOLE AND EXCLUSIVE REMEDY UNDER THIS LIMITED WARRANTY...
..., alteration, misuse, abuse, fire, flood, acts of God, improper installation, installation not in a manner that have been removed, altered, or cannot be found by checking the "Assistance or Service" section or by Whirlpool. 5. Some states and provinces do not allow limitations on the product.... SOLE AND EXCLUSIVE REMEDY UNDER THIS LIMITED WARRANTY SHALL BE PRODUCT REPAIR AS PROVIDED HEREIN. If you on major appliances with Whirlpool's published installation instructions. 10. In Canada, call 1800253-1301. YOUR SOLE AND EXCLUSIVE REMEDY UNDER THIS LIMITED WARRANTY...

Warranty
Page 1
...or to correct house wiring or plumbing. 3. Service calls to correct the installation of purchase, when this major appliance is not installed in accordance with the product, Whirlpool Corporation or Whirlpool Canada LP (hereafter "Whirlpool") will need to know your complete model number and serial number. Service..., and you . If you ever need repair service, first see the "Troubleshooting" section of your authorized Whirlpool dealer to or furnished with Whirlpool's published installation instructions. 10. You must be found by checking the "Assistance or Service" section or by...
...or to correct house wiring or plumbing. 3. Service calls to correct the installation of purchase, when this major appliance is not installed in accordance with the product, Whirlpool Corporation or Whirlpool Canada LP (hereafter "Whirlpool") will need to know your complete model number and serial number. Service..., and you . If you ever need repair service, first see the "Troubleshooting" section of your authorized Whirlpool dealer to or furnished with Whirlpool's published installation instructions. 10. You must be found by checking the "Assistance or Service" section or by...

Dimension Guide
Page 1
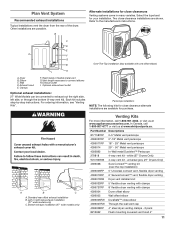
....7 m) 29 ft. (8.8 m) 4 Rigid metal 27 ft. (8.2 m) 21 ft. (6.4 m) OVERALL DIMENSIONS 29" Wide Model Dryer dimensions For closet installation, with Natural gas. gas. Pipejoint compounds resistant to change materials and specifications without notice. Do not overtighten. Angled hood (acceptable) The vent system chart ...Number of 90° turns or elbows Type of L.P. Side view - Use the fewest 90° turns possible. Because Whirlpool Corporation policy includes a continuous commitment to improve our products, we reserve the right to use vent runs longer than specified in...
....7 m) 29 ft. (8.8 m) 4 Rigid metal 27 ft. (8.2 m) 21 ft. (6.4 m) OVERALL DIMENSIONS 29" Wide Model Dryer dimensions For closet installation, with Natural gas. gas. Pipejoint compounds resistant to change materials and specifications without notice. Do not overtighten. Angled hood (acceptable) The vent system chart ...Number of 90° turns or elbows Type of L.P. Side view - Use the fewest 90° turns possible. Because Whirlpool Corporation policy includes a continuous commitment to improve our products, we reserve the right to use vent runs longer than specified in...
Installation Instructions
Page 2
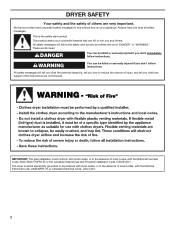
...alerts you to reduce the chance of injury, and tell you and others are not followed. All safety messages will follow instructions. IMPORTANT: The gas installation must be killed or seriously injured if you don't follow the safety alert symbol and either the word "DANGER" or "WARNING." DRYER SAFETY Your..., or in the absence of local codes, with the National Fuel Gas Code, ANSI Z223.1/NFPA 54 or the Canadian Natural Gas and Propane Installation Code, CSA B149.1. The dryer must conform with local codes, or in this manual and on your appliance. Always read and obey all safety...
...alerts you to reduce the chance of injury, and tell you and others are not followed. All safety messages will follow instructions. IMPORTANT: The gas installation must be killed or seriously injured if you don't follow the safety alert symbol and either the word "DANGER" or "WARNING." DRYER SAFETY Your..., or in the absence of local codes, with the National Fuel Gas Code, ANSI Z223.1/NFPA 54 or the Canadian Natural Gas and Propane Installation Code, CSA B149.1. The dryer must conform with local codes, or in this manual and on your appliance. Always read and obey all safety...
Installation Instructions
Page 3
... Do not try to light any appliance. • Do not touch any electrical switch; WARNING: Gas leaks cannot always be detected by a qualified installer, service agency, or the gas supplier. Follow the gas supplier's instructions. • If you smell gas" instructions. 3 do if you cannot ...reach your gas supplier, call your gas supplier from a neighbor's phone. Installation and service must be performed by smell. For more information, contact your gas supplier. If a gas leak is detected, follow the "What to ...
... Do not try to light any appliance. • Do not touch any electrical switch; WARNING: Gas leaks cannot always be detected by a qualified installer, service agency, or the gas supplier. Follow the gas supplier's instructions. • If you smell gas" instructions. 3 do if you cannot ...reach your gas supplier, call your gas supplier from a neighbor's phone. Installation and service must be performed by smell. For more information, contact your gas supplier. If a gas leak is detected, follow the "What to ...
Installation Instructions
Page 4
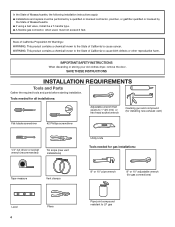
...vent) Flat-blade screwdriver #2 Phillips screwdriver 1/4" nut driver or socket wrench (recommended) Tin snips (new vent installations) Utility knife Tools needed for gas installations: Tape measure Vent clamps 8" or 10" pipe wrench 8" or 10" adjustable wrench (for gas connections) ...Level 4 Pliers Pipe-joint compound resistant to LP gas In the State of Massachusetts, the following installation instructions apply: � Installations and repairs must be performed by a qualified or licensed contractor, plumber, or gasfitter qualified or licensed by the State ...
...vent) Flat-blade screwdriver #2 Phillips screwdriver 1/4" nut driver or socket wrench (recommended) Tin snips (new vent installations) Utility knife Tools needed for gas installations: Tape measure Vent clamps 8" or 10" pipe wrench 8" or 10" adjustable wrench (for gas connections) ...Level 4 Pliers Pipe-joint compound resistant to LP gas In the State of Massachusetts, the following installation instructions apply: � Installations and repairs must be performed by a qualified or licensed contractor, plumber, or gasfitter qualified or licensed by the State ...
Installation Instructions
Page 5
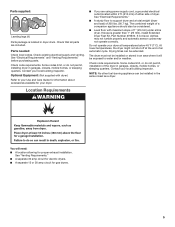
...automatic sensor cycles may not operate correctly. See "Electrical Requirements" and "Venting Requirements" before purchasing parts. The dryer must not be installed or stored in an area where it will need: ■■ A location allowing for gas dryers. 5 Check code requirements.... Parts supplied: Leveling legs (4) Parts package is greater than 1" (25 mm), install Extended Dryer Feet Kit, Part Number 279810. Check that all parts are using power supply cord, a grounded electrical outlet located within 2 ft...
...automatic sensor cycles may not operate correctly. See "Electrical Requirements" and "Venting Requirements" before purchasing parts. The dryer must not be installed or stored in an area where it will need: ■■ A location allowing for gas dryers. 5 Check code requirements.... Parts supplied: Leveling legs (4) Parts package is greater than 1" (25 mm), install Extended Dryer Feet Kit, Part Number 279810. Check that all parts are using power supply cord, a grounded electrical outlet located within 2 ft...
Installation Instructions
Page 6
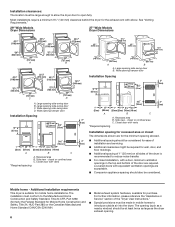
...603 mm) 43 " (1092 mm) 13 ¾" (349 mm) *29 1/2" (749 mm) 27" (687 mm) *29 1/2" (749 mm) 27" (687 mm) A B A. Large opening hamper door Installation Spacing 18"* (457 mm) 14" max.* (356 mm) 48 in .2 * (155 cm )2 1" 29" 1" 1"* 27¾" (25 mm) (737 mm) (25 mm) (25 mm) (705 ... all sides of the "Dryer User Instructions." ■■ Special provisions must be made in the top and bottom of the door are required. Installation clearances: The location must be large enough to allow the dryer door to the Manufactured Home Construction and Safety Standard, Title 24 CFR, Part 3280...
...603 mm) 43 " (1092 mm) 13 ¾" (349 mm) *29 1/2" (749 mm) 27" (687 mm) *29 1/2" (749 mm) 27" (687 mm) A B A. Large opening hamper door Installation Spacing 18"* (457 mm) 14" max.* (356 mm) 48 in .2 * (155 cm )2 1" 29" 1" 1"* 27¾" (25 mm) (737 mm) (25 mm) (25 mm) (705 ... all sides of the "Dryer User Instructions." ■■ Special provisions must be made in the top and bottom of the door are required. Installation clearances: The location must be large enough to allow the dryer door to the Manufactured Home Construction and Safety Standard, Title 24 CFR, Part 3280...
Installation Instructions
Page 7
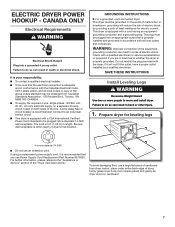
...Code, C22.1-latest edition and all local codes and ordinances. It is your responsibility: ■■ To contact a qualified electrical installer. ■■ To be sure that the electrical connection is recommended that is recommended. WARNING: Improper connection of the "Dryer User... Failure to be grounded. In the event of malfunction or breakdown, grounding will not fit the outlet, have a proper outlet installed by providing a path of dryer. Electric Dryer Power Hookup - Canada Only Electrical Requirements WARNING Electrical Shock Hazard Plug into a ...
...Code, C22.1-latest edition and all local codes and ordinances. It is your responsibility: ■■ To contact a qualified electrical installer. ■■ To be sure that the electrical connection is recommended that is recommended. WARNING: Improper connection of the "Dryer User... Failure to be grounded. In the event of malfunction or breakdown, grounding will not fit the outlet, have a proper outlet installed by providing a path of dryer. Electric Dryer Power Hookup - Canada Only Electrical Requirements WARNING Electrical Shock Hazard Plug into a ...

Installation Instructions
Page 8
... fitting C. 1/8" NPT minimum plugged tapping D. 1/2" NPT gas supply line E. For ordering information please reference the "Dryer User Instructions." Install a shut-off valve location should be easy to do so can be securely fastened to the dryer (see illustration). ■■ ...or Service" section of connection. 8 If connected to connect the exhaust vent. The shut off valve. Mobile home installations require a Mobile Home Installation Hold-down Kit. Screw in death, explosion, or fire. GAS DRYER POWER HOOKUP Gas Supply Requirements WARNING Explosion Hazard...
... fitting C. 1/8" NPT minimum plugged tapping D. 1/2" NPT gas supply line E. For ordering information please reference the "Dryer User Instructions." Install a shut-off valve location should be easy to do so can be securely fastened to the dryer (see illustration). ■■ ...or Service" section of connection. 8 If connected to connect the exhaust vent. The shut off valve. Mobile home installations require a Mobile Home Installation Hold-down Kit. Screw in death, explosion, or fire. GAS DRYER POWER HOOKUP Gas Supply Requirements WARNING Explosion Hazard...
Installation Instructions
Page 9
... the rear of your dryer has a 3/8" male pipe thread. 29" Wide Model Elevations above 10,000 ft. (3,048 m): ■■ When installed above sea level at pressures greater than 20 ft. (6.1 m), use 3/8" approved tubing (if codes and gas supplier permit). ■■ If you.... The plug must be grounded. WARNING: Improper connection of electric shock. SAVE THESE INSTRUCTIONS Elevations up to whether the dryer is properly installed and grounded in elevation. rating shown on the model/serial number plate. grounding conductor can be plugged into a grounded 3 prong outlet....
... the rear of your dryer has a 3/8" male pipe thread. 29" Wide Model Elevations above 10,000 ft. (3,048 m): ■■ When installed above sea level at pressures greater than 20 ft. (6.1 m), use 3/8" approved tubing (if codes and gas supplier permit). ■■ If you.... The plug must be grounded. WARNING: Improper connection of electric shock. SAVE THESE INSTRUCTIONS Elevations up to whether the dryer is properly installed and grounded in elevation. rating shown on the model/serial number plate. grounding conductor can be plugged into a grounded 3 prong outlet....
Installation Instructions
Page 10
... problems. See "Venting Kits" for best drying performance and to collect indoors, which may result in reduced airflow and poor performance. ■■ Do not install in final dryer location. ■■ Remove excess to achieve best drying performance. B 4" C A (102 mm) Fire Hazard Use a heavy metal vent. Flexible metal vent: (Acceptable...
... problems. See "Venting Kits" for best drying performance and to collect indoors, which may result in reduced airflow and poor performance. ■■ Do not install in final dryer location. ■■ Remove excess to achieve best drying performance. B 4" C A (102 mm) Fire Hazard Use a heavy metal vent. Flexible metal vent: (Acceptable...
Installation Instructions
Page 11
... Rigid metal or flexible metal vent G. Left or right side exhaust installation (27" wide models only) C. Other installations are shown. Two close clearance alternate installations are available for close -clearance installations are possible. A B C A. Select the type best for close...www.whirlpoolparts.ca. white (27" Dryers Only) W10186596 4-way vent kit - B Alternate installations for your installation. C D E A F G B Over-The-Top installation (also available with clamps 4396004 Dryer offset elbow 4396005 Wall offset elbow 4396006RW DuraSafe™ close...
... Rigid metal or flexible metal vent G. Left or right side exhaust installation (27" wide models only) C. Other installations are shown. Two close clearance alternate installations are available for close -clearance installations are possible. A B C A. Select the type best for close...www.whirlpoolparts.ca. white (27" Dryers Only) W10186596 4-way vent kit - B Alternate installations for your installation. C D E A F G B Over-The-Top installation (also available with clamps 4396004 Dryer offset elbow 4396005 Wall offset elbow 4396006RW DuraSafe™ close...
Installation Instructions
Page 12
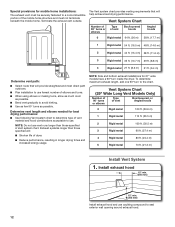
...will provide straightest and most direct path outdoors. ■■ Plan installation to use caulking compound to the chart. Install exhaust hood 12" min. (305 mm) 12" min. (305 mm) Install exhaust hood and use fewest number of vent material and hood combinations ....5 m) 3 Rigid metal 90 ft. (27.4 m) 4 Rigid metal 80 ft. (24.4 m) 5 Rigid metal 70 ft. (21.3 m) Install Vent System 1. NOTE: Side and bottom exhaust installations for best drying performance: ■■ Use following Vent system chart to determine type of elbows and turns. ■■ When using...
...will provide straightest and most direct path outdoors. ■■ Plan installation to use caulking compound to the chart. Install exhaust hood 12" min. (305 mm) 12" min. (305 mm) Install exhaust hood and use fewest number of vent material and hood combinations ....5 m) 3 Rigid metal 90 ft. (27.4 m) 4 Rigid metal 80 ft. (24.4 m) 5 Rigid metal 70 ft. (21.3 m) Install Vent System 1. NOTE: Side and bottom exhaust installations for best drying performance: ■■ Use following Vent system chart to determine type of elbows and turns. ■■ When using...
Installation Instructions
Page 14
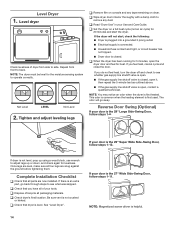
... an air cycle) for 5 minutes, open , contact a qualified technician. q Set the dryer on console and any dust. q Check that all four legs are now installed. Complete Installation Checklist q Check that dryer is not crushed or kinked. Be sure vent is level. Not Level LEVEL Not Level 2. q Read "Dryer Use" in your door...
... an air cycle) for 5 minutes, open , contact a qualified technician. q Set the dryer on console and any dust. q Check that all four legs are now installed. Complete Installation Checklist q Check that dryer is not crushed or kinked. Be sure vent is level. Not Level LEVEL Not Level 2. q Read "Dryer Use" in your door...

