Whirlpool WGD5300ST Support and Manuals
Get Help and Manuals for this Whirlpool item
View All Support Options Below
Free Whirlpool WGD5300ST manuals!
Problems with Whirlpool WGD5300ST?
Ask a Question
Free Whirlpool WGD5300ST manuals!
Problems with Whirlpool WGD5300ST?
Ask a Question
Popular Whirlpool WGD5300ST Manual Pages
User Instructions - Page 1
...
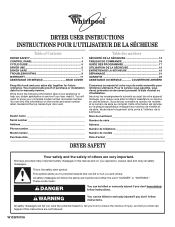
Your safety and the safety of others . ®
DRYER USER INSTRUCTIONS INSTRUCTIONS POUR L'UTILISATEUR DE LA SÉCHEUSE
Table of Contents
DRYER SAFETY 1 CONTROL PANEL 4 CYCLE GUIDE 5 DRYER USE 6 DRYER CARE 7 TROUBLESHOOTING 9 WARRANTY 11 ASSISTANCE OR SERVICE Back Cover
Keep this book and your complete model number and serial number. Inscrivez les renseignements suivants au...
User Instructions - Page 4
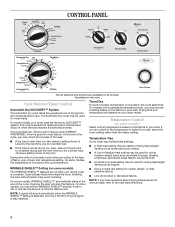
... of the cycle, you may vary. Cycle Selector (Timer) Control
Automatic Dry/ACCUDRY™ System The Automatic dry cycle takes the guesswork out of load, and temperature setting.
It periodically starts and stops the dryer, tumbling the load without heat to Very Dry. On some models, the temperature is included in the load and...
User Instructions - Page 5
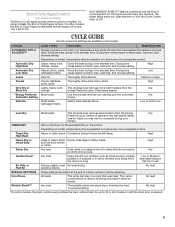
... a separate control. CYCLE GUIDE
Not all models.
Drying time
clothes, towels
varies based on all cycles and settings are available on fabric type, load size, and dryness setting. High
Casual, shirts, ...No heat
*On some models, the dryer continuously tumbles the load, without heat, for the specified time on fabric type, load size, and dryness setting. On other models, the End of Cycle...
User Instructions - Page 6
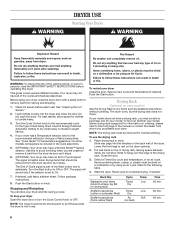
... Lint Screen."
2. Use the Energy Preferred Automatic Setting to dry most heavy to remove dust from dryer. Stopping and Restarting You can completely remove oil.
To use . Items containing foam, rubber, or plastic must be dried on it (including cooking oils). This guide covers several different models. Load clothes loosely into the dimples on...
User Instructions - Page 8
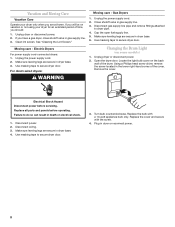
... operating. Replace all parts and panels before servicing. Plug in dryer or reconnect power.
8 Clean lint screen. Unplug the power supply cord. 2. Use masking tape to dryer pipe. ...dryer door. Remove the cover. Electric Dryers
For power supply cord-connected dryers: 1.
Replace the cover and secure with a 10-watt appliance bulb only. Locate the light bulb cover on some models...
User Instructions - Page 9
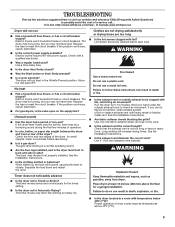
... not run
■■ Has a household fuse blown, or has a circuit breaker tripped? See the Installation Instructions.
■■ Is the exhaust vent diameter the correct size? Use 4" (102 mm) diameter vent material.
Timer does not noticeably advance
■■ Is the dryer set to Automatic Drying? Proper operation of the drum for 5-10 minutes.
User Instructions - Page 11
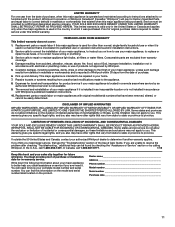
... Whirlpool dealer to repair or replace appliance light bulbs, air filters or water filters. You can be repaired in which it . Cosmetic damage, including scratches, dents, chips or other than normal, single-family household use or when it is installed in an inaccessible location or is not installed in accordance with Whirlpool's published installation instructions.
10. Repairs to parts...
Installation Instructions - Page 1

Dryer Installation Instructions
29" and 27" Wide Models Gas (U.S.A. et Canada) et Électrique (Canada uniquement)
Para obtener acceso al manual de uso y cuidado en español, o para obtener información adicional acerca de su producto, visite: www.whirlpool.com
Tenga listo su número de modelo completo. Table of injury, and tell you what the...
Installation Instructions - Page 4
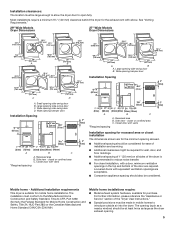
... at the end of the dryer in dryer drum. The combined weight of 1" (25 mm) under entire dryer. Check code requirements.
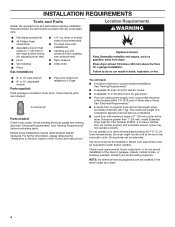
Do not operate your local building inspector. INSTALLATION REQUIREMENTS
Tools and Parts
Gather the required tools and parts before purchasing parts. Read and follow the instructions provided with maximum slope of a companion appliance should also be extended. Check...
Installation Instructions - Page 5
...User Instructions."
■■ Special provisions must be large enough to allow the dryer door to reduce noise transfer.
■■ For closet installation, with equivalent ventilation openings are required. Recessed area B. closet or confined area C. Closet door with elbow. closet or confined area C.
For further information, please reference the "Assistance or Service" section...
Installation Instructions - Page 9
...reference the "Assistance or Service" section of the dryer.
Housecleaning problems and health problems.
9
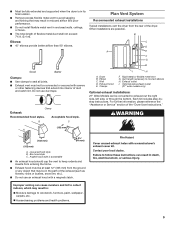
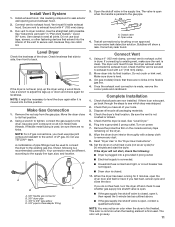
Wall D. Improper venting can be converted to connect elbows H. Exhaust:
Clamp
Recommended hood styles. Each kit includes step-bystep instructions. Elbow C. Plan Vent System
Recommended exhaust installations Typical installations vent the dryer from the ground or...
Installation Instructions - Page 10
... as much room as possible.
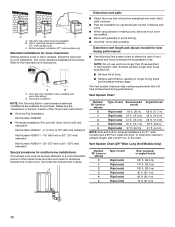
■■ Bend vDent gradually to a noncombustible portion of the "Dryer User Instructions."
■■ Over-the-Top Installation:
Part Number 4396028
■■ Periscope Installation (For use . Standard rear offset exhaust installation B. The Vent system chart provides venting requirements that will help achieve best drying performance.
Exhaust...
Installation Instructions - Page 11
... Check that the vent is an extra part, go away.
11 If there is... supply line shutoff valve is a recommended connection. Install exhaust hood. Use caulking compound to exhaust hood....dryer exhaust outlet and inside exhaust hood. Wipe the dryer drum interior thoroughly with a damp cloth
to exhaust outlet in the "Dryer User Instructions". 10. Read "Dryer Use" in dryer. Set the dryer...
Installation Instructions - Page 12
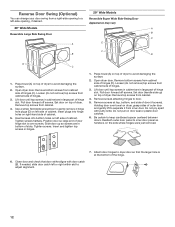
.... Insert and tighten top screws in large part of hinge slot. Do not pry apart ...Models
A
Reversible Large Side Swing Door
B
C
E A
F
B
D
D C
1. Lift door until top screws in cabinet are in hinges.
1. Insert plugs into bottom holes on left -side opening to a left side of cabinet. Do not pull on top of slots. Set door (handle side up so screws are in bottom of dryer...
Installation Instructions - Page 13
... (C). Loosen (do not remove) top screws from inner door. Set door (handle side up so screws are in large part of dryer. Remove screws attaching hinges to right side using the same 4 ... (E) from cabinet side of door (4 screws). Reattach outer door panel to adjust alignment.
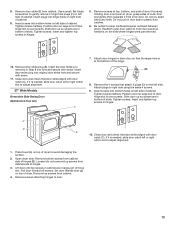
27" Wide Models
Reversible Side-Swing Door Appearance may vary
A
7. Remove top screws from cabinet.
4. Do not pry ...
Whirlpool WGD5300ST Reviews
We have not received any reviews for Whirlpool yet.