
Installation Instructions
Page 1
... 2 Location Requirements 3 Electrical Requirements 4 Gas Supply Requirements 4 Venting Requirements 5 Plan Vent System 6 Install Vent System 7 Install Leveling Legs 7 Level Dryer 8 Make Gas Connection 8 Connect Vent 8 Reverse Door Swing (Optional 8 Complete Installation 9 SEGURIDAD DE LA SECADORA 10 INSTRUCCIONES DE INSTALACIÓN 11 ... de escape 18 Cómo invertir el cierre de la puerta (opcional) ..... 18 Complete la instalación 19 DRYER SAFETY Your safety and the safety of injury, and tell you what the potential hazard is the safety alert symbol. Always...
... 2 Location Requirements 3 Electrical Requirements 4 Gas Supply Requirements 4 Venting Requirements 5 Plan Vent System 6 Install Vent System 7 Install Leveling Legs 7 Level Dryer 8 Make Gas Connection 8 Connect Vent 8 Reverse Door Swing (Optional 8 Complete Installation 9 SEGURIDAD DE LA SECADORA 10 INSTRUCCIONES DE INSTALACIÓN 11 ... de escape 18 Cómo invertir el cierre de la puerta (opcional) ..... 18 Complete la instalación 19 DRYER SAFETY Your safety and the safety of injury, and tell you what the potential hazard is the safety alert symbol. Always...
Installation Instructions
Page 2
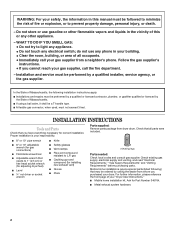
..., call your gas supplier from a neighbor's phone. In the State of Massachusetts, the following ) that you purchased your dryer. Proper installation is your "Dryer User Instructions." WARNING: For your safety, the information in this or any other flammable vapors and liquids in your building. ...area of your responsibility. s If using a ball valve, it shall be ordered by calling the dealer from dryer drum. Check that opens to 1" (2.5 cm) or hex-head socket wrench (for adjusting dryer feet) s Level s ¼" nut driver or socket wrench s Knife s Safety glasses s Vent clamps s...
..., call your gas supplier from a neighbor's phone. In the State of Massachusetts, the following ) that you purchased your dryer. Proper installation is your "Dryer User Instructions." WARNING: For your safety, the information in this or any other flammable vapors and liquids in your building. ...area of your responsibility. s If using a ball valve, it shall be ordered by calling the dealer from dryer drum. Check that opens to 1" (2.5 cm) or hex-head socket wrench (for adjusting dryer feet) s Level s ¼" nut driver or socket wrench s Knife s Safety glasses s Vent clamps s...
Installation Instructions
Page 3
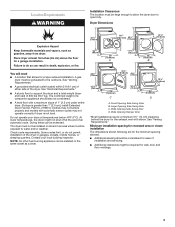
... Hamper Door *Most installations require a minimum 5½" (14 cm) clearance behind the dryer for ease of 200 lbs (90.7 kg). A gas dryer must be exhausted to support the dryer and a total weight (dryer and load) of installation and servicing. You will be installed in the same closet as..., explosion, or fire. NOTE: No other fuel-burning appliance can be exposed to do not permit, installation of the dryer. Dryer Dimensions Explosion Hazard Keep flammable materials and vapors, such as a dryer. 43 ³⁄₈" (110 cm) 15¼" (38.74 cm) 43 ³⁄₈" (110 ...
... Hamper Door *Most installations require a minimum 5½" (14 cm) clearance behind the dryer for ease of 200 lbs (90.7 kg). A gas dryer must be exhausted to support the dryer and a total weight (dryer and load) of installation and servicing. You will be installed in the same closet as..., explosion, or fire. NOTE: No other fuel-burning appliance can be exposed to do not permit, installation of the dryer. Dryer Dimensions Explosion Hazard Keep flammable materials and vapors, such as a dryer. 43 ³⁄₈" (110 cm) 15¼" (38.74 cm) 43 ³⁄₈" (110 ...
Installation Instructions
Page 4
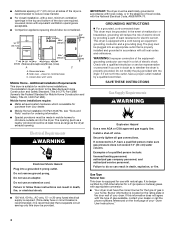
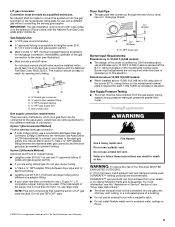
... and Safety Standard, Title 24 CFR, Part 3280 (formerly the Federal Standard for mobile home installations. Gas Type Natural Gas: This dryer is designcertified by a qualified electrician. It is equipped for L.P. (propane or butane) gases with natural gas. s Companion appliance spacing...personnel, and authorized service personnel. s Mobile Home Installation Kit Part #346764, see "Tools and Parts" section for purchase from your dryer. IMPORTANT: The dryer must have a qualified person make sure gas pressure does not exceed 13" (33 cm) water column. Install a shut-off valve...
... and Safety Standard, Title 24 CFR, Part 3280 (formerly the Federal Standard for mobile home installations. Gas Type Natural Gas: This dryer is designcertified by a qualified electrician. It is equipped for L.P. (propane or butane) gases with natural gas. s Companion appliance spacing...personnel, and authorized service personnel. s Mobile Home Installation Kit Part #346764, see "Tools and Parts" section for purchase from your dryer. IMPORTANT: The dryer must have a qualified person make sure gas pressure does not exceed 13" (33 cm) water column. Install a shut-off valve...
Installation Instructions
Page 5
...in the absence of your dealer or by calling Whirlpool Parts and Accessories. s Must include a shutoff valve: An individual manual shutoff valve must be installed within six (6) feet (1.8 m) of this dryer is certified by which your dryer to the gas supply. Listed here are some guidelines... (Design Certified by a qualified technician. Use an elbow and a ³⁄₈" flare x ³⁄₈" NPT adapter fitting between dryer pipe and ³⁄₈" approved tubing. s Lengths over 20 ft (6.1 m) should be made to prevent kinking. rating indicated on the ...
...in the absence of your dealer or by calling Whirlpool Parts and Accessories. s Must include a shutoff valve: An individual manual shutoff valve must be installed within six (6) feet (1.8 m) of this dryer is certified by which your dryer to the gas supply. Listed here are some guidelines... (Design Certified by a qualified technician. Use an elbow and a ³⁄₈" flare x ³⁄₈" NPT adapter fitting between dryer pipe and ³⁄₈" approved tubing. s Lengths over 20 ft (6.1 m) should be made to prevent kinking. rating indicated on the ...
Installation Instructions
Page 6
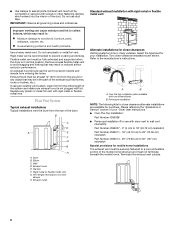
... must be in : Moisture damage to connect elbows H. B C D A E F G B H A. Exhaust outlet Alternate installations for your "Dryer User Instructions." A B A. Terminate the exhaust vent outside. 6 Two close clearances Venting systems come in reduced airflow and poor performance. Standard exhaust ... problems. Use a heavy metal vent. Clamps F. Remove excess flexible metal vent to prevent crushing and kinking. Dryer B. Select the type best for close -clearance installations are available for mobile home installations The exhaust vent must be...
... must be in : Moisture damage to connect elbows H. B C D A E F G B H A. Exhaust outlet Alternate installations for your "Dryer User Instructions." A B A. Terminate the exhaust vent outside. 6 Two close clearances Venting systems come in reduced airflow and poor performance. Standard exhaust ... problems. Use a heavy metal vent. Clamps F. Remove excess flexible metal vent to prevent crushing and kinking. Dryer B. Select the type best for close -clearance installations are available for mobile home installations The exhaust vent must be...
Installation Instructions
Page 7
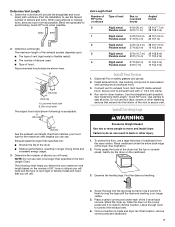
.... Select the route that matches your maximum vent length based on the corner posts until the diamond marking is close to move and install dryer. s Type of vent (rigid metal or flexible metal). Recommended hood styles are shown here. Leave enough room to seal exterior wall opening... 1. NOTE: Do not use . The following ) is in the Vent Length Chart. Use caulking compound to connect the exhaust vent. 6. Slide the dryer on the number of elbows and turns. Install Leveling Legs WARNING Excessive Weight Hazard Use two or more people to its final location. better good...
.... Select the route that matches your maximum vent length based on the corner posts until the diamond marking is close to move and install dryer. s Type of vent (rigid metal or flexible metal). Recommended hood styles are shown here. Leave enough room to seal exterior wall opening... 1. NOTE: Do not use . The following ) is in the Vent Length Chart. Use caulking compound to connect the exhaust vent. 6. Slide the dryer on the number of elbows and turns. Install Leveling Legs WARNING Excessive Weight Hazard Use two or more people to its final location. better good...
Installation Instructions
Page 8
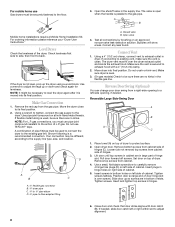
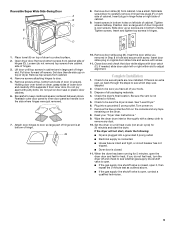
...tubing is moved into final position. Test all non-flared male threads. Using a 4" (10.2 cm) clamp, connect vent to back. Move dryer into its final position. 2. Reversible Large Side-Swing Door A B D C 1. Set door on an approved noncorrosive leak-detection solution. Tighten ... Tighten screws halfway. Your connection may be different, according to the existing gas line. Open valve 4. A combination of dryer to the dryer. Slide door up the dryer using a wood block. Using a wrench to tighten, connect the gas supply to protect surface. 2. Place towel (A) on...
...tubing is moved into final position. Test all non-flared male threads. Using a 4" (10.2 cm) clamp, connect vent to back. Move dryer into its final position. 2. Reversible Large Side-Swing Door A B D C 1. Set door on an approved noncorrosive leak-detection solution. Tighten ... Tighten screws halfway. Your connection may be different, according to the existing gas line. Open valve 4. A combination of dryer to the dryer. Slide door up the dryer using a wood block. Using a wrench to tighten, connect the gas supply to protect surface. 2. Place towel (A) on...
Installation Instructions
Page 9
... left side of hinge slot. Insert and tighten top screws in original door strike hole and secure with screw. Place towel (A) on left side of dryer to inner door panel so handle is open it from inner door. Remove door strike plug (B). Check to separate it , then repeat the 5-minute... test as outlined above. Plug into a grounded 3 prong outlet. Pull door forward off and check to be sure the dryer is intact and tight, or circuit breaker has not tripped. Remove screws attaching hinges to be sure all of slots. Check to see which step...
... left side of hinge slot. Insert and tighten top screws in original door strike hole and secure with screw. Place towel (A) on left side of dryer to inner door panel so handle is open it from inner door. Remove door strike plug (B). Check to separate it , then repeat the 5-minute... test as outlined above. Plug into a grounded 3 prong outlet. Pull door forward off and check to be sure the dryer is intact and tight, or circuit breaker has not tripped. Remove screws attaching hinges to be sure all of slots. Check to see which step...


