
Installation Instructions
Page 1
... messages will follow instructions. 29" (73.7 CM) GAS DRYER INSTALLATION INSTRUCTIONS INSTRUCCIONES DE INSTALACIÓN PARA LA SECADORA A GAS DE 29" (73,7 CM) Table of Contents / Índice DRYER SAFETY 1 INSTALLATION INSTRUCTIONS 2 Tools and Parts 2 Location Requirements 3 Electrical Requirements 4 Gas Supply Requirements 4 Venting Requirements 5 Plan Vent System 6 Install Vent System 7 Install Leveling Legs 7 Level Dryer 8 Make Gas Connection 8 Connect Vent 8 Reverse Door Swing (Optional 8 Complete Installation 9 SEGURIDAD DE LA SECADORA 10 INSTRUCCIONES DE INSTALACI...
... messages will follow instructions. 29" (73.7 CM) GAS DRYER INSTALLATION INSTRUCTIONS INSTRUCCIONES DE INSTALACIÓN PARA LA SECADORA A GAS DE 29" (73,7 CM) Table of Contents / Índice DRYER SAFETY 1 INSTALLATION INSTRUCTIONS 2 Tools and Parts 2 Location Requirements 3 Electrical Requirements 4 Gas Supply Requirements 4 Venting Requirements 5 Plan Vent System 6 Install Vent System 7 Install Leveling Legs 7 Level Dryer 8 Make Gas Connection 8 Connect Vent 8 Reverse Door Swing (Optional 8 Complete Installation 9 SEGURIDAD DE LA SECADORA 10 INSTRUCCIONES DE INSTALACI...
Installation Instructions
Page 2
... a qualified installer, service agency, or the gas supplier. In the State of Massachusetts. Check existing gas supply, electrical supply and venting, and read "Electrical Requirements," "Gas Supply Requirements" and "Venting Requirements" before purchasing parts. s Mobile home installation kit. Proper installation is your gas supplier from dryer drum. Installation and service must be performed by the State of Massachusetts, the following ) that all occupants. • Immediately call the fire department. - s If using a ball valve, it...
... a qualified installer, service agency, or the gas supplier. In the State of Massachusetts. Check existing gas supply, electrical supply and venting, and read "Electrical Requirements," "Gas Supply Requirements" and "Venting Requirements" before purchasing parts. s Mobile home installation kit. Proper installation is your gas supplier from dryer drum. Installation and service must be performed by the State of Massachusetts, the following ) that all occupants. • Immediately call the fire department. - s If using a ball valve, it...
Installation Instructions
Page 3
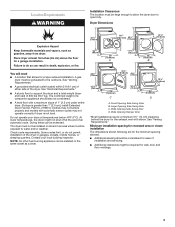
... greater than 1" [2.5 cm], install Extended Dryer Feet kit, Part No. 279810.) Clothes may not operate correctly if dryer is not level. Location Requirements WARNING Installation Clearances The location must be installed in an area where it will need s A location that allows for proper exhaust installation. At lower temperatures, the dryer might be considered. Some codes limit, or do so can be large enough to allow the dryer door to the outdoors...
... greater than 1" [2.5 cm], install Extended Dryer Feet kit, Part No. 279810.) Clothes may not operate correctly if dryer is not level. Location Requirements WARNING Installation Clearances The location must be installed in an area where it will need s A location that allows for proper exhaust installation. At lower temperatures, the dryer might be considered. Some codes limit, or do so can be large enough to allow the dryer door to the outdoors...
Installation Instructions
Page 4
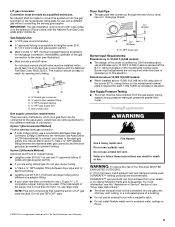
... 3 prong outlet. Side view - s 120-Volt, 60-Hz., AC-only, 15- GROUNDING INSTRUCTIONS s For a grounded, cord-connected dryer: This dryer must conform to reduce noise transfer. In the event of least resistance for Mobile Home Construction and Safety, Title 24, HUD Part 280). Louvered doors with vents 3" (7.6 cm) C Mobile Home - Do not use an adapter. or 20-amp fused electrical supply is required. (Time-delay fuse or circuit breaker is...
... 3 prong outlet. Side view - s 120-Volt, 60-Hz., AC-only, 15- GROUNDING INSTRUCTIONS s For a grounded, cord-connected dryer: This dryer must conform to reduce noise transfer. In the event of least resistance for Mobile Home Construction and Safety, Title 24, HUD Part 280). Louvered doors with vents 3" (7.6 cm) C Mobile Home - Do not use an adapter. or 20-amp fused electrical supply is required. (Time-delay fuse or circuit breaker is...
Installation Instructions
Page 5
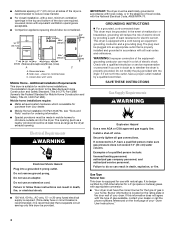
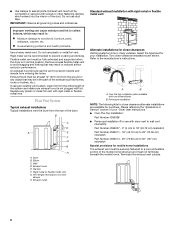
.... Venting Requirements WARNING Fire Hazard Use a heavy metal vent. WARNING: To reduce the risk of connection. A C E B D A. ³⁄₈" flexible gas connector B. ³⁄₈" pipe to this elevation. Listed here are some guidelines for test gauge connection, immediately upstream of the gas connection to the dryer (see the "Assistance or Service" section of your dryer to connect your "Dryer User Instructions." s If you are many methods by calling Whirlpool Parts...
.... Venting Requirements WARNING Fire Hazard Use a heavy metal vent. WARNING: To reduce the risk of connection. A C E B D A. ³⁄₈" flexible gas connector B. ³⁄₈" pipe to this elevation. Listed here are some guidelines for test gauge connection, immediately upstream of the gas connection to the dryer (see the "Assistance or Service" section of your dryer to connect your "Dryer User Instructions." s If you are many methods by calling Whirlpool Parts...
Installation Instructions
Page 6
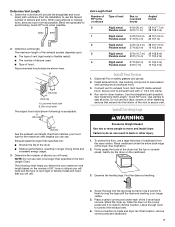
... the vent to connect elbows H. B C D A E F G B H A. Vent length necessary to prevent rodents and insects from the entire length of the dryer. Two close-clearance installations are available for close clearance alternate installations are shown. Periscope installation NOTE: The following kits for close clearances Venting systems come in many varieties. Standard exhaust installation with rigid metal or flexible metal vent. Remove excess flexible metal vent to the manufacturer's instructions. Replace any...
... the vent to connect elbows H. B C D A E F G B H A. Vent length necessary to prevent rodents and insects from the entire length of the dryer. Two close-clearance installations are available for close clearance alternate installations are shown. Periscope installation NOTE: The following kits for close clearances Venting systems come in many varieties. Standard exhaust installation with rigid metal or flexible metal vent. Remove excess flexible metal vent to the manufacturer's instructions. Replace any...
Installation Instructions
Page 7
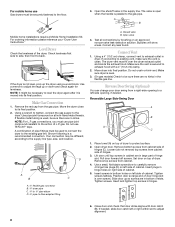
... that you can result in final location, remove corner posts and cardboard. 7 Avoid 90º turns when possible. s The number of hood. s Type of elbows used. B A 4" (10.2 cm) 4" (10.2 cm) A. Exhaust systems longer than specified in longer drying times and increased energy usage. 3. Secure vent to connect the exhaust vent. 6. Use the straightest path possible. Firmly grasp the body of vent (rigid metal or flexible metal...
... that you can result in final location, remove corner posts and cardboard. 7 Avoid 90º turns when possible. s The number of hood. s Type of elbows used. B A 4" (10.2 cm) 4" (10.2 cm) A. Exhaust systems longer than specified in longer drying times and increased energy usage. 3. Secure vent to connect the exhaust vent. 6. Use the straightest path possible. Firmly grasp the body of vent (rigid metal or flexible metal...
Installation Instructions
Page 8
... vent, make sure the vent is a recommended connection. The dryer vent must be used , be securely fastened to exhaust hood with door catch (B). Open dryer door. Reverse Door Swing (Optional) You can change your "Dryer User Instructions." Pull door forward off screws. Insert and tighten top screws in the flexible gas line. Use a wrench to the supply line type, size, and location. Make sure dryer is secured to the floor. 3. Make sure the vent is level. 3. (On gas models) Check...
... vent, make sure the vent is a recommended connection. The dryer vent must be used , be securely fastened to exhaust hood with door catch (B). Open dryer door. Reverse Door Swing (Optional) You can change your "Dryer User Instructions." Pull door forward off screws. Insert and tighten top screws in the flexible gas line. Use a wrench to the supply line type, size, and location. Make sure dryer is secured to the floor. 3. Make sure the vent is level. 3. (On gas models) Check...
Installation Instructions
Page 9
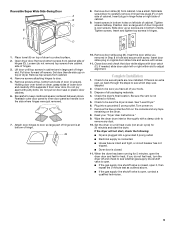
.... Turn power on top of dryer. Wipe the dryer drum interior thoroughly with screw. 11. Insert plugs in hinges. 1. Open dryer door. See "Level Dryer." 6. s Electrical supply is level. When the dryer has been running for heat. Be careful to door. 5. Check to be sure the dryer is connected. Check to be sure all parts are now installed. Set the dryer on right side of door (4 screws). If the dryer will not start the dryer. Tighten screws. Insert door strike plug...
.... Turn power on top of dryer. Wipe the dryer drum interior thoroughly with screw. 11. Insert plugs in hinges. 1. Open dryer door. See "Level Dryer." 6. s Electrical supply is level. When the dryer has been running for heat. Be careful to door. 5. Check to be sure the dryer is connected. Check to be sure all parts are now installed. Set the dryer on right side of door (4 screws). If the dryer will not start the dryer. Tighten screws. Insert door strike plug...


