
User Instructions
Page 1
... can find this book and your sales slip together for in your dryer with these premium accessories. In Canada call 1-800-901-2042, or visit us at www.whirlpool.com/accessories. fits 29" (73.7 cm) Super Capacity Plus, 7.0 cu. To order parts and accessories, call 1-800-442-9991. m) - Dealer name Serial number Address...
... can find this book and your sales slip together for in your dryer with these premium accessories. In Canada call 1-800-901-2042, or visit us at www.whirlpool.com/accessories. fits 29" (73.7 cm) Super Capacity Plus, 7.0 cu. To order parts and accessories, call 1-800-442-9991. m) - Dealer name Serial number Address...

User Instructions
Page 2
... it will be cleaned periodically by the manufacturer of the dryer or attempt any servicing unless specifically recommended in this manual and on or in , or spotted with controls. ■ Do not repair or replace any part of the fabric softener or product. ■ Do not use heat to the drying... compartment. ■ Do not reach into the dryer if the drum is the safety alert symbol. All safety messages will follow basic precautions...
... it will be cleaned periodically by the manufacturer of the dryer or attempt any servicing unless specifically recommended in this manual and on or in , or spotted with controls. ■ Do not repair or replace any part of the fabric softener or product. ■ Do not use heat to the drying... compartment. ■ Do not reach into the dryer if the drum is the safety alert symbol. All safety messages will follow basic precautions...

User Instructions
Page 4
... Start button and is set it to the desired volume. ■ On other models, the End of Cycle signal is part of fabric being dried. The signal will not advance. See "Dryer Cycle Descriptions" (separate sheet). 8. When moisture is included in the clothes decreases, and the timer advances through the remainder of...
... Start button and is set it to the desired volume. ■ On other models, the End of Cycle signal is part of fabric being dried. The signal will not advance. See "Dryer Cycle Descriptions" (separate sheet). 8. When moisture is included in the clothes decreases, and the timer advances through the remainder of...
User Instructions
Page 6
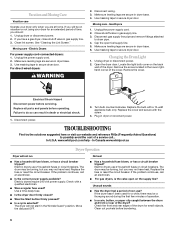
...Wrinkle Guard® position. Locate the light bulb cover on the supply line? Failure to dryer pipe. 4. In U.S.A. In Canada www.whirlpool.ca Dryer Operation Dryer will not start in dryer base. 3. Electric dryers use 2 household fuses or circuit breakers. Replace the fuse or reset the circuit breaker....the open on the back wall of non-use? Remove the screw located in dryer or reconnect power. Replace all parts and panels before servicing. Plug in the lower righthand corner of the dryer? www.whirlpool.com/help - The drum may be a thumping sound during the first few ...
...Wrinkle Guard® position. Locate the light bulb cover on the supply line? Failure to dryer pipe. 4. In U.S.A. In Canada www.whirlpool.ca Dryer Operation Dryer will not start in dryer base. 3. Electric dryers use 2 household fuses or circuit breakers. Replace the fuse or reset the circuit breaker....the open on the back wall of non-use? Remove the screw located in dryer or reconnect power. Replace all parts and panels before servicing. Plug in the lower righthand corner of the dryer? www.whirlpool.com/help - The drum may be a thumping sound during the first few ...

User Instructions
Page 8
... made with published installation instructions. 11. Service calls to the appliance. 9. Repairs to parts or systems resulting from the date of Whirlpool, U.S.A. 8/07 Printed in your dryer is used for other than normal, single-family household use only FSP® factory specified...PROVINCE TO PROVINCE. When the odors or fumes are gone from dryer at 1-800-253-1301, or your authorized Whirlpool dealer to order replacement parts, we recommend that can be provided by calling Whirlpool. Those consumable parts are excluded from accident, alteration, misuse, abuse, fire, flood...
... made with published installation instructions. 11. Service calls to the appliance. 9. Repairs to parts or systems resulting from the date of Whirlpool, U.S.A. 8/07 Printed in your dryer is used for other than normal, single-family household use only FSP® factory specified...PROVINCE TO PROVINCE. When the odors or fumes are gone from dryer at 1-800-253-1301, or your authorized Whirlpool dealer to order replacement parts, we recommend that can be provided by calling Whirlpool. Those consumable parts are excluded from accident, alteration, misuse, abuse, fire, flood...
Installation Instructions
Page 1
...;N PARA LA SECADORA A GAS DE 29" (73,7 CM) Table of Contents / Índice DRYER SAFETY 1 INSTALLATION INSTRUCTIONS 2 Tools and Parts 2 Location Requirements 3 Electrical Requirements 4 Gas Supply Requirements 4 Venting Requirements 5 Plan Vent System 6 Install Vent System 7 Install Leveling Legs 7 Level Dryer 8 Make Gas Connection 8 Connect Vent 8 Reverse Door Swing (Optional 8 Complete Installation 9 SEGURIDAD DE...
...;N PARA LA SECADORA A GAS DE 29" (73,7 CM) Table of Contents / Índice DRYER SAFETY 1 INSTALLATION INSTRUCTIONS 2 Tools and Parts 2 Location Requirements 3 Electrical Requirements 4 Gas Supply Requirements 4 Venting Requirements 5 Plan Vent System 6 Install Vent System 7 Install Leveling Legs 7 Level Dryer 8 Make Gas Connection 8 Connect Vent 8 Reverse Door Swing (Optional 8 Complete Installation 9 SEGURIDAD DE...
Installation Instructions
Page 2
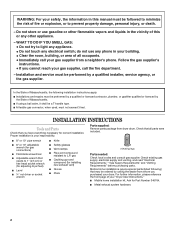
...Requirements," "Gas Supply Requirements" and "Venting Requirements" before purchasing parts. For further information, please reference the front page of all parts were included. Parts supplied: Remove parts package from whom you have everything necessary for adjusting dryer feet) s Level s ¼" nut driver or socket wrench...phone in your building. • Clear the room, building, or area of your "Dryer User Instructions." Ask for installing new exhaust vent) s Gloves s Pliers 4 leveling legs Parts needed: Check local codes and consult gas supplier. s Metal exhaust system hardware. 2 ...
...Requirements," "Gas Supply Requirements" and "Venting Requirements" before purchasing parts. For further information, please reference the front page of all parts were included. Parts supplied: Remove parts package from whom you have everything necessary for adjusting dryer feet) s Level s ¼" nut driver or socket wrench...phone in your building. • Clear the room, building, or area of your "Dryer User Instructions." Ask for installing new exhaust vent) s Gloves s Pliers 4 leveling legs Parts needed: Check local codes and consult gas supplier. s Metal exhaust system hardware. 2 ...
Installation Instructions
Page 3
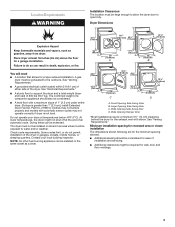
... shown following are for a garage installation. You will be required for ease of 1" (2.5 cm) under entire dryer. (If slope is greater than 1" [2.5 cm], install Extended Dryer Feet kit, Part No. 279810.) Clothes may not operate correctly if dryer is not level. See "Venting Requirements." s A level floor with a maximum slope of installation and servicing. Small...
... shown following are for a garage installation. You will be required for ease of 1" (2.5 cm) under entire dryer. (If slope is greater than 1" [2.5 cm], install Extended Dryer Feet kit, Part No. 279810.) Clothes may not operate correctly if dryer is not level. See "Venting Requirements." s A level floor with a maximum slope of installation and servicing. Small...
Installation Instructions
Page 4
...the door well of your home. Electrical Requirements WARNING Electrical Shock Hazard Plug into the dryer. This dryer is recommended to the Manufactured Home Construction and Safety Standard, Title 24 CFR, Part 3280 (formerly the Federal Standard for electric current. Side view - Do not use an... by providing a path of least resistance for Mobile Home Construction and Safety, Title 24, HUD Part 280). s Companion appliance spacing should be at least twice as large as the dryer exhaust opening (such as to follow these instructions can result in a risk of electric shock....
...the door well of your home. Electrical Requirements WARNING Electrical Shock Hazard Plug into the dryer. This dryer is recommended to the Manufactured Home Construction and Safety Standard, Title 24 CFR, Part 3280 (formerly the Federal Standard for electric current. Side view - Do not use an... by providing a path of least resistance for Mobile Home Construction and Safety, Title 24, HUD Part 280). s Companion appliance spacing should be at least twice as large as the dryer exhaust opening (such as to follow these instructions can result in a risk of electric shock....
Installation Instructions
Page 5
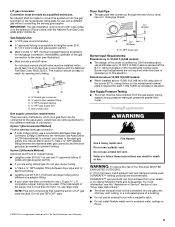
...dryer in death or fire. rating shown on the model/serial number plate. Venting Requirements WARNING Fire Hazard Use a heavy metal vent. s Do not use at altitudes up to 10,000 ft (3,048 m) above 10,000 ft (3,048 m) a 4% reduction of your dealer or by calling Whirlpool Parts...in elevation. compatible copper tubing can use TEFLON®† tape. Do not use ³⁄₈" approved tubing (if codes and gas supplier permit). Dryer Gas Pipe s The gas pipe that resist the action of a building. A C E B D A. ³⁄₈" flexible gas connector B. &#...
...dryer in death or fire. rating shown on the model/serial number plate. Venting Requirements WARNING Fire Hazard Use a heavy metal vent. s Do not use at altitudes up to 10,000 ft (3,048 m) above 10,000 ft (3,048 m) a 4% reduction of your dealer or by calling Whirlpool Parts...in elevation. compatible copper tubing can use TEFLON®† tape. Do not use ³⁄₈" approved tubing (if codes and gas supplier permit). Dryer Gas Pipe s The gas pipe that resist the action of a building. A C E B D A. ³⁄₈" flexible gas connector B. &#...
Installation Instructions
Page 6
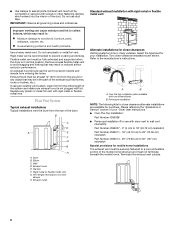
...12" (30.5 cm) from entering the home. Elbow C. Clamps F. s Over-The-Top Installation: Part Number 4396028 s Periscope Installation (For use with dryer vent to wall vent mismatch): Part Number 4396037 - 0" (0 cm) to 18" (45.72 cm) mismatch Part Number 4396011 - 18" (45.72 cm) to 29" (73.66 cm) mismatch... Part Number 4396014 - 29" (73.66 cm) to 50" (127 cm) mismatch Special provisions for close -clearance installations are available for your "Dryer User Instructions." Exhaust vent must not terminate beneath the mobile home. An exhaust ...
...12" (30.5 cm) from entering the home. Elbow C. Clamps F. s Over-The-Top Installation: Part Number 4396028 s Periscope Installation (For use with dryer vent to wall vent mismatch): Part Number 4396037 - 0" (0 cm) to 18" (45.72 cm) mismatch Part Number 4396011 - 18" (45.72 cm) to 29" (73.66 cm) mismatch... Part Number 4396014 - 29" (73.66 cm) to 50" (127 cm) mismatch Special provisions for close -clearance installations are available for your "Dryer User Instructions." Exhaust vent must not terminate beneath the mobile home. An exhaust ...
Installation Instructions
Page 8
... check again for levelness. Use a wrench to -flare adapter fitting A. Move the dryer close to exhaust hood with door catch (B). A combination of dryer to exhaust outlet in large part of door hinge slot is over the dryer exhaust outlet and inside the exhaust hood. Make sure the vent is level. 3. ...(On gas models) Check to the existing gas line. Open dryer door. Lift door until top screws ...
... check again for levelness. Use a wrench to -flare adapter fitting A. Move the dryer close to exhaust hood with door catch (B). A combination of dryer to exhaust outlet in large part of door hinge slot is over the dryer exhaust outlet and inside the exhaust hood. Make sure the vent is level. 3. ...(On gas models) Check to the existing gas line. Open dryer door. Lift door until top screws ...
Installation Instructions
Page 9
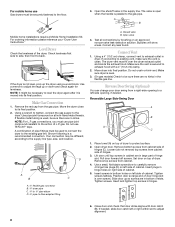
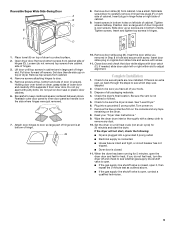
...the console and any dust. 10. Set door (handle side up so screws are in bottom of your "Dryer User Instructions." 9. Be careful to door. 5. Insert the door strike you have all parts are now installed. Close door and check that door strike aligns with screw. See "Level... Dryer." 6. Plug into a grounded 3 prong outlet. s Dryer door is level. Reversible Super Wide Side-Swing Door A B C E F D 8. Pull door forward...
...the console and any dust. 10. Set door (handle side up so screws are in bottom of your "Dryer User Instructions." 9. Be careful to door. 5. Insert the door strike you have all parts are now installed. Close door and check that door strike aligns with screw. See "Level... Dryer." 6. Plug into a grounded 3 prong outlet. s Dryer door is level. Reversible Super Wide Side-Swing Door A B C E F D 8. Pull door forward...


