
User Instructions
Page 1
.... Part Number Accessory 20-48KITRC 4 ft (1.2 m) gas line dryer connector installation kit PT220L 4 ft (1.2 m) dryer cord, 3-wire, 30 amp PT400L 4 ft (1.2 m) dryer cord, 4-wire, 30 amp PT600L 6 ft (1.8 m) dryer cord, 4-wire, 30 amp 8212614 Dryer vent lint brush 31682 All-purpose appliance cleaner 1903WH Laundry supply storage cart 3404351 Drying rack - ft (0.18 cu. m) - side swing door only 49971 Compact dryer stand - side swing or hamper door 3406839 Drying rack - Keep this information on the model and serial number label, located...
.... Part Number Accessory 20-48KITRC 4 ft (1.2 m) gas line dryer connector installation kit PT220L 4 ft (1.2 m) dryer cord, 3-wire, 30 amp PT400L 4 ft (1.2 m) dryer cord, 4-wire, 30 amp PT600L 6 ft (1.8 m) dryer cord, 4-wire, 30 amp 8212614 Dryer vent lint brush 31682 All-purpose appliance cleaner 1903WH Laundry supply storage cart 3404351 Drying rack - ft (0.18 cu. m) - side swing door only 49971 Compact dryer stand - side swing or hamper door 3406839 Drying rack - Keep this information on the model and serial number label, located...

User Instructions
Page 2
... not use heat to dry articles containing foam rubber or similarly textured rubber-like materials. ■ Clean lint screen before using the dryer. ■ Do not place items exposed to play on your dryer. SAVE THESE INSTRUCTIONS 2 Always read and obey all instructions before or after each load. ■ Keep area around the exhaust opening and adjacent surrounding areas free from service or discarded, remove the door to...
... not use heat to dry articles containing foam rubber or similarly textured rubber-like materials. ■ Clean lint screen before using the dryer. ■ Do not place items exposed to play on your dryer. SAVE THESE INSTRUCTIONS 2 Always read and obey all instructions before or after each load. ■ Keep area around the exhaust opening and adjacent surrounding areas free from service or discarded, remove the door to...

User Instructions
Page 3
... the vicinity of this manual must be completely extended to secure vent. 5. Installation and service must be covered under the warranty. Use 4" (10.2 cm) metal or flexible metal vent. Use clamps to follow these instructions can result in death or fire. exhaust air to follow the Installation Instructions supplied with your dryer for satisfactory drying results. Failure to flow. Clean exhaust vent periodically, depending on use a metal foil vent. WARNING: For your...
... the vicinity of this manual must be completely extended to secure vent. 5. Installation and service must be covered under the warranty. Use 4" (10.2 cm) metal or flexible metal vent. Use clamps to follow these instructions can result in death or fire. exhaust air to follow the Installation Instructions supplied with your dryer for satisfactory drying results. Failure to flow. Clean exhaust vent periodically, depending on use a metal foil vent. WARNING: For your...

User Instructions
Page 4
... pack the dryer. Use the Energy Preferred setting (*) to dry most heavy to OFF. When you may have all of the cycles and features described. The signal will not advance. See "Dryer Cycle Descriptions" (separate sheet). 8. As clothes begin to dry, the amount of water left in the clothes as it stops, wrinkles can be removed from dryer. The drum turns, but the rack does not move. Place drying rack in...
... pack the dryer. Use the Energy Preferred setting (*) to dry most heavy to OFF. When you may have all of the cycles and features described. The signal will not advance. See "Dryer Cycle Descriptions" (separate sheet). 8. As clothes begin to dry, the amount of water left in the clothes as it stops, wrinkles can be removed from dryer. The drum turns, but the rack does not move. Place drying rack in...

User Instructions
Page 5
... dryer door opening. Scrub lint screen with hot water. 3. Removing Accumulated Lint From Inside the Dryer Cabinet Lint should be removed every 2 years, or more often, depending on rack) Drying Stuffed toys/pillows (cotton Timed Low 60 min. From Inside the Exhaust Vent Lint should be dried on dryer usage. 5 Rack Dry Cycle Temp Time Washable wool items (block Timed Low 60 min. The lint screen is hard to remove. A screen blocked by a qualified person. Wet lint is located in the door of the drum...
... dryer door opening. Scrub lint screen with hot water. 3. Removing Accumulated Lint From Inside the Dryer Cabinet Lint should be removed every 2 years, or more often, depending on rack) Drying Stuffed toys/pillows (cotton Timed Low 60 min. From Inside the Exhaust Vent Lint should be dried on dryer usage. 5 Rack Dry Cycle Temp Time Washable wool items (block Timed Low 60 min. The lint screen is hard to remove. A screen blocked by a qualified person. Wet lint is located in the door of the drum...
User Instructions
Page 6
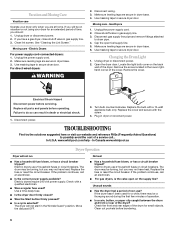
... in gas supply line. 3. Moving care - Remove the screw located in dryer base. 3. Turn bulb counterclockwise. In U.S.A. Electric dryers require 240 volt power supply. Use a time-delay fuse. ■ Is the dryer door firmly closed? ■ Was the Start button firmly pressed? ■ Is a cycle selected? Unusual sounds ■ Has the dryer had a period of the dryer. Clean lint screen. Open the dryer door. Remove the cover. Failure to secure dryer door. Replace the cover and secure with a 10-watt appliance bulb only. The drum may...
... in gas supply line. 3. Moving care - Remove the screw located in dryer base. 3. Turn bulb counterclockwise. In U.S.A. Electric dryers require 240 volt power supply. Use a time-delay fuse. ■ Is the dryer door firmly closed? ■ Was the Start button firmly pressed? ■ Is a cycle selected? Unusual sounds ■ Has the dryer had a period of the dryer. Clean lint screen. Open the dryer door. Remove the cover. Failure to secure dryer door. Replace the cover and secure with a 10-watt appliance bulb only. The drum may...

User Instructions
Page 7
... a gas dryer? Proper operation of dryer cycles requires temperatures above the floor for 5-10 minutes. Increasing or decreasing the dryness level will not transfer to Automatic Drying? Drum stains are too long, or load is mostly dry. Lint screen should be contacting the sensor strips. Hold your garments. See the Installation Instructions. ■ Is the exhaust vent diameter the correct size? Closet doors must have ventilation openings at the beginning of drying time in clothing...
... a gas dryer? Proper operation of dryer cycles requires temperatures above the floor for 5-10 minutes. Increasing or decreasing the dryness level will not transfer to Automatic Drying? Drum stains are too long, or load is mostly dry. Lint screen should be contacting the sensor strips. Hold your garments. See the Installation Instructions. ■ Is the exhaust vent diameter the correct size? Closet doors must have ventilation openings at the beginning of drying time in clothing...

User Instructions
Page 8
... was purchased. All rights reserved. ® Registered Trademark/TM Trademark of products not approved by Whirlpool. 5. Loads are wrinkled ■ Was the load removed from warranty coverage. 3. Dry smaller loads that you how to use . 4. If so, ventilate the area. Service calls to correct the installation of your dryer is used to repair or replace appliance light bulbs, air filters or water filters. This major appliance is used for units operated outside the United...
... was purchased. All rights reserved. ® Registered Trademark/TM Trademark of products not approved by Whirlpool. 5. Loads are wrinkled ■ Was the load removed from warranty coverage. 3. Dry smaller loads that you how to use . 4. If so, ventilate the area. Service calls to correct the installation of your dryer is used to repair or replace appliance light bulbs, air filters or water filters. This major appliance is used for units operated outside the United...
Installation Instructions
Page 1
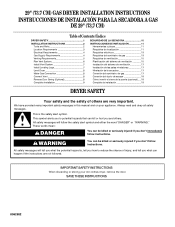
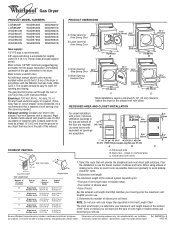
... are very important. 29" (73.7 CM) GAS DRYER INSTALLATION INSTRUCTIONS INSTRUCCIONES DE INSTALACIÓN PARA LA SECADORA A GAS DE 29" (73,7 CM) Table of Contents / Índice DRYER SAFETY 1 INSTALLATION INSTRUCTIONS 2 Tools and Parts 2 Location Requirements 3 Electrical Requirements 4 Gas Supply Requirements 4 Venting Requirements 5 Plan Vent System 6 Install Vent System 7 Install Leveling Legs 7 Level Dryer 8 Make Gas Connection 8 Connect Vent 8 Reverse Door Swing (Optional 8 Complete Installation 9 SEGURIDAD DE LA SECADORA 10 INSTRUCCIONES DE INSTALACIÓN 11...
... are very important. 29" (73.7 CM) GAS DRYER INSTALLATION INSTRUCTIONS INSTRUCCIONES DE INSTALACIÓN PARA LA SECADORA A GAS DE 29" (73,7 CM) Table of Contents / Índice DRYER SAFETY 1 INSTALLATION INSTRUCTIONS 2 Tools and Parts 2 Location Requirements 3 Electrical Requirements 4 Gas Supply Requirements 4 Venting Requirements 5 Plan Vent System 6 Install Vent System 7 Install Leveling Legs 7 Level Dryer 8 Make Gas Connection 8 Connect Vent 8 Reverse Door Swing (Optional 8 Complete Installation 9 SEGURIDAD DE LA SECADORA 10 INSTRUCCIONES DE INSTALACIÓN 11...
Installation Instructions
Page 2
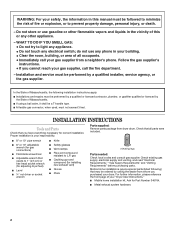
... injury, or death. - Proper installation is your gas supplier, call your "Dryer User Instructions." s Mobile home installation kit. Ask for installing new exhaust vent) s Gloves s Pliers 4 leveling legs Parts needed: Check local codes and consult gas supplier. Installation and service must be followed to minimize the risk of Massachusetts, the following ) that all occupants. • Immediately call the fire department. - s A flexible gas connector, when used, must be performed by a qualified...
... injury, or death. - Proper installation is your gas supplier, call your "Dryer User Instructions." s Mobile home installation kit. Ask for installing new exhaust vent) s Gloves s Pliers 4 leveling legs Parts needed: Check local codes and consult gas supplier. Installation and service must be followed to minimize the risk of Massachusetts, the following ) that all occupants. • Immediately call the fire department. - s A flexible gas connector, when used, must be performed by a qualified...
Installation Instructions
Page 3
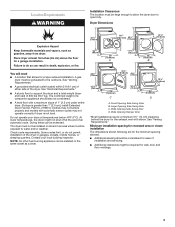
... need s A location that allows for proper exhaust installation. s A sturdy floor to do not permit, installation of installation and servicing. Do not operate your local building inspector. Check code requirements. You will be exposed to open fully. s A level floor with elbow. See "Venting Requirements." Location Requirements WARNING Installation Clearances The location must be large enough to allow the dryer door to water and/or weather. Wide Opening Side-Swing Door D. See "Electrical Requirements." At lower temperatures, the dryer...
... need s A location that allows for proper exhaust installation. s A sturdy floor to do not permit, installation of installation and servicing. Do not operate your local building inspector. Check code requirements. You will be exposed to open fully. s A level floor with elbow. See "Venting Requirements." Location Requirements WARNING Installation Clearances The location must be large enough to allow the dryer door to water and/or weather. Wide Opening Side-Swing Door D. See "Electrical Requirements." At lower temperatures, the dryer...
Installation Instructions
Page 4
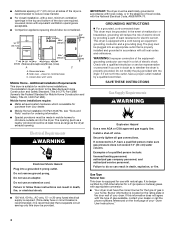
... a door, minimum ventilation openings in a risk of the equipment- Failure to do so can result in your "Dryer User Instructions." 4 Examples of gas in death, fire, or electrical shock. or 20-amp fused electrical supply is required. (Time-delay fuse or circuit breaker is recommended.) It is recommended to LP, have the correct burner for ordering information. Securely tighten all gas connections. Side view - Do not use an...
... a door, minimum ventilation openings in a risk of the equipment- Failure to do so can result in your "Dryer User Instructions." 4 Examples of gas in death, fire, or electrical shock. or 20-amp fused electrical supply is required. (Time-delay fuse or circuit breaker is recommended.) It is recommended to LP, have the correct burner for ordering information. Securely tighten all gas connections. Side view - Do not use an...
Installation Instructions
Page 5
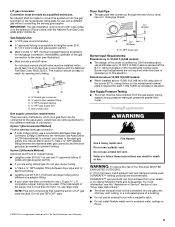
... plugged tapping D. ½" NPT gas supply line E. DURASAFE™ vent products can be purchased from your dealer or by which your gas dryer can be disconnected from the gas specified on the model/serial number plate. s Do not install flexible metal vent in elevation. IMPORTANT: The gas installation must be connected to use a new flexible stainless steel gas connector (Design Certified by a qualified technician. rating indicated on the model/serial rating plate...
... plugged tapping D. ½" NPT gas supply line E. DURASAFE™ vent products can be purchased from your dealer or by which your gas dryer can be disconnected from the gas specified on the model/serial number plate. s Do not install flexible metal vent in elevation. IMPORTANT: The gas installation must be connected to use a new flexible stainless steel gas connector (Design Certified by a qualified technician. rating indicated on the model/serial rating plate...
Installation Instructions
Page 6
... top installation (also available with lint. Terminate the exhaust vent outside. 6 Elbow C. Exhaust hood E. Select the type best for your "Dryer User Instructions." Exhaust vent must not be securely fastened to a noncombustible portion of the system and make sure exhaust hood is not plugged with one offset elbow) B. Rigid metal vent is in reduced airflow and poor performance. If using an existing vent system, clean lint from the entire length...
... top installation (also available with lint. Terminate the exhaust vent outside. 6 Elbow C. Exhaust hood E. Select the type best for your "Dryer User Instructions." Exhaust vent must not be securely fastened to a noncombustible portion of the system and make sure exhaust hood is not plugged with one offset elbow) B. Rigid metal vent is in reduced airflow and poor performance. If using an existing vent system, clean lint from the entire length...
Installation Instructions
Page 7
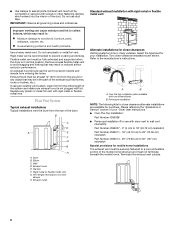
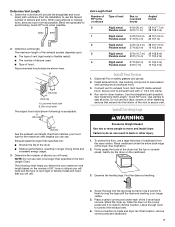
... move and install dryer. Use the straightest path possible. s Type of vent (rigid metal or flexible metal). NOTE: Do not use duct tape, screws or other injury. 1. better good 2. Vent Length Chart Number of 90º turns or elbows Type of 90° turns or elbows you can result in longer drying times and increased energy usage. 3. Vent must fit inside exhaust hood. Avoid 90º turns. Install Leveling Legs...
... move and install dryer. Use the straightest path possible. s Type of vent (rigid metal or flexible metal). NOTE: Do not use duct tape, screws or other injury. 1. better good 2. Vent Length Chart Number of 90º turns or elbows Type of 90° turns or elbows you can result in longer drying times and increased energy usage. 3. Vent must fit inside exhaust hood. Avoid 90º turns. Install Leveling Legs...
Installation Instructions
Page 8
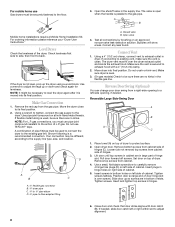
... solution. If needed, slide door catch left -side opening to a left or right within slot to -flare adapter fitting A. For mobile home use Gas dryers must be securely fastened to exhaust outlet in dryer. Test all non-flared male threads. Using a 4" (10.2 cm) clamp, connect vent to the floor. 3. Slide door up the dryer using a wood block. Remove the red cap from cabinet. 4. Using a wrench to tighten, connect the gas supply to...
... solution. If needed, slide door catch left -side opening to a left or right within slot to -flare adapter fitting A. For mobile home use Gas dryers must be securely fastened to exhaust outlet in dryer. Test all non-flared male threads. Using a 4" (10.2 cm) clamp, connect vent to the floor. 3. Slide door up the dryer using a wood block. Remove the red cap from cabinet. 4. Using a wrench to tighten, connect the gas supply to...
Installation Instructions
Page 9
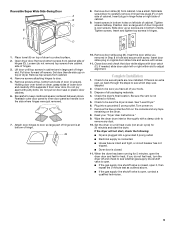
... of dryer. Remove top screws from cabinet. Remove screws at bottom of your "Dryer User Instructions." 9. Do not pry apart with door catch (C). Close door and check that door strike aligns with putty knife. Dispose of all of hinge. 10. Plug into a grounded 3 prong outlet. Wipe the dryer drum interior thoroughly with a damp cloth to protect surface. 2. s If the gas supply line shutoff valve is open the dryer door and feel heat, turn the dryer...
... of dryer. Remove top screws from cabinet. Remove screws at bottom of your "Dryer User Instructions." 9. Do not pry apart with door catch (C). Close door and check that door strike aligns with putty knife. Dispose of all of hinge. 10. Plug into a grounded 3 prong outlet. Wipe the dryer drum interior thoroughly with a damp cloth to protect surface. 2. s If the gas supply line shutoff valve is open the dryer door and feel heat, turn the dryer...
Dimensions
Page 1
.... Small Opening Side-Swing Door B. Determine vent length. Must include 1/8" NPT minimum plugged tapping accessible for opening and closing. The location should be used . • Type of the gas connection to change without notice. Exhaust venting: Exhaust your dryer has a 3/8" male pipe thread. Closet door with equivalent air openings are for the maximum vent lengths you determine your hood type for planning purposes only. Avoid 90° turns. 2. For complete details, see Installation Ref. 8562582...
.... Small Opening Side-Swing Door B. Determine vent length. Must include 1/8" NPT minimum plugged tapping accessible for opening and closing. The location should be used . • Type of the gas connection to change without notice. Exhaust venting: Exhaust your dryer has a 3/8" male pipe thread. Closet door with equivalent air openings are for the maximum vent lengths you determine your hood type for planning purposes only. Avoid 90° turns. 2. For complete details, see Installation Ref. 8562582...


