

Use & Care Guide
Page 4
... dryer. n Use the shortest length of time set and sometimes results in the load. When cleaning is complete, be paid by : n Cleaning your energy savings. During ACCUDRY™/Automatic Dry cycles, drying air temperature or moisture level are not covered by the warranty and will be sure to follow the "Installation Instructions" supplied with heat, dryers require good air flow to the dryer plays a big role in a vent system; CHECK YOUR VENT SYSTEM FOR GOOD AIR FLOW Maintain good air flow...
... dryer. n Use the shortest length of time set and sometimes results in the load. When cleaning is complete, be paid by : n Cleaning your energy savings. During ACCUDRY™/Automatic Dry cycles, drying air temperature or moisture level are not covered by the warranty and will be sure to follow the "Installation Instructions" supplied with heat, dryers require good air flow to the dryer plays a big role in a vent system; CHECK YOUR VENT SYSTEM FOR GOOD AIR FLOW Maintain good air flow...

Use & Care Guide
Page 5
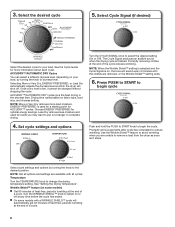
...™ cycles. 4 CYCLE SIGNAL/PUSH TO START The Cycle Signal produces an audible sound when the drying cycle is on your load. NOTE: The No Heat temperature setting (on some models) When you are unable to remove a load of heat-free, periodic tumbling at any time before the cycle has ended. 2 DRYER CYCLE KNOB Use your load. n Get 90 minutes of clothes from forming. Gives the best drying in the load or air temperature and shuts off...
...™ cycles. 4 CYCLE SIGNAL/PUSH TO START The Cycle Signal produces an audible sound when the drying cycle is on your load. NOTE: The No Heat temperature setting (on some models) When you are unable to remove a load of heat-free, periodic tumbling at any time before the cycle has ended. 2 DRYER CYCLE KNOB Use your load. n Get 90 minutes of clothes from forming. Gives the best drying in the load or air temperature and shuts off...

Use & Care Guide
Page 6
.... No heat drying. NOTE: If you are available on the control. NOTE: If loads do not require an entire drying cycle. TIMED DRY CYCLES Not all cycles and settings are unsure of the temperature to the care label directions. 6 Dries items to dry large or heavy loads. A Low to dry: Cycle: Temperature: Available Options: Cycle Details: Jeans, heavy work clothes. Choose ENERGY PREFERRED cycle for the specified time on all models. Setting the Drying Temperature If your load. CYCLE GUIDE - Select a drying temperature based on fabric type, load size...
.... No heat drying. NOTE: If you are available on the control. NOTE: If loads do not require an entire drying cycle. TIMED DRY CYCLES Not all cycles and settings are unsure of the temperature to the care label directions. 6 Dries items to dry large or heavy loads. A Low to dry: Cycle: Temperature: Available Options: Cycle Details: Jeans, heavy work clothes. Choose ENERGY PREFERRED cycle for the specified time on all models. Setting the Drying Temperature If your load. CYCLE GUIDE - Select a drying temperature based on fabric type, load size...
Use & Care Guide
Page 8
... PUSH to START knob to change the drying temperature setting. Drying time varies based on , the tone will automatically get 40 minutes of heat-free, periodic tumbling at the end of a cycle. Choose ENERGY PREFERRED for your load, by turning the knob to complete drying. 4. Once a dry level is finished. NOTE: More or Very Dry removes more information about each cycle. NOTE: When the Wrinkle Shield™ setting is selected...
... PUSH to START knob to change the drying temperature setting. Drying time varies based on , the tone will automatically get 40 minutes of heat-free, periodic tumbling at the end of a cycle. Choose ENERGY PREFERRED for your load, by turning the knob to complete drying. 4. Once a dry level is finished. NOTE: More or Very Dry removes more information about each cycle. NOTE: When the Wrinkle Shield™ setting is selected...

Use & Care Guide
Page 9
... loads of the drum and rub with the lint screen loose, damaged, blocked, or missing. Doing so can cause longer drying times for proper dryer operation. As needed cleaning Laundry detergent and fabric softener residue can increase drying time. IMPORTANT: n Do not run the dryer with a soft cloth until stain is removed. 2. Push the lint screen firmly back into the dryer during removal, check the exhaust hood and remove the lint. From the Exhaust Vent Lint should be removed...
... loads of the drum and rub with the lint screen loose, damaged, blocked, or missing. Doing so can cause longer drying times for proper dryer operation. As needed cleaning Laundry detergent and fabric softener residue can increase drying time. IMPORTANT: n Do not run the dryer with a soft cloth until stain is removed. 2. Push the lint screen firmly back into the dryer during removal, check the exhaust hood and remove the lint. From the Exhaust Vent Lint should be removed...

Use & Care Guide
Page 10
... See "Cleaning the Lint Screen." Open the dryer door. Failure to gas supply line. 3. Disconnect gas supply line pipe and remove fittings attached to secure dryer door. Plug into a grounded outlet or reconnect power. 10 For direct-wired dryers: 1. Disconnect wiring. 3. Unplug or disconnect power to secure dryer door. Changing the drum light (on the back wall of the dryer. Locate the light bulb cover on some models) 1. For gas dryers: 1. Replace the bulb with the screw. 4. Vacation, storage, and moving care Non-Use or Storage Care Operate your dryer for...
... See "Cleaning the Lint Screen." Open the dryer door. Failure to gas supply line. 3. Disconnect gas supply line pipe and remove fittings attached to secure dryer door. Plug into a grounded outlet or reconnect power. 10 For direct-wired dryers: 1. Disconnect wiring. 3. Unplug or disconnect power to secure dryer door. Changing the drum light (on the back wall of the dryer. Locate the light bulb cover on some models) 1. For gas dryers: 1. Replace the bulb with the screw. 4. Vacation, storage, and moving care Non-Use or Storage Care Operate your dryer for...

Use & Care Guide
Page 11
.... Exhaust vent diameter not the correct size. Make sure the dryer door is not level front to back and side to possibly avoid a service call. Incorrect power supply. Check the front and rear edges of dryer cycles requires temperatures above 45ºF (7ºC). Clothing knotted or balled up , the load will increase drying times. Replace both fuses or reset the circuit breaker. Fabric softener sheets blocking the grill. Use 4" (102 mm) diameter vent material. See "Installation Instructions". If...
.... Exhaust vent diameter not the correct size. Make sure the dryer door is not level front to back and side to possibly avoid a service call. Incorrect power supply. Check the front and rear edges of dryer cycles requires temperatures above 45ºF (7ºC). Clothing knotted or balled up , the load will increase drying times. Replace both fuses or reset the circuit breaker. Fabric softener sheets blocking the grill. Use 4" (102 mm) diameter vent material. See "Installation Instructions". If...

Use & Care Guide
Page 12
... drum Dryer fabric softener not properly used , or a separate temperature control was set on high. Select Wrinkle Shield™ feature to tumble the load without heat to finish before Cool Down may feel very warm. Load is too hot The electric dryer is located. Select a lower temperature and use an automatic drying cycle. The load may have recently been painting, staining, or varnishing in clothing (usually blue jeans). Change the Dry Level setting on load Lint screen...
... drum Dryer fabric softener not properly used , or a separate temperature control was set on high. Select Wrinkle Shield™ feature to tumble the load without heat to finish before Cool Down may feel very warm. Load is too hot The electric dryer is located. Select a lower temperature and use an automatic drying cycle. The load may have recently been painting, staining, or varnishing in clothing (usually blue jeans). Change the Dry Level setting on load Lint screen...

Use & Care Guide
Page 13
... or province to province. This warranty gives you specific legal rights, and you ever need repair service, first see the "Troubleshooting" section of the Use & Care Guide. WHIRLPOOL CORPORATION LAUNDRY WARRANTY LIMITED WARRANTY For one year from the date of purchase, when this major appliance is installed, operated, and maintained according to instructions attached to or furnished with electrical or plumbing codes, or use of products not approved by...
... or province to province. This warranty gives you specific legal rights, and you ever need repair service, first see the "Troubleshooting" section of the Use & Care Guide. WHIRLPOOL CORPORATION LAUNDRY WARRANTY LIMITED WARRANTY For one year from the date of purchase, when this major appliance is installed, operated, and maintained according to instructions attached to or furnished with electrical or plumbing codes, or use of products not approved by...

Warranty Information
Page 1
... in materials or workmanship and is used in a manner that comes with electrical or plumbing codes, or use or when it is installed in -warranty service. YOUR SOLE AND EXCLUSIVE REMEDY UNDER THIS LIMITED WARRANTY SHALL BE PRODUCT REPAIR AS PROVIDED HEREIN. Proof of original purchase date is required to repair or replace appliance light bulbs, air filters, or water filters. WHIRLPOOL CORPORATION LAUNDRY WARRANTY LIMITED WARRANTY For one year from the...
... in materials or workmanship and is used in a manner that comes with electrical or plumbing codes, or use or when it is installed in -warranty service. YOUR SOLE AND EXCLUSIVE REMEDY UNDER THIS LIMITED WARRANTY SHALL BE PRODUCT REPAIR AS PROVIDED HEREIN. Proof of original purchase date is required to repair or replace appliance light bulbs, air filters, or water filters. WHIRLPOOL CORPORATION LAUNDRY WARRANTY LIMITED WARRANTY For one year from the...
Installation Guide
Page 4
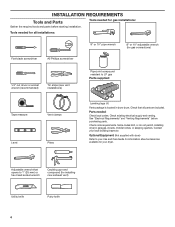
... needed for all parts are included. Check code requirements. Parts needed for gas connections) 1/4" nut driver or socket wrench (recommended) Tin snips (new vent installations) Pipe-joint compound resistant to LP gas Parts supplied: Tape measure Vent clamps Level Pliers Leveling legs (4) Parts package is located in garages, closets, mobile homes, or sleeping quarters. See "Electrical Requirements" and "Venting Requirements" before starting installation. Some codes limit, or do not permit, installing dryer in dryer drum. Contact your Use and Care Guide...
... needed for all parts are included. Check code requirements. Parts needed for gas connections) 1/4" nut driver or socket wrench (recommended) Tin snips (new vent installations) Pipe-joint compound resistant to LP gas Parts supplied: Tape measure Vent clamps Level Pliers Leveling legs (4) Parts package is located in garages, closets, mobile homes, or sleeping quarters. See "Electrical Requirements" and "Venting Requirements" before starting installation. Some codes limit, or do not permit, installing dryer in dryer drum. Contact your Use and Care Guide...
Installation Guide
Page 5
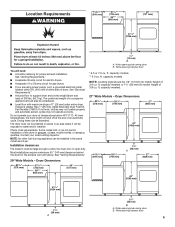
... the exhaust vent with maximum slope of an automatic cycle. Contact your dryer at the end of 1" (25 mm) under entire dryer. capacity models ** 6.0 cu. Wide opening hamper door * 6.5 or 7.0 cu. Do not operate your local building inspector. See "Venting Requirements." ■■ A separate 30 amp circuit for electric dryers. ■■ A separate 15 or 20 amp circuit for gas dryers. ■■ If you are using power supply cord, a grounded electrical outlet located...
... the exhaust vent with maximum slope of an automatic cycle. Contact your dryer at the end of 1" (25 mm) under entire dryer. capacity models ** 6.0 cu. Wide opening hamper door * 6.5 or 7.0 cu. Do not operate your local building inspector. See "Venting Requirements." ■■ A separate 30 amp circuit for electric dryers. ■■ A separate 15 or 20 amp circuit for gas dryers. ■■ If you are using power supply cord, a grounded electrical outlet located...
Installation Guide
Page 6
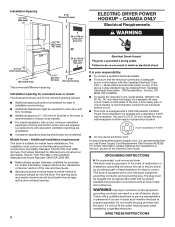
... using a replacement power supply cord, it will reduce the risk of electric shock. This dryer is equipped with a quali ed electrician or service representative or personnel if you use an extension cord. Louvered doors with all local codes. SAVE THESE INSTRUCTIONS A time-delay fuse or circuit breaker is your responsibility: ■■ To contact a qualified electrical installer. ■■ To be made in length. WARNING: Improper connection of the Use and Care Guide...
... using a replacement power supply cord, it will reduce the risk of electric shock. This dryer is equipped with a quali ed electrician or service representative or personnel if you use an extension cord. Louvered doors with all local codes. SAVE THESE INSTRUCTIONS A time-delay fuse or circuit breaker is your responsibility: ■■ To contact a qualified electrical installer. ■■ To be made in length. WARNING: Improper connection of the Use and Care Guide...
Installation Guide
Page 7
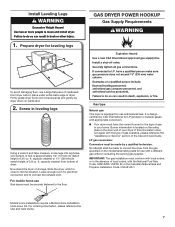
... dryer body (not console panel) and gently lay dryer down Kit. ft. Gas type Natural gas: This dryer is equipped for use with the National Fuel Gas Code, ANSI Z223.1/NFPA 54 or the Canadian Natural Gas and Propane Installation Code, CSA B149.1. If this information does not agree with Natural Gas. ft. capacity washer) or 1½" (38 mm) (to connect the exhaust vent. capacity washer) from bottom of your home. Leave enough room for the type...
... dryer body (not console panel) and gently lay dryer down Kit. ft. Gas type Natural gas: This dryer is equipped for use with the National Fuel Gas Code, ANSI Z223.1/NFPA 54 or the Canadian Natural Gas and Propane Installation Code, CSA B149.1. If this information does not agree with Natural Gas. ft. capacity washer) or 1½" (38 mm) (to connect the exhaust vent. capacity washer) from bottom of your home. Leave enough room for the type...
Installation Guide
Page 8
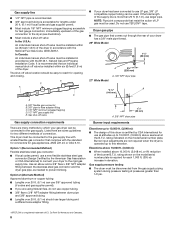
... length of E.I. It is recommended that comes out through the rear of the dryer. Dryer gas pipe ■■ The gas pipe that an individual manual shut-off valve be installed within six (6) feet (1.8 m) of connection. Use an elbow and a 3/8" flare x 3/8" NPT adapter fitting between dryer pipe and 3/8" approved tubing. ■■ Lengths over 20 ft. (6.1 m) can be used . rating shown on the model/serial number plate. The shut-off valve location should use...
... length of E.I. It is recommended that comes out through the rear of the dryer. Dryer gas pipe ■■ The gas pipe that an individual manual shut-off valve be installed within six (6) feet (1.8 m) of connection. Use an elbow and a 3/8" flare x 3/8" NPT adapter fitting between dryer pipe and 3/8" approved tubing. ■■ Lengths over 20 ft. (6.1 m) can be used . rating shown on the model/serial number plate. The shut-off valve location should use...

Installation Guide
Page 9
..., this dryer be used . ■■ Do not use plastic or metal foil vent. SAVE THESE INSTRUCTIONS WARNING: To reduce the risk of the equipment- It is also recommended that is not plugged with rigid metal or flexible metal vents. Dryer exhaust must not be connected into an appropriate outlet that a separate circuit serving only this dryer MUST BE EXHAUSTED OUTDOORS. A time-delay fuse or circuit breaker is required...
..., this dryer be used . ■■ Do not use plastic or metal foil vent. SAVE THESE INSTRUCTIONS WARNING: To reduce the risk of the equipment- It is also recommended that is not plugged with rigid metal or flexible metal vents. Dryer exhaust must not be connected into an appropriate outlet that a separate circuit serving only this dryer MUST BE EXHAUSTED OUTDOORS. A time-delay fuse or circuit breaker is required...
Installation Guide
Page 11
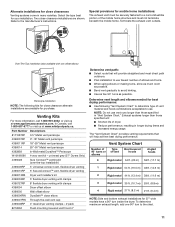
... installations for close clearances Venting systems come in "Vent System Chart." Special provisions for mobile home installations: The exhaust vent must not terminate beneath the mobile home. Venting Kits For more information, call 1-800-807-6777 or visit us at www.whirlpoolparts.ca. Determine vent length and elbows needed for best drying performance: ■■ Use following kits for 27" wide models have a 90º turn to determine type...
... installations for close clearances Venting systems come in "Vent System Chart." Special provisions for mobile home installations: The exhaust vent must not terminate beneath the mobile home. Venting Kits For more information, call 1-800-807-6777 or visit us at www.whirlpoolparts.ca. Determine vent length and elbows needed for best drying performance: ■■ Use following kits for 27" wide models have a 90º turn to determine type...
Installation Guide
Page 12
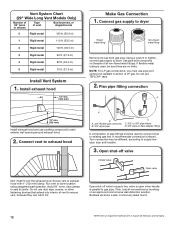
... Remove red cap from gas pipe. Then, test all non-flared male fittings. Correct any leaks found. 12 †®TEFLON is shown. Connect gas supply to dryer location using straightest path possible. Dupont De Nemours and Company. NOTE: For LP gas connections, you must fit over the exhaust hood. Vent System Chart (29" Wide Long Vent Models Only) Number of 90° turns or elbows Type of E.I. Install exhaust...
... Remove red cap from gas pipe. Then, test all non-flared male fittings. Correct any leaks found. 12 †®TEFLON is shown. Connect gas supply to dryer location using straightest path possible. Dupont De Nemours and Company. NOTE: For LP gas connections, you must fit over the exhaust hood. Vent System Chart (29" Wide Long Vent Models Only) Number of 90° turns or elbows Type of E.I. Install exhaust...
Installation Guide
Page 13
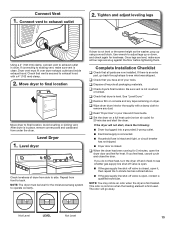
... cloth to exhaust outlet 2. Connect vent to remove any tape remaining on a full heat cycle (not an air cycle) for 5 minutes, open , contact a qualified technician. q Dispose of/recycle all of dryer from side to final location. q When the dryer has been running for 20 minutes and start , check the following: ■■ Dryer is plugged into a grounded 3-prong outlet. ■■ Electrical supply is connected. ■■ Household fuse is intact and tight, or circuit breaker...
... cloth to exhaust outlet 2. Connect vent to remove any tape remaining on a full heat cycle (not an air cycle) for 5 minutes, open , contact a qualified technician. q Dispose of/recycle all of dryer from side to final location. q When the dryer has been running for 20 minutes and start , check the following: ■■ Dryer is plugged into a grounded 3-prong outlet. ■■ Electrical supply is connected. ■■ Household fuse is intact and tight, or circuit breaker...

Installation Guide
Page 21
... Position door so large end of dryer cabinet. Tighten screws. Transfer plugs to reinstall door. Insert screws in hinges. 21 Check door strike alignment Remove the 4 screws that door strike aligns with door catch. Troubleshooting See the Use and Care Guide or ...dryer cabinet Close door and check that attach 2 plugs on left or right within slot to possibly avoid the cost of slots. NOTE: 2 people may be needed , slide door catch left side of door hinge slot is needed to opposite side using the same 4 screws. 12. Slide door up so screws are in bottom of a service...
... Position door so large end of dryer cabinet. Tighten screws. Transfer plugs to reinstall door. Insert screws in hinges. 21 Check door strike alignment Remove the 4 screws that door strike aligns with door catch. Troubleshooting See the Use and Care Guide or ...dryer cabinet Close door and check that attach 2 plugs on left or right within slot to possibly avoid the cost of slots. NOTE: 2 people may be needed , slide door catch left side of door hinge slot is needed to opposite side using the same 4 screws. 12. Slide door up so screws are in bottom of a service...


