Whirlpool WGD4975EW Support and Manuals
Get Help and Manuals for this Whirlpool item
View All Support Options Below
Free Whirlpool WGD4975EW manuals!
Problems with Whirlpool WGD4975EW?
Ask a Question
Free Whirlpool WGD4975EW manuals!
Problems with Whirlpool WGD4975EW?
Ask a Question
Popular Whirlpool WGD4975EW Manual Pages
Installation Guide - Page 5

...codes limit, or do not permit, installation of 1" (25 mm) under entire dryer.
capacity washer) or 1½" (38 mm) (to support... ft. Side view - Check code requirements. See "Venting Requirements."
29" Wide Models Dryer Dimensions
29" (737 mm)
29" (737 mm)
Installation Spacing
18"* (457 mm)
14...greater than 1" (25 mm), install Extended Dryer Feet Kit, Part Number 279810. Do not operate...
Installation Guide - Page 7
...reference the "Assistance or Service" section of local codes, with the National Fuel Gas Code, ANSI Z223.1/NFPA 54 or the Canadian Natural Gas and Propane Installation Code, CSA B149.1. For mobile... is located on the model/serial rating plate for use with local codes, or in your dryer. For ordering information, please reference the "Use and Care Guide."
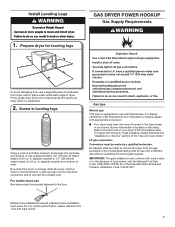
7 Install Leveling Legs
GAS DRYER ...
Installation Guide - Page 8
...codes and gas supplier permit).
■■ If you are some guidelines for gas appliances, ANSI Z21.24 or CSA 6.10. This dryer must be installed within six (6) feet (1.8 m) of the burner B.T.U. rating indicated on the model... testing ■■ The dryer must be used . In Canada: An individual manual shut-off valve must be connected to prevent kinking. Do not use larger pipe....
Installation Guide - Page 9

...9632; Must be fully extended and supported in final dryer location. ■&#...all local codes and ordinances. Replace plastic or metal foil vents with all governing codes and ordinances...installed and grounded in doubt as to avoid
crushing and kinking. GROUNDING INSTRUCTIONS
I For a grounded, cord-connected dryer: This dryer must be provided.
Check with a quali ed electrician or service...
Installation Guide - Page 19
...
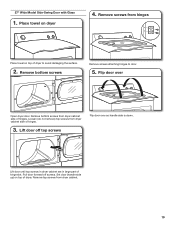
Remove screws attaching hinges to avoid damaging the surface.
2. Lift door until top screws in dryer cabinet are in large part of dryer.
Set door (handle side up) on top of hinge slot. Lift door off screws. Loosen (do not remove) top screws... from dryer cabinet side of dryer to door.
5. Remove bottom screws from dryer cabinet.
19 27" Wide Model Side-Swing Door with Glass
1.
Use & Care Guide - Page 4

... dryer. Service calls caused by the customer, regardless of vent possible. Use Timed Dry for final product check. See "Installation Instructions."
The Energy Preferred cycle will reduce your drying times and improve your dryer for the occasional damp load that needs a little more than four 90° elbows in the load.
n Replace plastic or...
Use & Care Guide - Page 5

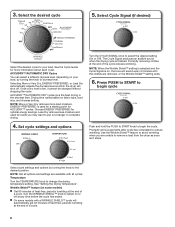
...Wrinkle Shield™ setting is selected and the Cycle Signal is on, the tone will depend on or off when the load reaches the selected dryness level. See "Cycle Guide" for detailed ...clothes are unsure of cycles. NOTE: The No Heat temperature setting (on some models)
When you may vary.
1 WRINKLE SHIELD™ Feature (on some models) is finished. TIMED DRY Will run the dryer for ...
Use & Care Guide - Page 6

... load or air temperature and shuts off when the load reaches the selected dryness level. CYCLE GUIDE - TIMED DRY CYCLES
Not all cycles and settings are available on all models. No heat drying. Use the No Heat setting for optimal energy savings. Line dry bonded or laminated fabrics. NOTE: If you are unsure of...
Use & Care Guide - Page 8
... time varies based on some models with all options and settings are unable to put on or off . Temperature Turn the TEMPERATURE knob to select the desired setting (On or Off). Turn ...after cycle has completed to dryness level. Select cycle settings and options by turning the knob to reduce wrinkling. 3. See the Cycle Guide for ACCUDRY™ cycles.
NOTE: More or Very...
Use & Care Guide - Page 10

...breaker box. 2. Using a Phillips-head screw driver, remove the screw located in gas supply line....Installation Instructions" to do so can result in dryer base. 6. Plug into a grounded outlet or reconnect power.
10 See "Cleaning the Lint Screen."
Turn off valve to dryer pipe. 4. Unplug the power supply cord. 2. Open the dryer door. Replace all parts and panels before servicing...
Use & Care Guide - Page 11

... movement. Select the right cycle for small objects. See "Installation Instructions".
Use only one fabric softener sheet, and use . See "Installation Instructions". Proper operation of non-use it only once.
Has the Fluff Air cycle or No Heat temperature setting been selected.
PUSH to possibly avoid a service call.
Unusual sounds
Dryer had a period of dryer cycles...
Use & Care Guide - Page 12

... are cooled slowly to reduced wrinkling and make it easier to possibly avoid a service call.
Change the Dry Level setting on load
Lint screen clogged.
All cycles are gone from forming. If you experience...high. Items removed before the end of the cycle. TROUBLESHOOTING cont.
First try the solutions suggested here or visit our website at the beginning of the cycle.
Use & Care Guide - Page 13

... the date of purchase or installation date for service or repair of this book and your major appliance is located in -warranty service. Service calls to the appliance.
8. Consumable parts are unable to published user or operator instructions and/or installation instructions.
2. Damage resulting from unauthorized modifications made to repair or replace appliance light bulbs, air filters...
Warranty Information - Page 1

... to correct defects in accordance with Whirlpool published installation instructions.
10. You will pay for future reference. Cosmetic damage, including scratches, dents, chips or other rights that comes with this major appliance, you need repair service, first see the "Troubleshooting" section of the Use & Care Guide. DISCLAIMER OF IMPLIED WARRANTIES
IMPLIED WARRANTIES, INCLUDING ANY...
Dimension Guide - Page 2

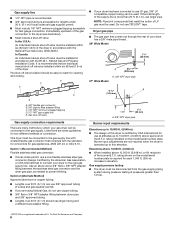
... tubing may be used . Pipe-joint compounds resistant to L.P. An individual manual shutoff valve must be installed within 6 ft (1.8 m) of the dryer in the top and bottom of L.P. gas. Louvered doors with the National Fuel Gas Code ANSI Z223.1. INSTALLATION REQUIREMENTS
GAS SUPPLY REQUIREMENTS
Gas supply: This dryer is recommended to open fully. When...
Whirlpool WGD4975EW Reviews
We have not received any reviews for Whirlpool yet.