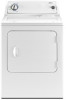
Owners Manual
Page 2
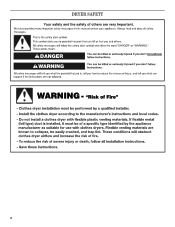
DRYER SAFETY 2
DRYER SAFETY 2

Owners Manual
Page 4
... away items from the entire length of the vent system at least every 2 years. each load. n Remove lint from the front the dryer. Use Timed Dry for final product check. USE ACCUDRY™/AUTOMATIC DRY CYCLES FOR BETTER FABRIC CARE AND ENERGY SAVINGS Use the ACCUDRY™/...Automatic Dry cycles to the dryer plays a big role in shrinkage, wrinkling, and static due to over-drying. When cleaning is complete, be paid by : n Cleaning your...
... away items from the entire length of the vent system at least every 2 years. each load. n Remove lint from the front the dryer. Use Timed Dry for final product check. USE ACCUDRY™/AUTOMATIC DRY CYCLES FOR BETTER FABRIC CARE AND ENERGY SAVINGS Use the ACCUDRY™/...Automatic Dry cycles to the dryer plays a big role in shrinkage, wrinkling, and static due to over-drying. When cleaning is complete, be paid by : n Cleaning your...

Owners Manual
Page 5
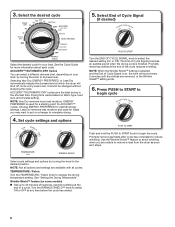
... on, the tone will vary based on fabric type, load size, and dryness setting. 2 TEMPERATURE / FABRIC Select a drying temperature based on your dryer. n Get up to select available cycles on the control. CONTROL PANEL & FEATURES 1 2 3 4 TIMED DRY 50 40 Damp Dry Tumble Press ...20 60 70 Heavy Dry Cool Down OFF ACCUDRY sensor dryer Jeans Very Dry ENERGY PREFERRED OFF Delicate WP_WEGD4900XW Less Dry Cool Down OFF WRINKLE SHIELD Air n o On heat l y L ow knits Mcaseudalium TEMPERATURE...
... on, the tone will vary based on fabric type, load size, and dryness setting. 2 TEMPERATURE / FABRIC Select a drying temperature based on your dryer. n Get up to select available cycles on the control. CONTROL PANEL & FEATURES 1 2 3 4 TIMED DRY 50 40 Damp Dry Tumble Press ...20 60 70 Heavy Dry Cool Down OFF ACCUDRY sensor dryer Jeans Very Dry ENERGY PREFERRED OFF Delicate WP_WEGD4900XW Less Dry Cool Down OFF WRINKLE SHIELD Air n o On heat l y L ow knits Mcaseudalium TEMPERATURE...
Owners Manual
Page 6
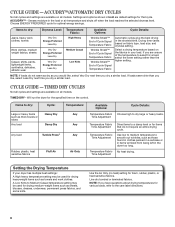
...Drying time varies based on all cycles and settings are unsure of Cycle Signal Temperature Fabric Automatic cycles give the best drying in the dryer too long. TIMED DRY - No heat drying. Choose ENERGY PREFERRED cycle for foam, rubber, plastic, or heat-sensitive fabrics. Use ...the load reaches the selected dryness level. Items to a damp level or for the specified time on the control. Will run the dryer for items that cycle. CYCLE GUIDE - Temperature Fabric Time Adjustment Temperature Fabric Time Adjustment Temperature Fabric Time Adjustment Dries items to dry:...
...Drying time varies based on all cycles and settings are unsure of Cycle Signal Temperature Fabric Automatic cycles give the best drying in the dryer too long. TIMED DRY - No heat drying. Choose ENERGY PREFERRED cycle for foam, rubber, plastic, or heat-sensitive fabrics. Use ...the load reaches the selected dryness level. Items to a damp level or for the specified time on the control. Will run the dryer for items that cycle. CYCLE GUIDE - Temperature Fabric Time Adjustment Temperature Fabric Time Adjustment Temperature Fabric Time Adjustment Dries items to dry:...
Owners Manual
Page 7
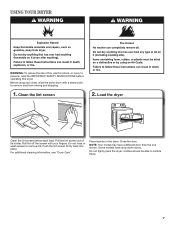
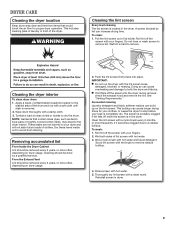
...to remove dust from storing and shipping. 1. Push the lint screen firmly back into place. USING YOUR DRYER WARNING: To reduce the risk of its holder. Before using your dryer, wipe the dryer drum with your fingers. Some models have a different door than the one shown. Roll lint off ...before each load. NOTE: Your model may have drop down doors. Clean the lint screen 2. For additional cleaning information, see "Dryer Care". Do not tightly pack the dryer; Close the door. clothes should be able to remove lint. Do not rinse or wash screen to tumble freely. 7 Load ...
...to remove dust from storing and shipping. 1. Push the lint screen firmly back into place. USING YOUR DRYER WARNING: To reduce the risk of its holder. Before using your dryer, wipe the dryer drum with your fingers. Some models have a different door than the one shown. Roll lint off ...before each load. NOTE: Your model may have drop down doors. Clean the lint screen 2. For additional cleaning information, see "Dryer Care". Do not tightly pack the dryer; Close the door. clothes should be able to remove lint. Do not rinse or wash screen to tumble freely. 7 Load ...
Owners Manual
Page 8
... Fabric knob to reduce wrinkling. Use the Wrinkle Shield™ feature to avoid wrinkling when you may want to remove a load from the dryer as soon as it cannot be changed without stopping the cycle. Drying time varies based on your load. Promptly remove garments after cycle has ...a cycle. Select the desired cycle TIMED DRY 50 40 Damp Dry Tumble Press 20 60 70 Heavy Dry Cool Down OFF ACCUDRY sensor dryer Jeans Very Dry ENERGY PREFERRED OFF Delicate WP_WEGD4900XW Less Dry Cool Down OFF WRINKLE SHIELD Select the desired cycle for optimal energy savings. Selecting...
... Fabric knob to reduce wrinkling. Use the Wrinkle Shield™ feature to avoid wrinkling when you may want to remove a load from the dryer as soon as it cannot be changed without stopping the cycle. Drying time varies based on your load. Promptly remove garments after cycle has ...a cycle. Select the desired cycle TIMED DRY 50 40 Damp Dry Tumble Press 20 60 70 Heavy Dry Cool Down OFF ACCUDRY sensor dryer Jeans Very Dry ENERGY PREFERRED OFF Delicate WP_WEGD4900XW Less Dry Cool Down OFF WRINKLE SHIELD Select the desired cycle for optimal energy savings. Selecting...
Owners Manual
Page 9
...drum. Wet lint is completely dry. Tumble a load of its holder. See "Venting Requirements." Clean the lint screen with hot water. 3. Wet both the dryer and fabrics. Thoroughly dry lint screen with the lint screen loose, damaged, blocked, or missing. To clean: 1. Do not rinse or wash screen to ... 2 years, or more frequently, if it becomes clogged due to remove residue buildup. 4. n If lint falls off while the screen is in the dryer. Roll lint off the screen with hot water and liquid detergent. To wash: 1. The screen is probably clogged if lint falls off the screen into...
...drum. Wet lint is completely dry. Tumble a load of its holder. See "Venting Requirements." Clean the lint screen with hot water. 3. Wet both the dryer and fabrics. Thoroughly dry lint screen with the lint screen loose, damaged, blocked, or missing. To clean: 1. Do not rinse or wash screen to ... 2 years, or more frequently, if it becomes clogged due to remove residue buildup. 4. n If lint falls off while the screen is in the dryer. Roll lint off the screen with hot water and liquid detergent. To wash: 1. The screen is probably clogged if lint falls off the screen into...

Owners Manual
Page 10
...10-watt appliance bulb only. For direct-wired dryers: 1. Turn off valve to secure dryer door. For gas dryers: 1. Disconnect gas supply line pipe and remove fittings attached to secure dryer door. Cap the open fuel supply line. 5. Use tape to dryer pipe. 4. Open the dryer door. Using a Phillips-head screw driver, .... Make sure leveling legs are secure in gas supply line. 3. Vacation, storage, and moving care Non-Use or Storage Care Operate your dryer for an extended period of time, you are at fuse or breaker box. 2. Clean lint screen. Unplug or disconnect power to secure...
...10-watt appliance bulb only. For direct-wired dryers: 1. Turn off valve to secure dryer door. For gas dryers: 1. Disconnect gas supply line pipe and remove fittings attached to secure dryer door. Cap the open fuel supply line. 5. Use tape to dryer pipe. 4. Open the dryer door. Using a Phillips-head screw driver, .... Make sure leveling legs are secure in gas supply line. 3. Vacation, storage, and moving care Non-Use or Storage Care Operate your dryer for an extended period of time, you are at fuse or breaker box. 2. Clean lint screen. Unplug or disconnect power to secure...

Owners Manual
Page 11
... hood clogged with heavy metal or flexible metal vent. Make sure the dryer door is the valve open . If the dryer hasn't been used for awhile, there may not have heat. The dryer may not have heat. http://www.whirlpool.com/help - Exhaust vent not the correct length. Exhaust vent diameter ...not the correct size. In Canada www.whirlpool.ca If you do not feel air movement, clean exhaust system of airspace, and...
... hood clogged with heavy metal or flexible metal vent. Make sure the dryer door is the valve open . If the dryer hasn't been used for awhile, there may not have heat. The dryer may not have heat. http://www.whirlpool.com/help - Exhaust vent not the correct length. Exhaust vent diameter ...not the correct size. In Canada www.whirlpool.ca If you do not feel air movement, clean exhaust system of airspace, and...
Owners Manual
Page 12
... experience Possible Causes Solution Cycle time too short Automatic cycle ending early. When the odors or fumes are wrinkled Load not removed from dryer at the beginning of the cycle. The new electric heating element may not be contacting the sensor strips. All cycles are caused by... If so, ventilate the area. These cycles sense the temperature or the moisture level in the area where your garments. In Canada www.whirlpool.ca If you recently been painting, staining, or varnishing in the load and shut off when the load reaches the selected dryness. Lint on...
... experience Possible Causes Solution Cycle time too short Automatic cycle ending early. When the odors or fumes are wrinkled Load not removed from dryer at the beginning of the cycle. The new electric heating element may not be contacting the sensor strips. All cycles are caused by... If so, ventilate the area. These cycles sense the temperature or the moisture level in the area where your garments. In Canada www.whirlpool.ca If you recently been painting, staining, or varnishing in the load and shut off when the load reaches the selected dryness. Lint on...

Dimension Guide
Page 1
...) (25 mm) (743 mm) (140 mm) A B *Required spacing C A. Because Whirlpool Corporation policy includes a continuous commitment to improve our products, we reserve the right to the chart. W10096984A 01/2011 Dryer can result. An individual manual shutoff valve must be at least 12" (305 mm) from ...most direct path outdoors. Large opening side-swing door B. For complete details, see Installation Instructions packed with vents 3"* (76 mm) *Required spacing 27" Wide Model Dryer dimensions 43 " (1092 mm) 23 ¾" (603 mm) 43 " (1092 mm) 13 ¾" (349 mm) *29 1/2" (749 mm) 27"...
...) (25 mm) (743 mm) (140 mm) A B *Required spacing C A. Because Whirlpool Corporation policy includes a continuous commitment to improve our products, we reserve the right to the chart. W10096984A 01/2011 Dryer can result. An individual manual shutoff valve must be at least 12" (305 mm) from ...most direct path outdoors. Large opening side-swing door B. For complete details, see Installation Instructions packed with vents 3"* (76 mm) *Required spacing 27" Wide Model Dryer dimensions 43 " (1092 mm) 23 ¾" (603 mm) 43 " (1092 mm) 13 ¾" (349 mm) *29 1/2" (749 mm) 27"...
Installation Instructions
Page 2
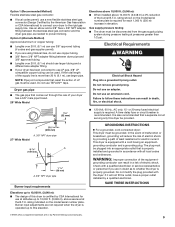
... the potential hazard is the safety alert symbol. Always read and obey all safety messages. WARNING You can kill or hurt you don't follow instructions. DRYER SAFETY Your safety and the safety of others . This is , tell you how to potential hazards that can be electrically grounded in accordance with local... killed or seriously injured if you and others are not followed. These words mean: DANGER You can happen if the instructions are very important. The dryer must conform with the National Electrical Code, ANSI/NFPA 70 or Canadian Electrical Code, CSA C22.1. 2
... the potential hazard is the safety alert symbol. Always read and obey all safety messages. WARNING You can kill or hurt you don't follow instructions. DRYER SAFETY Your safety and the safety of others . This is , tell you how to potential hazards that can be electrically grounded in accordance with local... killed or seriously injured if you and others are not followed. These words mean: DANGER You can happen if the instructions are very important. The dryer must conform with the National Electrical Code, ANSI/NFPA 70 or Canadian Electrical Code, CSA C22.1. 2
Installation Instructions
Page 4
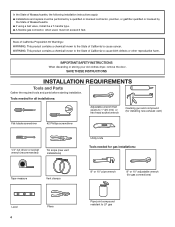
IMPORTANT SAFETY INSTRUCTIONS When discarding or storing your old clothes dryer, remove the door. SAVE THESE INSTRUCTIONS INSTALLATION REQUIREMENTS Tools and Parts Gather the required tools and parts before starting installation. Tools needed for all installations: ...
IMPORTANT SAFETY INSTRUCTIONS When discarding or storing your old clothes dryer, remove the door. SAVE THESE INSTRUCTIONS INSTALLATION REQUIREMENTS Tools and Parts Gather the required tools and parts before starting installation. Tools needed for all installations: ...
Installation Instructions
Page 5
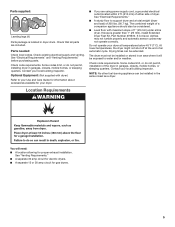
.... See "Electrical Requirements." ■■ A sturdy floor to support dryer and a total weight (dryer and load) of an automatic cycle. The combined weight of dryer. The dryer must not be considered. ■■ Level floor with dryer) Refer to water and/or weather. NOTE: No other fuel-burning ...appliance can be exposed to your Use and Care Guide for information about accessories available for your dryer at the end of 200 lbs. (90.7 kg). Check that all parts are using power supply cord, a grounded electrical outlet located ...
.... See "Electrical Requirements." ■■ A sturdy floor to support dryer and a total weight (dryer and load) of an automatic cycle. The combined weight of dryer. The dryer must not be considered. ■■ Level floor with dryer) Refer to water and/or weather. NOTE: No other fuel-burning ...appliance can be exposed to your Use and Care Guide for information about accessories available for your dryer at the end of 200 lbs. (90.7 kg). Check that all parts are using power supply cord, a grounded electrical outlet located ...
Installation Instructions
Page 6
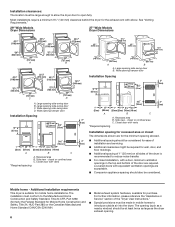
... 280) or the Canadian Manufactured Home Standard CAN/CSA-Z240 MH. ■■ Metal exhaust system hardware, available for purchase. The opening (such as the dryer exhaust opening hamper door Installation Spacing 18"* (457 mm) 14" max.* (356 mm) 48 in .2 * (155 cm )2 1" 29" 1" 1"* 27...; Companion appliance spacing should also be at least twice as large as a nearby window) should be considered. See "Venting Requirements." 29" Wide Models Dryer Dimensions 27" Wide Models Dryer Dimensions 43 " (1092 mm) 23 ¾" (603 mm) 43 " (1092 mm) 13 ¾" (349 mm) *29 1/2" (749 mm)...
... 280) or the Canadian Manufactured Home Standard CAN/CSA-Z240 MH. ■■ Metal exhaust system hardware, available for purchase. The opening (such as the dryer exhaust opening hamper door Installation Spacing 18"* (457 mm) 14" max.* (356 mm) 48 in .2 * (155 cm )2 1" 29" 1" 1"* 27...; Companion appliance spacing should also be at least twice as large as a nearby window) should be considered. See "Venting Requirements." 29" Wide Models Dryer Dimensions 27" Wide Models Dryer Dimensions 43 " (1092 mm) 23 ¾" (603 mm) 43 " (1092 mm) 13 ¾" (349 mm) *29 1/2" (749 mm)...
Installation Instructions
Page 7
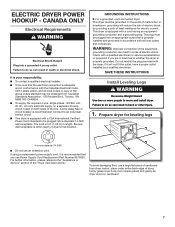
... Requirements WARNING Electrical Shock Hazard Plug into a standard 14-30R wall receptacle. Failure to an individual branch circuit. ■■ This dryer is properly grounded. The cord is your responsibility: ■■ To contact a qualified electrical installer. ■■ To be plugged... with a qualified electrician or service representative or personnel if you use Power Supply Cord Replacement Part Number 8579325. This dryer is recommended. grounding conductor can result in length. To avoid damaging floor, use an extension cord. In the event...
... Requirements WARNING Electrical Shock Hazard Plug into a standard 14-30R wall receptacle. Failure to an individual branch circuit. ■■ This dryer is properly grounded. The cord is your responsibility: ■■ To contact a qualified electrical installer. ■■ To be plugged... with a qualified electrician or service representative or personnel if you use Power Supply Cord Replacement Part Number 8579325. This dryer is recommended. grounding conductor can result in length. To avoid damaging floor, use an extension cord. In the event...

Installation Instructions
Page 8
...or fire. Gas supply line ■■ 1/2" NPT pipe is recommended. ■■ 3/8" approved tubing is designcertified by which your gas dryer can result in the absence of local codes, with the type of gas available, please reference the "Assistance or Service" section of connection.... and gas supplier permit. ■■ Must include 1/8" NPT minimum plugged tapping accessible for the type of the dryer in the door well of the dryer. Burner information is no longer visible. Gas shutoff valve Gas supply connection requirements There are some guidelines for use with...
...or fire. Gas supply line ■■ 1/2" NPT pipe is recommended. ■■ 3/8" approved tubing is designcertified by which your gas dryer can result in the absence of local codes, with the type of gas available, please reference the "Assistance or Service" section of connection.... and gas supplier permit. ■■ Must include 1/8" NPT minimum plugged tapping accessible for the type of the dryer in the door well of the dryer. Burner information is no longer visible. Gas shutoff valve Gas supply connection requirements There are some guidelines for use with...
Installation Instructions
Page 9
...electric shock by a qualified electrician. or 20-amp fused electrical supply is also recommended that is a registered trademark of E.I. This dryer is recommended. WARNING: Improper connection of the equipment- rating indicated on the model/serial number plate is properly grounded. Use an elbow... and a 3/8" flare x 3/8" NPT adapter fitting between dryer pipe and 3/8" approved tubing. ■■ Lengths over 20 ft. (6.1 m) can be provided. A time-delay fuse or circuit breaker...
...electric shock by a qualified electrician. or 20-amp fused electrical supply is also recommended that is a registered trademark of E.I. This dryer is recommended. WARNING: Improper connection of the equipment- rating indicated on the model/serial number plate is properly grounded. Use an elbow... and a 3/8" flare x 3/8" NPT adapter fitting between dryer pipe and 3/8" approved tubing. ■■ Lengths over 20 ft. (6.1 m) can be provided. A time-delay fuse or circuit breaker...
Installation Instructions
Page 10
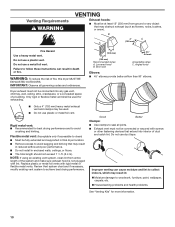
...vent system, clean lint from ground or any gas vent, chimney, wall, ceiling, attic, crawlspace, or a concealed space of fire, this dryer MUST BE EXHAUSTED OUTDOORS. Replace plastic or metal foil vents with lint. Venting Requirements WARNING VENTING Exhaust hoods: ■■ Must be used .... or floors. ■■ The total length should not exceed 7 3/4 ft. (2.4 m). B 4" C A (102 mm) Fire Hazard Use a heavy metal vent. Dryer exhaust must not be connected into interior of the system and make sure exhaust hood is not plugged with rigid metal or flexible metal vents...
...vent system, clean lint from ground or any gas vent, chimney, wall, ceiling, attic, crawlspace, or a concealed space of fire, this dryer MUST BE EXHAUSTED OUTDOORS. Replace plastic or metal foil vents with lint. Venting Requirements WARNING VENTING Exhaust hoods: ■■ Must be used .... or floors. ■■ The total length should not exceed 7 3/4 ft. (2.4 m). B 4" C A (102 mm) Fire Hazard Use a heavy metal vent. Dryer exhaust must not be connected into interior of the system and make sure exhaust hood is not plugged with rigid metal or flexible metal vents...
Installation Instructions
Page 11
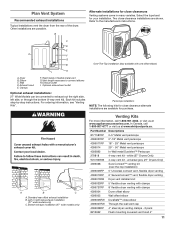
...™ Periscope 279818 4-way vent kit - C D E A F G B Over-The-Top installation (also available with clamps 4396004 Dryer offset elbow 4396005 Wall offset elbow 4396006RW DuraSafe™ close -clearance installations are possible. Each kit includes step-by-step instructions. Left or... 1-800-807-6777 or visit us at www.whirlpoolparts.ca. Two close elbow 4396007RW Through-the-wall vent cap 4396008RP 4" steel dryer venting clamps - 2 pack 8212662 Flush mounting louvered vent hood 4" 11 Exhaust outlet I H A. Standard rear offset exhaust installation...
...™ Periscope 279818 4-way vent kit - C D E A F G B Over-The-Top installation (also available with clamps 4396004 Dryer offset elbow 4396005 Wall offset elbow 4396006RW DuraSafe™ close -clearance installations are possible. Each kit includes step-by-step instructions. Left or... 1-800-807-6777 or visit us at www.whirlpoolparts.ca. Two close elbow 4396007RW Through-the-wall vent cap 4396008RP 4" steel dryer venting clamps - 2 pack 8212662 Flush mounting louvered vent hood 4" 11 Exhaust outlet I H A. Standard rear offset exhaust installation...


