

Installation Guide
Page 5
... might not shut off at temperatures below 45°F (7°C). Some codes limit, or do not permit, installation of dryer. See "Venting Requirements." 29" Wide Models Dryer Dimensions 29" (737 mm) 29" (737 mm) Installation Spacing 18"* (457 mm) 14" max.* (356 mm) 48 in.2* (310 cm )2 ... considered. ■■ Level floor with maximum slope of 3.6 cu. Do not operate your local building inspector. Closet door with vents *Required spacing 27" Wide Models Dryer Dimensions 27" (686 mm) 3"* (76 mm) 43" (1092 mm) 223/4" (578 mm) 291/2" (749 mm) 11/2" (38 mm) 133/4" (349 ...
... might not shut off at temperatures below 45°F (7°C). Some codes limit, or do not permit, installation of dryer. See "Venting Requirements." 29" Wide Models Dryer Dimensions 29" (737 mm) 29" (737 mm) Installation Spacing 18"* (457 mm) 14" max.* (356 mm) 48 in.2* (310 cm )2 ... considered. ■■ Level floor with maximum slope of 3.6 cu. Do not operate your local building inspector. Closet door with vents *Required spacing 27" Wide Models Dryer Dimensions 27" (686 mm) 3"* (76 mm) 43" (1092 mm) 223/4" (578 mm) 291/2" (749 mm) 11/2" (38 mm) 133/4" (349 ...
Installation Guide
Page 7
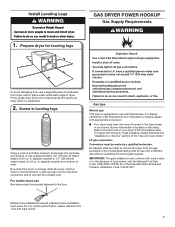
... height of dryer. Burner information is designcertified by a qualified technician. capacity washer) or 1½" (38 mm) (to its legs. Now stand the dryer on the model/serial rating plate for use a large flat piece of cardboard from bottom of the "Use and Care Guide." It is located on cardboard. 2. Mobile home...
... height of dryer. Burner information is designcertified by a qualified technician. capacity washer) or 1½" (38 mm) (to its legs. Now stand the dryer on the model/serial rating plate for use a large flat piece of cardboard from bottom of the "Use and Care Guide." It is located on cardboard. 2. Mobile home...
Installation Guide
Page 8
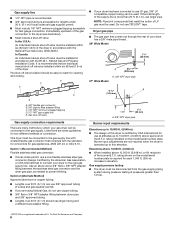
...9632; Must include a shut-off valve: In the U.S.A.: An individual manual shut-off valve location should use larger pipe. rating indicated on the model/serial number plate is required for test gauge connection, immediately upstream of the gas connection to 10,000 ft. (3,048 m) above 10,000 ...ft. (3,048 m), a 4% reduction of the burner B.T.U. rating shown on the model/serial number plate. Elevations above 10,000 ft. (3,048 m): ■■ When installed above sea level at pressures greater than 20 ft. (6.1 m), use...
...9632; Must include a shut-off valve: In the U.S.A.: An individual manual shut-off valve location should use larger pipe. rating indicated on the model/serial number plate is required for test gauge connection, immediately upstream of the gas connection to 10,000 ft. (3,048 m) above 10,000 ...ft. (3,048 m), a 4% reduction of the burner B.T.U. rating shown on the model/serial number plate. Elevations above 10,000 ft. (3,048 m): ■■ When installed above sea level at pressures greater than 20 ft. (6.1 m), use...

Installation Guide
Page 10
... out the right side, left side, or through the bottom (4-way vent kit). Optional side exhaust outlet Optional exhaust installations: 27" Wide Models can be converted to connect elbows H. Clamps: ■■ Use clamps to seal all joints. ■■ Exhaust vent must not ... outlet I H A. Left- Other installations are possible. Clamps F. Do not use duct tape. or right-side exhaust installation (27" wide models only) C. Dryer B. Each kit includes step-by-step instructions. See "Venting Kits" for more information. 10 A B C A. Bottom exhaust installation (27" wide...
... out the right side, left side, or through the bottom (4-way vent kit). Optional side exhaust outlet Optional exhaust installations: 27" Wide Models can be converted to connect elbows H. Clamps: ■■ Use clamps to seal all joints. ■■ Exhaust vent must not ... outlet I H A. Left- Other installations are possible. Clamps F. Do not use duct tape. or right-side exhaust installation (27" wide models only) C. Dryer B. Each kit includes step-by-step instructions. See "Venting Kits" for more information. 10 A B C A. Bottom exhaust installation (27" wide...

Installation Guide
Page 11
....4 m) 38 ft. (11.6 m) 3 Rigid metal 35 ft. (10.7 m) 29 ft. (8.8 m) 4 Rigid metal 27 ft. (8.2 m) 21 ft. (6.4 m) NOTE: Side and bottom exhaust installations for 27" wide models have a 90º turn to avoid kinking. ■■ Use as few 90° turns as possible. ■■ Bend vent gradually to the chart...
....4 m) 38 ft. (11.6 m) 3 Rigid metal 35 ft. (10.7 m) 29 ft. (8.8 m) 4 Rigid metal 27 ft. (8.2 m) 21 ft. (6.4 m) NOTE: Side and bottom exhaust installations for 27" wide models have a 90º turn to avoid kinking. ■■ Use as few 90° turns as possible. ■■ Bend vent gradually to the chart...
Installation Guide
Page 12
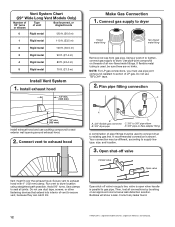
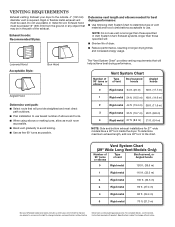
... is open when handle is used, be used to connect dryer to exhaust hood with 4" (102 mm) clamp. Vent System Chart (29" Wide Long Vent Models Only) Number of 90° turns or elbows Type of pipe fittings must fit over the exhaust hood. Using a wrench to tighten, connect gas supply...
... is open when handle is used, be used to connect dryer to exhaust hood with 4" (102 mm) clamp. Vent System Chart (29" Wide Long Vent Models Only) Number of 90° turns or elbows Type of pipe fittings must fit over the exhaust hood. Using a wrench to tighten, connect gas supply...

Installation Guide
Page 16
... strike plug from dryer cabinet. Place towel on dryer Place towel on opposite side of door hinge slot is needed to adjust alignment. 27" Wide Model Side-Swing Door 1. Insert the door strike into original door strike hole and secure with screw. Insert screws into hinge holes on top of slots...
... strike plug from dryer cabinet. Place towel on dryer Place towel on opposite side of door hinge slot is needed to adjust alignment. 27" Wide Model Side-Swing Door 1. Insert the door strike into original door strike hole and secure with screw. Insert screws into hinge holes on top of slots...
Installation Guide
Page 19
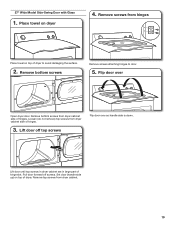
... in dryer cabinet are in large part of dryer. Remove screws from dryer cabinet. 19 Place towel on top of dryer to door. 5. 27" Wide Model Side-Swing Door with Glass 1. Remove top screws from hinges Place towel on dryer 4. Lift door off screws.
... in dryer cabinet are in large part of dryer. Remove screws from dryer cabinet. 19 Place towel on top of dryer to door. 5. 27" Wide Model Side-Swing Door with Glass 1. Remove top screws from hinges Place towel on dryer 4. Lift door off screws.

Dimension Guide
Page 1
...) (25 mm) (25 mm) (705 mm) A B C A. Closet door with vents *Required spacing A B A. Gas Dryer PRODUCT MODEL NUMBERS WGD4800B, WGD4810B, WGD4850B, WGD4890B, WGD5500B, WGD5800B, WGD5810B 29" Wide Models Dryer Dimensions 29" (737 mm) 29" (737 mm) 27" Wide Models Dryer Dimensions 27" (686 mm) 433/8" (1102 mm) 433/8" (1102 mm) 43" (1092 mm) 1/2" (13...
...) (25 mm) (25 mm) (705 mm) A B C A. Closet door with vents *Required spacing A B A. Gas Dryer PRODUCT MODEL NUMBERS WGD4800B, WGD4810B, WGD4850B, WGD4890B, WGD5500B, WGD5800B, WGD5810B 29" Wide Models Dryer Dimensions 29" (737 mm) 29" (737 mm) 27" Wide Models Dryer Dimensions 27" (686 mm) 433/8" (1102 mm) 433/8" (1102 mm) 43" (1092 mm) 1/2" (13...
Dimension Guide
Page 3
...100 ft. (30.5 m) 3 Rigid metal 90 ft. (27.4 m) 4 Rigid metal 80 ft. (24.4 m) 5 Rigid metal 70 ft. (21.3 m) Because Whirlpool Corporation policy includes a continuous commitment to improve our products, we reserve the right to change materials and specifications without notice. Dimensions are for 27" wide... models have a 90º turn to avoid kinking. ■■ Use as few 90° turns as possible. Specifications subject ...
...100 ft. (30.5 m) 3 Rigid metal 90 ft. (27.4 m) 4 Rigid metal 80 ft. (24.4 m) 5 Rigid metal 70 ft. (21.3 m) Because Whirlpool Corporation policy includes a continuous commitment to improve our products, we reserve the right to change materials and specifications without notice. Dimensions are for 27" wide... models have a 90º turn to avoid kinking. ■■ Use as few 90° turns as possible. Specifications subject ...

Use & Care Guide
Page 5
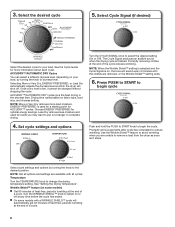
...based on fabric type, load size, and dryness setting. 3 TEMPERATURE Select a drying temperature based on your dryer. NOTE: The No Heat temperature setting (on some models) When you may vary. 1 WRINKLE SHIELD™ Feature (on the fabrics in your laundry load. Press the PUSH to START knob to select a cycle for... the specified time on your dryer model. Turn the WRINKLE SHIELD™ knob to remove a load of clothes from forming. TIMED DRY Will run the dryer for your load. On...
...based on fabric type, load size, and dryness setting. 3 TEMPERATURE Select a drying temperature based on your dryer. NOTE: The No Heat temperature setting (on some models) When you may vary. 1 WRINKLE SHIELD™ Feature (on the fabrics in your laundry load. Press the PUSH to START knob to select a cycle for... the specified time on your dryer model. Turn the WRINKLE SHIELD™ knob to remove a load of clothes from forming. TIMED DRY Will run the dryer for your load. On...

Use & Care Guide
Page 6
CYCLE GUIDE - TIMED DRY CYCLES Not all cycles and settings are available on all models. Items to dry: Cycle: Large or heavy items such as towels and work clothes, towels Jeans, More, or Very Dry Work clothes, medium weight fabrics, ... for items that do not seem as dry as sheets, blouses, dresses, underwear, permanent press fabrics, and some knits. Drying time varies based on all models. If loads seem drier than the higher setting. If you dry a similar load. NOTE: If you have questions about drying temperatures for various loads, refer...
CYCLE GUIDE - TIMED DRY CYCLES Not all cycles and settings are available on all models. Items to dry: Cycle: Large or heavy items such as towels and work clothes, towels Jeans, More, or Very Dry Work clothes, medium weight fabrics, ... for items that do not seem as dry as sheets, blouses, dresses, underwear, permanent press fabrics, and some knits. Drying time varies based on all models. If loads seem drier than the higher setting. If you dry a similar load. NOTE: If you have questions about drying temperatures for various loads, refer...
Use & Care Guide
Page 7
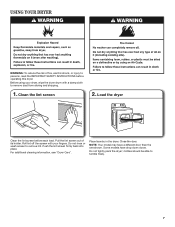
..., wipe the dryer drum with a damp cloth to persons, read the IMPORTANT SAFETY INSTRUCTIONS before each load. clothes should be able to remove lint. Some models have a different door than the one shown. Do not rinse or wash screen to tumble freely. 7 Push the lint screen firmly back into place. For... operating this dryer. USING YOUR DRYER WARNING: To reduce the risk of its holder. Clean the lint screen 2. Place laundry in the dryer. NOTE: Your model may have drop down doors.
..., wipe the dryer drum with a damp cloth to persons, read the IMPORTANT SAFETY INSTRUCTIONS before each load. clothes should be able to remove lint. Some models have a different door than the one shown. Do not rinse or wash screen to tumble freely. 7 Push the lint screen firmly back into place. For... operating this dryer. USING YOUR DRYER WARNING: To reduce the risk of its holder. Clean the lint screen 2. Place laundry in the dryer. NOTE: Your model may have drop down doors.
Use & Care Guide
Page 8
... by turning the knob to select the desired setting (On or Off). NOTE: More or Very Dry removes more information about each cycle. n On some models) n Get 90 minutes of heat-free, periodic tumbling at the end of a cycle. 8 Turn the WRINKLE SHIELD™ knob to change the drying ...temperature setting. Use the Wrinkle Shield™ feature to avoid wrinkling when you may want to put on some models with all cycles. 3. Select the desired cycle 5. Promptly remove garments after cycle has completed to remove a load from the dryer as soon as ...
... by turning the knob to select the desired setting (On or Off). NOTE: More or Very Dry removes more information about each cycle. n On some models) n Get 90 minutes of heat-free, periodic tumbling at the end of a cycle. 8 Turn the WRINKLE SHIELD™ knob to change the drying ...temperature setting. Use the Wrinkle Shield™ feature to avoid wrinkling when you may want to put on some models with all cycles. 3. Select the desired cycle 5. Promptly remove garments after cycle has completed to remove a load from the dryer as soon as ...

Use & Care Guide
Page 10
... Shock Hazard Disconnect power before operating. Turn off valve to secure dryer door. Replace the bulb with the screw. 4. If you will be on some models) 1. Open the dryer door. Replace all parts and panels before servicing. Make sure leveling legs are secure in gas supply line. 3. Cap the open fuel...
... Shock Hazard Disconnect power before operating. Turn off valve to secure dryer door. Replace the bulb with the screw. 4. If you will be on some models) 1. Open the dryer door. Replace all parts and panels before servicing. Make sure leveling legs are secure in gas supply line. 3. Cap the open fuel...

Use & Care Guide
Page 13
...appliance is installed, operated, and maintained according to instructions attached to or furnished with the product, Whirlpool Corporation or Whirlpool Canada LP (hereafter "Whirlpool") will need to know your complete model number and serial number. If you think you . Replacement parts or repair labor on the ...product. If you should ask Whirlpool or your retailer about the quality, durability, or need for Factory Specified Replacement Parts and repair ...
...appliance is installed, operated, and maintained according to instructions attached to or furnished with the product, Whirlpool Corporation or Whirlpool Canada LP (hereafter "Whirlpool") will need to know your complete model number and serial number. If you think you . Replacement parts or repair labor on the ...product. If you should ask Whirlpool or your retailer about the quality, durability, or need for Factory Specified Replacement Parts and repair ...

Warranty Information
Page 1
... installed, operated, and maintained according to instructions attached to or furnished with the product, Whirlpool Corporation or Whirlpool Canada LP (hereafter "Whirlpool") will need to know your complete model number and serial number. This limited warranty is valid only in the United States or ... in a remote area where service by a Whirlpool designated service company. DISCLAIMER OF REPRESENTATIONS OUTSIDE OF WARRANTY Whirlpool makes no representations about your major appliance to better help can find this information on the model and serial number label located on the duration of...
... installed, operated, and maintained according to instructions attached to or furnished with the product, Whirlpool Corporation or Whirlpool Canada LP (hereafter "Whirlpool") will need to know your complete model number and serial number. This limited warranty is valid only in the United States or ... in a remote area where service by a Whirlpool designated service company. DISCLAIMER OF REPRESENTATIONS OUTSIDE OF WARRANTY Whirlpool makes no representations about your major appliance to better help can find this information on the model and serial number label located on the duration of...


