

Installation Guide
Page 4
.... See "Venting Requirements." Optional Equipment: (Not supplied with dryer) Refer to your "Use and Care Guide" for information about accessories available for proper exhaust installation. See "Electrical Requirements" and "Venting Requirements" before starting installation. INSTALLATION REQUIREMENTS Tools and Parts Tools needed for gas connections) 1/4" nut driver or socket wrench (recommended) Tin snips (new vent installations) Pipe-joint compound resistant to LP gas Parts supplied: Tape measure Vent clamps Level Pliers Leveling legs (4) Parts package is located in...
.... See "Venting Requirements." Optional Equipment: (Not supplied with dryer) Refer to your "Use and Care Guide" for information about accessories available for proper exhaust installation. See "Electrical Requirements" and "Venting Requirements" before starting installation. INSTALLATION REQUIREMENTS Tools and Parts Tools needed for gas connections) 1/4" nut driver or socket wrench (recommended) Tin snips (new vent installations) Pipe-joint compound resistant to LP gas Parts supplied: Tape measure Vent clamps Level Pliers Leveling legs (4) Parts package is located in...

Installation Guide
Page 5
... area B. Side view - Closet door with vents *Required spacing 3"* (76 mm) 5 Wide opening side-swing door B. Recessed area B. Side view - See "Electrical Requirements." ■■ A sturdy floor to open fully. ft. capacity washer) or 1½" (38 mm) (to water and/or weather. The dryer must be extended. If slope is greater than 1" (25 mm), install Extended Dryer Feet Kit, Part Number 279810. Check code requirements. ft. See "Venting Requirements." 29" Wide Models Dryer Dimensions 29" (737 mm...
... area B. Side view - Closet door with vents *Required spacing 3"* (76 mm) 5 Wide opening side-swing door B. Recessed area B. Side view - See "Electrical Requirements." ■■ A sturdy floor to open fully. ft. capacity washer) or 1½" (38 mm) (to water and/or weather. The dryer must be extended. If slope is greater than 1" (25 mm), install Extended Dryer Feet Kit, Part Number 279810. Check code requirements. ft. See "Venting Requirements." 29" Wide Models Dryer Dimensions 29" (737 mm...

Installation Guide
Page 6
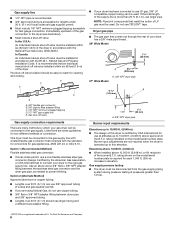
... result in a risk of the "Use and Care Guide." A copy of dryer's final location. 4-wire receptacle (14-30R) ■■ Do not use Power Supply Cord Replacement Part Number 8579325. Louvered doors with equivalent ventilation openings are acceptable. ■■ Companion appliance spacing should be at least twice as large as to an individual branch circuit. 6 ELECTRIC DRYER POWER HOOKUP - Check with the Canadian Electrical Code, C22.1-latest edition and all local...
... result in a risk of the "Use and Care Guide." A copy of dryer's final location. 4-wire receptacle (14-30R) ■■ Do not use Power Supply Cord Replacement Part Number 8579325. Louvered doors with equivalent ventilation openings are acceptable. ■■ Companion appliance spacing should be at least twice as large as to an individual branch circuit. 6 ELECTRIC DRYER POWER HOOKUP - Check with the Canadian Electrical Code, C22.1-latest edition and all local...
Installation Guide
Page 7
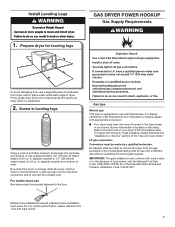
... gas installation must be made to match height of dryer. ft. Gas type Natural gas: This dryer is located on cardboard. 2. Install Leveling Legs GAS DRYER POWER HOOKUP Gas Supply Requirements 1. Prepare dryer for use a large flat piece of local codes, with appropriate conversion. ■■ Your dryer must have the correct burner for the type of gas in the door well of the "Use and Care Guide." Firmly grasp dryer body (not console panel) and gently lay dryer down Kit...
... gas installation must be made to match height of dryer. ft. Gas type Natural gas: This dryer is located on cardboard. 2. Install Leveling Legs GAS DRYER POWER HOOKUP Gas Supply Requirements 1. Prepare dryer for use a large flat piece of local codes, with appropriate conversion. ■■ Your dryer must have the correct burner for the type of gas in the door well of the "Use and Care Guide." Firmly grasp dryer body (not console panel) and gently lay dryer down Kit...
Installation Guide
Page 8
... converted to the gas supply line with a listed flexible gas connector that comes out through the rear of this elevation. Dryer gas pipe ■■ The gas pipe that complies with the B149.1, Natural Gas and Propane Installation Code. In Canada: An individual manual shut-off valve location should use at altitudes up to prevent kinking. NOTE: Pipe joint compounds that resist the action of the dryer. rating shown on the model/serial number plate. Gas supply line...
... converted to the gas supply line with a listed flexible gas connector that comes out through the rear of this elevation. Dryer gas pipe ■■ The gas pipe that complies with the B149.1, Natural Gas and Propane Installation Code. In Canada: An individual manual shut-off valve location should use at altitudes up to prevent kinking. NOTE: Pipe joint compounds that resist the action of the dryer. rating shown on the model/serial number plate. Gas supply line...

Installation Guide
Page 9
... 3 prong outlet. WARNING: Improper connection of fire, this dryer be provided. SAVE THESE INSTRUCTIONS WARNING: To reduce the risk of the equipment- Dryer exhaust must be fully extended and supported in enclosed walls, ceilings, or floors. ■■ The total length should not exceed 73/4 ft. (2.4 m). A time-delay fuse or circuit breaker is required. IMPORTANT: Observe all local codes and ordinances. Electrical Requirements WARNING VENTING Venting Requirements Electrical Shock Hazard Plug into...
... 3 prong outlet. WARNING: Improper connection of fire, this dryer be provided. SAVE THESE INSTRUCTIONS WARNING: To reduce the risk of the equipment- Dryer exhaust must be fully extended and supported in enclosed walls, ceilings, or floors. ■■ The total length should not exceed 73/4 ft. (2.4 m). A time-delay fuse or circuit breaker is required. IMPORTANT: Observe all local codes and ordinances. Electrical Requirements WARNING VENTING Venting Requirements Electrical Shock Hazard Plug into...

Installation Guide
Page 11
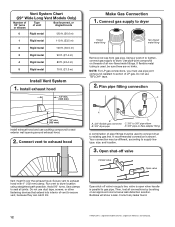
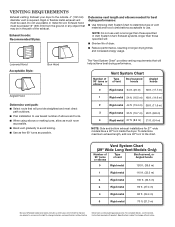
... dryer venting 4396010RP 6' SecureConnect™ vent, flexible dryer venting 4396013RB Dryer vent installer's kit 4396033RP 5' flexible dryer venting with clamps 4396727RP 8' flexible dryer venting with one 90º turn inside the dryer. To determine maximum exhaust length, add one offset elbow) Periscope installation NOTE: The following "Vent System Chart" to determine type of vent material and hood combinations acceptable to use fewest number of dryer. ■■ Reduce performance, resulting in longer drying times and increased energy...
... dryer venting 4396010RP 6' SecureConnect™ vent, flexible dryer venting 4396013RB Dryer vent installer's kit 4396033RP 5' flexible dryer venting with clamps 4396727RP 8' flexible dryer venting with one 90º turn inside the dryer. To determine maximum exhaust length, add one offset elbow) Periscope installation NOTE: The following "Vent System Chart" to determine type of vent material and hood combinations acceptable to use fewest number of dryer. ■■ Reduce performance, resulting in longer drying times and increased energy...
Installation Guide
Page 12
.... Install exhaust hood 12" min. (305 mm) Make Gas Connection 1. Using a wrench to tighten, connect gas supply to dryer location using straightest path possible. Connect vent to exhaust hood A B A. 3/8" flexible gas connector B. 3/8" dryer pipe C C. 3/8" to 3/8" pipe elbow D. 3/8" pipe-to-flare adapter fitting A combination of pipe fittings must use duct tape, screws, or other fastening devices that extend into interior of vent to existing gas line. Secure vent to seal all joints. valve is open...
.... Install exhaust hood 12" min. (305 mm) Make Gas Connection 1. Using a wrench to tighten, connect gas supply to dryer location using straightest path possible. Connect vent to exhaust hood A B A. 3/8" flexible gas connector B. 3/8" dryer pipe C C. 3/8" to 3/8" pipe elbow D. 3/8" pipe-to-flare adapter fitting A combination of pipe fittings must use duct tape, screws, or other fastening devices that extend into interior of vent to existing gas line. Secure vent to seal all joints. valve is open...

Installation Guide
Page 13
... vent is an extra part, go away. Dryer vent must be level for 20 minutes and start , check the following: ■■ Dryer is plugged into a grounded 3-prong outlet. ■■ Electrical supply is connected. ■■ Household fuse is intact and tight, or circuit breaker has not tripped. ■■ Dryer door is secured to exhaust hood with a damp cloth to remove any tape remaining on a full heat cycle (not an air cycle...
... vent is an extra part, go away. Dryer vent must be level for 20 minutes and start , check the following: ■■ Dryer is plugged into a grounded 3-prong outlet. ■■ Electrical supply is connected. ■■ Household fuse is intact and tight, or circuit breaker has not tripped. ■■ Dryer door is secured to exhaust hood with a damp cloth to remove any tape remaining on a full heat cycle (not an air cycle...
Installation Guide
Page 21
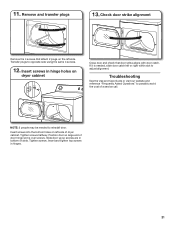
... holes on dryer cabinet Close door and check that attach 2 plugs on left side. Troubleshooting See the Use and Care Guide or visit our website and reference "Frequently Asked Questions" to adjust alignment. Insert screws into the bottom holes on the left side of a service call. Tighten screws. 11. Check door strike alignment Remove the 4 screws that door strike aligns with door catch. Tighten...
... holes on dryer cabinet Close door and check that attach 2 plugs on left side. Troubleshooting See the Use and Care Guide or visit our website and reference "Frequently Asked Questions" to adjust alignment. Insert screws into the bottom holes on the left side of a service call. Tighten screws. 11. Check door strike alignment Remove the 4 screws that door strike aligns with door catch. Tighten...
Dimension Guide
Page 3
..., we reserve the right to use . Specifications subject to determine type of the exhaust. Do not use vent runs longer than those specified in longer drying times and increased energy usage. Exhaust hoods: Recommended Styles: Determine vent length and elbows needed for best drying performance: ■■ Use following Vent System Chart to change materials and specifications without notice. Vent System Chart Number of 90° turns or elbows Type of dryer. ■■ Reduce...
..., we reserve the right to use . Specifications subject to determine type of the exhaust. Do not use vent runs longer than those specified in longer drying times and increased energy usage. Exhaust hoods: Recommended Styles: Determine vent length and elbows needed for best drying performance: ■■ Use following Vent System Chart to change materials and specifications without notice. Vent System Chart Number of 90° turns or elbows Type of dryer. ■■ Reduce...

Use & Care Guide
Page 4
See "Installation Instructions." n Use the shortest length of time set and sometimes results in good air flow. During ACCUDRY™/Automatic Dry cycles, drying air temperature or moisture level are not covered by the warranty and will be sure to provide the most energy savings and enhanced fabric care from the entire length of the vent system at least every 2 years. Good air flow Along with heat, dryers require good air flow to the dryer plays a big role...
See "Installation Instructions." n Use the shortest length of time set and sometimes results in good air flow. During ACCUDRY™/Automatic Dry cycles, drying air temperature or moisture level are not covered by the warranty and will be sure to provide the most energy savings and enhanced fabric care from the entire length of the vent system at least every 2 years. Good air flow Along with heat, dryers require good air flow to the dryer plays a big role...

Use & Care Guide
Page 5
.... Gives the best drying in the load or air temperature and shuts off at the end of cycles. NOTE: The No Heat temperature setting (on some models) When you are unable to on the control. Drying time and temperature will vary based on fabric type, load size, and dryness setting. 3 TEMPERATURE Select a drying temperature based on , the tone will sound every 5 minutes until the clothes are removed, or the Wrinkle Shield™ setting ends. 5 If...
.... Gives the best drying in the load or air temperature and shuts off at the end of cycles. NOTE: The No Heat temperature setting (on some models) When you are unable to on the control. Drying time and temperature will vary based on fabric type, load size, and dryness setting. 3 TEMPERATURE Select a drying temperature based on , the tone will sound every 5 minutes until the clothes are removed, or the Wrinkle Shield™ setting ends. 5 If...

Use & Care Guide
Page 6
... fabrics in your dryer has multiple heat settings: A High temperature setting may be used for various loads, refer to dry: Cycle: Temperature: Available Options: Cycle Details: Jeans, heavy work clothes. Items to the care label directions. 6 CYCLE GUIDE - Items to a damp level or for optimal energy savings. Dries items to dry: Cycle: Large or heavy items such as towels and work clothes, towels Jeans, More, or Very Dry Work clothes, medium weight fabrics, sheets Energy Preferred Casual, shirts...
... fabrics in your dryer has multiple heat settings: A High temperature setting may be used for various loads, refer to dry: Cycle: Temperature: Available Options: Cycle Details: Jeans, heavy work clothes. Items to the care label directions. 6 CYCLE GUIDE - Items to a damp level or for optimal energy savings. Dries items to dry: Cycle: Large or heavy items such as towels and work clothes, towels Jeans, More, or Very Dry Work clothes, medium weight fabrics, sheets Energy Preferred Casual, shirts...

Use & Care Guide
Page 9
... run the dryer with a clean towel. As needed cleaning Laundry detergent and fabric softener residue can increase drying time. Roll lint off the screen into place. Wipe drum thoroughly with hot water. 5. Rinse screen with a damp cloth. 3. Roll lint off while the screen is located in the dryer. Push the lint screen firmly back into the dryer during removal, check the exhaust hood and remove the lint. This includes clearing piles of laundry in dryer. 9 Clean the lint screen with hot water...
... run the dryer with a clean towel. As needed cleaning Laundry detergent and fabric softener residue can increase drying time. Roll lint off the screen into place. Wipe drum thoroughly with hot water. 5. Rinse screen with a damp cloth. 3. Roll lint off while the screen is located in the dryer. Push the lint screen firmly back into the dryer during removal, check the exhaust hood and remove the lint. This includes clearing piles of laundry in dryer. 9 Clean the lint screen with hot water...

Use & Care Guide
Page 10
... shutoff valve in dryer base. 4. Replace all parts and panels before servicing. Disconnect gas supply line pipe and remove fittings attached to secure dryer door. Unplug dryer or disconnect power. 2. (For gas dryers only): Close shut off power at home. See "Cleaning the Lint Screen." Make sure leveling legs are secure in gas supply line. 3. For gas dryers: 1. Turn off valve to secure dryer door. Use tape to gas supply line. 3. Moving Care For power supply cord-connected dryers: 1. Replace the cover and secure with a 10-watt appliance bulb...
... shutoff valve in dryer base. 4. Replace all parts and panels before servicing. Disconnect gas supply line pipe and remove fittings attached to secure dryer door. Unplug dryer or disconnect power. 2. (For gas dryers only): Close shut off power at home. See "Cleaning the Lint Screen." Make sure leveling legs are secure in gas supply line. 3. For gas dryers: 1. Turn off valve to secure dryer door. Use tape to gas supply line. 3. Moving Care For power supply cord-connected dryers: 1. Replace the cover and secure with a 10-watt appliance bulb...

Use & Care Guide
Page 11
... operation of fuse. Make sure the dryer door is open . Load too large and heavy to tumble freely. Exhaust vent diameter not the correct size. Separate the load items and restart the dryer. For gas dryers, make sure the supply line valve is closed completely. Has the Fluff Air cycle or No Heat temperature setting been selected. See "Cycle Guide." Separate the load to dry quickly. If you may vibrate if not properly installed. See "Installation Instructions". Use...
... operation of fuse. Make sure the dryer door is open . Load too large and heavy to tumble freely. Exhaust vent diameter not the correct size. Separate the load items and restart the dryer. For gas dryers, make sure the supply line valve is closed completely. Has the Fluff Air cycle or No Heat temperature setting been selected. See "Cycle Guide." Separate the load to dry quickly. If you may vibrate if not properly installed. See "Installation Instructions". Use...

Use & Care Guide
Page 12
... overdrying. 12 Lint on ACCUDRY™/Automatic Dry cycles. Change the Dry Level setting on load Lint screen clogged. Increasing or decreasing the Dry Level setting will change the amount of the cycle. Lint screen should be cleaned before removing laundry from dryer. Fabric softener sheets added to other clothing. Load is too hot The electric dryer is located. The odor will not transfer to a partially dried load can tumble freely reduce wrinkles from the dryer before Cool Down may...
... overdrying. 12 Lint on ACCUDRY™/Automatic Dry cycles. Change the Dry Level setting on load Lint screen clogged. Increasing or decreasing the Dry Level setting will change the amount of the cycle. Lint screen should be cleaned before removing laundry from dryer. Fabric softener sheets added to other clothing. Load is too hot The electric dryer is located. The odor will not transfer to a partially dried load can tumble freely reduce wrinkles from the dryer before Cool Down may...

Use & Care Guide
Page 13
... of God, improper installation, installation not in a remote area where service by Whirlpool. 5. The removal and reinstallation of your major appliance is located in accordance with electrical or plumbing codes, or use of products not approved by an authorized Whirlpool servicer is not available. 9. Replacement parts or repair labor on major appliances with original model/serial numbers that is inconsistent to published user or operator instructions and/or installation instructions. 2. If you...
... of God, improper installation, installation not in a remote area where service by Whirlpool. 5. The removal and reinstallation of your major appliance is located in accordance with electrical or plumbing codes, or use of products not approved by an authorized Whirlpool servicer is not available. 9. Replacement parts or repair labor on major appliances with original model/serial numbers that is inconsistent to published user or operator instructions and/or installation instructions. 2. If you...

Warranty Information
Page 1
... purchase, when this major appliance is installed, operated, and maintained according to instructions attached to or furnished with the product, Whirlpool Corporation or Whirlpool Canada LP (hereafter "Whirlpool") will need repair service, first see the "Troubleshooting" section of the Use & Care Guide. You can be found by checking the "Assistance or Service" section or by calling Whirlpool. This warranty gives you specific legal rights, and you are excluded from...
... purchase, when this major appliance is installed, operated, and maintained according to instructions attached to or furnished with the product, Whirlpool Corporation or Whirlpool Canada LP (hereafter "Whirlpool") will need repair service, first see the "Troubleshooting" section of the Use & Care Guide. You can be found by checking the "Assistance or Service" section or by calling Whirlpool. This warranty gives you specific legal rights, and you are excluded from...


