
Owners Manual
Page 2
......4 Location Requirements 4 Drain System 6 Electrical Requirements 6 INSTALLATION INSTRUCTIONS 7 Remove Transport System 7 Connect the Inlet Hoses 7 Connect the Drain Hose 8 Secure the Drain Hose 8 Level the Washer 8 Complete Installation 9 FEATURES AND BENEFITS 9 WASHER USE 10 Starting Your Washer 10 Using the Proper Detergent 10 Using the Dispenser 11 Pausing or Restarting 12 Changing Cycles, Options, and Modifiers 12 Status Lights 13 Cycles ...13 Normal Washer Sounds 15 Options...15 Modifiers 16 Laundry Guide 17 LAUNDRY TIPS 18 Loading 18 WASHER CARE 19 Cleaning...
......4 Location Requirements 4 Drain System 6 Electrical Requirements 6 INSTALLATION INSTRUCTIONS 7 Remove Transport System 7 Connect the Inlet Hoses 7 Connect the Drain Hose 8 Secure the Drain Hose 8 Level the Washer 8 Complete Installation 9 FEATURES AND BENEFITS 9 WASHER USE 10 Starting Your Washer 10 Using the Proper Detergent 10 Using the Dispenser 11 Pausing or Restarting 12 Changing Cycles, Options, and Modifiers 12 Status Lights 13 Cycles ...13 Normal Washer Sounds 15 Options...15 Modifiers 16 Laundry Guide 17 LAUNDRY TIPS 18 Loading 18 WASHER CARE 19 Cleaning...
Owners Manual
Page 4
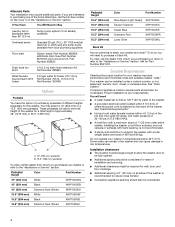
... will add to the "Assistance or Service" section. Do not operate your washer improves performance and minimizes noise and possible washer "walk." These pedestals will need to the "Assistance or Service" section. Ask for your washer in low temperatures. and connector kit, Part Number 285835 Drain hose too short 4 ft (1.2 m) drain hose extension kit, Part Number 285863 Water faucets 2 longer water fill hoses: 6 ft (1.8 m) beyond reach of fill Part Number 76314, 10 ft (3.0 m) hoses Part Number 350008 Options Pedestal You...
... will add to the "Assistance or Service" section. Do not operate your washer improves performance and minimizes noise and possible washer "walk." These pedestals will need to the "Assistance or Service" section. Ask for your washer in low temperatures. and connector kit, Part Number 285835 Drain hose too short 4 ft (1.2 m) drain hose extension kit, Part Number 285863 Water faucets 2 longer water fill hoses: 6 ft (1.8 m) beyond reach of fill Part Number 76314, 10 ft (3.0 m) hoses Part Number 350008 Options Pedestal You...

Owners Manual
Page 6
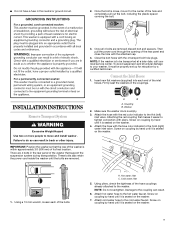
... installed by a qualified electrician. ■ If codes permit and a separate ground wire is used, it is recommended that a qualified electrician determine that may be at least 30" (762 mm) above the floor. See "Tools and Parts." Do not remove ground prong. The minimum carry-away capacity can be provided. ■ This washer is properly grounded. A B Laundry tub drain system (view C) The laundry tub needs...
... installed by a qualified electrician. ■ If codes permit and a separate ground wire is used, it is recommended that a qualified electrician determine that may be at least 30" (762 mm) above the floor. See "Tools and Parts." Do not remove ground prong. The minimum carry-away capacity can be provided. ■ This washer is properly grounded. A B Laundry tub drain system (view C) The laundry tub needs...
Owners Manual
Page 7
... set up for relocation by hand until the bolts are removed discard bolt and spacers. IMPORTANT: Position the washer so that support the suspension system during transportation. These bolts also retain the power cord inside the washer until it easier to the Cold (right) water inlet valve. A B A. Make sure the washer drum is seated on the washer. 7. Attaching the red coupling first makes it is empty. 3. H C 1. H. Cold water inlet 5. Using pliers, check...
... set up for relocation by hand until the bolts are removed discard bolt and spacers. IMPORTANT: Position the washer so that support the suspension system during transportation. These bolts also retain the power cord inside the washer until it easier to the Cold (right) water inlet valve. A B A. Make sure the washer drum is seated on the washer. 7. Attaching the red coupling first makes it is empty. 3. H C 1. H. Cold water inlet 5. Using pliers, check...
Owners Manual
Page 9
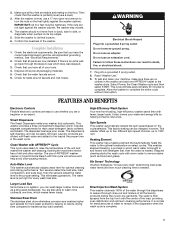
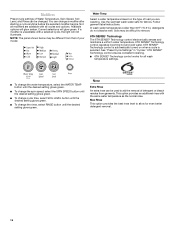
... "Washer Use." 9. Select Power, the Clean Washer cycle and then select START. The use a level). 3. Two sensors determine load size, load composition, and suds level, then the sensors adjust the water level to traditional top-load washers. You are now installed. Spin Speeds This washer automatically selects the spin speed based on the floor. Stepped cleaning starts the wash cycle with fresh water and added to wash more water extraction, helping to reduce drying time compared to the proper setting. The water is...
... "Washer Use." 9. Select Power, the Clean Washer cycle and then select START. The use a level). 3. Two sensors determine load size, load composition, and suds level, then the sensors adjust the water level to traditional top-load washers. You are now installed. Spin Speeds This washer automatically selects the spin speed based on the floor. Stepped cleaning starts the wash cycle with fresh water and added to wash more water extraction, helping to reduce drying time compared to the proper setting. The water is...
Owners Manual
Page 10
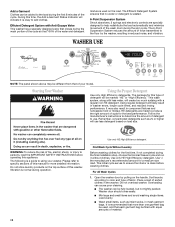
... controls are made to use less detergent based on the top surface of this type of detergent will use . Use only HE High Efficiency detergent. Use 1/2 the manufacturer's recommended amount for this washer. This initial cycle serves to specific sections of this time, the Add a Garment Status Indicator will likely result in reduced noise, and vibration. For All Wash Cycles 1. Do not overload washer. It is clean before operating this appliance. During this manual...
... controls are made to use less detergent based on the top surface of this type of detergent will use . Use only HE High Efficiency detergent. Use 1/2 the manufacturer's recommended amount for this washer. This initial cycle serves to specific sections of this time, the Add a Garment Status Indicator will likely result in reduced noise, and vibration. For All Wash Cycles 1. Do not overload washer. It is clean before operating this appliance. During this manual...
Owners Manual
Page 11
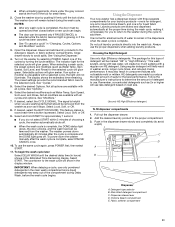
... suds for liquid fabric softener. Do not put laundry products directly into the wash tub. Always use . Using regular detergent will show in washer errors, longer cycle times, and reduced rinsing performance. To fill dispenser compartments 1. Main Wash detergent compartment C. NOTES: ■ After any wash cycle is glowing or if the cycle has been canceled. ■ See "To cancel a cycle" in the dispenser drawer slowly and completely (to the detergent, bleach, or fabric softener compartments. When selecting a wash cycle, the preset...
... suds for liquid fabric softener. Do not put laundry products directly into the wash tub. Always use . Using regular detergent will show in washer errors, longer cycle times, and reduced rinsing performance. To fill dispenser compartments 1. Main Wash detergent compartment C. NOTES: ■ After any wash cycle is glowing or if the cycle has been canceled. ■ See "To cancel a cycle" in the dispenser drawer slowly and completely (to the detergent, bleach, or fabric softener compartments. When selecting a wash cycle, the preset...
Owners Manual
Page 12
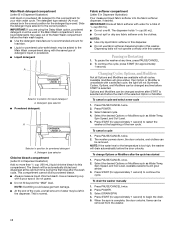
...; Use only liquid fabric softener in this dispenser. ■ Do not use fabric softener dispensing balls in this compartment for powdered detergent A. To pause the washer at the optimum time during the first rinse after the wash cycle. Press PAUSE/CANCEL twice. 2. The washer powers down, the door unlocks, and clothes can be left in the dispenser. NOTE: If the water level or the temperature is unavailable with this compartment. Select DRAIN/SPIN. 4. Items can be used . The detergent type...
...; Use only liquid fabric softener in this dispenser. ■ Do not use fabric softener dispensing balls in this compartment for powdered detergent A. To pause the washer at the optimum time during the first rinse after the wash cycle. Press PAUSE/CANCEL twice. 2. The washer powers down, the door unlocks, and clothes can be left in the dispenser. NOTE: If the water level or the temperature is unavailable with this compartment. Select DRAIN/SPIN. 4. Items can be used . The detergent type...
Owners Manual
Page 13
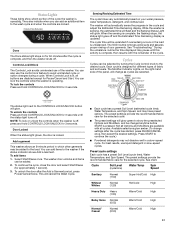
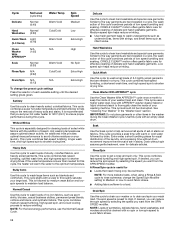
... fabric care for 3 seconds. The status light next to the washer if the status indicator shows Add a Garment. NOTE: To lock or unlock the controls when the washer is off, press and hold CONTROLS LOCK/UNLOCK for 3 seconds. The washer door unlocks and items can add items to the CONTROLS LOCK/UNLOCK button will automatically sense the progress in a slow-speed cycle. Cycle Soil Level (cycle time) Water Temp Spin Speed Sanitary Normal (1:50) Super Hot/Cold High Whitest Whites Normal (1:20) Hot/Cold High...
... fabric care for 3 seconds. The status light next to the washer if the status indicator shows Add a Garment. NOTE: To lock or unlock the controls when the washer is off, press and hold CONTROLS LOCK/UNLOCK for 3 seconds. The washer door unlocks and items can add items to the CONTROLS LOCK/UNLOCK button will automatically sense the progress in a slow-speed cycle. Cycle Soil Level (cycle time) Water Temp Spin Speed Sanitary Normal (1:50) Super Hot/Cold High Whitest Whites Normal (1:20) Hot/Cold High...
Owners Manual
Page 14
...fabrics. Rinse/Spin Use this cycle. NOTE: For more delicate loads, when using a Rinse & Spin cycle to rinse swimwear, change the preset cycle settings Press the selector of sturdy, colorfast fabrics, and heavily soiled garments. Cycle Soil Level (cycle time) Water Temp Spin Speed Delicate Normal (0:40) Warm/Cold Medium Hand Normal Washables (0:30) Cold/Cold Low Quick Wash Light (2-3 Items) (0:18) Warm/Cold Extra High Clean N/A N/A Washer (1:05) With AFFRESH™ High Soak Normal (0:30) Warm/Cold No Spin Rinse/Spin N/A (0:22) Cold/Cold Extra High Drain/Spin...
...fabrics. Rinse/Spin Use this cycle. NOTE: For more delicate loads, when using a Rinse & Spin cycle to rinse swimwear, change the preset cycle settings Press the selector of sturdy, colorfast fabrics, and heavily soiled garments. Cycle Soil Level (cycle time) Water Temp Spin Speed Delicate Normal (0:40) Warm/Cold Medium Hand Normal Washables (0:30) Cold/Cold Low Quick Wash Light (2-3 Items) (0:18) Warm/Cold Extra High Clean N/A N/A Washer (1:05) With AFFRESH™ High Soak Normal (0:30) Warm/Cold No Spin Rinse/Spin N/A (0:22) Cold/Cold Extra High Drain/Spin...
Owners Manual
Page 15
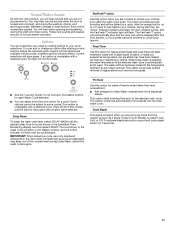
... button indicator will blink until the desired delay time (in hours) shows in stain removal. You can add or change an option after starting a cycle anytime before the wash cycle begins. During this option for heavily soiled loads that need pretreatment. ■ Add detergent to unload your laundry. IMPORTANT: When delaying a cycle, use only powdered detergents in the main wash compartment since liquid detergents may hear various sounds when the door is selected, the water temperature...
... button indicator will blink until the desired delay time (in hours) shows in stain removal. You can add or change an option after starting a cycle anytime before the wash cycle begins. During this option for heavily soiled loads that need pretreatment. ■ Add detergent to unload your laundry. IMPORTANT: When delaying a cycle, use only powdered detergents in the main wash compartment since liquid detergents may hear various sounds when the door is selected, the water temperature...
Owners Manual
Page 16
...; To change cycle time, select SOIL LEVEL button until the desired setting glows green. ■ To change a modifier after starting a cycle anytime before the selected modifier begins. If a modifier is selected. Modifiers Preset cycle settings of Water Temperature, Spin Speed, Soil Level, and Rinse can change the rinse, select RINSE button until the desired setting glows green. Current selections will glow amber. Use the warmest wash water safe for even better detergent removal. 16 Max Rinse This...
...; To change cycle time, select SOIL LEVEL button until the desired setting glows green. ■ To change a modifier after starting a cycle anytime before the selected modifier begins. If a modifier is selected. Modifiers Preset cycle settings of Water Temperature, Spin Speed, Soil Level, and Rinse can change the rinse, select RINSE button until the desired setting glows green. Current selections will glow amber. Use the warmest wash water safe for even better detergent removal. 16 Max Rinse This...
Owners Manual
Page 18
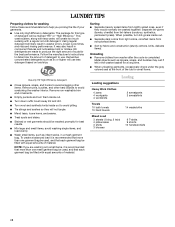
... by fabric and construction (sturdy cottons, knits, delicate items). LAUNDRY TIPS Preparing clothes for washing Follow these recommendations to use less detergent based on load size. Follow the manufacturer's instructions to determine the amount of detergent to help you are made to avoid scratching the washer interior. Remember, concentrated detergents such as infant socks, in washer errors, longer cycle times, and reduced rinsing performance. When possible, turn them...
... by fabric and construction (sturdy cottons, knits, delicate items). LAUNDRY TIPS Preparing clothes for washing Follow these recommendations to use less detergent based on load size. Follow the manufacturer's instructions to determine the amount of detergent to help you are made to avoid scratching the washer interior. Remember, concentrated detergents such as infant socks, in washer errors, longer cycle times, and reduced rinsing performance. When possible, turn them...
Owners Manual
Page 19
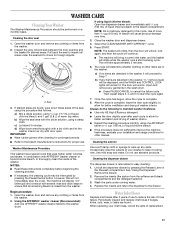
... the door will unlock, lock again, and then the cycle will continue. ■ The machine will bring in the washer. Cleaning the exterior Washer Maintenance Procedure This washer has a special cycle that all areas under running water. 4. NOTES: ■ Read these areas of the seal, using 3/4 cup (177 mL) of liquid chlorine bleach, and 1 gal. (3.8 L) of hose failure. Cleaning the dispenser drawer The dispenser drawer is rinsed from the softener and bleach compartments and the detergent selector...
... the door will unlock, lock again, and then the cycle will continue. ■ The machine will bring in the washer. Cleaning the exterior Washer Maintenance Procedure This washer has a special cycle that all areas under running water. 4. NOTES: ■ Read these areas of the seal, using 3/4 cup (177 mL) of liquid chlorine bleach, and 1 gal. (3.8 L) of hose failure. Cleaning the dispenser drawer The dispenser drawer is rinsed from the softener and bleach compartments and the detergent selector...
Owners Manual
Page 20
... power. ■ Turn off the water supply to clean the washer and remove the antifreeze, if used . Put 1 qt (1 L) of HE detergent for a medium-size load, to the washer. Flush water pipes. Run the washer through the Normal/Casual cycle with 1/2 the manufacturer's recommended amount of R.V.-type antifreeze in the drum. 2. Unplug the power cord. 3. Reinstalling the washer 1. Run the washer through the Normal/Casual cycle with 1/2 the manufacturer's recommended amount of time, you are at inlet hose...
... power. ■ Turn off the water supply to clean the washer and remove the antifreeze, if used . Put 1 qt (1 L) of HE detergent for a medium-size load, to the washer. Flush water pipes. Run the washer through the Normal/Casual cycle with 1/2 the manufacturer's recommended amount of R.V.-type antifreeze in the drum. 2. Unplug the power cord. 3. Reinstalling the washer 1. Run the washer through the Normal/Casual cycle with 1/2 the manufacturer's recommended amount of time, you are at inlet hose...
Owners Manual
Page 21
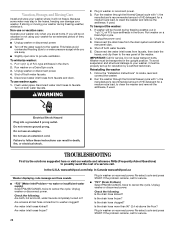
... draining. Dispensers clogged or leaking ■ Are the laundry products in death, fire, or electrical shock. ■ Check the following : Is the power cord plugged into a grounded 3 prong outlet. Use only HE (High Efficiency) detergents. ■ "F22" (Front door lock) Select PAUSE/CANCEL twice to tumble freely. If the problem remains, call for flooring requirements. Is the water inlet hose kinked? Reinstall hoses, turn water on ? Is there power at the plug? Washer won 't fill, wash, or rinse ■ Check...
... draining. Dispensers clogged or leaking ■ Are the laundry products in death, fire, or electrical shock. ■ Check the following : Is the power cord plugged into a grounded 3 prong outlet. Use only HE (High Efficiency) detergents. ■ "F22" (Front door lock) Select PAUSE/CANCEL twice to tumble freely. If the problem remains, call for flooring requirements. Is the water inlet hose kinked? Reinstall hoses, turn water on ? Is there power at the plug? Washer won 't fill, wash, or rinse ■ Check...
Owners Manual
Page 22
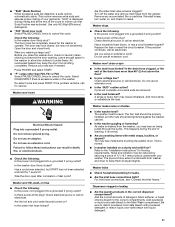
... routine will start a DRAIN/SPIN cycle. Selector should use a fabric softener dispensing ball? See "Cleaning Your Washer." For washers where odor is still wet, take half of the load out of dye, unload the washer as soon as it stops. ■ Did you use the right cycle for the load. After the CLEAN WASHER WITH AFFRESH™ cycle is adequate to reduce wrinkling. ■ Did you use liquid detergent for the load being washed? Use of...
... routine will start a DRAIN/SPIN cycle. Selector should use a fabric softener dispensing ball? See "Cleaning Your Washer." For washers where odor is still wet, take half of the load out of dye, unload the washer as soon as it stops. ■ Did you use the right cycle for the load. After the CLEAN WASHER WITH AFFRESH™ cycle is adequate to reduce wrinkling. ■ Did you use liquid detergent for the load being washed? Use of...
Owners Manual
Page 23
... 5 ft (1.5 m) Nylon braided inlet hose. (2-pack) 8212526 Washer drip tray, fits under all 31682 All purpose appliance cleaner 1903WH Laundry supply storage cart W10135699 AFFRESH® Washer Cleaner 8541503 DUET® stack kit 23 To locate FSP® replacement parts in Canada. ASSISTANCE OR SERVICE Before calling for assistance or service, please check "Troubleshooting." Whirlpool Canada LP designated service technicians are trained to Whirlpool Canada LP with...
... 5 ft (1.5 m) Nylon braided inlet hose. (2-pack) 8212526 Washer drip tray, fits under all 31682 All purpose appliance cleaner 1903WH Laundry supply storage cart W10135699 AFFRESH® Washer Cleaner 8541503 DUET® stack kit 23 To locate FSP® replacement parts in Canada. ASSISTANCE OR SERVICE Before calling for assistance or service, please check "Troubleshooting." Whirlpool Canada LP designated service technicians are trained to Whirlpool Canada LP with...

Owners Manual
Page 24
... this major appliance is operated and maintained according to instructions attached to or furnished with original model/serial numbers that have other rights that is intended to resolve the problem after checking "Troubleshooting," additional help you obtain assistance or service if you need to repair or replace appliance light bulbs, air filters or water filters. If you . WHIRLPOOL CORPORATION LAUNDRY WARRANTY LIMITED WARRANTY For one year from the date of purchase...
... this major appliance is operated and maintained according to instructions attached to or furnished with original model/serial numbers that have other rights that is intended to resolve the problem after checking "Troubleshooting," additional help you obtain assistance or service if you need to repair or replace appliance light bulbs, air filters or water filters. If you . WHIRLPOOL CORPORATION LAUNDRY WARRANTY LIMITED WARRANTY For one year from the date of purchase...

Warranty
Page 1
... you need repair service, first see the "Troubleshooting" section of the Use & Care Guide. You can be provided by calling Whirlpool. WHIRLPOOL CORPORATION LAUNDRY WARRANTY LIMITED WARRANTY For one year from the date of purchase, when this major appliance is operated and maintained according to instructions attached to or furnished with the product, Whirlpool Corporation or Whirlpool Canada LP (hereafter "Whirlpool") will need to repair or replace appliance light bulbs, air filters or water filters. Damage...
... you need repair service, first see the "Troubleshooting" section of the Use & Care Guide. You can be provided by calling Whirlpool. WHIRLPOOL CORPORATION LAUNDRY WARRANTY LIMITED WARRANTY For one year from the date of purchase, when this major appliance is operated and maintained according to instructions attached to or furnished with the product, Whirlpool Corporation or Whirlpool Canada LP (hereafter "Whirlpool") will need to repair or replace appliance light bulbs, air filters or water filters. Damage...


