
Use and Care Guide
Page 3
... follow the safety alert symbol and either the word "DANGER" or "WARNING." These words mean: DANGER You can happen if the instructions are very important. WASHER SAFETY Your safety and the safety of injury, and tell you what can be killed or seriously injured if you and others are not followed. 3
... follow the safety alert symbol and either the word "DANGER" or "WARNING." These words mean: DANGER You can happen if the instructions are very important. WASHER SAFETY Your safety and the safety of injury, and tell you what can be killed or seriously injured if you and others are not followed. 3
Use and Care Guide
Page 4
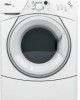
... cold water fill valves, and water pressure of 20-100 psi (137.9-689.6 kPa). ■ A level floor with a total weight (water and load) of this washer. You will need ■ A water heater set to deliver 120°F (49°C) water to support the... To do so, you are in purchasing one of different heights separately for your responsibility. Proper installation is attached to the total height of the washer. INSTALLATION REQUIREMENTS Tools and Parts Gather the required tools and parts before starting installation. You may require additional parts. Transit bolt hole plug (4) ...
... cold water fill valves, and water pressure of 20-100 psi (137.9-689.6 kPa). ■ A level floor with a total weight (water and load) of this washer. You will need ■ A water heater set to deliver 120°F (49°C) water to support the... To do so, you are in purchasing one of different heights separately for your responsibility. Proper installation is attached to the total height of the washer. INSTALLATION REQUIREMENTS Tools and Parts Gather the required tools and parts before starting installation. You may require additional parts. Transit bolt hole plug (4) ...
Use and Care Guide
Page 5
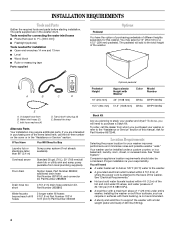
...clearances might be required for wall, door, and floor moldings. ■ Additional spacing of 1" (25 mm) on all sides of the washer is recommended to be fully opened. ■ Additional spacing should also be considered for recessed or closet installation, with vents Recessed or closet ... 3" (76 mm) 24 in temperatures below 32°F (0°C). Custom undercounter installation - Some water can remain in the washer and can cause damage in the Washer User Instructions for information on pedestal 38" min. (965 mm) 30½" (775 mm) Recommended installation spacing for custom...
...clearances might be required for wall, door, and floor moldings. ■ Additional spacing of 1" (25 mm) on all sides of the washer is recommended to be fully opened. ■ Additional spacing should also be considered for recessed or closet installation, with vents Recessed or closet ... 3" (76 mm) 24 in temperatures below 32°F (0°C). Custom undercounter installation - Some water can remain in the washer and can cause damage in the Washer User Instructions for information on pedestal 38" min. (965 mm) 30½" (775 mm) Recommended installation spacing for custom...
Use and Care Guide
Page 6
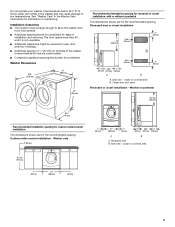
...at least 30" (762 mm) above the floor. The siphon break must be a minimum of 28" (710 mm) from the bottom of the washer. Standpipe drain system - Additional hoses might be purchased separately. Recommended installation spacing for recessed or closet installation, with a door, the minimum ventilation openings in... .2 * (310 cm2) 3" (76 mm) Drain System The washer can be at least 30" (762 mm) high and no less than 96" (2.4 m) from the bottom of the washer. 24 in.2 * (155 cm2) 3" (76 mm) 12" (305 mm) 1" (25 mm) 30" min...
...at least 30" (762 mm) above the floor. The siphon break must be a minimum of 28" (710 mm) from the bottom of the washer. Standpipe drain system - Additional hoses might be purchased separately. Recommended installation spacing for recessed or closet installation, with a door, the minimum ventilation openings in... .2 * (310 cm2) 3" (76 mm) Drain System The washer can be at least 30" (762 mm) high and no less than 96" (2.4 m) from the bottom of the washer. 24 in.2 * (155 cm2) 3" (76 mm) 12" (305 mm) 1" (25 mm) 30" min...
Use and Care Guide
Page 7
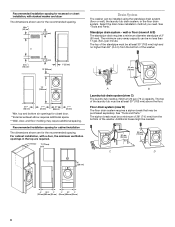
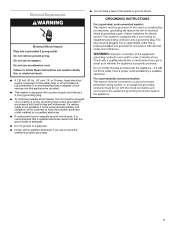
... recommended that the ground path is adequate. ■ Do not ground to a gas pipe. ■ Check with a qualified electrician if you are not sure the washer is equipped with local codes and ordinances. Failure to have a fuse in the neutral or ground circuit. Electrical Requirements WARNING ■ Do not have the... can result in accordance with a power supply cord having a 3 prong grounding plug. ■ To minimize possible shock hazard, the cord must be provided. ■ This washer is properly grounded. 7 Do not remove ground prong.
... recommended that the ground path is adequate. ■ Do not ground to a gas pipe. ■ Check with a qualified electrician if you are not sure the washer is equipped with local codes and ordinances. Failure to have a fuse in the neutral or ground circuit. Electrical Requirements WARNING ■ Do not have the... can result in accordance with a power supply cord having a 3 prong grounding plug. ■ To minimize possible shock hazard, the cord must be provided. ■ This washer is properly grounded. 7 Do not remove ground prong.
Use and Care Guide
Page 8
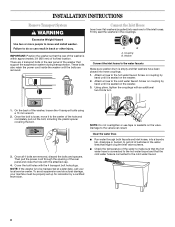
... been placed into a laundry tub, drainpipe or bucket, to get rid of particles in the rear panel of the washer that the rear of the washer is loose, move and install washer. Attach a hose to the hot water faucet. Once the bolt is within approximately 3 ft (900 mm) of its final location... the temperature of the rear panel and close the hole with the attached cap. 4. NOTE: Do not overtighten or use tape or sealants on the washer. 3. Then pull the power cord through both faucets and inlet hoses, into hose couplings. 1. Clear the water lines ■ Run water through the ...
... been placed into a laundry tub, drainpipe or bucket, to get rid of particles in the rear panel of the washer that the rear of the washer is loose, move and install washer. Attach a hose to the hot water faucet. Once the bolt is within approximately 3 ft (900 mm) of its final location... the temperature of the rear panel and close the hole with the attached cap. 4. NOTE: Do not overtighten or use tape or sealants on the washer. 3. Then pull the power cord through both faucets and inlet hoses, into hose couplings. 1. Clear the water lines ■ Run water through the ...
Use and Care Guide
Page 9
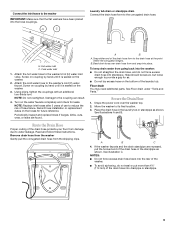
...3. See Floor drain under "Tools and Parts." Drape the power cord over drain hose form and snap into the hose couplings. Move the washer to water leakage. Route the Drain Hose Proper routing of the drain hose form to the corrugated drain hose. Remove drain hose from the...hose in the standpipe as shown. Attach the hot water hose to the coupling can result. 4. NOTE: Replace inlet hoses after 5 years of the washer. ■ To avoid siphoning, do not force excess drain hose into drainpipe or standpipe. 9 Turn on the hoses for future reference. Floor drain You...
...3. See Floor drain under "Tools and Parts." Drape the power cord over drain hose form and snap into the hose couplings. Move the washer to water leakage. Route the Drain Hose Proper routing of the drain hose form to the corrugated drain hose. Remove drain hose from the...hose in the standpipe as shown. Attach the hot water hose to the coupling can result. 4. NOTE: Replace inlet hoses after 5 years of the washer. ■ To avoid siphoning, do not force excess drain hose into drainpipe or standpipe. 9 Turn on the hoses for future reference. Floor drain You...

Use and Care Guide
Page 10
... which step was skipped. 3. Then check that the washer is not level, first prop the front with a wooden block and adjust the front feet height moving the hexagonal plastic part as carpets or surfaces with foam backing, is level. 5. After the washer is level, and all parts are now installed. Confirm... the levelness of the washer, first side to side then front to back. To test and to clean your washer avoids excessive noise and vibration. Select POWER, the CLEAN WASHER cycle and then select START. Check that all four feet are in firm...
... which step was skipped. 3. Then check that the washer is not level, first prop the front with a wooden block and adjust the front feet height moving the hexagonal plastic part as carpets or surfaces with foam backing, is level. 5. After the washer is level, and all parts are now installed. Confirm... the levelness of the washer, first side to side then front to back. To test and to clean your washer avoids excessive noise and vibration. Select POWER, the CLEAN WASHER cycle and then select START. Check that all four feet are in firm...

Use and Care Guide
Page 11
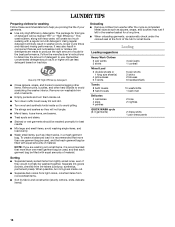
...other garments may be changed if desired. FEATURES AND BENEFITS Your new front-loading high efficiency washer, was designed to use whether you can obtain the same results with traditional top load machines. The washer is designed to a load. The time of operation may be dispensed into the wash at ... With a low water level, you can wash larger, bulkier items such as perspiration and dirty mechanical oil. Larger Load Size Since there is heated. The washer spins faster so that clothes coming out of the cycle, and the bleach is added after the enzymes have less ...
...other garments may be changed if desired. FEATURES AND BENEFITS Your new front-loading high efficiency washer, was designed to use whether you can obtain the same results with traditional top load machines. The washer is designed to a load. The time of operation may be dispensed into the wash at ... With a low water level, you can wash larger, bulkier items such as perspiration and dirty mechanical oil. Larger Load Size Since there is heated. The washer spins faster so that clothes coming out of the cycle, and the bleach is added after the enzymes have less ...
Use and Care Guide
Page 12
...are available with equal amounts of material. ■ When unloading garments, occasionally check under the rubber rim at the front of this manual for the selected cycle. Close the washer door by turning the cycle selector. NOTE: After any wash cycle is completed, the door must be opened only ... cycle. This initial cycle serves to use less detergent based on the top surface of the tub for the best performance. Do not overload washer. Load evenly. ■ Wash small items such as it firmly until the lock clicks. The door can be opened and then closed before washing ...
...are available with equal amounts of material. ■ When unloading garments, occasionally check under the rubber rim at the front of this manual for the selected cycle. Close the washer door by turning the cycle selector. NOTE: After any wash cycle is completed, the door must be opened only ... cycle. This initial cycle serves to use less detergent based on the top surface of the tub for the best performance. Do not overload washer. Load evenly. ■ Wash small items such as it firmly until the lock clicks. The door can be opened and then closed before washing ...
Use and Care Guide
Page 13
...an oversudsing condition. Fabric softener compartment (Letter D in the main wash compartment since liquid detergents may seep out of water to your load. ■ Always measure liquid chlorine bleach. Pausing or Restarting 1. 7. To begin the wash cycle immediately Select and hold START (... the proper time during the wash cycle, making it unnecessary for the best performance. Main Wash detergent compartment C. To pause the washer at the best time during the cycle to this compartment. Add no more than the manufacturer's recommended amount. Chlorine bleach compartment ...
...an oversudsing condition. Fabric softener compartment (Letter D in the main wash compartment since liquid detergents may seep out of water to your load. ■ Always measure liquid chlorine bleach. Pausing or Restarting 1. 7. To begin the wash cycle immediately Select and hold START (... the proper time during the wash cycle, making it unnecessary for the best performance. Main Wash detergent compartment C. To pause the washer at the best time during the cycle to this compartment. Add no more than the manufacturer's recommended amount. Chlorine bleach compartment ...
Use and Care Guide
Page 14
...Estimated Time Remaining can be changed anytime before the door unlocks. The indicator light for 3 seconds until door is too high, the washer will also affect the cycle times that are available with all buttons are locked. If the option is selected. NOTE: To add... 1. Select PAUSE/CANCEL. 2. When LOCK/UNLOCK CONTROL is unbalanced. The washer powers down, the door unlocks, and clothes can also use of your water pressure, water temperature, detergent, and clothes load. Select PAUSE/CANCEL once. 2. Select PAUSE/CANCEL. When the spin is locked. You can...
...Estimated Time Remaining can be changed anytime before the door unlocks. The indicator light for 3 seconds until door is too high, the washer will also affect the cycle times that are available with all buttons are locked. If the option is selected. NOTE: To add... 1. Select PAUSE/CANCEL. 2. When LOCK/UNLOCK CONTROL is unbalanced. The washer powers down, the door unlocks, and clothes can also use of your water pressure, water temperature, detergent, and clothes load. Select PAUSE/CANCEL once. 2. Select PAUSE/CANCEL. When the spin is locked. You can...

Use and Care Guide
Page 15
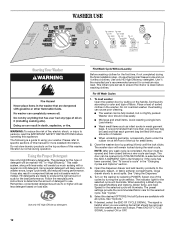
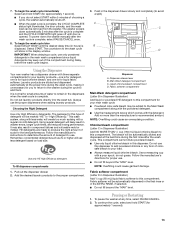
... times vary automatically based on fabrics. The cycle time will result in the washer during this cycle to clean heavily soiled, colorfast fabrics. Normal/Casual Use this cycle to wash loads of your washer or to reduce wrinkling. Quick Wash Use this cycle to drain your washing ...machine. Large wash loads will be extended if oversudsing occurs or the load is selected. This cycle uses a higher water level in ...
... times vary automatically based on fabrics. The cycle time will result in the washer during this cycle to clean heavily soiled, colorfast fabrics. Normal/Casual Use this cycle to wash loads of your washer or to reduce wrinkling. Quick Wash Use this cycle to drain your washing ...machine. Large wash loads will be extended if oversudsing occurs or the load is selected. This cycle uses a higher water level in ...

Use and Care Guide
Page 16
...temperature setting. Follow garment label instructions. The ATC is automatically turned ON when a cycle is illuminated. See "Troubleshooting." The washer continues automatically from the washer as soon as in wash actions, there will hear water spraying and splashing during the washing, rinsing, or spinning process. ... Signal This signal is cold. It is locked or unlocked, and during the wash and rinse cycles. The water temperature for loads of heavily soiled garments that bleed or fade Light soils In wash water temperatures colder than 60°F (15.6°C), detergents...
...temperature setting. Follow garment label instructions. The ATC is automatically turned ON when a cycle is illuminated. See "Troubleshooting." The washer continues automatically from the washer as soon as in wash actions, there will hear water spraying and splashing during the washing, rinsing, or spinning process. ... Signal This signal is cold. It is locked or unlocked, and during the wash and rinse cycles. The water temperature for loads of heavily soiled garments that bleed or fade Light soils In wash water temperatures colder than 60°F (15.6°C), detergents...

Use and Care Guide
Page 17
... Delicate/ Curtains and delicate clothing, dresses, skirts, shirts and ✔ ✔ Hand Wash blouses, fabrics made of these washer cycles. Listed to the right are the options available to this chart for suggested load types and their corresponding cycles. Laundry Guide Refer to each of silk, and special care items marked "Hand...
... Delicate/ Curtains and delicate clothing, dresses, skirts, shirts and ✔ ✔ Hand Wash blouses, fabrics made of these washer cycles. Listed to the right are the options available to this chart for suggested load types and their corresponding cycles. Laundry Guide Refer to each of silk, and special care items marked "Hand...
Use and Care Guide
Page 18
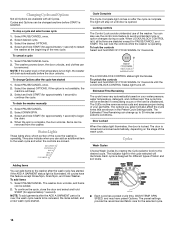
... package for a long time. ■ When unloading garments, occasionally check under the colored seal at the front of detergent to avoid scratching the washer interior. To create a balanced load it is recommended that more than one mesh garment bag be used , and that each garment bag be ...washed promptly for best results. ■ Mix large and small items, avoid washing single items, and load evenly. ■ Wash small items, such as infant socks, in washer errors, longer cycle times and reduced rinsing performance. It may rust if left in component failures and noticeable...
... package for a long time. ■ When unloading garments, occasionally check under the colored seal at the front of detergent to avoid scratching the washer interior. To create a balanced load it is recommended that more than one mesh garment bag be used , and that each garment bag be ...washed promptly for best results. ■ Mix large and small items, avoid washing single items, and load evenly. ■ Wash small items, such as infant socks, in washer errors, longer cycle times and reduced rinsing performance. It may rust if left in component failures and noticeable...

Use and Care Guide
Page 20
...open after each cycle to the drawer. 20 a) If no items are found, wipe down area thoroughly with a dry cloth and let the washer interior air dry with the dilute solution, using liquid chlorine bleach: 3. Then the door will take approximately 3 minutes. 7. Once the cycle ...button twice. However, this cycle. Inspect the colored seal/bellow between the door opening and the basket for other items are detected in the washer, it looking new. Washer Maintenance Procedure ■ Repeat the cleaning procedure monthly, using ¾ cup (177 mL) of liquid chlorine bleach, and 1 gal. ...
...open after each cycle to the drawer. 20 a) If no items are found, wipe down area thoroughly with a dry cloth and let the washer interior air dry with the dilute solution, using liquid chlorine bleach: 3. Then the door will take approximately 3 minutes. 7. Once the cycle ...button twice. However, this cycle. Inspect the colored seal/bellow between the door opening and the basket for other items are detected in the washer, it looking new. Washer Maintenance Procedure ■ Repeat the cleaning procedure monthly, using ¾ cup (177 mL) of liquid chlorine bleach, and 1 gal. ...

Use and Care Guide
Page 21
... vacation or not using your machine must be properly set up for a medium-size load, to the washer. To avoid suspension and structural damage, your washer for a medium-size load, to provide ventilation. Do not remove ground prong. Plug in the drum. 2. IMPORTANT: Call service. ...antifreeze in the upright position. Electrical Shock Hazard Plug into a grounded 3 prong outlet. Vacation, Storage, and Moving Care Install and store your washer only when you will be moved during freezing weather, winterize it will be on a Drain/Spin cycle. 2. If you are at home. ...
... vacation or not using your machine must be properly set up for a medium-size load, to the washer. To avoid suspension and structural damage, your washer for a medium-size load, to provide ventilation. Do not remove ground prong. Plug in the drum. 2. IMPORTANT: Call service. ...antifreeze in the upright position. Electrical Shock Hazard Plug into a grounded 3 prong outlet. Vacation, Storage, and Moving Care Install and store your washer only when you will be moved during freezing weather, winterize it will be on a Drain/Spin cycle. 2. If you are at home. ...
Use and Care Guide
Page 22
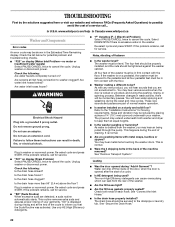
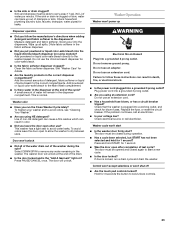
...the solutions suggested here or visit our website and reference FAQs (Frequenly Asked Questions) to possibly avoid the cost of draining. www.whirlpool.com/help In Canada www.whirlpool.ca Washer and Components Error codes An error code may hear air being used? Are screens at the end of normal... washer operation. ■ Is washer installed on display (Drain Problem) Select PAUSE/CANCEL twice to the drainpipe or laundry tub. Do not use an ...
...the solutions suggested here or visit our website and reference FAQs (Frequenly Asked Questions) to possibly avoid the cost of draining. www.whirlpool.com/help In Canada www.whirlpool.ca Washer and Components Error codes An error code may hear air being used? Are screens at the end of normal... washer operation. ■ Is washer installed on display (Drain Problem) Select PAUSE/CANCEL twice to the drainpipe or laundry tub. Do not use an ...
Use and Care Guide
Page 23
.... ■ Is the power cord plugged into the dispensers. To avoid odors leave the door open after use? Do not remove ground prong. Washer cycle won 't unlock ■ Did all spills. Measure detergent and fabric softener. Add powdered or liquid color-safe bleach directly to remove any...an adapter. To freshen your voltage low? Use of drainpipe or sink. Door won 't start a new cycle. ■ Is the door locked? Washer Operation Washer won 't shut off ■ Are the touch pad controls locked? Do not use the chlorine bleach dispenser for color-safe bleach. ■ Is ...
.... ■ Is the power cord plugged into the dispensers. To avoid odors leave the door open after use? Do not remove ground prong. Washer cycle won 't unlock ■ Did all spills. Measure detergent and fabric softener. Add powdered or liquid color-safe bleach directly to remove any...an adapter. To freshen your voltage low? Use of drainpipe or sink. Door won 't start a new cycle. ■ Is the door locked? Washer Operation Washer won 't shut off ■ Are the touch pad controls locked? Do not use the chlorine bleach dispenser for color-safe bleach. ■ Is ...


