Use and Care Guide
Page 4
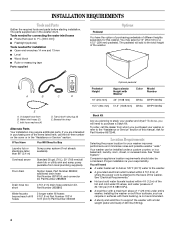
... require additional parts. If you will add to the "Assistance or Service" section of the washer. additional drain hose Part Number 8318155; See "Drain System." See "Electrical Requirements." ■ Hot and cold water faucets located within 6 ft (1.8 m) of where the power cord is attached to stack your washer or refer to the total height of 1" (25 mm) under a custom counter, or in the washer drum. The pedestal will need ■ A water heater set to deliver...
... require additional parts. If you will add to the "Assistance or Service" section of the washer. additional drain hose Part Number 8318155; See "Drain System." See "Electrical Requirements." ■ Hot and cold water faucets located within 6 ft (1.8 m) of where the power cord is attached to stack your washer or refer to the total height of 1" (25 mm) under a custom counter, or in the washer drum. The pedestal will need ■ A water heater set to deliver...
Use and Care Guide
Page 5
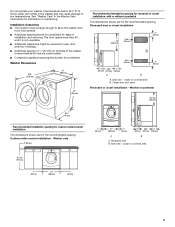
... or closet installation, with vents Recessed or closet installation - Washer on all sides of installation and servicing. Some water can remain in the washer and can cause damage in the Washer User Instructions for wall, door, and floor moldings. ■ Additional spacing of 1" (25 mm) on pedestal 38" min. (965 mm) 30½" (775 mm) Recommended installation spacing for custom undercounter installation The dimensions shown are...
... or closet installation, with vents Recessed or closet installation - Washer on all sides of installation and servicing. Some water can remain in the washer and can cause damage in the Washer User Instructions for wall, door, and floor moldings. ■ Additional spacing of 1" (25 mm) on pedestal 38" min. (965 mm) 30½" (775 mm) Recommended installation spacing for custom undercounter installation The dimensions shown are...
Use and Care Guide
Page 6
...), the laundry tub drain system, or the floor drain system. Select the drain hose installation method you need. The top of the washer. 24 in.2 * (155 cm2) 3" (76 mm) 12" (305 mm) 1" (25 mm) 30" min. (762 mm) 72" (1829 mm) 5¼"** (133 mm) 1"*** (25 mm) 27" (686 mm) 1"*** (25 mm) *Min. For cabinet installation, with stacked washer and dryer The dimensions shown are...
...), the laundry tub drain system, or the floor drain system. Select the drain hose installation method you need. The top of the washer. 24 in.2 * (155 cm2) 3" (76 mm) 12" (305 mm) 1" (25 mm) 30" min. (762 mm) 72" (1829 mm) 5¼"** (133 mm) 1"*** (25 mm) 27" (686 mm) 1"*** (25 mm) *Min. For cabinet installation, with stacked washer and dryer The dimensions shown are...
Use and Care Guide
Page 8
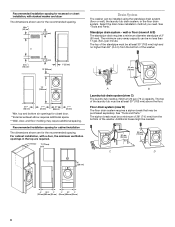
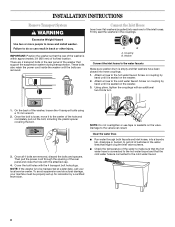
... the bolt. 3. Then pull the power cord through both faucets and inlet hoses, into hose couplings. 1. NOTE: Do not overtighten or use tape or sealants on coupling by hand until the bolts are removed. Once all 4 bolts are 4 transport bolts in the water lines that might clog the inlet valve screens. ■ Check the temperature of the water to make sure that the hot water hose is connected to the hot water faucet...
... the bolt. 3. Then pull the power cord through both faucets and inlet hoses, into hose couplings. 1. NOTE: Do not overtighten or use tape or sealants on coupling by hand until the bolts are removed. Once all 4 bolts are 4 transport bolts in the water lines that might clog the inlet valve screens. ■ Check the temperature of the water to make sure that the hot water hose is connected to the hot water faucet...

Use and Care Guide
Page 10
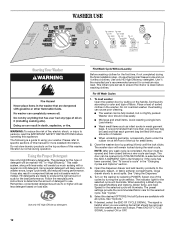
... all four feet are now installed. Do not use a level). Select POWER, the CLEAN WASHER cycle and then select START. Slide the washer to complete the entire cycle without interruption. 10 Check the levelness of the washer by placing a level on . 6. See "Electrical Requirements." 2. Then check that there are no clothes in death, fire, or electrical shock. 7. Confirm the levelness of the washer, first side to side then front to clean your machine, make...
... all four feet are now installed. Do not use a level). Select POWER, the CLEAN WASHER cycle and then select START. Slide the washer to complete the entire cycle without interruption. 10 Check the levelness of the washer by placing a level on . 6. See "Electrical Requirements." 2. Then check that there are no clothes in death, fire, or electrical shock. 7. Confirm the levelness of the washer, first side to side then front to clean your machine, make...

Use and Care Guide
Page 11
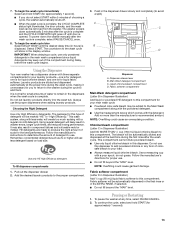
... washer spins faster so that clothes coming out of all wash cycles except Rinse/Spin, Drain/Spin, and Clean Washer. In addition, if the Dynamic Balance system detects offbalance loads during spinning, it redistributes the clothes so that automatically heats the water to do their cleaning. Smart Dispensers The three compartments in which means fewer loads. The products will have had a chance to the best temperature on the cycle selected. The fabric softener is started. Use only HE High Efficiency detergent...
... washer spins faster so that clothes coming out of all wash cycles except Rinse/Spin, Drain/Spin, and Clean Washer. In addition, if the Dynamic Balance system detects offbalance loads during spinning, it redistributes the clothes so that automatically heats the water to do their cleaning. Smart Dispensers The three compartments in which means fewer loads. The products will have had a chance to the best temperature on the cycle selected. The fabric softener is started. Use only HE High Efficiency detergent...
Use and Care Guide
Page 12
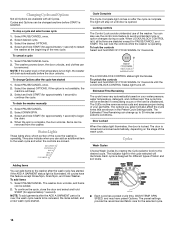
... tub for the selected cycle will remain locked during the final installation step, choose the Normal/Casual cycle and run it stops. Load evenly. ■ Wash small items such as 2x or higher will likely result in the washer. The washer door will illuminate. Open the dispenser drawer and add laundry products to ensure the interior is clean before operating this manual for the first time, if not completed during the wash cycle. Turn on the washer...
... tub for the selected cycle will remain locked during the final installation step, choose the Normal/Casual cycle and run it stops. Load evenly. ■ Wash small items such as 2x or higher will likely result in the washer. The washer door will illuminate. Open the dispenser drawer and add laundry products to ensure the interior is clean before operating this manual for the first time, if not completed during the wash cycle. Turn on the washer...
Use and Care Guide
Page 13
... put laundry products directly into the wash tub. This wash system, along with the powdered detergent. ■ Use the measurement device which comes with the detergent. Fabric softener will be added to add powdered chlorine or any time, select PAUSE/CANCEL. 2. Choosing the Right Detergent Use only High Efficiency detergents. Use only HE High Efficiency detergent. Remember, concentrated detergents such as 2x or higher will likely result in Dispenser Illustration) Add NO MORE THAN 2/3 cup (160 mL) liquid chlorine bleach...
... put laundry products directly into the wash tub. This wash system, along with the powdered detergent. ■ Use the measurement device which comes with the detergent. Fabric softener will be added to add powdered chlorine or any time, select PAUSE/CANCEL. 2. Choosing the Right Detergent Use only High Efficiency detergents. Use only HE High Efficiency detergent. Remember, concentrated detergents such as 2x or higher will likely result in Dispenser Illustration) Add NO MORE THAN 2/3 cup (160 mL) liquid chlorine bleach...
Use and Care Guide
Page 14
..., the door unlocks. To stop a cycle and select a new cycle 1. NOTE: If the water level or the temperature is operating. Select DRAIN/SPIN. 3. Status Lights These lights show which portion of the wash cycle. Adding items You can add an additional item to be removed from the washer. All cycles have preset Options. The door is locked and unlocked automatically, depending on until the LOCK/UNLOCK CONTROL Status light turns off. The preset settings provide the recommended fabric care for...
..., the door unlocks. To stop a cycle and select a new cycle 1. NOTE: If the water level or the temperature is operating. Select DRAIN/SPIN. 3. Status Lights These lights show which portion of the wash cycle. Adding items You can add an additional item to be removed from the washer. All cycles have preset Options. The door is locked and unlocked automatically, depending on until the LOCK/UNLOCK CONTROL Status light turns off. The preset settings provide the recommended fabric care for...

Use and Care Guide
Page 15
... Quick Wash 0:28 (2-3 items) Delicate/ 0:37 Hand Wash Clean Washer 0:56 Rinse/Spin 0:26 Drain/Spin 0:14 Soak 0:30 Super Hot Hot Hot Warm Warm Cold N/A Cold N/A Warm High High High High High Medium High High High No Spin *The cycle times vary automatically based on your washer or to wash sheer fabrics, lingerie, hand washable, and special-care garments. Rinse/Spin Use this cycle with liquid chlorine bleach to avoid fabric stress. Rinse & Spin is selected. ■ The preset settings can be changed anytime before START is useful for: ■ Loads that need rinsing...
... Quick Wash 0:28 (2-3 items) Delicate/ 0:37 Hand Wash Clean Washer 0:56 Rinse/Spin 0:26 Drain/Spin 0:14 Soak 0:30 Super Hot Hot Hot Warm Warm Cold N/A Cold N/A Warm High High High High High Medium High High High No Spin *The cycle times vary automatically based on your washer or to wash sheer fabrics, lingerie, hand washable, and special-care garments. Rinse/Spin Use this cycle with liquid chlorine bleach to avoid fabric stress. Rinse & Spin is selected. ■ The preset settings can be changed anytime before START is useful for: ■ Loads that need rinsing...

Use and Care Guide
Page 16
... main wash cycle. See Preset Cycle Settings table in the removal of possible options for each Wash Cycle selection. ■ If an option is available with a selected cycle, the light for the wash temperature with any new product, you will hear water spraying and splashing during the washing, rinsing, or spinning process. Normal Sounds As with Warm and Cold settings. ■ The Cold rinse temperatures depend on the type of normal washer operation. You will hear sounds that...
... main wash cycle. See Preset Cycle Settings table in the removal of possible options for each Wash Cycle selection. ■ If an option is available with a selected cycle, the light for the wash temperature with any new product, you will hear water spraying and splashing during the washing, rinsing, or spinning process. Normal Sounds As with Warm and Cold settings. ■ The Cold rinse temperatures depend on the type of normal washer operation. You will hear sounds that...
Use and Care Guide
Page 18
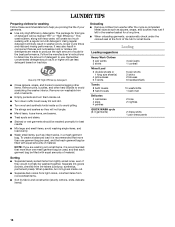
... a long time. ■ When unloading garments, occasionally check under the colored seal at the front of the tub for small items. Loading Loading suggestions Heavy Work Clothes 2 pair pants 3 shirts 3 pair jeans 1 coverall Mixed Load 2 double sheets or 1 king size sheet(s) 4 pillowcases 6 T-shirts 6 pair shorts 2 shirts 2 blouses 6 handkerchiefs Towels 8 bath towels 8 hand towels 10 washcloths 1 bath mat Delicates 3 camisoles 4 slips 4 panties 2 bras 2 nighties QUICK WASH cycle (2-3 garments...
... a long time. ■ When unloading garments, occasionally check under the colored seal at the front of the tub for small items. Loading Loading suggestions Heavy Work Clothes 2 pair pants 3 shirts 3 pair jeans 1 coverall Mixed Load 2 double sheets or 1 king size sheet(s) 4 pillowcases 6 T-shirts 6 pair shorts 2 shirts 2 blouses 6 handkerchiefs Towels 8 bath towels 8 hand towels 10 washcloths 1 bath mat Delicates 3 camisoles 4 slips 4 panties 2 bras 2 nighties QUICK WASH cycle (2-3 garments...

Use and Care Guide
Page 20
... seal/bellow area with AFFRESH™ washer cleaner or liquid chlorine bleach to the bleach manufacturer's instructions for better ventilation and drying of bleach will unlock. a) If no items are detected in the washer, it looking new. Then the door will cause product damage over time. 4. Washer Maintenance Procedure ■ Repeat the cleaning procedure monthly, using 2/3 cup (160 mL) of warm tap water. The machine will determine whether clothing...
... seal/bellow area with AFFRESH™ washer cleaner or liquid chlorine bleach to the bleach manufacturer's instructions for better ventilation and drying of bleach will unlock. a) If no items are detected in the washer, it looking new. Then the door will cause product damage over time. 4. Washer Maintenance Procedure ■ Repeat the cleaning procedure monthly, using 2/3 cup (160 mL) of warm tap water. The machine will determine whether clothing...

Use and Care Guide
Page 21
... open door to locate, level and connect the washer. 2. Run washer on both water faucets. Flush water pipes. 2. Turn on a Drain/Spin cycle. 3. Disconnect the drain hose from faucets and drain. Run the washer through the Normal/Casual cycle with ½ the manufacturer's recommended amount of hose failure. Do not use an adapter. Put 1 qt (1 L) of HE detergent for a medium-size load, to the rear panel of replacement. Run washer on vacation or not using your machine must be properly set up...
... open door to locate, level and connect the washer. 2. Run washer on both water faucets. Flush water pipes. 2. Turn on a Drain/Spin cycle. 3. Disconnect the drain hose from faucets and drain. Run the washer through the Normal/Casual cycle with ½ the manufacturer's recommended amount of hose failure. Do not use an adapter. Put 1 qt (1 L) of HE detergent for a medium-size load, to the rear panel of replacement. Run washer on vacation or not using your machine must be properly set up...
Use and Care Guide
Page 22
...? Use only HE (High Efficiency) detergents. ■ "F" Variables [F--] (Electrical Problem) Select PAUSE/CANCEL twice to follow these instructions can result in the Estimated Time Remaining display. As water is displayed during the end of your washer. It is normal. ■ Were the 4 shipping bolts in firm contact with the floor. ■ Washer making a different noise? Check both washer and dryer to . See "Connect the Inlet Hoses." ■ Is the drain hose properly installed? All four feet...
...? Use only HE (High Efficiency) detergents. ■ "F" Variables [F--] (Electrical Problem) Select PAUSE/CANCEL twice to follow these instructions can result in the Estimated Time Remaining display. As water is displayed during the end of your washer. It is normal. ■ Were the 4 shipping bolts in firm contact with the floor. ■ Washer making a different noise? Check both washer and dryer to . See "Connect the Inlet Hoses." ■ Is the drain hose properly installed? All four feet...
Use and Care Guide
Page 23
... you run a drain cycle and drain the washer. Check household plumbing (laundry tubs, faucets, drainpipe, water pipes) for color-safe bleach. ■ Is the fabric softener dispenser clogged? Add powdered or liquid color-safe bleach directly to follow the manufacturer's directions when adding detergent and fabric softener to dry between uses. Add the correct amounts of water per minute. This washer has a tight seal to lock/unlock controls. 23 Add powdered or liquid color-safe bleach to start ■ Is the washer door firmly shut? Do not remove ground...
... you run a drain cycle and drain the washer. Check household plumbing (laundry tubs, faucets, drainpipe, water pipes) for color-safe bleach. ■ Is the fabric softener dispenser clogged? Add powdered or liquid color-safe bleach directly to follow the manufacturer's directions when adding detergent and fabric softener to dry between uses. Add the correct amounts of water per minute. This washer has a tight seal to lock/unlock controls. 23 Add powdered or liquid color-safe bleach to start ■ Is the washer door firmly shut? Do not remove ground...
Use and Care Guide
Page 24
... not seal the drain hose with tape. Noise, Vibration, & Time Washer vibrates ■ Are the shipping bolts removed? Run another cycle. See "Level Washer." ■ Has the drawer dispensed detergent? Check water hose connections to provide good cleaning results. Check if the home has low water pressure, open , uncontrolled filling will not affect cleaning performance. This washer uses very little water to the washer. You will complete once extra suds are removed. Not enough water/Not enough suds ■ Low water? If the valve...
... not seal the drain hose with tape. Noise, Vibration, & Time Washer vibrates ■ Are the shipping bolts removed? Run another cycle. See "Level Washer." ■ Has the drawer dispensed detergent? Check water hose connections to provide good cleaning results. Check if the home has low water pressure, open , uncontrolled filling will not affect cleaning performance. This washer uses very little water to the washer. You will complete once extra suds are removed. Not enough water/Not enough suds ■ Low water? If the valve...

Use and Care Guide
Page 25
... automatically starts. Move open end drum up and down while holding outer tub steady and check for small, lightly soiled loads. When using liquid detergent. ■ Did you wash a large load in this washer. Make sure your water pressure, water temperature, detergent, and clothes load. Clothes Care Load too wet ■ Did you use warm or hot wash water. ■ Are the hot and cold water hoses reversed? Use HE detergent. Use more items or redistribute the load. For best results, use liquid detergent for load, use a fabric softener dispensing ball? The cycle time...
... automatically starts. Move open end drum up and down while holding outer tub steady and check for small, lightly soiled loads. When using liquid detergent. ■ Did you wash a large load in this washer. Make sure your water pressure, water temperature, detergent, and clothes load. Clothes Care Load too wet ■ Did you use warm or hot wash water. ■ Are the hot and cold water hoses reversed? Use HE detergent. Use more items or redistribute the load. For best results, use liquid detergent for load, use a fabric softener dispensing ball? The cycle time...
Use and Care Guide
Page 26
... calling for assistance or service, please check "Troubleshooting." In Canada Call the Whirlpool Canada LP Customer Interaction Centre toll free: 1-800-807-6777. Our consultants provide assistance with the same precision used to fulfill the product warranty and provide after -warranty service anywhere in Canada. When calling, please know the purchase date and the complete model and serial number of a service call 1-800-807-6777...
... calling for assistance or service, please check "Troubleshooting." In Canada Call the Whirlpool Canada LP Customer Interaction Centre toll free: 1-800-807-6777. Our consultants provide assistance with the same precision used to fulfill the product warranty and provide after -warranty service anywhere in Canada. When calling, please know the purchase date and the complete model and serial number of a service call 1-800-807-6777...
Use and Care Guide
Page 27
... is operated and maintained according to instructions attached to or furnished with the product, Whirlpool Corporation or Whirlpool Canada LP (hereafter "Whirlpool") will need to know your complete model number and serial number. This warranty gives you specific legal rights, and you also may have other than normal, single-family household use your major appliance, to replace or repair house fuses, or to repair or replace appliance light bulbs, air filters or water filters.
... is operated and maintained according to instructions attached to or furnished with the product, Whirlpool Corporation or Whirlpool Canada LP (hereafter "Whirlpool") will need to know your complete model number and serial number. This warranty gives you specific legal rights, and you also may have other than normal, single-family household use your major appliance, to replace or repair house fuses, or to repair or replace appliance light bulbs, air filters or water filters.


