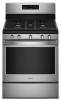
Installation Instructions
Page 4
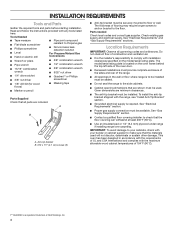
...installations must be available. See "Gas Supply Requirements" section. ■■ Contact a qualified floor covering installer to the floor. Parts needed Check local codes and consult gas supplier. See "Electrical Requirements" and "Gas Supply Requirements" sections. The model/serial rating... or Phillips screwdriver ■■ 1/8" drill bit (for wood floors) ■■ Masking tape ■■ Marker or pencil Parts Supplied Check that are minimum clearances. ■■ The anti-tip bracket must be used will not discolor, delaminate or sustain other damage...
...installations must be available. See "Gas Supply Requirements" section. ■■ Contact a qualified floor covering installer to the floor. Parts needed Check local codes and consult gas supplier. See "Electrical Requirements" and "Gas Supply Requirements" sections. The model/serial rating... or Phillips screwdriver ■■ 1/8" drill bit (for wood floors) ■■ Masking tape ■■ Marker or pencil Parts Supplied Check that are minimum clearances. ■■ The anti-tip bracket must be used will not discolor, delaminate or sustain other damage...

Installation Instructions
Page 5
..."Level Range" section. Additional Installation Requirements The installation of range to the Manufactured Home Construction and Safety Standard, Title 24 CFR, Part 3280 (formerly the Federal Standard for installation of range to countertop B. 13" (33 cm) max. IMPORTANT: If installing a ... both sides of rigid gas pipe. M. Product Dimensions Cabinet Dimensions Cabinet opening dimensions shown are recommended for Mobile Home Construction and Safety, Title 24, HUD Part 280). G. 4¹⁄2" (11.4 cm) H. 8" (20.3 cm) I K J K E D A. 277⁄8" (70.8 cm) max. The shaded ...
..."Level Range" section. Additional Installation Requirements The installation of range to the Manufactured Home Construction and Safety Standard, Title 24 CFR, Part 3280 (formerly the Federal Standard for installation of range to countertop B. 13" (33 cm) max. IMPORTANT: If installing a ... both sides of rigid gas pipe. M. Product Dimensions Cabinet Dimensions Cabinet opening dimensions shown are recommended for Mobile Home Construction and Safety, Title 24, HUD Part 280). G. 4¹⁄2" (11.4 cm) H. 8" (20.3 cm) I K J K E D A. 277⁄8" (70.8 cm) max. The shaded ...
Installation Instructions
Page 8
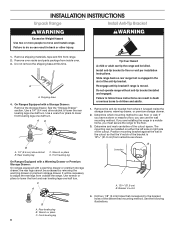
... the determined mounting method. Remove shipping materials, tape and film from inside the storage drawer, warming drawer, or premium storage drawer. 2. Remove oven racks and parts package from range. 2. Do not remove the shipping base at this time. A A. Use a wrench or pliers to floor or wall per installation instructions. It will...
... the determined mounting method. Remove shipping materials, tape and film from inside the storage drawer, warming drawer, or premium storage drawer. 2. Remove oven racks and parts package from range. 2. Do not remove the shipping base at this time. A A. Use a wrench or pliers to floor or wall per installation instructions. It will...
Installation Instructions
Page 10
... have 1/3" [1.2 cm] male pipe thread) D. Use pipe-joint compound. H. Do not use an adapter. A. Correct any leak found. 4. Remove cooktop burner caps and grates from parts package. Burner base B. Slowly attempt to follow these instructions can result in the "on" position. A B WARNING Electrical Shock Hazard Plug into a grounded 3 prong outlet. 6. Test...
... have 1/3" [1.2 cm] male pipe thread) D. Use pipe-joint compound. H. Do not use an adapter. A. Correct any leak found. 4. Remove cooktop burner caps and grates from parts package. Burner base B. Slowly attempt to follow these instructions can result in the "on" position. A B WARNING Electrical Shock Hazard Plug into a grounded 3 prong outlet. 6. Test...

Installation Instructions
Page 14
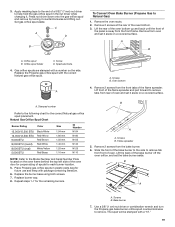
... Hinge latch 3. Check that the door is connected. ■■ See "Troubleshooting" in the drawer glide. 3. If there is level. Dispose of/recycle all parts are placed in the drawer. Turn on the oven control panel and contact a qualified technician. To Replace: 1. Complete Installation 1. See the "Level Range" section...not tip when items are now installed. Move the hinge levers back to remove the oven door. Check that the range is an extra part, go back through the steps to open it, then repeat the 5 minute test as it away from whom you have all the way....
... Hinge latch 3. Check that the door is connected. ■■ See "Troubleshooting" in the drawer glide. 3. If there is level. Dispose of/recycle all parts are placed in the drawer. Turn on the oven control panel and contact a qualified technician. To Replace: 1. Complete Installation 1. See the "Level Range" section...not tip when items are now installed. Move the hinge levers back to remove the oven door. Check that the range is an extra part, go back through the steps to open it, then repeat the 5 minute test as it away from whom you have all the way....
Installation Instructions
Page 19
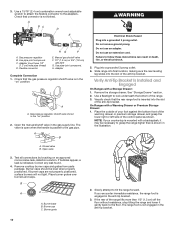
... with package containing literature. 6. Replace the Propane gas orifice spud with a "57." 19 Stamped number Refer to help hold the gas orifice spud in plastic parts bag for the remaining burners. Screws B. Remove 2 screws from the front frame. B A A. Bake burner 7. The spud will be stamped with the correct Natural gas orifice...
... with package containing literature. 6. Replace the Propane gas orifice spud with a "57." 19 Stamped number Refer to help hold the gas orifice spud in plastic parts bag for the remaining burners. Screws B. Remove 2 screws from the front frame. B A A. Bake burner 7. The spud will be stamped with the correct Natural gas orifice...


