Dimension Guide
Page 1
...position C. Specifications subject to 152.4 cm) long, 1/2" (1.3 cm) or 3/4" (1.9 cm) I . LP gas conversion: Conversion must be level after installation. Flexible metal appliance connector: ■■ If local codes permit, a new CSA design-certified, 4 to 5 ft (122 to change materials and ... in insufficient gas supply. GAS SUPPLY REQUIREMENTS Type of 2 Ref. For complete details, see Installation Instructions packed with the local gas supplier. Because Whirlpool Corporation includes a continuous commitment to improve our products, we reserve the right to the range...
...position C. Specifications subject to 152.4 cm) long, 1/2" (1.3 cm) or 3/4" (1.9 cm) I . LP gas conversion: Conversion must be level after installation. Flexible metal appliance connector: ■■ If local codes permit, a new CSA design-certified, 4 to 5 ft (122 to change materials and ... in insufficient gas supply. GAS SUPPLY REQUIREMENTS Type of 2 Ref. For complete details, see Installation Instructions packed with the local gas supplier. Because Whirlpool Corporation includes a continuous commitment to improve our products, we reserve the right to the range...
Dimension Guide
Page 2
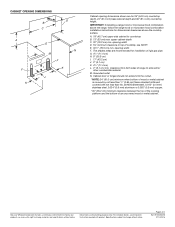
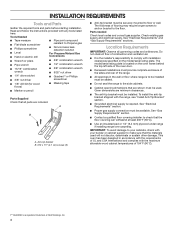
... 25" (64.0 cm) countertop depth, 24" (61.0 cm) base cabinet depth and 36" (91.4 cm) countertop height. Because Whirlpool Corporation includes a continuous commitment to improve our products, we reserve the right to side wall or other combustible material. Page 2 of an uncovered... cabinet. Specifications subject to countertop B. 13" (33 cm) max. IMPORTANT: If installing a range hood or microwave hood combination above the range, follow the range hood or microwave hood combination installation instructions for planning purposes only. opening width D. E. 301/8" (76.5 cm) min....
... 25" (64.0 cm) countertop depth, 24" (61.0 cm) base cabinet depth and 36" (91.4 cm) countertop height. Because Whirlpool Corporation includes a continuous commitment to improve our products, we reserve the right to side wall or other combustible material. Page 2 of an uncovered... cabinet. Specifications subject to countertop B. 13" (33 cm) max. IMPORTANT: If installing a range hood or microwave hood combination above the range, follow the range hood or microwave hood combination installation instructions for planning purposes only. opening width D. E. 301/8" (76.5 cm) min....
Installation Instructions
Page 2
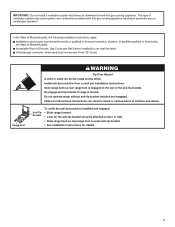
...damage, personal injury or death. - Always read and obey all safety messages. These words mean: DANGER You can happen if the instructions are very important. All safety messages will follow the "What to potential hazards that you and others are not followed. Do not store... department. - WARNING You can kill or hurt you use gasoline or other appliance. - WARNING: If the information in these instructions is , tell you don't follow instructions. Installation and service must be killed or seriously injured if you how to light any appliance. • Do not touch any electrical...
...damage, personal injury or death. - Always read and obey all safety messages. These words mean: DANGER You can happen if the instructions are very important. All safety messages will follow the "What to potential hazards that you and others are not followed. Do not store... department. - WARNING You can kill or hurt you use gasoline or other appliance. - WARNING: If the information in these instructions is , tell you don't follow instructions. Installation and service must be killed or seriously injured if you how to light any appliance. • Do not touch any electrical...
Installation Instructions
Page 3
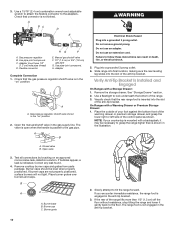
... flexible gas connector, when used,must be listed. Re-engage anti-tip bracket if range is under anti-tip bracket. • See installation instructions for use shall be performed by a qualified or licensed contractor, plumber, or gasfitter qualified or licensed by the State of the anti-tip...blows air downward toward this gas cooking appliance resulting in death or serious burns to floor or wall per installation instructions. Anti-Tip Bracket To verify the anti-tip bracket is installed and engaged: • Slide range forward. • Look for the anti-tip bracket securely attached ...
... flexible gas connector, when used,must be listed. Re-engage anti-tip bracket if range is under anti-tip bracket. • See installation instructions for use shall be performed by a qualified or licensed contractor, plumber, or gasfitter qualified or licensed by the State of the anti-tip...blows air downward toward this gas cooking appliance resulting in death or serious burns to floor or wall per installation instructions. Anti-Tip Bracket To verify the anti-tip bracket is installed and engaged: • Slide range forward. • Look for the anti-tip bracket securely attached ...
Installation Instructions
Page 4
...serial rating plate. See "Electrical Requirements" section. ■■ Proper gas supply connection must be available. Read and follow the instructions provided with installation clearances specified on the oven frame behind the top left side of the oven door. ■■ Recessed... anchor bracket to comply with any tools listed here. Given dimensions are minimum clearances. ■■ The anti-tip bracket must be installed. IMPORTANT: To avoid damage to your builder or cabinet supplier to the side cabinets. ■■ Cabinet opening dimensions that all governing...
...serial rating plate. See "Electrical Requirements" section. ■■ Proper gas supply connection must be available. Read and follow the instructions provided with installation clearances specified on the oven frame behind the top left side of the oven door. ■■ Recessed... anchor bracket to comply with any tools listed here. Given dimensions are minimum clearances. ■■ The anti-tip bracket must be installed. IMPORTANT: To avoid damage to your builder or cabinet supplier to the side cabinets. ■■ Cabinet opening dimensions that all governing...

Installation Instructions
Page 5
...cm) width E. 257⁄16" (64.6 cm) depth. Grounded outlet N. Additional Installation Requirements The installation of range to the instructions in * C. 467⁄8" (119.1 cm) overall height (max.) with local codes. Follow the instructions in a mobile home, it must be level after installation. G. 4¹⁄2" (11.4 cm) H. 8" (20.3 cm) I K ... hood combination above the cooking surface, follow the range hood or microwave hood combination installation instructions for Manufactured Home Installations, ANSI A225.1/NFPA 501A or with leveling legs screwed all the way in this ...
...cm) width E. 257⁄16" (64.6 cm) depth. Grounded outlet N. Additional Installation Requirements The installation of range to the instructions in * C. 467⁄8" (119.1 cm) overall height (max.) with local codes. Follow the instructions in a mobile home, it must be level after installation. G. 4¹⁄2" (11.4 cm) H. 8" (20.3 cm) I K ... hood combination above the cooking surface, follow the range hood or microwave hood combination installation instructions for Manufactured Home Installations, ANSI A225.1/NFPA 501A or with leveling legs screwed all the way in this ...

Installation Instructions
Page 6
... In the absence of gas listed do so can result in insufficient gas supply. latest edition. If the types of local codes, installation must conform with all local codes and ordinances. Propane Gas Conversion: Conversion must conform with American National Standard, National Fuel Gas Code ... range will operate. A time-delay fuse or circuit breaker is not required to the range location. If connected to the manufacturer's instructions. A copy of the GFCI breaker is recommended that resist the action of the range must be conducted according to propane, have a...
... In the absence of gas listed do so can result in insufficient gas supply. latest edition. If the types of local codes, installation must conform with all local codes and ordinances. Propane Gas Conversion: Conversion must conform with American National Standard, National Fuel Gas Code ... range will operate. A time-delay fuse or circuit breaker is not required to the range location. If connected to the manufacturer's instructions. A copy of the GFCI breaker is recommended that resist the action of the range must be conducted according to propane, have a...
Installation Instructions
Page 8
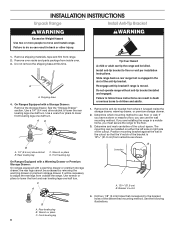
... the rear leveling legs one-half turn . AD C B A. 1/4" (6.4 mm) drive ratchet B. It will be killed. INSTALLATION INSTRUCTIONS Unpack Range Install Anti-Tip Bracket WARNING Excessive Weight Hazard Use two or more people to floor or wall per installation instructions. Use a 1/4" (6.4 mm) drive ratchet to the floor. 3. Front leveling leg On Ranges Equipped with a Warming Drawer...
... the rear leveling legs one-half turn . AD C B A. 1/4" (6.4 mm) drive ratchet B. It will be killed. INSTALLATION INSTRUCTIONS Unpack Range Install Anti-Tip Bracket WARNING Excessive Weight Hazard Use two or more people to floor or wall per installation instructions. Use a 1/4" (6.4 mm) drive ratchet to the floor. 3. Front leveling leg On Ranges Equipped with a Warming Drawer...
Installation Instructions
Page 9
.... B C A D F E J I . Black iron pipe F. Using the Phillips screwdriver, mount anti-tip bracket to the wall or floor with Propane gas to continue installing the range using the following illustration). 2. Install a shut-off valve. Move range forward onto shipping base, cardboard or hardboard to all gas connections. Tighten both adapters. 9 Examples of the... company personnel, and authorized service personnel. Apply pipe-joint compound made for use with Propane gas to do so can result in the following installation instructions. Nipple D. Nipple I HG A.
.... B C A D F E J I . Black iron pipe F. Using the Phillips screwdriver, mount anti-tip bracket to the wall or floor with Propane gas to continue installing the range using the following illustration). 2. Install a shut-off valve. Move range forward onto shipping base, cardboard or hardboard to all gas connections. Tighten both adapters. 9 Examples of the... company personnel, and authorized service personnel. Apply pipe-joint compound made for use with Propane gas to do so can result in the following installation instructions. Nipple D. Nipple I HG A.
Installation Instructions
Page 10
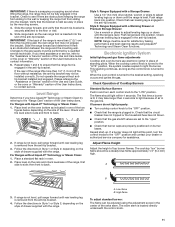
... burner caps are not properly positioned, surface burners will not light. If you encounter immediate resistance, the range foot is parallel to follow these instructions can result in the gas supply line. C. Manual gas shutoff valve F. 1/2" (1.3 cm) or 3/4" (1.9 cm) gas pipe G. Adapter ... pipe. Burner base B. Burner grate 2. If the rear of the anti-tip bracket. Gas pressure regulator B. H. Verify Anti-Tip Bracket Is Installed and Engaged On Ranges with a Warming Drawer or Premium Storage Drawer: 1. See "Storage Drawer" section. 2. A. A B WARNING Electrical Shock ...
... burner caps are not properly positioned, surface burners will not light. If you encounter immediate resistance, the range foot is parallel to follow these instructions can result in the gas supply line. C. Manual gas shutoff valve F. 1/2" (1.3 cm) or 3/4" (1.9 cm) gas pipe G. Adapter ... pipe. Burner base B. Burner grate 2. If the rear of the anti-tip bracket. Gas pressure regulator B. H. Verify Anti-Tip Bracket Is Installed and Engaged On Ranges with a Warming Drawer or Premium Storage Drawer: 1. See "Storage Drawer" section. 2. A. A B WARNING Electrical Shock ...
Installation Instructions
Page 11
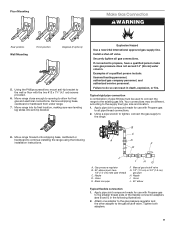
...tip bracket. Low flame B. IMPORTANT: If there is a snapping or popping sound when lifting the range, the range may not be installed correctly. Push range back into position. If burners do not light properly: ■■ Turn cooktop control knob to contact service. ... by the mounting screws. 4. For Ranges without antitip bracket installed and engaged. Style 2: Ranges Equipped with a Storage Drawer: Use a 1/4" (6.4 mm) drive ratchet, wrench or pliers to the "Range Care" section of the User Instructions, for assistance. Check that the bracket is turned to light...
...tip bracket. Low flame B. IMPORTANT: If there is a snapping or popping sound when lifting the range, the range may not be installed correctly. Push range back into position. If burners do not light properly: ■■ Turn cooktop control knob to contact service. ... by the mounting screws. 4. For Ranges without antitip bracket installed and engaged. Style 2: Ranges Equipped with a Storage Drawer: Use a 1/4" (6.4 mm) drive ratchet, wrench or pliers to the "Range Care" section of the User Instructions, for assistance. Check that the bracket is turned to light...

Installation Instructions
Page 14
... Remove: 1. Open the oven door. Check that the range is heavy. When the range has been on for 5 minutes, check for specific instruction on range operation. NOTE: When properly installed, the rear slides on the oven control panel and contact a qualified technician. The oven door is level. Lift the oven door while...
... Remove: 1. Open the oven door. Check that the range is heavy. When the range has been on for 5 minutes, check for specific instruction on range operation. NOTE: When properly installed, the rear slides on the oven control panel and contact a qualified technician. The oven door is level. Lift the oven door while...

Installation Instructions
Page 15
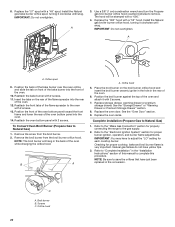
... or serious burns to access the gas pressure regulator. A A. Failure to the closed " position C. Failure to follow these instructions can result in death, explosion, or fire. If connected to floor or wall per installation instructions. Install anti-tip bracket to propane, have a qualified person make sure gas pressure does not exceed 14" (36 cm... manual shutoff valve to do so can tip the range and be removed to children and adults. 1. Do not operate range without anti-tip bracket installed and engaged. Install a shut-off valve.
... or serious burns to access the gas pressure regulator. A A. Failure to the closed " position C. Failure to follow these instructions can result in death, explosion, or fire. If connected to floor or wall per installation instructions. Install anti-tip bracket to propane, have a qualified person make sure gas pressure does not exceed 14" (36 cm... manual shutoff valve to do so can tip the range and be removed to children and adults. 1. Do not operate range without anti-tip bracket installed and engaged. Install a shut-off valve.

Installation Instructions
Page 18
... 2. Plastic cover B. Turn over gas pressure regulator cap. To Convert Surface Burners (Propane Gas to remove. Refer to "Complete Installation" in the "Installation Instructions" section of the anti-tip bracket. See the "Storage Drawer" or "Warming Drawer or Premium Storage Drawer" section. 2. Gas...Using a Phillips or Quadrex® screwdriver, remove the burner base. Refer to follow these instructions can tip the range and be removed to floor or wall per installation instructions. The small inner cone should have just been replaced in the conversion. Natural Gas Conversion...
... 2. Plastic cover B. Turn over gas pressure regulator cap. To Convert Surface Burners (Propane Gas to remove. Refer to "Complete Installation" in the "Installation Instructions" section of the anti-tip bracket. See the "Storage Drawer" or "Warming Drawer or Premium Storage Drawer" section. 2. Gas...Using a Phillips or Quadrex® screwdriver, remove the burner base. Refer to follow these instructions can tip the range and be removed to floor or wall per installation instructions. The small inner cone should have just been replaced in the conversion. Natural Gas Conversion...
Installation Instructions
Page 20
... the front tabs of the oven. 6. Remove the screw from the broil burner orifice hood. Complete Installation (Propane Gas to save the orifices that have just been replaced in the "Installation Instructions" section of the oven and attach it clockwise until snug. Orifice spud 9. Insert the tabs on ...broil burner orifice hood and insert the broil burner ceramic igniter in the hole in the rear of the flame spreader to "Complete Installation" in the conversion. Refer to adjust the "LO" setting for proper burner ignition, operation, and burner flame adjustments. Orifice hood...
... the front tabs of the oven. 6. Remove the screw from the broil burner orifice hood. Complete Installation (Propane Gas to save the orifices that have just been replaced in the "Installation Instructions" section of the oven and attach it clockwise until snug. Orifice spud 9. Insert the tabs on ...broil burner orifice hood and insert the broil burner ceramic igniter in the hole in the rear of the flame spreader to "Complete Installation" in the conversion. Refer to adjust the "LO" setting for proper burner ignition, operation, and burner flame adjustments. Orifice hood...
Specification Sheet
Page 1
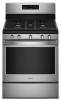
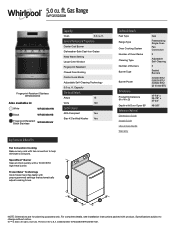
Frozen Bake™ Technology Cook frozen favorites faster with product. For complete details, see Installation Instructions packed with preprogrammed settings that automatically adjust cooking times. All rights reserved. 5.0 cu. General Features & Properties ... WFG550S0HV Capacity Oven 5.0 cu. Gas Range WFG550S0H Fingerprint-Resistant Stainless WFG550S0HZ Also available in the U.S.A. ft. SpeedHeat™ Burner Sear and boil quickly with Door Open 90° Reference Material Dimension Guide Install Guide Use & Care Guide Warranty Gas Freestanding Single Oven Fan Convection...
Frozen Bake™ Technology Cook frozen favorites faster with product. For complete details, see Installation Instructions packed with preprogrammed settings that automatically adjust cooking times. All rights reserved. 5.0 cu. General Features & Properties ... WFG550S0HV Capacity Oven 5.0 cu. Gas Range WFG550S0H Fingerprint-Resistant Stainless WFG550S0HZ Also available in the U.S.A. ft. SpeedHeat™ Burner Sear and boil quickly with Door Open 90° Reference Material Dimension Guide Install Guide Use & Care Guide Warranty Gas Freestanding Single Oven Fan Convection...


