
Installation Instructions
Page 4
...Pipe-joint compound resistant to comply with installation clearances specified on the oven frame behind the top left side of NLW Holdings, Inc. 4 A B A. Parts needed Check local codes and consult gas supplier. Anti-tip bracket B. #12 x 15⁄8" (4.1 cm) screws (2) ■■ Anti-tip ...®† or Phillips screwdriver ■■ 1/8" drill bit (for wood floors) ■■ Masking tape ■■ Marker or pencil Parts Supplied Check that the floor covering can withstand at least 200°F (93°C). ■■ Use an insulated pad or 1/4" (6.4 mm)...
...Pipe-joint compound resistant to comply with installation clearances specified on the oven frame behind the top left side of NLW Holdings, Inc. 4 A B A. Parts needed Check local codes and consult gas supplier. Anti-tip bracket B. #12 x 15⁄8" (4.1 cm) screws (2) ■■ Anti-tip ...®† or Phillips screwdriver ■■ 1/8" drill bit (for wood floors) ■■ Masking tape ■■ Marker or pencil Parts Supplied Check that the floor covering can withstand at least 200°F (93°C). ■■ Use an insulated pad or 1/4" (6.4 mm)...

Installation Instructions
Page 5
... ■■ When this range is installed in a mobile home, it must conform to the Manufactured Home Construction and Safety Standard, Title 24 CFR, Part 3280 (formerly the Federal Standard for leveling the range is not applicable, use the Standard for 25" (64.0 cm) countertop depth, 24" (61.0...the way in this range must be level after installation. Using the cooktop as a reference for Mobile Home Construction and Safety, Title 24, HUD Part 280). clearance from both sides of range to front of the oven door) IMPORTANT: Range must be secured according to the instructions in * ...
... ■■ When this range is installed in a mobile home, it must conform to the Manufactured Home Construction and Safety Standard, Title 24 CFR, Part 3280 (formerly the Federal Standard for leveling the range is not applicable, use the Standard for 25" (64.0 cm) countertop depth, 24" (61.0...the way in this range must be level after installation. Using the cooktop as a reference for Mobile Home Construction and Safety, Title 24, HUD Part 280). clearance from both sides of range to front of the oven door) IMPORTANT: Range must be secured according to the instructions in * ...

Installation Instructions
Page 8
... premium storage drawer. 2. If you are installing the range in the slot of the determined mounting method. See the following illustrations. Remove oven racks and parts package from centerline as shown. See the "Storage Drawer" section. Wrench or pliers D. If you have a stone or masonry floor, you must secure the range...
... premium storage drawer. 2. If you are installing the range in the slot of the determined mounting method. See the following illustrations. Remove oven racks and parts package from centerline as shown. See the "Storage Drawer" section. Wrench or pliers D. If you have a stone or masonry floor, you must secure the range...
Installation Instructions
Page 10
..., making sure the rear leveling leg slides into a grounded 3 prong outlet. Adapter (must have 1/3" [1.2 cm] male pipe thread) D. A B A. Remove cooktop burner caps and grates from parts package. Burner caps should be necessary to grasp the range higher than 1/2" (1.3 cm) off the floor without resistance, stop tilting the range and lower it...
..., making sure the rear leveling leg slides into a grounded 3 prong outlet. Adapter (must have 1/3" [1.2 cm] male pipe thread) D. A B A. Remove cooktop burner caps and grates from parts package. Burner caps should be necessary to grasp the range higher than 1/2" (1.3 cm) off the floor without resistance, stop tilting the range and lower it...
Installation Instructions
Page 14
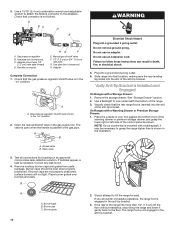
...caused by shipping material. Check that you purchased your tools. 3. If the range is closed and pull it away from whom you have all parts are placed in the Use and Care Guide or User Instructions. 8. NOTE: When properly installed, the rear slides on the oven control panel...are now installed. A To Replace: 1. To Replace: 1. Slowly push the drawer into a grounded 3 prong outlet. ■■ Electrical supply is an extra part, go back through the steps to remove the oven door. The oven door is plugged into the range. Dispose of liquid household cleaner and warm...
...caused by shipping material. Check that you purchased your tools. 3. If the range is closed and pull it away from whom you have all parts are placed in the Use and Care Guide or User Instructions. 8. NOTE: When properly installed, the rear slides on the oven control panel...are now installed. A To Replace: 1. To Replace: 1. Slowly push the drawer into a grounded 3 prong outlet. ■■ Electrical supply is an extra part, go back through the steps to remove the oven door. The oven door is plugged into the range. Dispose of liquid household cleaner and warm...

Installation Instructions
Page 19
Apply masking tape to the end of a 9/32" (7 mm) nut driver to help hold the gas orifice spud in plastic parts bag for the correct Natural gas orifice spud placement. Remove from the front tabs of oven and set the bake burner aside. XXX A A. Remove 2 screws ...
Apply masking tape to the end of a 9/32" (7 mm) nut driver to help hold the gas orifice spud in plastic parts bag for the correct Natural gas orifice spud placement. Remove from the front tabs of oven and set the bake burner aside. XXX A A. Remove 2 screws ...
Owners Manual
Page 9
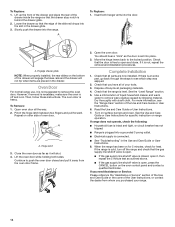
... when entering Sabbath mode, it will be set , no sounds during the Sabbath mode. The On and Delay indicator lights will turn off for only part of models with the bake elements off . When the set cook time ends, the oven will shut off automatically and the indicator lights will be...
... when entering Sabbath mode, it will be set , no sounds during the Sabbath mode. The On and Delay indicator lights will turn off for only part of models with the bake elements off . When the set cook time ends, the oven will shut off automatically and the indicator lights will be...
Owners Manual
Page 13
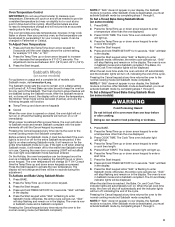
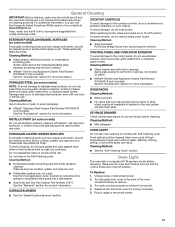
...to stainless steel surfaces, even with Self-Cleaning cycle. These spills may occur to slide, a light coating of our website at www.whirlpool.ca. Do not use oven cleaners on some models) Do not use . Cleaning Method: ■■ Nonabrasive plastic scrubbing pad and... or abrasive paper towels. Do not reassemble caps on cleaning products. Cooked-on panel. ■■ Affresh® Kitchen and Appliance Cleaner Part Number W10355010 (not included): See the "Accessories" section for more information. Cleaning Method: Rub in direction of the oven counterclockwise to avoid...
...to stainless steel surfaces, even with Self-Cleaning cycle. These spills may occur to slide, a light coating of our website at www.whirlpool.ca. Do not use oven cleaners on some models) Do not use . Cleaning Method: ■■ Nonabrasive plastic scrubbing pad and... or abrasive paper towels. Do not reassemble caps on cleaning products. Cooked-on panel. ■■ Affresh® Kitchen and Appliance Cleaner Part Number W10355010 (not included): See the "Accessories" section for more information. Cleaning Method: Rub in direction of the oven counterclockwise to avoid...

Owners Manual
Page 16
... W10275756 Gas Grate and Drip Pan Cleaner Order Part Number 31617 Split Oven Rack Order Part Number 4396927 Porcelain Broiler Pan and Grid Order Part Number 4396923 Premium Broiler Pan and Roasting Rack Order Part Number W10123240 16 In Canada, you can visit our website at www.whirlpool.ca or call us at 1-800-253...
... W10275756 Gas Grate and Drip Pan Cleaner Order Part Number 31617 Split Oven Rack Order Part Number 4396927 Porcelain Broiler Pan and Grid Order Part Number 4396923 Premium Broiler Pan and Roasting Rack Order Part Number W10123240 16 In Canada, you can visit our website at www.whirlpool.ca or call us at 1-800-253...
Owners Manual
Page 17
...when the major appliance is effective from state to state or province to use with servicing, removal, or replacement of non-genuine Whirlpool parts or accessories. 6. ONE YEAR LIMITED WARRANTY WHAT IS COVERED WHAT IS NOT COVERED For one year from state to state or ...countertops, drywall) that existed when this major appliance, you . In the U.S. and Canada, direct all requests for factory specified replacement parts and repair labor to Whirlpool within 30 days. 10. In the event of product replacement, your retailer about the quality, durability, or need for appliances with ...
...when the major appliance is effective from state to state or province to use with servicing, removal, or replacement of non-genuine Whirlpool parts or accessories. 6. ONE YEAR LIMITED WARRANTY WHAT IS COVERED WHAT IS NOT COVERED For one year from state to state or ...countertops, drywall) that existed when this major appliance, you . In the U.S. and Canada, direct all requests for factory specified replacement parts and repair labor to Whirlpool within 30 days. 10. In the event of product replacement, your retailer about the quality, durability, or need for appliances with ...


