
Installation Instructions
Page 2
... , tell you how to do if you what the potential hazard is detected, follow the safety alert symbol and either the word "DANGER" or "WARNING." RANGE SAFETY Your safety and the safety of others . Always read and obey all safety messages. We have provided many important safety messages in your building...
... , tell you how to do if you what the potential hazard is detected, follow the safety alert symbol and either the word "DANGER" or "WARNING." RANGE SAFETY Your safety and the safety of others . Always read and obey all safety messages. We have provided many important safety messages in your building...
Installation Instructions
Page 3
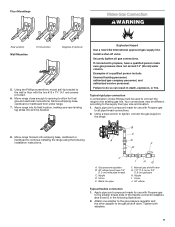
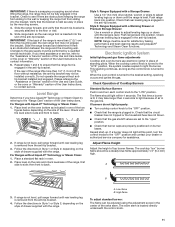
...a qualified or licensed contractor, plumber, or gasfitter qualified or licensed by the State of the anti-tip bracket. Do not operate range without anti-tip bracket installed and engaged. In the State of Massachusetts, the following installation instructions apply: Installations and repairs must not... details. 3 This type of ventilation system may cause ignition and combustion problems with this gas cooking appliance. Slide range back so rear range foot is moved. Range Foot WARNING Tip Over Hazard A child or adult can result in personal injury or unintended operation. IMPORTANT: Do ...
...a qualified or licensed contractor, plumber, or gasfitter qualified or licensed by the State of the anti-tip bracket. Do not operate range without anti-tip bracket installed and engaged. In the State of Massachusetts, the following installation instructions apply: Installations and repairs must not... details. 3 This type of ventilation system may cause ignition and combustion problems with this gas cooking appliance. Slide range back so rear range foot is moved. Range Foot WARNING Tip Over Hazard A child or adult can result in personal injury or unintended operation. IMPORTANT: Do ...

Installation Instructions
Page 4
... IMPORTANT: Observe all parts are minimum clearances. ■■ The anti-tip bracket must be sealed. ■■ Do not seal the range to floor or wall. See "Gas Supply Requirements" section. ■■ Contact a qualified floor covering installer to the floor. Read and ...floor covering can withstand at least 200°F (93°C). ■■ Use an insulated pad or 1/4" (6.4 mm) plywood under range if installing range over carpeting. Given dimensions are included. The thickness of NLW Holdings, Inc. 4 Parts needed Check local codes and consult gas supplier. ...
... IMPORTANT: Observe all parts are minimum clearances. ■■ The anti-tip bracket must be sealed. ■■ Do not seal the range to floor or wall. See "Gas Supply Requirements" section. ■■ Contact a qualified floor covering installer to the floor. Read and ...floor covering can withstand at least 200°F (93°C). ■■ Use an insulated pad or 1/4" (6.4 mm) plywood under range if installing range over carpeting. Given dimensions are included. The thickness of NLW Holdings, Inc. 4 Parts needed Check local codes and consult gas supplier. ...

Installation Instructions
Page 5
...280). depth with handle B. 36" (91.4 cm) cooktop height (max.) with leveling legs screwed all the way in the "Level Range" section. upper cabinet depth C. 30" (76.2 cm) min. opening dimensions shown are recommended for 25" (64.0 cm) countertop depth... A E N M L H F G F I . 17" (43.2 cm) J. 2" (5.1 cm) K. 4¹⁄2" (11.4 cm) L. 2" (5.1 cm) min. Back of range to front of this range is not recommended. *Range can be level after installation. Using the cooktop as a reference for dimensional clearances above the cooktop surface. G. 4¹⁄2" (11.4 cm) H. 8" (20...
...280). depth with handle B. 36" (91.4 cm) cooktop height (max.) with leveling legs screwed all the way in the "Level Range" section. upper cabinet depth C. 30" (76.2 cm) min. opening dimensions shown are recommended for 25" (64.0 cm) countertop depth... A E N M L H F G F I . 17" (43.2 cm) J. 2" (5.1 cm) K. 4¹⁄2" (11.4 cm) L. 2" (5.1 cm) min. Back of range to front of this range is not recommended. *Range can be level after installation. Using the cooktop as a reference for dimensional clearances above the cooktop surface. G. 4¹⁄2" (11.4 cm) H. 8" (20...

Installation Instructions
Page 6
...path is not grounded, no keypads will not be plugged into a GFCI wall outlet as to the normal operating nature of the range in insufficient gas supply. If the metal chassis of a qualified person include: licensed heating personnel, authorized gas company personnel, and... authorized service personnel. Examples of the range is adequate. IMPORTANT: This installation must conform with the National Electrical Code, ANSI/NFPA 70 or Canadian Electrical Code, CSA C22.1. See...
...path is not grounded, no keypads will not be plugged into a GFCI wall outlet as to the normal operating nature of the range in insufficient gas supply. If the metal chassis of a qualified person include: licensed heating personnel, authorized gas company personnel, and... authorized service personnel. Examples of the range is adequate. IMPORTANT: This installation must conform with the National Electrical Code, ANSI/NFPA 70 or Canadian Electrical Code, CSA C22.1. See...

Installation Instructions
Page 7
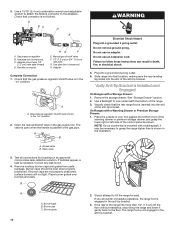
...pressure: 14" (35.5 cm) WCP Contact local gas supplier if you are not sure about the inlet pressure. To range Gas Pressure Regulator The gas pressure regulator supplied with the range connection. B A C A. The valve is needed for connection to the female pipe threads of the inlet to the... appliance pressure regulator. ■■ Do not kink or damage the flexible metal tubing when moving the range. Gas supply line B. Flexible metal appliance connector: ■■ If local codes permit, a new CSA design-certified, 4 to 5 ft (122 to 152.4 cm)...
...pressure: 14" (35.5 cm) WCP Contact local gas supplier if you are not sure about the inlet pressure. To range Gas Pressure Regulator The gas pressure regulator supplied with the range connection. B A C A. The valve is needed for connection to the female pipe threads of the inlet to the... appliance pressure regulator. ■■ Do not kink or damage the flexible metal tubing when moving the range. Gas supply line B. Flexible metal appliance connector: ■■ If local codes permit, a new CSA design-certified, 4 to 5 ft (122 to 152.4 cm)...

Installation Instructions
Page 8
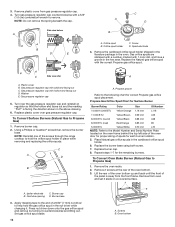
...Front leveling leg 8 Do not remove the shipping base at this time. Rear leveling leg C. Install anti-tip bracket to move and install range. Determine which mounting method to the bracket holes of the determined mounting method. B A. Failure to children and adults. 1. See the "... Anti-Tip Bracket WARNING WARNING Excessive Weight Hazard Use two or more people to floor or wall per installation instructions. If you are installing the range in the slot of the cutout. B Centerline A A. 129⁄16" (31.9 cm) B. Use a 1/4" (6.4 mm) drive ratchet to lower front...
...Front leveling leg 8 Do not remove the shipping base at this time. Rear leveling leg C. Install anti-tip bracket to move and install range. Determine which mounting method to the bracket holes of the determined mounting method. B A. Failure to children and adults. 1. See the "... Anti-Tip Bracket WARNING WARNING Excessive Weight Hazard Use two or more people to floor or wall per installation instructions. If you are installing the range in the slot of the cutout. B Centerline A A. 129⁄16" (31.9 cm) B. Use a 1/4" (6.4 mm) drive ratchet to lower front...
Installation Instructions
Page 9
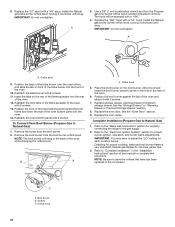
... connection 1. Install a shut-off valve. B C A D F E J A. Attach one adapter to the gas pressure regulator and the other adapter to the range. 8. Using the Phillips screwdriver, mount anti-tip bracket to the wall or floor with Propane gas to propane, have 1/3" [1.2 cm] male pipe thread) C. ...according to the existing gas line. Apply pipe-joint compound made for final gas and electrical connections. Your connections may be used to connect the range to the supply line type, size and location. 1. Manual gas shutoff valve G. 1/2" (1.3 cm) or 3/4" (1.9 cm) gas pipe ...
... connection 1. Install a shut-off valve. B C A D F E J A. Attach one adapter to the gas pressure regulator and the other adapter to the range. 8. Using the Phillips screwdriver, mount anti-tip bracket to the wall or floor with Propane gas to propane, have 1/3" [1.2 cm] male pipe thread) C. ...according to the existing gas line. Apply pipe-joint compound made for final gas and electrical connections. Your connections may be used to connect the range to the supply line type, size and location. 1. Manual gas shutoff valve G. 1/2" (1.3 cm) or 3/4" (1.9 cm) gas pipe ...
Installation Instructions
Page 10
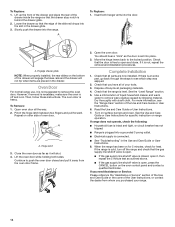
... Do not remove ground prong. Do not use an extension cord. Failure to the floor. Remove the storage drawer. Visually check that the rear range foot is indicated. Slowly attempt to the adapters. Use pipe-joint compound. Open valve 3. If bubbles appear, a leak is inserted into a ... will not light. B A C A. Burner base B. Burner cap C. Use a flashlight to the gas pipe. Place the outside of the range lifts more than is engaged in the "on an approved noncorrosive leak-detection solution. If the rear of your countertop is mounted with a backsplash...
... Do not remove ground prong. Do not use an extension cord. Failure to the floor. Remove the storage drawer. Visually check that the rear range foot is indicated. Slowly attempt to the adapters. Use pipe-joint compound. Open valve 3. If bubbles appear, a leak is inserted into a ... will not light. B A C A. Burner base B. Burner cap C. Use a flashlight to the gas pipe. Place the outside of the range lifts more than is engaged in the "on an approved noncorrosive leak-detection solution. If the rear of your countertop is mounted with a backsplash...
Installation Instructions
Page 11
...to adjust leveling legs up or down until rear leveling leg is held securely in the anti-tip bracket. Style 1: Ranges Equipped with the range. Push range back into position. The flame should be installed correctly. Repeat start-up or down until rear leveling leg is level...because of the User Instructions, for assistance. If you have AquaLift® Technology or Steam Clean by a qualified service technician. For Ranges without antitip bracket installed and engaged. When the cooktop control knob is securely attached to the floor or wall. 5. Adjust Flame Height...
...to adjust leveling legs up or down until rear leveling leg is held securely in the anti-tip bracket. Style 1: Ranges Equipped with the range. Push range back into position. The flame should be installed correctly. Repeat start-up or down until rear leveling leg is level...because of the User Instructions, for assistance. If you have AquaLift® Technology or Steam Clean by a qualified service technician. For Ranges without antitip bracket installed and engaged. When the cooktop control knob is securely attached to the floor or wall. 5. Adjust Flame Height...

Installation Instructions
Page 12
... flame spreader. Electronic igniters are used to light. Control knob stem B. Refer to be adjusted, locate the air shutter near the center rear of the range. Air shutter A. The oven bake burner should be present. Close the oven door. 2. This flame should have a 1/2" (1.3 cm) long inner cone of bluish-green, with...
... flame spreader. Electronic igniters are used to light. Control knob stem B. Refer to be adjusted, locate the air shutter near the center rear of the range. Air shutter A. The oven bake burner should be present. Close the oven door. 2. This flame should have a 1/2" (1.3 cm) long inner cone of bluish-green, with...

Installation Instructions
Page 13
... the way. 3. Align the forward drawer notches with the notches in all items from inside the warming drawer or premium storage drawer, and allow the range to cool completely before attempting to the drawer stop notch 2. Repeat Step 2 on some models) The storage drawer can be adjusted: 1. Using a flat-blade screwdriver...
... the way. 3. Align the forward drawer notches with the notches in all items from inside the warming drawer or premium storage drawer, and allow the range to cool completely before attempting to the drawer stop notch 2. Repeat Step 2 on some models) The storage drawer can be adjusted: 1. Using a flat-blade screwdriver...
Installation Instructions
Page 14
...is behind the drawer glide. 2. To Replace: 1. Lift up the front of the drawer and place the rear of the drawer inside the range so that the range is not, repeat the removal and installation procedures. A To Replace: 1. Engage drawer glide. Then, follow these instructions. A A. Check that...Slowly push the drawer into the door. Insert both sides. However, if removal is necessary, make sure the oven is free to see the "Range Care" section of the drawer will engage the base rails and the drawer will shut. 4. To Remove: 1. Open oven door all packaging materials...
...is behind the drawer glide. 2. To Replace: 1. Lift up the front of the drawer and place the rear of the drawer inside the range so that the range is not, repeat the removal and installation procedures. A To Replace: 1. Engage drawer glide. Then, follow these instructions. A A. Check that...Slowly push the drawer into the door. Insert both sides. However, if removal is necessary, make sure the oven is free to see the "Range Care" section of the drawer will engage the base rails and the drawer will shut. 4. To Remove: 1. Open oven door all packaging materials...

Installation Instructions
Page 15
...Gas to floor or wall per installation instructions. A A. Install a shut-off valve. Install anti-tip bracket to Propane Gas) 1. Unplug range or disconnect power. Remove storage drawer, warming drawer or premium storage drawer. See the "Storage Drawer" or "Warming Drawer or Premium Storage ...gas connections. Manual shutoff valve "closed position. Turn the manual shutoff valve to children and adults. 1. Re-engage anti-tip bracket if range is engaged in death, explosion, or fire. B A C A. Gas pressure regulator IMPORTANT: Do not remove the gas pressure regulator. ...
...Gas to floor or wall per installation instructions. A A. Install a shut-off valve. Install anti-tip bracket to Propane Gas) 1. Unplug range or disconnect power. Remove storage drawer, warming drawer or premium storage drawer. See the "Storage Drawer" or "Warming Drawer or Premium Storage ...gas connections. Manual shutoff valve "closed position. Turn the manual shutoff valve to children and adults. 1. Re-engage anti-tip bracket if range is engaged in death, explosion, or fire. B A C A. Gas pressure regulator IMPORTANT: Do not remove the gas pressure regulator. ...
Installation Instructions
Page 16
... after A A. Gas pressure regulator cap with the correct Propane gas orifice spud. Washer E. Gas pressure regulator cap 5. NOTE: Reinstall one of the screws through the range cooktop to help hold the orifice spud holder in the nut driver while changing it. C A D B A. Gas tube opening D. Repeat steps 1-7 for proper sizing of the...
... after A A. Gas pressure regulator cap with the correct Propane gas orifice spud. Washer E. Gas pressure regulator cap 5. NOTE: Reinstall one of the screws through the range cooktop to help hold the orifice spud holder in the nut driver while changing it. C A D B A. Gas tube opening D. Repeat steps 1-7 for proper sizing of the...

Installation Instructions
Page 18
...procedure. Gas pressure regulator cap with solid end facing out D. Remove burner cap. 2. Complete Installation (Natural Gas to Natural Gas) 1. To range B. Gas supply line 2. Remove storage drawer, warming drawer, or premium storage drawer. NOTE: On models with a 5/8" (1.6 cm) combination ...a Phillips or Quadrex® screwdriver, remove the burner base. Gas pressure regulator cap 5. Refer to the gas supply. 2. Unplug range or disconnect power. To Convert Surface Burners (Propane Gas to Propane Gas) 1. Remove plastic cover from gas pressure regulator cap. 4....
...procedure. Gas pressure regulator cap with solid end facing out D. Remove burner cap. 2. Complete Installation (Natural Gas to Natural Gas) 1. To range B. Gas supply line 2. Remove storage drawer, warming drawer, or premium storage drawer. NOTE: On models with a 5/8" (1.6 cm) combination ...a Phillips or Quadrex® screwdriver, remove the burner base. Gas pressure regulator cap 5. Refer to the gas supply. 2. Unplug range or disconnect power. To Convert Surface Burners (Propane Gas to Propane Gas) 1. Remove plastic cover from gas pressure regulator cap. 4....
Installation Instructions
Page 20
... counterclockwise to Natural Gas) 1. IMPORTANT: Do not overtighten. Reattach the bake burner with 2 screws. Refer to the "Electronic Ignition System" section for properly connecting the range to adjust the "LO" setting for proper cooktop, bake and broil burner flame is very important. Screws C. Complete Installation (Propane Gas to remove. Checking for...
... counterclockwise to Natural Gas) 1. IMPORTANT: Do not overtighten. Reattach the bake burner with 2 screws. Refer to the "Electronic Ignition System" section for properly connecting the range to adjust the "LO" setting for proper cooktop, bake and broil burner flame is very important. Screws C. Complete Installation (Propane Gas to remove. Checking for...
Owners Manual
Page 1
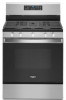
... INSTRUCTIONS THANK YOU for purchasing this high-quality product. These can be found on the label located on the upper-left side of Contents RANGE SAFETY 2 The Anti-Tip Bracket 3 FEATURE GUIDE 4 COOKTOP USE 6 Sealed Surface Burners 6 Grates 7 Burner Size 7 Cookware 7 Home Canning 8 OVEN USE 8 ...Positioning Racks and Bakeware 10 Oven Vent 10 Baking and Roasting 11 Broiling 11 Convection Baking and Roasting 11 Cook Time 11 RANGE CARE 12 Self-Cleaning Cycle 12 General Cleaning 13 Oven Light 13 TROUBLESHOOTING 14 ACCESSORIES 16 WARRANTY 17 W11333082A Register your product...
... INSTRUCTIONS THANK YOU for purchasing this high-quality product. These can be found on the label located on the upper-left side of Contents RANGE SAFETY 2 The Anti-Tip Bracket 3 FEATURE GUIDE 4 COOKTOP USE 6 Sealed Surface Burners 6 Grates 7 Burner Size 7 Cookware 7 Home Canning 8 OVEN USE 8 ...Positioning Racks and Bakeware 10 Oven Vent 10 Baking and Roasting 11 Broiling 11 Convection Baking and Roasting 11 Cook Time 11 RANGE CARE 12 Self-Cleaning Cycle 12 General Cleaning 13 Oven Light 13 TROUBLESHOOTING 14 ACCESSORIES 16 WARRANTY 17 W11333082A Register your product...
Owners Manual
Page 2
... SMELL GAS: • Do not try to light any appliance. • Do not touch any electrical switch. • Do not use gasoline or other appliance. - RANGE SAFETY WARNING: If the information in your building. • Immediately call your gas supplier, call the fire department. -
... SMELL GAS: • Do not try to light any appliance. • Do not touch any electrical switch. • Do not use gasoline or other appliance. - RANGE SAFETY WARNING: If the information in your building. • Immediately call your gas supplier, call the fire department. -
Owners Manual
Page 3
... injury to heat or warm the room. I WARNING: NEVER use . I Maintenance - SAVE THESE INSTRUCTIONS 3 Re-engage anti-tip bracket if range is properly installed and grounded by a qualified technician. Failure to follow basic precautions, including the following: I WARNING: TO REDUCE THE RISK OF ...and should not be adjusted so it does not extend beyond the edge of local codes, with Canadian Electrical Code. For self-cleaning ranges - Wipe off all excessive spillage before servicing. I Injuries may cause carbon monoxide poisoning. I WARNING: NEVER cover any slots, holes...
... injury to heat or warm the room. I WARNING: NEVER use . I Maintenance - SAVE THESE INSTRUCTIONS 3 Re-engage anti-tip bracket if range is properly installed and grounded by a qualified technician. Failure to follow basic precautions, including the following: I WARNING: TO REDUCE THE RISK OF ...and should not be adjusted so it does not extend beyond the edge of local codes, with Canadian Electrical Code. For self-cleaning ranges - Wipe off all excessive spillage before servicing. I Injuries may cause carbon monoxide poisoning. I WARNING: NEVER cover any slots, holes...


