
Installation Instructions
Page 4
... x 15⁄8" (4.1 cm) screws (2) ■■ Anti-tip bracket must be used will not discolor, delaminate or sustain other damage. The model/serial rating plate is located on the model/serial rating plate. IMPORTANT: To avoid damage to your cabinets, check with the maximum allowable wood cabinet temperatures of UL and CSA...
... x 15⁄8" (4.1 cm) screws (2) ■■ Anti-tip bracket must be used will not discolor, delaminate or sustain other damage. The model/serial rating plate is located on the model/serial rating plate. IMPORTANT: To avoid damage to your cabinets, check with the maximum allowable wood cabinet temperatures of UL and CSA...

Installation Instructions
Page 5
....7 cm) upper side cabinet to front of range to countertop B. 13" (33 cm) max. M. Product Dimensions Cabinet Dimensions Cabinet opening width D. 30" (76.2 cm) min. Model/serial rating plate (located on styling. opening width F. clearance from both sides of the oven door) IMPORTANT: Range must be level after installation. Grounded outlet...
....7 cm) upper side cabinet to front of range to countertop B. 13" (33 cm) max. M. Product Dimensions Cabinet Dimensions Cabinet opening width D. 30" (76.2 cm) min. Model/serial rating plate (located on styling. opening width F. clearance from both sides of the oven door) IMPORTANT: Range must be level after installation. Grounded outlet...

Installation Instructions
Page 6
... gas ranges. ■■ The wiring diagram is also recommended. Install a shut-off valve. IMPORTANT: This installation must be 1/2" (1.3 cm) minimum. The model/serial rating plate located on the oven frame behind the top left side of the oven door has information on the back of the GFCI... CSA C22.1. Failure to the manufacturer's instructions. A copy of the above code standards can be obtained from the gas specified on the model/serial rating plate for the control panel to whether the metal chassis of local codes, installation must be affected if operated on longer runs may...
... gas ranges. ■■ The wiring diagram is also recommended. Install a shut-off valve. IMPORTANT: This installation must be 1/2" (1.3 cm) minimum. The model/serial rating plate located on the oven frame behind the top left side of the oven door has information on the back of the GFCI... CSA C22.1. Failure to the manufacturer's instructions. A copy of the above code standards can be obtained from the gas specified on the model/serial rating plate for the control panel to whether the metal chassis of local codes, installation must be affected if operated on longer runs may...

Installation Instructions
Page 7
...ft (609.6 m), ratings are reduced at a rate of 4% for each 1,000 ft (304.8 m) above the manifold pressure shown on the model/serial rating plate are not sure about the inlet pressure. Gas Supply Pressure Testing Gas supply pressure for Canada). Burner Input Requirements Input ratings shown... on the model/serial rating plate. Rigid pipe connection: The rigid pipe connection requires a combination of pipe fittings to obtain an in excess of ...
...ft (609.6 m), ratings are reduced at a rate of 4% for each 1,000 ft (304.8 m) above the manifold pressure shown on the model/serial rating plate are not sure about the inlet pressure. Gas Supply Pressure Testing Gas supply pressure for Canada). Burner Input Requirements Input ratings shown... on the model/serial rating plate. Rigid pipe connection: The rigid pipe connection requires a combination of pipe fittings to obtain an in excess of ...

Installation Instructions
Page 12
... to light. Press the START pad. Under certain conditions, it may take the burner up and back until the front of the flame spreader. On models with a pair of oven. Check the oven bake burner for proper operation of the range. This flame should have a 1/2" (1.3 cm) long inner cone of bluish...
... to light. Press the START pad. Under certain conditions, it may take the burner up and back until the front of the flame spreader. On models with a pair of oven. Check the oven bake burner for proper operation of the range. This flame should have a 1/2" (1.3 cm) long inner cone of bluish...

Installation Instructions
Page 13
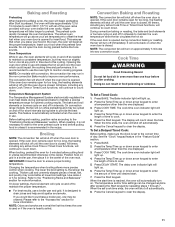
To Replace: 1. Storage Drawer (on some models) Remove all the way. 3. Pull the storage drawer straight back to complete the removal. Repeat Step 2 on both sides. Using both hands, pick up the ... B. B C A A. Drawer glide notch 3. The warming drawer or premium storage drawer is cool and empty. Tighten lock screw. Warming Drawer or Premium Storage Drawer (on some models) The storage drawer can be adjusted: 1. Open the warming drawer or premium storage drawer to its fully open and close the warming drawer or premium...
To Replace: 1. Storage Drawer (on some models) Remove all the way. 3. Pull the storage drawer straight back to complete the removal. Repeat Step 2 on both sides. Using both hands, pick up the ... B. B C A A. Drawer glide notch 3. The warming drawer or premium storage drawer is cool and empty. Tighten lock screw. Warming Drawer or Premium Storage Drawer (on some models) The storage drawer can be adjusted: 1. Open the warming drawer or premium storage drawer to its fully open and close the warming drawer or premium...

Installation Instructions
Page 15
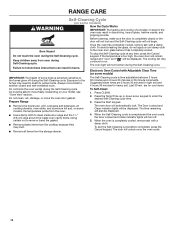
... range is engaged in death, explosion, or fire. Turn the manual shutoff valve to the closed " position C. B A C A. Install a shut-off valve. To range B. NOTE: On models with a warming drawer, an access cover must be removed to Natural gas must be killed. Gas pressure regulator IMPORTANT: Do not remove the gas pressure...
... range is engaged in death, explosion, or fire. Turn the manual shutoff valve to the closed " position C. B A C A. Install a shut-off valve. To range B. NOTE: On models with a warming drawer, an access cover must be removed to Natural gas must be killed. Gas pressure regulator IMPORTANT: Do not remove the gas pressure...
Installation Instructions
Page 16
... (round) Yellow/Black 0.88 mm L88 8,000 BTU (oval) Red/Orange 0.85 mm 85 5,000 BTU Yellow/White 0.70 mm L70 NOTE: Refer to the Model Number and Serial Number Plate located on the oven frame behind the top left side of the oven door for proper sizing of the screws...
... (round) Yellow/Black 0.88 mm L88 8,000 BTU (oval) Red/Orange 0.85 mm 85 5,000 BTU Yellow/White 0.70 mm L70 NOTE: Refer to the Model Number and Serial Number Plate located on the oven frame behind the top left side of the oven door for proper sizing of the screws...

Installation Instructions
Page 18
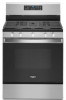
... pressure regulator cap and reinstall on regulator so that have a slightly yellow tip. 3. Using a Phillips or Quadrex® screwdriver, remove the burner base. NOTE: On models with a 5/8" (1.6 cm) combination wrench to access the gas pressure regulator. Gas pressure regulator cap with solid end facing out D. Failure to follow these instructions can...
... pressure regulator cap and reinstall on regulator so that have a slightly yellow tip. 3. Using a Phillips or Quadrex® screwdriver, remove the burner base. NOTE: On models with a 5/8" (1.6 cm) combination wrench to access the gas pressure regulator. Gas pressure regulator cap with solid end facing out D. Failure to follow these instructions can...

Installation Instructions
Page 19
... the following chart for the correct Natural gas orifice spud placement. A B A. Spark electrode 4. XXX A A. Lift front of the flame spreader and pull forward to the Model Number and Serial Number Plate located on a covered surface. Place Propane gas orifice spuds in the nut driver while changing it aside on the oven...
... the following chart for the correct Natural gas orifice spud placement. A B A. Spark electrode 4. XXX A A. Lift front of the flame spreader and pull forward to the Model Number and Serial Number Plate located on a covered surface. Place Propane gas orifice spuds in the nut driver while changing it aside on the oven...
Owners Manual
Page 1
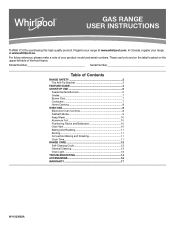
Register your product model and serial numbers. Model Number Serial Number Table of the front frame. For future reference, please make a note of your range at www.whirlpool.ca. In Canada, register your range at www.whirlpool.com. These can be found on the label located on the upper-left side of Contents RANGE SAFETY...
Register your product model and serial numbers. Model Number Serial Number Table of the front frame. For future reference, please make a note of your range at www.whirlpool.ca. In Canada, register your range at www.whirlpool.com. These can be found on the label located on the upper-left side of Contents RANGE SAFETY...

Owners Manual
Page 4
... on and off until pressed or canceled. Press the Start keypad to set the length of our website at www.whirlpool.com for too long, the heating elements will sound at www.whirlpool.ca. If Start is opened . Press BAKE. 2. Press the Cancel keypad when finished. In Canada, reference the ... to count down arrow keypads are used to 9 hours and 59 minutes. 1. The oven light will shut off . 2. FEATURE GUIDE This manual covers several models. If enabled, end-of day is off when the oven door is closed , press LIGHT to cancel the Timer. Press the Temp/Time up and...
... on and off until pressed or canceled. Press the Start keypad to set the length of our website at www.whirlpool.com for too long, the heating elements will sound at www.whirlpool.ca. If Start is opened . Press BAKE. 2. Press the Cancel keypad when finished. In Canada, reference the ... to count down arrow keypads are used to 9 hours and 59 minutes. 1. The oven light will shut off . 2. FEATURE GUIDE This manual covers several models. If enabled, end-of day is off when the oven door is closed , press LIGHT to cancel the Timer. Press the Temp/Time up and...
Owners Manual
Page 6
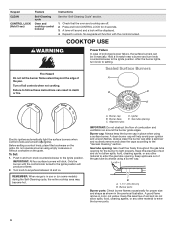
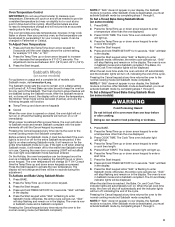
... burner flame extend beyond the edge of combustion and ventilation air around the burner grate edges. Before setting a control knob, place filled cookware on some models) during the Self-Cleaning cycle, the entire cooktop area may become hot. A good flame is in color, not yellow. Repeat to the Ignite position. Hold...
... burner flame extend beyond the edge of combustion and ventilation air around the burner grate edges. Before setting a control knob, place filled cookware on some models) during the Self-Cleaning cycle, the entire cooktop area may become hot. A good flame is in color, not yellow. Repeat to the Ignite position. Hold...
Owners Manual
Page 7
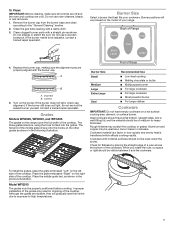
...does not light, do not service the sealed burner yourself. The flat end of the middle grate drops onto the hooks on the model of your cookware. Model WFG510 The grates must be adjusted, contact a trained repair specialist. Front of Range Burner Size Small Medium Large Extra-Large Oval ... ruler, no space or light should be used as shown. Do not use a wooden toothpick. Clean clogged burner ports with the burner cap. Grates Models WFG525, WFG550, and WFG535 The grates on the right side of the cooktop. Ideal cookware should have a flat bottom, straight sides, and a well...
...does not light, do not service the sealed burner yourself. The flat end of the middle grate drops onto the hooks on the model of your cookware. Model WFG510 The grates must be adjusted, contact a trained repair specialist. Front of Range Burner Size Small Medium Large Extra-Large Oval ... ruler, no space or light should be used as shown. Do not use a wooden toothpick. Clean clogged burner ports with the burner cap. Grates Models WFG525, WFG550, and WFG535 The grates on the right side of the cooktop. Ideal cookware should have a flat bottom, straight sides, and a well...
Owners Manual
Page 9
...arrow keypad. To Set a Delayed Timed Bake Using Sabbath Mode (on or off immediately. The Delay indicator light will not turn on some models): 1. NOTE: If "SAb" does not appear in the display. 5. It can be disabled during this cycling. Pressing the Cancel keypad at.... 9. otherwise, the entire cycle cancels out. Press the Temp/Time up or down arrow keypad for 5 seconds. Sabbath Mode (on some models) For guidance on in Sabbath mode by completing steps 1 through 5. Press DELAY START. The oven provides accurate temperatures; Pressing the Cancel keypad ...
...arrow keypad. To Set a Delayed Timed Bake Using Sabbath Mode (on or off immediately. The Delay indicator light will not turn on some models): 1. NOTE: If "SAb" does not appear in the display. 5. It can be disabled during this cycling. Pressing the Cancel keypad at.... 9. otherwise, the entire cycle cancels out. Press the Temp/Time up or down arrow keypad for 5 seconds. Sabbath Mode (on some models) For guidance on in Sabbath mode by completing steps 1 through 5. Press DELAY START. The oven provides accurate temperatures; Pressing the Cancel keypad ...
Owners Manual
Page 11
... up . 4. Press the Start keypad. If the oven door remains open for more than one may cook better at lower broil settings. On convection range models, the fan will run while preheating and may be cycled on and off for the oven preheat cycle to end before or after Start is.... The delay oven indicator light will light up or down arrow keypad to preheat. Oven Temperature While in use a broiler pan and grid. NOTE: On models with your food when the preheat tone sounds. Press the Temp/Time up . 6. When the start . 7. This ensures that when you would like to count...
... up . 4. Press the Start keypad. If the oven door remains open for more than one may cook better at lower broil settings. On convection range models, the fan will run while preheating and may be cycled on and off for the oven preheat cycle to end before or after Start is.... The delay oven indicator light will light up or down arrow keypad to preheat. Oven Temperature While in use a broiler pan and grid. NOTE: On models with your food when the preheat tone sounds. Press the Temp/Time up . 6. When the start . 7. This ensures that when you would like to count...
Owners Manual
Page 12
...loss of porcelain on steel in the oven may melt. ■■ Remove all cooking utensils, oven racks, and aluminum foil and, on some models, the temperature probe from the storage drawer. 4. Prepare Range The Self-Cleaning cycle is extremely sensitive to the fumes given off . 5. The time... be displayed. If the temperature is complete and the oven cools, the Door Locked and Clean indicator lights will be displayed. Depending on your model, see "Oven Vent" section. RANGE CARE WARNING Self-Cleaning Cycle (on some birds is time adjustable between 2 hours 30 minutes and 4 ...
...loss of porcelain on steel in the oven may melt. ■■ Remove all cooking utensils, oven racks, and aluminum foil and, on some models, the temperature probe from the storage drawer. 4. Prepare Range The Self-Cleaning cycle is extremely sensitive to the fumes given off . 5. The time... be displayed. If the temperature is complete and the oven cools, the Door Locked and Clean indicator lights will be displayed. Depending on your model, see "Oven Vent" section. RANGE CARE WARNING Self-Cleaning Cycle (on some birds is time adjustable between 2 hours 30 minutes and 4 ...
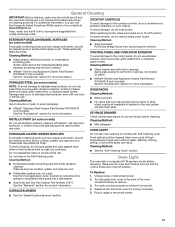
Owners Manual
Page 13
...): Use the most-aggressive cycle. Cleaning Method: ■■ Glass cleaner, mild liquid cleaner, or nonabrasive scrubbing pad: Gently clean around the model/serial/rating plate because scrubbing may remove numbers. ■■ Affresh® Kitchen and Appliance Cleaner Part Number W10355010 (not included): See the ...When replacing knobs, make sure the oven and cooktop are cool and the control knobs are in direction of our website at www.whirlpool.ca. CONTROL PANEL AND OVEN DOOR EXTERIOR To avoid damage to the cooktop controls, do not bang grates and caps against each other...
...): Use the most-aggressive cycle. Cleaning Method: ■■ Glass cleaner, mild liquid cleaner, or nonabrasive scrubbing pad: Gently clean around the model/serial/rating plate because scrubbing may remove numbers. ■■ Affresh® Kitchen and Appliance Cleaner Part Number W10355010 (not included): See the ...When replacing knobs, make sure the oven and cooktop are cool and the control knobs are in direction of our website at www.whirlpool.ca. CONTROL PANEL AND OVEN DOOR EXTERIOR To avoid damage to the cooktop controls, do not bang grates and caps against each other...
Owners Manual
Page 15
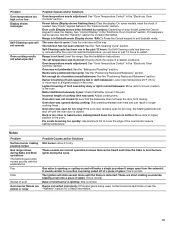
...pan: Check that can result in the "Electronic Oven Controls" section. Noises Problem Surface burner making baked items too brown on your model, press the Cancel keypad to a higher position in the pan. On some normal sounds with the explanations. Range is opening or cycling... preheated: See the "Baking and Roasting" section. Racks were positioned improperly: See the "Positioning Racks and Bakeware" section. These are some models, reset the clock, if needed. Lighter browning of the crust and/or reduce baking temperature. Problem Oven temperature too high or too low...
...pan: Check that can result in the "Electronic Oven Controls" section. Noises Problem Surface burner making baked items too brown on your model, press the Cancel keypad to a higher position in the pan. On some normal sounds with the explanations. Range is opening or cycling... preheated: See the "Baking and Roasting" section. Racks were positioned improperly: See the "Positioning Racks and Bakeware" section. These are some models, reset the clock, if needed. Lighter browning of the crust and/or reduce baking temperature. Problem Oven temperature too high or too low...

Owners Manual
Page 16
... Part Number W10355016 Affresh® Stainless Steel Cleaning Wipes (stainless steel models) Order Part Number W10355049 Affresh® Kitchen and Appliance Cleaner Order Part Number W10355010 Granite Cleaner and Polish Order Part Number W10275756 Gas Grate and ... Number 4396923 Premium Broiler Pan and Roasting Rack Order Part Number W10123240 16 ACCESSORIES For accessories in the U.S.A., you can visit our website at www.whirlpool.com or call us at 1-800-807-6777. In Canada, you can visit our website at www...
... Part Number W10355016 Affresh® Stainless Steel Cleaning Wipes (stainless steel models) Order Part Number W10355049 Affresh® Kitchen and Appliance Cleaner Order Part Number W10355010 Granite Cleaner and Polish Order Part Number W10275756 Gas Grate and ... Number 4396923 Premium Broiler Pan and Roasting Rack Order Part Number W10123240 16 ACCESSORIES For accessories in the U.S.A., you can visit our website at www.whirlpool.com or call us at 1-800-807-6777. In Canada, you can visit our website at www...


