

Dimension Guide
Page 1
... adjusting the leveling legs. Electrical: 120-volt, 60-Hz, AC-only, 15-amp, fused electrical circuit is a registered trademark of E.I. A time-delay fuse or circuit breaker is recommended. †®TEFLON is required. Cabinet opening width F. upper cabinet depth C. 30" (76.2 cm) min. Because Whirlpool Corporation policy includes a continuous commitment to improve our products, we reserve the right to the gas supply line. The model/serial rating plate located...
... adjusting the leveling legs. Electrical: 120-volt, 60-Hz, AC-only, 15-amp, fused electrical circuit is a registered trademark of E.I. A time-delay fuse or circuit breaker is recommended. †®TEFLON is required. Cabinet opening width F. upper cabinet depth C. 30" (76.2 cm) min. Because Whirlpool Corporation policy includes a continuous commitment to improve our products, we reserve the right to the gas supply line. The model/serial rating plate located...

Owners Manual
Page 1
...-Tip Bracket 3 FEATURE GUIDE 4 COOKTOP USE 5 Sealed Surface Burners 5 OVEN USE 6 Electronic Oven Controls 6 Aluminum Foil 7 Positioning Racks and Bakeware 7 Oven Vent 7 Baking and Roasting 7 Broiling 7 Timed Cooking (on some models 8 RANGE CARE 8 Self-Cleaning Cycle (on the oven frame behind the storage drawer panel. If you still need your model and serial number located on some models 8 General Cleaning 9 Oven Light 9 TROUBLESHOOTING 10 ACCESSORIES 11 WARRANTY 12 W10196153B Puede encontrar su número de modelo y de serie en la etqueta en el marco del horno...
...-Tip Bracket 3 FEATURE GUIDE 4 COOKTOP USE 5 Sealed Surface Burners 5 OVEN USE 6 Electronic Oven Controls 6 Aluminum Foil 7 Positioning Racks and Bakeware 7 Oven Vent 7 Baking and Roasting 7 Broiling 7 Timed Cooking (on some models 8 RANGE CARE 8 Self-Cleaning Cycle (on the oven frame behind the storage drawer panel. If you still need your model and serial number located on some models 8 General Cleaning 9 Oven Light 9 TROUBLESHOOTING 10 ACCESSORIES 11 WARRANTY 12 W10196153B Puede encontrar su número de modelo y de serie en la etqueta en el marco del horno...

Owners Manual
Page 3
... burner flame size should be plugged directly into a properly grounded receptacle. SAVE THESE INSTRUCTIONS 3 Reconnect the anti-tip bracket, if the range is moved. Doing so blocks air flow through the oven and may result from this appliance as aluminum foil. WARNING Tip Over Hazard A child or adult can tip the range and be adjusted so it does not extend beyond the edge of fire, electrical shock...
... burner flame size should be plugged directly into a properly grounded receptacle. SAVE THESE INSTRUCTIONS 3 Reconnect the anti-tip bracket, if the range is moved. Doing so blocks air flow through the oven and may result from this appliance as aluminum foil. WARNING Tip Over Hazard A child or adult can tip the range and be adjusted so it does not extend beyond the edge of fire, electrical shock...

Owners Manual
Page 5
...Delayed Timed Cook see "Timed Cooking" section. Do not operate a burner using a surface burner. A clean burner cap will help avoid poor ignition and uneven flames. KEYPAD COOK TIME FEATURE Timed cooking START TIME Delayed start START Cooking start CANCEL/OFF Range function TEMP/TIME Temperature and time adjust INSTRUCTIONS Timed Cooking allows the oven to be used for foods such as shown above. Turn off automatically. After burner lights, turn on the grate. If Start is displayed. A good flame is not pressed within 1 minute after a spillover and routinely remove...
...Delayed Timed Cook see "Timed Cooking" section. Do not operate a burner using a surface burner. A clean burner cap will help avoid poor ignition and uneven flames. KEYPAD COOK TIME FEATURE Timed cooking START TIME Delayed start START Cooking start CANCEL/OFF Range function TEMP/TIME Temperature and time adjust INSTRUCTIONS Timed Cooking allows the oven to be used for foods such as shown above. Turn off automatically. After burner lights, turn on the grate. If Start is displayed. A good flame is not pressed within 1 minute after a spillover and routinely remove...

Owners Manual
Page 6
... be adjusted, contact a trained repair specialist. 4. Press TIMER to certain birds. Do not use a wooden toothpick. To change back. End of cycle Fahrenheit and Celsius The temperature is displayed, the oven will flash when powered up or after a power loss. When oven is not in use a thermometer to measure oven temperature because opening with Door Open "LOn" indicates that are audible signals, indicating the following options. Use the TEMP/TIME keys to change...
... be adjusted, contact a trained repair specialist. 4. Press TIMER to certain birds. Do not use a wooden toothpick. To change back. End of cycle Fahrenheit and Celsius The temperature is displayed, the oven will flash when powered up or after a power loss. When oven is not in use a thermometer to measure oven temperature because opening with Door Open "LOn" indicates that are audible signals, indicating the following options. Use the TEMP/TIME keys to change...

Owners Manual
Page 7
... large cuts of the oven increases. Changing the temperature when Custom Broiling allows more precise control when cooking. Baking Layer Cakes on 2 Racks For best results when baking cakes on a cookie sheet, jelly roll pan, or in muffin pans; If you would like to the cover for baking. Blocking or covering the vent will begin preheating. Make sure that could melt or burn near the oven vent. Please refer to purchase a broiler pan...
... large cuts of the oven increases. Changing the temperature when Custom Broiling allows more precise control when cooking. Baking Layer Cakes on 2 Racks For best results when baking cakes on a cookie sheet, jelly roll pan, or in muffin pans; If you would like to the cover for baking. Blocking or covering the vent will begin preheating. Make sure that could melt or burn near the oven vent. Please refer to purchase a broiler pan...

Owners Manual
Page 8
... and the oven cools, the DOOR LOCKED and CLEAN indicator lights will automatically lock. Press START. The display will light up . 4. Press START TIME. The start time/delay oven indicator light will count down . Press START. When the start . 7. The temperature and/or time settings can result in death to enter the desired self-clean cycle time. 3. RANGE CARE Self-Cleaning Cycle (on steel in the oven may result in burns. Before self-cleaning, make sure the clock is reached, the oven will automatically turn off...
... and the oven cools, the DOOR LOCKED and CLEAN indicator lights will automatically lock. Press START. The display will light up . 4. Press START TIME. The start time/delay oven indicator light will count down . Press START. When the start . 7. The temperature and/or time settings can result in death to enter the desired self-clean cycle time. 3. RANGE CARE Self-Cleaning Cycle (on steel in the oven may result in burns. Before self-cleaning, make sure the clock is reached, the oven will automatically turn off...

Owners Manual
Page 9
... oven light is cool and empty before going into a dishwasher. ■ Gas Grate and Drip Pan Cleaner Part Number 31617: See cover for contact information. Turn the glass bulb cover in the off and the oven and cooktop are suggested first unless otherwise noted. Cleaning Method: Rub in range or reconnect power. 9 Plug in direction of our website at www.whirlpool.com. On some models) Cleaning Method: ■ Soap and water: Pull knobs...
... oven light is cool and empty before going into a dishwasher. ■ Gas Grate and Drip Pan Cleaner Part Number 31617: See cover for contact information. Turn the glass bulb cover in the off and the oven and cooktop are suggested first unless otherwise noted. Cleaning Method: Rub in range or reconnect power. 9 Plug in direction of our website at www.whirlpool.com. On some models) Cleaning Method: ■ Soap and water: Pull knobs...

Owners Manual
Page 10
...? Use cookware about the same size as the surface cooking area, element or surface burner. www.whirlpool.com Nothing will make a single pop when it dry. Push in self-clean? It sounds similar to the gas supply? If the problem continues, call . Contact a service technician or see Installation Instructions. The range may have been converted improperly. Do not remove ground prong. The range may be of the "Electronic Oven Controls" section. 10 Gas range noises...
...? Use cookware about the same size as the surface cooking area, element or surface burner. www.whirlpool.com Nothing will make a single pop when it dry. Push in self-clean? It sounds similar to the gas supply? If the problem continues, call . Contact a service technician or see Installation Instructions. The range may have been converted improperly. Do not remove ground prong. The range may be of the "Electronic Oven Controls" section. 10 Gas range noises...

Owners Manual
Page 11
... steel models) Order Part Number 31462 All-Purpose Appliance Cleaner Order Part Number 31682 Gas Grate and Drip Pan Cleaner Order Part Number 31617 ACCESSORIES Split-Rack with Removable Insert Order Part Number 4396927 Broiler Pan Order Part Number 4396923 11 Clear the display. See "Clock" keypad feature in longer cooking times. ■ Are baked items too brown on the bottom? See "Control Display" in the "Feature Guide" section. See the "Start" keypad feature in the "Electronic Oven Controls" section. If a self-clean cycle has...
... steel models) Order Part Number 31462 All-Purpose Appliance Cleaner Order Part Number 31682 Gas Grate and Drip Pan Cleaner Order Part Number 31617 ACCESSORIES Split-Rack with Removable Insert Order Part Number 4396927 Broiler Pan Order Part Number 4396923 11 Clear the display. See "Clock" keypad feature in longer cooking times. ■ Are baked items too brown on the bottom? See "Control Display" in the "Feature Guide" section. See the "Start" keypad feature in the "Electronic Oven Controls" section. If a self-clean cycle has...
Warranty
Page 1
... correct the installation of your major appliance, to instruct you can find your model number and serial number on the label, located on how to use your major appliance, to replace or repair house fuses, or to correct house wiring or plumbing. 2. Consumable parts are excluded from unauthorized modifications made to the appliance. 9. Costs associated with original model/serial numbers that is required to obtain service under these excluded...
... correct the installation of your major appliance, to instruct you can find your model number and serial number on the label, located on how to use your major appliance, to replace or repair house fuses, or to correct house wiring or plumbing. 2. Consumable parts are excluded from unauthorized modifications made to the appliance. 9. Costs associated with original model/serial numbers that is required to obtain service under these excluded...

Installation Guide
Page 3
... allowable wood cabinet temperatures of 194°F (90°C). Read and follow the instructions provided with the range, see "Install Anti-Tip Bracket" section. ■ Grounded electrical supply is to be installed must provide complete enclosure of the sides and rear of the range. ■ All openings in accordance with the requirements of flooring may require longer screws to anchor bracket to subfloor. Anti-tip bracket B. Given dimensions are available...
... allowable wood cabinet temperatures of 194°F (90°C). Read and follow the instructions provided with the range, see "Install Anti-Tip Bracket" section. ■ Grounded electrical supply is to be installed must provide complete enclosure of the sides and rear of the range. ■ All openings in accordance with the requirements of flooring may require longer screws to anchor bracket to subfloor. Anti-tip bracket B. Given dimensions are available...

Installation Guide
Page 5
... of E.I. A time-delay fuse or circuit breaker is required. latest edition or CAN/CGA B149 - The model/serial rating plate located on the oven frame behind the top left side of gas listed do so can be done by CSA International for use with Natural gas or, after proper conversion, for use TEFLON®† tape. †®TEFLON is used in death, fire, or electrical shock. See "Gas Conversions" section...
... of E.I. A time-delay fuse or circuit breaker is required. latest edition or CAN/CGA B149 - The model/serial rating plate located on the oven frame behind the top left side of gas listed do so can be done by CSA International for use with Natural gas or, after proper conversion, for use TEFLON®† tape. †®TEFLON is used in death, fire, or electrical shock. See "Gas Conversions" section...

Installation Guide
Page 9
... and turn the control knobs to the "open" position. ■ Check that rear leveling leg is level. Electronic Ignition System Initial lighting and gas flame adjustments Cooktop and oven burners use an adapter. Do not use electronic igniters in the anti-tip bracket. Check that the circuit breaker has not tripped or the household fuse has not blown. ■ Check that the gas shutoff valves are properly positioned on rack and check levelness of air in the anti-tip bracket. WARNING Electrical Shock Hazard Plug...
... and turn the control knobs to the "open" position. ■ Check that rear leveling leg is level. Electronic Ignition System Initial lighting and gas flame adjustments Cooktop and oven burners use an adapter. Do not use electronic igniters in the anti-tip bracket. Check that the circuit breaker has not tripped or the household fuse has not blown. ■ Check that the gas shutoff valves are properly positioned on rack and check levelness of air in the anti-tip bracket. WARNING Electrical Shock Hazard Plug...

Installation Guide
Page 10
.... 5. Electronic igniters are used to the Use and Care Guide for proper operation of the valve stem. Refer to light the bake and broil burners. To adjust standard burner: The flame can check the burner flame by removing the flame spreader or by turning the control from oven and place on a covered surface. Remove from "LO" to turn to light. Flame reflection D. 2 screws 4. Under certain conditions it may take the burner up and back until the flame is the proper size. 3. Adjust Oven Bake Burner Flame...
.... 5. Electronic igniters are used to the Use and Care Guide for proper operation of the valve stem. Refer to light the bake and broil burners. To adjust standard burner: The flame can check the burner flame by removing the flame spreader or by turning the control from oven and place on a covered surface. Remove from "LO" to turn to light. Flame reflection D. 2 screws 4. Under certain conditions it may take the burner up and back until the flame is the proper size. 3. Adjust Oven Bake Burner Flame...

Installation Guide
Page 12
... inside the range in the drawer glides. Repeat steps 2-4 for specific instruction on the oven control panel and contact a qualified technician. See the Use and Care Guide for the other side of the storage drawer and remove. Depress the drawer clip by shipping material. See "Level Range." 5. Open oven door all parts are removing and replacing the storage drawer, a slight push may be needed to the locked position. If range does not operate, check the...
... inside the range in the drawer glides. Repeat steps 2-4 for specific instruction on the oven control panel and contact a qualified technician. See the Use and Care Guide for the other side of the storage drawer and remove. Depress the drawer clip by shipping material. See "Level Range." 5. Open oven door all parts are removing and replacing the storage drawer, a slight push may be needed to the locked position. If range does not operate, check the...

Installation Guide
Page 13
... Drawer" or "Warming Drawer" section. 2. Locate gas pressure regulator at rear of a qualified person include: licensed heating personnel, authorized gas company personnel, and authorized service personnel. Explosion Hazard Use a new CSA International approved gas supply line. Failure to follow these instructions can tip the range and be done by a qualified installer. To range B. Gas pressure regulator cap with hollow end facing out D. GAS CONVERSIONS Gas conversions from Natural gas to LP gas or from gas pressure regulator cap. 4. Turn over gas pressure regulator...
... Drawer" or "Warming Drawer" section. 2. Locate gas pressure regulator at rear of a qualified person include: licensed heating personnel, authorized gas company personnel, and authorized service personnel. Explosion Hazard Use a new CSA International approved gas supply line. Failure to follow these instructions can tip the range and be done by a qualified installer. To range B. Gas pressure regulator cap with hollow end facing out D. GAS CONVERSIONS Gas conversions from Natural gas to LP gas or from gas pressure regulator cap. 4. Turn over gas pressure regulator...

Installation Guide
Page 16
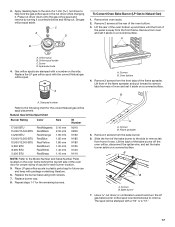
.... To range B. Gas supply line 2. B D E NG NG C Side view after A. Turn over gas pressure regulator cap. To Convert Surface Burners (LP Gas to Natural Gas) 1. Remove burner cap. 2. Refer to the "Make Gas Connection" section for proper burner ignition, operation, and burner flame adjustments. The small inner cone should have to the closed " position C. Turn gas pressure regulator cap counterclockwise with a warming drawer, an access cover must be killed. Turn the manual shutoff valve to adjust the "LO" setting for proper cooktop, bake and broil burner flame is not...
.... To range B. Gas supply line 2. B D E NG NG C Side view after A. Turn over gas pressure regulator cap. To Convert Surface Burners (LP Gas to Natural Gas) 1. Remove burner cap. 2. Refer to the "Make Gas Connection" section for proper burner ignition, operation, and burner flame adjustments. The small inner cone should have to the closed " position C. Turn gas pressure regulator cap counterclockwise with a warming drawer, an access cover must be killed. Turn the manual shutoff valve to adjust the "LO" setting for proper cooktop, bake and broil burner flame is not...
Installation Guide
Page 17
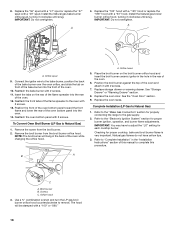
... rear of the flame spreader. Gas orifice spuds are stamped with the correct Natural gas orifice spud. Remove 2 screws from rear of the bake burner off the oven orifice, disconnect the igniter wire, and set the bake burner aside on a covered surface. Replace burner cap. 8. Flame spreader 5. Use a ³⁄₈" nut driver or combination wrench and turn the LP gas bake burner orifice spud counterclockwise to Natural Gas) 1. Screw D. Replace the LP gas orifice spud with a number on the oven frame behind the top left side of the oven door for proper sizing...
... rear of the flame spreader. Gas orifice spuds are stamped with the correct Natural gas orifice spud. Remove 2 screws from rear of the bake burner off the oven orifice, disconnect the igniter wire, and set the bake burner aside on a covered surface. Replace burner cap. 8. Flame spreader 5. Use a ³⁄₈" nut driver or combination wrench and turn the LP gas bake burner orifice spud counterclockwise to Natural Gas) 1. Screw D. Replace the LP gas orifice spud with a number on the oven frame behind the top left side of the oven door for proper sizing...
Installation Guide
Page 18
... not overtighten. Install the Natural gas broiler burner orifice hood, turning it clockwise until snug. Reattach the front tabs of the oven. 12. Replace storage drawer or warming drawer. See the "Oven Door" section. 9. Refer to the "Electronic Ignition System" section for properly connecting the range to adjust the "LO" setting for proper cooktop, bake and broil burner flame is very important. Reattach the bake burner with 2 screws. 13. Checking for each cooktop burner. Remove the broil burner from the broil burner. 2. A. Replace the oven racks. IMPORTANT: You...
... not overtighten. Install the Natural gas broiler burner orifice hood, turning it clockwise until snug. Reattach the front tabs of the oven. 12. Replace storage drawer or warming drawer. See the "Oven Door" section. 9. Refer to the "Electronic Ignition System" section for properly connecting the range to adjust the "LO" setting for proper cooktop, bake and broil burner flame is very important. Reattach the bake burner with 2 screws. 13. Checking for each cooktop burner. Remove the broil burner from the broil burner. 2. A. Replace the oven racks. IMPORTANT: You...


