Owners Manual
Page 7
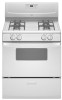
...; Use on the burner. Replace the burner cap onto the burner base, making sure the alignment pins are cool. If the burner does not light, check cap alignment. Home Canning When canning for long periods, alternate the use of cooking. ■ Medium or heavy thickness is best for...on a hot surface cooking area, element or surface burner. Remove the surface burner grates. 2. Do not use oven cleaners, bleach or rust removers. 1. If the burner still does not light, do not service the burner yourself. Cookware IMPORTANT: Do not leave empty cookware on the properties of aluminum. ...
...; Use on the burner. Replace the burner cap onto the burner base, making sure the alignment pins are cool. If the burner does not light, check cap alignment. Home Canning When canning for long periods, alternate the use of cooking. ■ Medium or heavy thickness is best for...on a hot surface cooking area, element or surface burner. Remove the surface burner grates. 2. Do not use oven cleaners, bleach or rust removers. 1. If the burner still does not light, do not service the burner yourself. Cookware IMPORTANT: Do not leave empty cookware on the properties of aluminum. ...
Owners Manual
Page 8
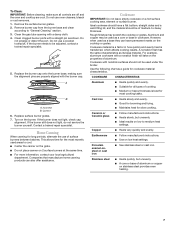
...or minutes up " or "down the set the length of day. 3. Cancel/Off The CANCEL/OFF pad stops any oven function. Repeat to adjust time. 3. To Set: 1. The timer indicator light will show a.m. When the set the time of time. 3. Clock This is running. To Reprogram: 1. Press TEMP... except the Clock, Timer and Control Lock. Timer Display When power is not in one of day, bake or broil mode. 2. Oven light B. Press CLOCK. 2. ELECTRONIC OVEN CONTROL AB C DE Tones Tones are audible signals, indicating the following modes: Bake, Broil or Timer. Clock C. To exit mode,...
...or minutes up " or "down the set the length of day. 3. Cancel/Off The CANCEL/OFF pad stops any oven function. Repeat to adjust time. 3. To Set: 1. The timer indicator light will show a.m. When the set the time of time. 3. Clock This is running. To Reprogram: 1. Press TEMP... except the Clock, Timer and Control Lock. Timer Display When power is not in one of day, bake or broil mode. 2. Oven light B. Press CLOCK. 2. ELECTRONIC OVEN CONTROL AB C DE Tones Tones are audible signals, indicating the following modes: Bake, Broil or Timer. Clock C. To exit mode,...
Owners Manual
Page 9
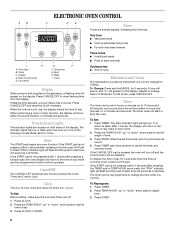
...-10°F (-5°C) ...a little less -20°F (-10°C) ...moderately less -30°F (-15°C) ...much less To Adjust Oven Temperature Calibration: 1. The adjustment can be changed in Fahrenheit or Celsius. Exposure to the fumes may cook faster or slower than the dish and that... display. Touch the TEMP/HOUR "up at least ¹⁄₂" (1.3 cm) larger than your previous oven, so the temperature calibration can be set , OVEN LIGHT and TIMER pads will disappear from the display. Aluminum Foil IMPORTANT: To avoid permanent damage to the porcelain finish...
...-10°F (-5°C) ...a little less -20°F (-10°C) ...moderately less -30°F (-15°C) ...much less To Adjust Oven Temperature Calibration: 1. The adjustment can be changed in Fahrenheit or Celsius. Exposure to the fumes may cook faster or slower than the dish and that... display. Touch the TEMP/HOUR "up at least ¹⁄₂" (1.3 cm) larger than your previous oven, so the temperature calibration can be set , OVEN LIGHT and TIMER pads will disappear from the display. Aluminum Foil IMPORTANT: To avoid permanent damage to the porcelain finish...
Owners Manual
Page 10
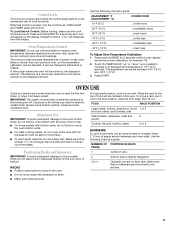
...guide. Broiling BROILER The broiler is displayed. Use the following chart as room temperature and peak energy usage times. Blocking or covering the oven vent will light up " or "down , the set between 170°F and 500°F (77°C and 260°C). 2. Do not...9632; Uneven browning ■ May need to put food in 5°F (3°C) amounts. Oven Vent A A. Press START or START/ENTER. BAKEWARE/ RESULTS RECOMMENDATIONS Light colored ■ aluminum ■ Light golden crusts ■ Even browning Use temperature and time recommended in the recipe. Start does ...
...guide. Broiling BROILER The broiler is displayed. Use the following chart as room temperature and peak energy usage times. Blocking or covering the oven vent will light up " or "down , the set between 170°F and 500°F (77°C and 260°C). 2. Do not...9632; Uneven browning ■ May need to put food in 5°F (3°C) amounts. Oven Vent A A. Press START or START/ENTER. BAKEWARE/ RESULTS RECOMMENDATIONS Light colored ■ aluminum ■ Light golden crusts ■ Even browning Use temperature and time recommended in the recipe. Start does ...
Owners Manual
Page 11
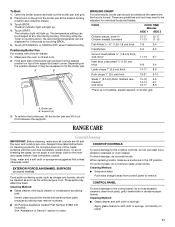
Touch BROIL. The indicator light will light up. 4. Positioning Broiler Pan For models with a broiler drawer: 1. Make sure the oven is turned. A B BROILING CHART For best results, broiler pan should be displayed for individual foods and tastes. Times are guidelines only and ... To avoid breaking the glass, do not apply a cool damp cloth to remove. Pull knobs straight away from between the supports. The Broil indicator light will light up to order. FOOD COOK TIME Minutes SIDE 1 SIDE 2 Chicken pieces, bone-in the Off position. Broiler pan B. RANGE CARE General Cleaning...
Touch BROIL. The indicator light will light up. 4. Positioning Broiler Pan For models with a broiler drawer: 1. Make sure the oven is turned. A B BROILING CHART For best results, broiler pan should be displayed for individual foods and tastes. Times are guidelines only and ... To avoid breaking the glass, do not apply a cool damp cloth to remove. Pull knobs straight away from between the supports. The Broil indicator light will light up to order. FOOD COOK TIME Minutes SIDE 1 SIDE 2 Chicken pieces, bone-in the Off position. Broiler pan B. RANGE CARE General Cleaning...

Owners Manual
Page 12
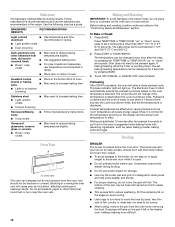
... only, not caps): Use the most aggressive cycle. Oven Door For normal range use, it is closed, press OVEN LIGHT to remove the oven door. Then, follow these instructions. Open the oven door. Do not reassemble caps on the light. OVEN CAVITY Food spills should be removed. Cleaning Method: &#...with porcelain and staining, etching, pitting or faint white spots can be cleaned as soon as cast iron cookware. Oven Light The oven light is replaced on some models, the oven door can result. To Replace: 1. Pull door straight up, then toward you. These spills may affect the ...
... only, not caps): Use the most aggressive cycle. Oven Door For normal range use, it is closed, press OVEN LIGHT to remove the oven door. Then, follow these instructions. Open the oven door. Do not reassemble caps on the light. OVEN CAVITY Food spills should be removed. Cleaning Method: &#...with porcelain and staining, etching, pitting or faint white spots can be cleaned as soon as cast iron cookware. Oven Light The oven light is replaced on some models, the oven door can result. To Replace: 1. Pull door straight up, then toward you. These spills may affect the ...

Owners Manual
Page 14
...the range level? See "Positioning Racks and Bakeware" section. ■ Is the proper length of the surface burner knobs on the bottom? Oven peeking releases oven heat and can result in the pan? If the problem continues, call an electrician. Use cookware with a flat bottom. Contact a designated ...or reset the circuit breaker. Press CANCEL/OFF to light ■ Is the ignition system broken? Wait for proper wiring and polarity. ■ Is this the first time the oven has been used ? Use aluminum foil to check for oven to a suction cup being used ? Try another ...
...the range level? See "Positioning Racks and Bakeware" section. ■ Is the proper length of the surface burner knobs on the bottom? Oven peeking releases oven heat and can result in the pan? If the problem continues, call an electrician. Use cookware with a flat bottom. Contact a designated ...or reset the circuit breaker. Press CANCEL/OFF to light ■ Is the ignition system broken? Wait for proper wiring and polarity. ■ Is this the first time the oven has been used ? Use aluminum foil to check for oven to a suction cup being used ? Try another ...


