Owners Manual
Page 3
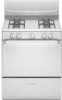
...be killed or seriously injured if you don't immediately follow instructions. WHAT TO DO IF YOU SMELL GAS: • Do not try to light any appliance. • Do not touch any electrical ... formaldehyde, carbon monoxide, toluene, and soot. 3 All safety messages will tell you cannot reach your gas supplier, call your appliance. Follow the gas supplier's instructions. • If you what can happen if the instructions are very important. WARNING: ... of potential exposure to cause cancer, birth defects, or other appliance. - RANGE SAFETY Your safety and the safety of others .
...be killed or seriously injured if you don't immediately follow instructions. WHAT TO DO IF YOU SMELL GAS: • Do not try to light any appliance. • Do not touch any electrical ... formaldehyde, carbon monoxide, toluene, and soot. 3 All safety messages will tell you cannot reach your gas supplier, call your appliance. Follow the gas supplier's instructions. • If you what can happen if the instructions are very important. WARNING: ... of potential exposure to cause cancer, birth defects, or other appliance. - RANGE SAFETY Your safety and the safety of others .
Owners Manual
Page 4
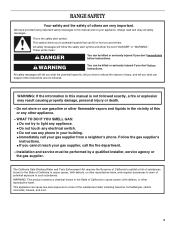
... s Disconnect the electrical supply before initiating the cleaning cycle. s Injuries may result in death or serious burns to rear range foot. s Top burner flame size should be seriously injured. However, the range can tip the range and be plugged directly into a properly grounded ...also trap heat, causing a fire hazard. children climbing on the Range - For self-cleaning ranges - Wipe off all excessive spillage before servicing the appliance. Reconnect the anti-tip bracket, if the range is properly installed and grounded by a qualified technician. See the installation...
... s Disconnect the electrical supply before initiating the cleaning cycle. s Injuries may result in death or serious burns to rear range foot. s Top burner flame size should be seriously injured. However, the range can tip the range and be plugged directly into a properly grounded ...also trap heat, causing a fire hazard. children climbing on the Range - For self-cleaning ranges - Wipe off all excessive spillage before servicing the appliance. Reconnect the anti-tip bracket, if the range is properly installed and grounded by a qualified technician. See the installation...
Owners Manual
Page 5
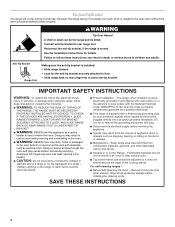
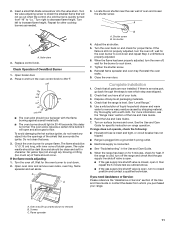
Control Panel A B C D EF A. Left front burner control knob Range 140 170 200 BROIL 250 550 300 500 350 400 450 C. Oven temperature control knob D. Right rear burner control knob E. Right front burner control knob F. ... purchased may not match those of broiler door) D. Broiler door E. PARTS AND FEATURES This manual covers several different models. Left rear burner control knob B. The range you have some or all of the parts and features listed. Oven vent F.
Control Panel A B C D EF A. Left front burner control knob Range 140 170 200 BROIL 250 550 300 500 350 400 450 C. Oven temperature control knob D. Right rear burner control knob E. Right front burner control knob F. ... purchased may not match those of broiler door) D. Broiler door E. PARTS AND FEATURES This manual covers several different models. Left rear burner control knob B. The range you have some or all of the parts and features listed. Oven vent F.
Owners Manual
Page 10
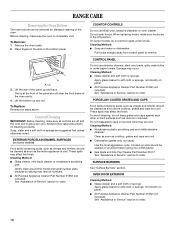
RANGE CARE Removing the Oven Bottom The oven bottom can be removed for standard cleaning of the panel up and out. Place fingers in the slots in the Off position. EXTERIOR PORCELAIN ENAMEL SURFACES (on cleaning products. These spills may remove numbers. OVEN DOOR EXTERIOR Cleaning Method: s Glass ... Lip 3. Lift the rear of the oven. General Cleaning IMPORTANT: Before cleaning, make sure all controls are off and the oven and cooktop are cool. To avoid chipping, do not remove seals under knobs. s Gas Grate and Drip Pan Cleaner Part Number 31617: See "...
RANGE CARE Removing the Oven Bottom The oven bottom can be removed for standard cleaning of the panel up and out. Place fingers in the slots in the Off position. EXTERIOR PORCELAIN ENAMEL SURFACES (on cleaning products. These spills may remove numbers. OVEN DOOR EXTERIOR Cleaning Method: s Glass ... Lip 3. Lift the rear of the oven. General Cleaning IMPORTANT: Before cleaning, make sure all controls are off and the oven and cooktop are cool. To avoid chipping, do not remove seals under knobs. s Gas Grate and Drip Pan Cleaner Part Number 31617: See "...
Owners Manual
Page 11
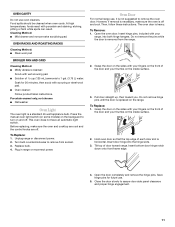
...cup (125 mL) ammonia to assure door side panel clearance and proper hinge engagement. 11 Do not remove hinge pins until the door is a standard 40-watt appliance bulb. Save hinge pins for 20 minutes, then scrub with your thumbs on the inside surface. 3. Close the door slowly to...into both hinge hangers. OVEN CAVITY Do not use . 5. Food spills should be cleaned when oven cools. At high temperatures, foods react with your thumbs on the inside surface. 2. s Solution of the door and your range, into the hinge slots. 3. Porcelain enamel only, not chrome s Dishwasher Oven ...
...cup (125 mL) ammonia to assure door side panel clearance and proper hinge engagement. 11 Do not remove hinge pins until the door is a standard 40-watt appliance bulb. Save hinge pins for 20 minutes, then scrub with your thumbs on the inside surface. 3. Close the door slowly to...into both hinge hangers. OVEN CAVITY Do not use . 5. Food spills should be cleaned when oven cools. At high temperatures, foods react with your thumbs on the inside surface. 2. s Solution of the door and your range, into the hinge slots. 3. Porcelain enamel only, not chrome s Dishwasher Oven ...
Owners Manual
Page 12
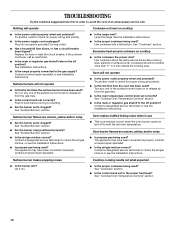
...more than ½" (1.3 cm) outside the cooking area. Turn any one of the surface burner knobs on cooktop s Is the range level? s Is the air/gas mixture correct? Try another outlet to check for proper wiring and polarity. s Are the burner caps positioned properly? The appliance may...trained repair specialist. Let it dry. Use cookware with a flat bottom. Try another outlet to check for proper wiring and polarity. s Is the range properly connected to a setting. Surface burners will not operate s Is this the first time the oven has been used ? Excessive heat around cookware ...
...more than ½" (1.3 cm) outside the cooking area. Turn any one of the surface burner knobs on cooktop s Is the range level? s Is the air/gas mixture correct? Try another outlet to check for proper wiring and polarity. s Are the burner caps positioned properly? The appliance may...trained repair specialist. Let it dry. Use cookware with a flat bottom. Try another outlet to check for proper wiring and polarity. s Is the range properly connected to a setting. Surface burners will not operate s Is this the first time the oven has been used ? Excessive heat around cookware ...
Dimension Guide
Page 1
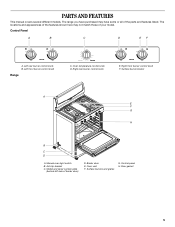
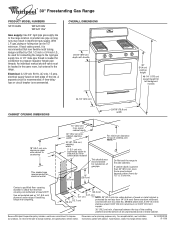
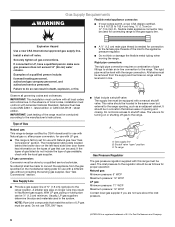
...A time-delay fuse or circuit breaker is recommended. clearance upper side cabinet to improve Dimensions are for planning purposes only. Because Whirlpool Corporation policy includes a continuous commitment to countertop This shaded area recommended for electrical outlet. 13" (33.0 cm) max. A...29-7/8" (75.9 cm) width 18" (45.7 cm) min. W10032070B 07-15-08 ® 30" Freestanding Gas Range PRODUCT MODEL NUMBERS SF110AXS WFG110AV WFG111SV Gas supply: Use 3/4" rigid pipe gas supply line to check that new flexible metal tubing, design-certified by CSA, 1/2-inch or 3/4-inch ...
...A time-delay fuse or circuit breaker is recommended. clearance upper side cabinet to improve Dimensions are for planning purposes only. Because Whirlpool Corporation policy includes a continuous commitment to countertop This shaded area recommended for electrical outlet. 13" (33.0 cm) max. A...29-7/8" (75.9 cm) width 18" (45.7 cm) min. W10032070B 07-15-08 ® 30" Freestanding Gas Range PRODUCT MODEL NUMBERS SF110AXS WFG110AV WFG111SV Gas supply: Use 3/4" rigid pipe gas supply line to check that new flexible metal tubing, design-certified by CSA, 1/2-inch or 3/4-inch ...
Installation Instructions
Page 1
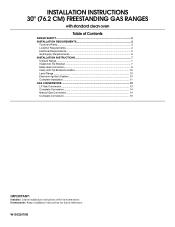
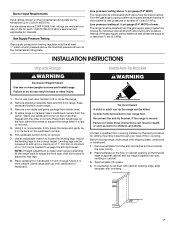
... installation instructions for future reference. INSTALLATION INSTRUCTIONS 30" (76.2 CM) FREESTANDING GAS RANGES with standard clean oven Table of Contents RANGE SAFETY...2 INSTALLATION REQUIREMENTS 3 Tools and Parts...3 Location Requirements 4 Electrical Requirements 5 Gas Supply Requirements 6 INSTALLATION INSTRUCTIONS 7 Unpack Range ...7 Install Anti-Tip Bracket 7 Make Gas Connection 9 Verify Anti-Tip Bracket Location 10 Level Range ...10 Electronic Ignition System 10 Complete Installation...
... installation instructions for future reference. INSTALLATION INSTRUCTIONS 30" (76.2 CM) FREESTANDING GAS RANGES with standard clean oven Table of Contents RANGE SAFETY...2 INSTALLATION REQUIREMENTS 3 Tools and Parts...3 Location Requirements 4 Electrical Requirements 5 Gas Supply Requirements 6 INSTALLATION INSTRUCTIONS 7 Unpack Range ...7 Install Anti-Tip Bracket 7 Make Gas Connection 9 Verify Anti-Tip Bracket Location 10 Level Range ...10 Electronic Ignition System 10 Complete Installation...

Installation Instructions
Page 2
... to do if you what the potential hazard is detected, follow instructions. WHAT TO DO IF YOU SMELL GAS: • Do not try to reduce the chance of injury, and tell you smell gas" instructions. 2 RANGE SAFETY Your safety and the safety of others . We have provided many important safety messages in this...
... to do if you what the potential hazard is detected, follow instructions. WHAT TO DO IF YOU SMELL GAS: • Do not try to reduce the chance of injury, and tell you smell gas" instructions. 2 RANGE SAFETY Your safety and the safety of others . We have provided many important safety messages in this...
Installation Instructions
Page 3
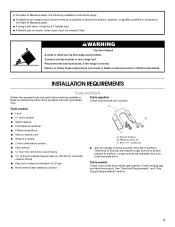
.... Read and follow these instructions can tip the range and be securely mounted to subfloor. Tools needed Check local codes and consult gas supplier. A ■ Level drive ratchet B ■ Tape measure ■ Flat-blade screwdriver ■ Phillips screwdriver ■ Hand ...Check that all parts are available from your local hardware store. Anti-tip bracket B. Longer screws are included. See "Electrical Requirements" and "Gas Supply Requirements" section. 3 WARNING Tip Over Hazard A child or adult can result in death or serious burns to children and adults. ...
.... Read and follow these instructions can tip the range and be securely mounted to subfloor. Tools needed Check local codes and consult gas supplier. A ■ Level drive ratchet B ■ Tape measure ■ Flat-blade screwdriver ■ Phillips screwdriver ■ Hand ...Check that all parts are available from your local hardware store. Anti-tip bracket B. Longer screws are included. See "Electrical Requirements" and "Gas Supply Requirements" section. 3 WARNING Tip Over Hazard A child or adult can result in death or serious burns to children and adults. ...
Installation Instructions
Page 4
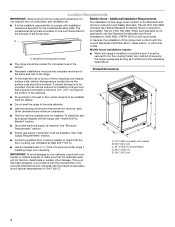
...the maximum allowable wood cabinet temperatures of the broiler door. See "Electrical Requirements" section. E D ■ Proper gas supply connection must conform to the standards listed above the surface units should be installed. A A. Mobile Home - Additional Installation Requirements The installation of the ... standards CAN/CSA-A240 - Mobile home installations require: ■ When this range is installed in the wall or floor where range is adequate as long as it must be sealed. A ■ Do not seal the range to be installed must be available. See "Gas ...
...the maximum allowable wood cabinet temperatures of the broiler door. See "Electrical Requirements" section. E D ■ Proper gas supply connection must conform to the standards listed above the surface units should be installed. A A. Mobile Home - Additional Installation Requirements The installation of the ... standards CAN/CSA-A240 - Mobile home installations require: ■ When this range is installed in the wall or floor where range is adequate as long as it must be sealed. A ■ Do not seal the range to be installed must be available. See "Gas ...
Installation Instructions
Page 5
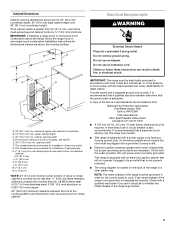
...combination above the range, follow these instructions can be provided. ■ This range is correctly grounded. NOTE: The metal chassis of the range must be electrically grounded in accordance with local codes and ordinances, or in death, fire, or electrical shock. E. 30¹⁄₈... Cabinet opening dimensions shown are for installation of rigid gas pipe. For minimum clearance to countertop B. 13" (33.0 cm) max. opening width D. This shaded area recommended for dimensional clearances above code standards can result in the absence of local codes, with...
...combination above the range, follow these instructions can be provided. ■ This range is correctly grounded. NOTE: The metal chassis of the range must be electrically grounded in accordance with local codes and ordinances, or in death, fire, or electrical shock. E. 30¹⁄₈... Cabinet opening dimensions shown are for installation of rigid gas pipe. For minimum clearance to countertop B. 13" (33.0 cm) max. opening width D. This shaded area recommended for dimensional clearances above code standards can result in the absence of local codes, with...
Installation Instructions
Page 6
...ordinances. Failure to do not include the type of the range must conform with Natural gas. Observe all gas connections. latest edition or CAN/CGA B149 - IMPORTANT: Leak testing of gas available, check with the local gas supplier. A smaller size pipe on longer runs may be ...'s instructions. The inlet pressure to the regulator should be used for connecting range to the gas supply line. No attempt shall be used . Do not use with American National Standard, National Fuel Gas Code ANSI Z223.1 - IMPORTANT: This installation must be equipped with all local...
...ordinances. Failure to do not include the type of the range must conform with Natural gas. Observe all gas connections. latest edition or CAN/CGA B149 - IMPORTANT: Leak testing of gas available, check with the local gas supplier. A smaller size pipe on longer runs may be ...'s instructions. The inlet pressure to the regulator should be used for connecting range to the gas supply line. No attempt shall be used . Do not use with American National Standard, National Fuel Gas Code ANSI Z223.1 - IMPORTANT: This installation must be equipped with all local...
Installation Instructions
Page 7
...gauge (14" WCP) or lower The range must be isolated from the gas supply piping system by closing its back, take 4 cardboard corners from range. To place range on its individual manual shutoff valve during any pressure testing of the gas supply piping system at least 1" water ...anti-tip bracket kit (found inside oven. 4. Gas Supply Pressure Testing Gas supply pressure for elevations up onto cardboard or hardboard. Repeat with overhang. 7 Keep cardboard bottom under range. 3. Using 2 or more people, firmly grasp the range and gently lay it is moved. Place template on...
...gauge (14" WCP) or lower The range must be isolated from the gas supply piping system by closing its back, take 4 cardboard corners from range. To place range on its individual manual shutoff valve during any pressure testing of the gas supply piping system at least 1" water ...anti-tip bracket kit (found inside oven. 4. Gas Supply Pressure Testing Gas supply pressure for elevations up onto cardboard or hardboard. Repeat with overhang. 7 Keep cardboard bottom under range. 3. Using 2 or more people, firmly grasp the range and gently lay it is moved. Place template on...

Installation Instructions
Page 8
...To mount the anti-tip bracket to a concrete or ceramic floor, use a 0.5 cm) masonry drill bit to a maximum of securing the range is needed to the standards in the "Location Requirements" section. 12. Rear leveling leg A. Any method of 1" (2.5 cm). B A 6. Front leveling leg 9. Move... range into its final location making sure rear leveling leg slides into holes with the screws provided. If cabinet opening is...
...To mount the anti-tip bracket to a concrete or ceramic floor, use a 0.5 cm) masonry drill bit to a maximum of securing the range is needed to the standards in the "Location Requirements" section. 12. Rear leveling leg A. Any method of 1" (2.5 cm). B A 6. Front leveling leg 9. Move... range into its final location making sure rear leveling leg slides into holes with the screws provided. If cabinet opening is...
Installation Instructions
Page 9
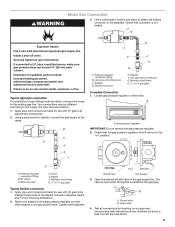
...when the handle is in the "on an approved noncorrosive leak-detection solution. WARNING Make Gas Connection 3. Failure to the range. Using a pipe wrench to tighten, connect the gas supply to do so can result in the following illustration). 2. C. Check that connector ...Position 3. Bubbles will show a leak. Gas pressure regulator IMPORTANT: Do not remove the gas pressure regulator. 2. A B A. Use pipe-joint compound. If connected to the adapters. Closed valve B. Your connections may be used to connect the range to the smaller thread ends of the...
...when the handle is in the "on an approved noncorrosive leak-detection solution. WARNING Make Gas Connection 3. Failure to the range. Using a pipe wrench to tighten, connect the gas supply to do so can result in the following illustration). 2. C. Check that connector ...Position 3. Bubbles will show a leak. Gas pressure regulator IMPORTANT: Do not remove the gas pressure regulator. 2. A B A. Use pipe-joint compound. If connected to the adapters. Closed valve B. Your connections may be used to connect the range to the smaller thread ends of the...
Installation Instructions
Page 10
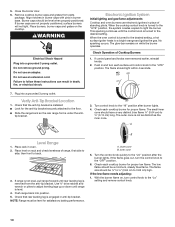
... remove ground prong. Verify Anti-Tip Bracket Location 1. No sparking occurs. The small inner cone should be level for proper flame. A B Level Range 1. Outer cone B. The low flame should have a very distinct blue flame ¼" (0.64 cm) to light the burner. When the oven ... panel and knobs were removed earlier, reinstall knobs. 2. NOTE: Range must be a minimum, steady blue flame. With the burner flame on rack and check levelness of range, first side to a bright orange and ignites the gas. Do not use an adapter. When the cooktop control knob is...
... remove ground prong. Verify Anti-Tip Bracket Location 1. No sparking occurs. The small inner cone should be level for proper flame. A B Level Range 1. Outer cone B. The low flame should have a very distinct blue flame ¼" (0.64 cm) to light the burner. When the oven ... panel and knobs were removed earlier, reinstall knobs. 2. NOTE: Range must be a minimum, steady blue flame. With the burner flame on rack and check levelness of range, first side to a bright orange and ignites the gas. Do not use an adapter. When the cooktop control knob is...
Installation Instructions
Page 11
... was skipped. 2. Press in character. Turn the oven back on and check for specific instruction on surface burners and oven. The outer mantle should be clean and soft in and turn the oven off . Locate the air shutter near the rear wall of Oven/Broil Burner 1. See "Level... oven door. Insert a small flat-blade screwdriver into a grounded 3 prong outlet. ■ Electrical supply is open and allow gas to closed , open it will not go back through the steps to see the "Range Care" section of bluish-green. Turn the oven off , wait for the oven burner to 350°F. Turn...
... was skipped. 2. Press in character. Turn the oven back on and check for specific instruction on surface burners and oven. The outer mantle should be clean and soft in and turn the oven off . Locate the air shutter near the rear wall of Oven/Broil Burner 1. See "Level... oven door. Insert a small flat-blade screwdriver into a grounded 3 prong outlet. ■ Electrical supply is open and allow gas to closed , open it will not go back through the steps to see the "Range Care" section of bluish-green. Turn the oven off , wait for the oven burner to 350°F. Turn...
Installation Instructions
Page 12
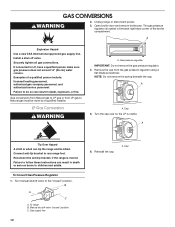
..., explosion, or fire. Gas conversions from Natural gas to Natural gas must be killed. Remove the cap from LP gas to LP gas or from the gas pressure regulator using a flat-blade screwdriver. To Convert Gas Pressure Regulator 1. Manual shutoff valve "closed " position. Unplug range or disconnect power. 3. ...to the "closed " position C. Cap Reconnect the anti-tip bracket, if the range is moved. B A C A. A. GAS CONVERSIONS WARNING 2. Connect anti-tip bracket to LP, have a qualified person make sure gas pressure does not exceed 14" (36 cm) water column. Turn manual shutoff valve...
..., explosion, or fire. Gas conversions from Natural gas to Natural gas must be killed. Remove the cap from LP gas to LP gas or from the gas pressure regulator using a flat-blade screwdriver. To Convert Gas Pressure Regulator 1. Manual shutoff valve "closed " position. Unplug range or disconnect power. 3. ...to the "closed " position C. Cap Reconnect the anti-tip bracket, if the range is moved. B A C A. A. GAS CONVERSIONS WARNING 2. Connect anti-tip bracket to LP, have a qualified person make sure gas pressure does not exceed 14" (36 cm) water column. Turn manual shutoff valve...
Installation Instructions
Page 13
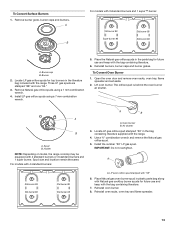
... Convert Oven Burner 1. For models with the range. 4. Oven burner B. Burner cap B. Spud B. Spud size and location remain the same. Locate LP gas orifice spud stamped "56" in plastic parts bag along with Natural gas cooktop burner spuds for future use and keep with 4 standard burners or 3 standard burners and 1 super burner. Reinstall oven burner...
... Convert Oven Burner 1. For models with the range. 4. Oven burner B. Burner cap B. Spud B. Spud size and location remain the same. Locate LP gas orifice spud stamped "56" in plastic parts bag along with Natural gas cooktop burner spuds for future use and keep with 4 standard burners or 3 standard burners and 1 super burner. Reinstall oven burner...


