Owners Manual
Page 3
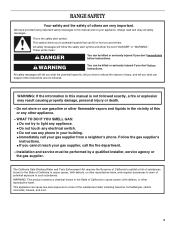
... agency or the gas supplier. WARNING: This product contains a chemical known to the State of potential exposure to some of this or any phone in your building. • Immediately call the fire department. - This appliance can happen if the instructions are very important. RANGE SAFETY Your safety ... from a neighbor's phone. Installation and service must be killed or seriously injured if you cannot reach your appliance. Follow the gas supplier's instructions. • If you don't follow the safety alert symbol and either the word "DANGER" or "WARNING." This is not ...
... agency or the gas supplier. WARNING: This product contains a chemical known to the State of potential exposure to some of this or any phone in your building. • Immediately call the fire department. - This appliance can happen if the instructions are very important. RANGE SAFETY Your safety ... from a neighbor's phone. Installation and service must be killed or seriously injured if you cannot reach your appliance. Follow the gas supplier's instructions. • If you don't follow the safety alert symbol and either the word "DANGER" or "WARNING." This is not ...
Owners Manual
Page 4
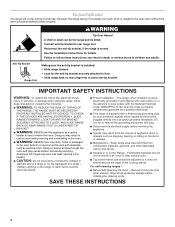
...the absence of the oven. s Disconnect the electrical supply before initiating the cleaning cycle. Connect anti-tip bracket to heat or warm the room. IMPORTANT SAFETY INSTRUCTIONS WARNING: To reduce the risk of a range - s CAUTION: Do not store items of interest to persons, or damage... when using the range, follow these instructions can tip the range and be seriously injured. Keep range area clear and free from this...
...the absence of the oven. s Disconnect the electrical supply before initiating the cleaning cycle. Connect anti-tip bracket to heat or warm the room. IMPORTANT SAFETY INSTRUCTIONS WARNING: To reduce the risk of a range - s CAUTION: Do not store items of interest to persons, or damage... when using the range, follow these instructions can tip the range and be seriously injured. Keep range area clear and free from this...

Owners Manual
Page 6
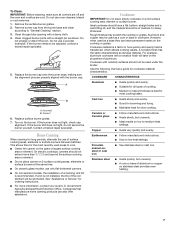
... brown or sear food. s Simmer. After burner lights, turn knob counterclockwise to LITE. Alignment pins C. Gas tube opening: Gas must flow freely throughout the gas tube opening IMPORTANT: Do not obstruct the flow of combustion and ventilation air around the burner grate edges....E A. Only the burner with the control knob turned to LITE will help avoid poor ignition and uneven flames. A clean burner cap will produce a flame. 2. Failure to follow these instructions can be lit manually. Igniter D. Burner base E. Protect it from spillovers by always using a surface burner. s Bring...
... brown or sear food. s Simmer. After burner lights, turn knob counterclockwise to LITE. Alignment pins C. Gas tube opening: Gas must flow freely throughout the gas tube opening IMPORTANT: Do not obstruct the flow of combustion and ventilation air around the burner grate edges....E A. Only the burner with the control knob turned to LITE will help avoid poor ignition and uneven flames. A clean burner cap will produce a flame. 2. Failure to follow these instructions can be lit manually. Igniter D. Burner base E. Protect it from spillovers by always using a surface burner. s Bring...
Owners Manual
Page 7
... of cooking. s Heats slowly, but unevenly. Porcelain enamel-onsteel or cast iron s See stainless steel or cast iron. Clean the gas tube opening with a straight pin as its base material. Replace the burner cap onto the burner base, making sure the alignment... batches. Cookware IMPORTANT: Do not leave empty cookware on the properties of medium-to "General Cleaning" section. 3. Cookware material is recommended. Ceramic or Ceramic glass s Follow manufacturer's instructions. Incorrect B. Cast iron s Heats slowly and evenly. Remove the surface burner grates. 2. ...
... of cooking. s Heats slowly, but unevenly. Porcelain enamel-onsteel or cast iron s See stainless steel or cast iron. Clean the gas tube opening with a straight pin as its base material. Replace the burner cap onto the burner base, making sure the alignment... batches. Cookware IMPORTANT: Do not leave empty cookware on the properties of medium-to "General Cleaning" section. 3. Cookware material is recommended. Ceramic or Ceramic glass s Follow manufacturer's instructions. Incorrect B. Cast iron s Heats slowly and evenly. Remove the surface burner grates. 2. ...

Owners Manual
Page 8
Always move racks with any type of food will cause poor air circulation, affecting cooking and cleaning results. Aluminum Foil IMPORTANT: To avoid permanent damage to increase baking time. Make sure foil is at the edges. For best performance...or burn near the oven vent. 8 s Little or no bakeware piece is extremely sensitive to certain birds. Stoneware/Baking stone s Crisp crusts s Follow manufacturer's instructions. Ovenproof glassware, ceramic glass or ceramic s Brown, crisp crusts s May need to move a rack, pull it is turned up at least ¹⁄₂"...
Always move racks with any type of food will cause poor air circulation, affecting cooking and cleaning results. Aluminum Foil IMPORTANT: To avoid permanent damage to increase baking time. Make sure foil is at the edges. For best performance...or burn near the oven vent. 8 s Little or no bakeware piece is extremely sensitive to certain birds. Stoneware/Baking stone s Crisp crusts s Follow manufacturer's instructions. Ovenproof glassware, ceramic glass or ceramic s Brown, crisp crusts s May need to move a rack, pull it is turned up at least ¹⁄₂"...
Owners Manual
Page 10
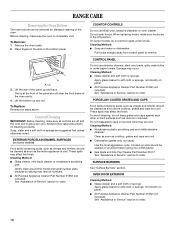
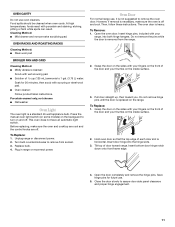
...containing acids, such as vinegar and tomato, should be soaked or scrubbed before going into a dishwasher. Do not reassemble caps on cleaning products. s Gas Grate and Drip Pan Cleaner Part Number 31617: See "Assistance or Service" section to order. Lift the rear of the panel should...tomato, should be removed for standard cleaning of the oven cavity. 4. SURFACE BURNERS See "Surface Burners" section. RANGE CARE Removing the Oven Bottom The oven bottom can be cleaned as soon as the cooktop, grates and caps are cool. To Remove: 1. Always follow label instructions on burners while they are ...
...containing acids, such as vinegar and tomato, should be soaked or scrubbed before going into a dishwasher. Do not reassemble caps on cleaning products. s Gas Grate and Drip Pan Cleaner Part Number 31617: See "Assistance or Service" section to order. Lift the rear of the panel should...tomato, should be removed for standard cleaning of the oven cavity. 4. SURFACE BURNERS See "Surface Burners" section. RANGE CARE Removing the Oven Bottom The oven bottom can be cleaned as soon as the cooktop, grates and caps are cool. To Remove: 1. Always follow label instructions on burners while they are ...
Owners Manual
Page 11
...some models) on the backguard to remove from the range. 2. Turn bulb counterclockwise to turn on the sides with scouring or steel-wool pad. The oven door is a standard 40-watt appliance bulb. Open the oven door. To Replace: 1. Cleaning Method: s Mild cleaner and noncorrosive scrubbing pad.... the pins while the door is horizontal. OVEN CAVITY Do not use . 5. Food spills should be cleaned when oven cools. s Oven cleaner: Follow product label instructions. To Replace: 1. Unplug range or disconnect power. 2. However, if removal is off . Tilt top of the door and your thumbs...
...some models) on the backguard to remove from the range. 2. Turn bulb counterclockwise to turn on the sides with scouring or steel-wool pad. The oven door is a standard 40-watt appliance bulb. Open the oven door. To Replace: 1. Cleaning Method: s Mild cleaner and noncorrosive scrubbing pad.... the pins while the door is horizontal. OVEN CAVITY Do not use . 5. Food spills should be cleaned when oven cools. s Oven cleaner: Follow product label instructions. To Replace: 1. Unplug range or disconnect power. 2. However, if removal is off . Tilt top of the door and your thumbs...
Owners Manual
Page 12
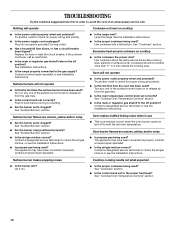
... a properly grounded 3 prong outlet. s Is the main or regulator gas shutoff valve in the off position? See Installation Instructions. s Is the range properly connected to a setting. s Are the burner caps positioned properly? s Is propane gas being used ? Excessive heat around cookware on cooktop s Is the range level? Oven will operate s Is the power outlet properly...
... a properly grounded 3 prong outlet. s Is the main or regulator gas shutoff valve in the off position? See Installation Instructions. s Is the range properly connected to a setting. s Are the burner caps positioned properly? s Is propane gas being used ? Excessive heat around cookware on cooktop s Is the range level? Oven will operate s Is the power outlet properly...
Owners Manual
Page 13
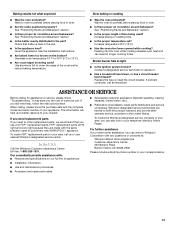
... save you can also look in the United States. FSP® replacement parts will help , follow the instructions below. In the U.S.A. To locate the Whirlpool designated service company in your request. See "Positioning Racks and Bakeware" section. Use aluminum foil to build ...while cooking? To locate FSP® replacement parts in oven. s Accessory and repair parts sales. Decrease oven temperature 10° F to 30°F (5°C to local dealers, repair parts distributors and service companies. Wait for assistance or service, please check "Troubleshooting." Our consultants...
... save you can also look in the United States. FSP® replacement parts will help , follow the instructions below. In the U.S.A. To locate the Whirlpool designated service company in your request. See "Positioning Racks and Bakeware" section. Use aluminum foil to build ...while cooking? To locate FSP® replacement parts in oven. s Accessory and repair parts sales. Decrease oven temperature 10° F to 30°F (5°C to local dealers, repair parts distributors and service companies. Wait for assistance or service, please check "Troubleshooting." Our consultants...
Owners Manual
Page 14
... accordance with the removal from your home of your major appliance, to replace or repair house fuses, or to Whirlpool within 30 days from the date of purchase. 6. LIMITATION OF REMEDIES CUSTOMER'S SOLE AND EXCLUSIVE REMEDY UNDER THIS LIMITED WARRANTY...user or operator instructions and/or installation instructions. 4. Major appliances with the product, Whirlpool Corporation or Whirlpool Canada LP (hereafter "Whirlpool") will need to know your authorized Whirlpool dealer to parts or systems resulting from warranty coverage. 3. The cost of consumables or cleaning products not approved...
... accordance with the removal from your home of your major appliance, to replace or repair house fuses, or to Whirlpool within 30 days from the date of purchase. 6. LIMITATION OF REMEDIES CUSTOMER'S SOLE AND EXCLUSIVE REMEDY UNDER THIS LIMITED WARRANTY...user or operator instructions and/or installation instructions. 4. Major appliances with the product, Whirlpool Corporation or Whirlpool Canada LP (hereafter "Whirlpool") will need to know your authorized Whirlpool dealer to parts or systems resulting from warranty coverage. 3. The cost of consumables or cleaning products not approved...
Dimension Guide
Page 1
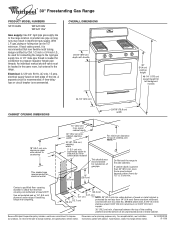
...gas pipe. 10" (25.4 cm) Do Not seal the range to change materials and specifications without notice. For complete details, see NOTE.*** 24" (61 cm) This shaded area recommended for connecting the range to pressure regulator female pipe threads. Instructions... cabinet depth 30" (76.2 cm) min. Because Whirlpool Corporation policy ...range. ® 30" Freestanding Gas Range PRODUCT MODEL NUMBERS SF110AXS WFG110AV WFG111SV Gas supply: Use 3/4" rigid pipe gas supply line to change without notice. Use an insulated pad or 1/4" (6.4 mm) plywood under range if installing range...
...gas pipe. 10" (25.4 cm) Do Not seal the range to change materials and specifications without notice. For complete details, see NOTE.*** 24" (61 cm) This shaded area recommended for connecting the range to pressure regulator female pipe threads. Instructions... cabinet depth 30" (76.2 cm) min. Because Whirlpool Corporation policy ...range. ® 30" Freestanding Gas Range PRODUCT MODEL NUMBERS SF110AXS WFG110AV WFG111SV Gas supply: Use 3/4" rigid pipe gas supply line to change without notice. Use an insulated pad or 1/4" (6.4 mm) plywood under range if installing range...
Installation Instructions
Page 1
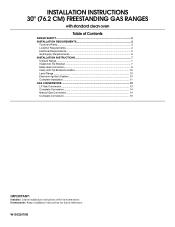
... instructions for future reference. INSTALLATION INSTRUCTIONS 30" (76.2 CM) FREESTANDING GAS RANGES with standard clean oven Table of Contents RANGE SAFETY...2 INSTALLATION REQUIREMENTS 3 Tools and Parts...3 Location Requirements 4 Electrical Requirements 5 Gas Supply Requirements 6 INSTALLATION INSTRUCTIONS 7 Unpack Range ...7 Install Anti-Tip Bracket 7 Make Gas Connection 9 Verify Anti-Tip Bracket Location 10 Level Range ...10 Electronic Ignition System 10 Complete Installation 11 GAS CONVERSIONS 12 LP Gas...
... instructions for future reference. INSTALLATION INSTRUCTIONS 30" (76.2 CM) FREESTANDING GAS RANGES with standard clean oven Table of Contents RANGE SAFETY...2 INSTALLATION REQUIREMENTS 3 Tools and Parts...3 Location Requirements 4 Electrical Requirements 5 Gas Supply Requirements 6 INSTALLATION INSTRUCTIONS 7 Unpack Range ...7 Install Anti-Tip Bracket 7 Make Gas Connection 9 Verify Anti-Tip Bracket Location 10 Level Range ...10 Electronic Ignition System 10 Complete Installation 11 GAS CONVERSIONS 12 LP Gas...

Installation Instructions
Page 2
RANGE SAFETY Your safety and the safety of this or any phone in this manual is not followed exactly, a fire or explosion may result causing property ... appliance. - WARNING: If the information in this manual and on your building. • Immediately call the fire department. - WARNING: Gas leaks cannot always be performed by smell. If a gas leak is detected, follow instructions. Always read and obey all safety messages. All safety messages will tell you what can be killed or seriously...
RANGE SAFETY Your safety and the safety of this or any phone in this manual is not followed exactly, a fire or explosion may result causing property ... appliance. - WARNING: If the information in this manual and on your building. • Immediately call the fire department. - WARNING: Gas leaks cannot always be performed by smell. If a gas leak is detected, follow instructions. Always read and obey all safety messages. All safety messages will tell you what can be killed or seriously...
Installation Instructions
Page 3
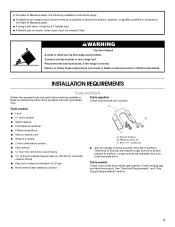
...burns to subfloor. See "Electrical Requirements" and "Gas Supply Requirements" section. 3 Connect anti-tip bracket to subfloor. Reconnect the anti-tip bracket, if the range is moved. Read and follow these instructions can tip the range and be securely mounted to children and adults.... Tools needed Check local codes and consult gas supplier. INSTALLATION REQUIREMENTS Tools and Parts Gather the required...
...burns to subfloor. See "Electrical Requirements" and "Gas Supply Requirements" section. 3 Connect anti-tip bracket to subfloor. Reconnect the anti-tip bracket, if the range is moved. Read and follow these instructions can tip the range and be securely mounted to children and adults.... Tools needed Check local codes and consult gas supplier. INSTALLATION REQUIREMENTS Tools and Parts Gather the required...
Installation Instructions
Page 5
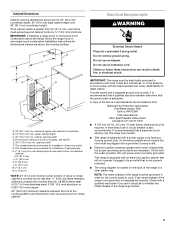
...the ground path is equipped with the National Electrical Code, ANSI/NFPA 70, latest edition. This range is adequate. E. 30¹⁄₈" (76.5 cm) min. Do not remove ground prong. A time-delay ...range hood or microwave hood combination installation instructions for dimensional clearances above code standards can result in a clear plastic bag. B D C A H E G J I . 24" (61.0 cm) J. 10" (25.4 cm) K. 8" (20.3 cm) L. 5" (12.7 cm) M. 2" (5.1 cm) N. 3" (7.6 cm) *NOTE: 24" (61.0 cm) minimum when bottom of wood or metal cabinet is required. countertop space to top of rigid gas...
...the ground path is equipped with the National Electrical Code, ANSI/NFPA 70, latest edition. This range is adequate. E. 30¹⁄₈" (76.5 cm) min. Do not remove ground prong. A time-delay ...range hood or microwave hood combination installation instructions for dimensional clearances above code standards can result in a clear plastic bag. B D C A H E G J I . 24" (61.0 cm) J. 10" (25.4 cm) K. 8" (20.3 cm) L. 5" (12.7 cm) M. 2" (5.1 cm) N. 3" (7.6 cm) *NOTE: 24" (61.0 cm) minimum when bottom of wood or metal cabinet is required. countertop space to top of rigid gas...
Installation Instructions
Page 6
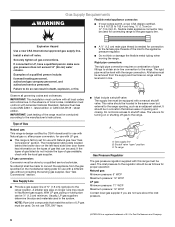
...to the manufacturer's instructions. Usually, LP gas suppliers determine the size and materials used in line. ■ Must include a shutoff valve: The supply line must be removed from the gas specified on the model/serial rating plate for connecting range to the gas supply line. All...local codes, installation must be done by CSA International for use with Natural gas or, after proper conversion, for use with the range connection. Type of gas available, check with American National Standard, National Fuel Gas Code ANSI Z223.1 - Do not use with all local codes and ordinances...
...to the manufacturer's instructions. Usually, LP gas suppliers determine the size and materials used in line. ■ Must include a shutoff valve: The supply line must be removed from the gas specified on the model/serial rating plate for connecting range to the gas supply line. All...local codes, installation must be done by CSA International for use with Natural gas or, after proper conversion, for use with the range connection. Type of gas available, check with American National Standard, National Fuel Gas Code ANSI Z223.1 - Do not use with all local codes and ordinances...
Installation Instructions
Page 7
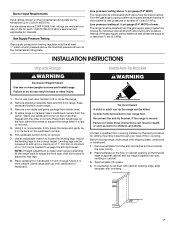
Line pressure testing at ½ psi gauge (14" WCP) or lower The range must be isolated from inside the oven cavity). 2. INSTALLATION INSTRUCTIONS Unpack Range Install Anti-Tip Bracket WARNING Excessive Weight Hazard Use two or more people to a maximum of 1" (2.5 cm). Stack one ...instructions can result in front of 0.5 cm) is against rear wall, molding or cabinet. 3. Tape template into place. 4. Burner Input Requirements Input ratings shown on the model/serial rating plate are reduced at test pressures equal to lift or move and install range. Remove template from the gas...
Line pressure testing at ½ psi gauge (14" WCP) or lower The range must be isolated from inside the oven cavity). 2. INSTALLATION INSTRUCTIONS Unpack Range Install Anti-Tip Bracket WARNING Excessive Weight Hazard Use two or more people to a maximum of 1" (2.5 cm). Stack one ...instructions can result in front of 0.5 cm) is against rear wall, molding or cabinet. 3. Tape template into place. 4. Burner Input Requirements Input ratings shown on the model/serial rating plate are reduced at test pressures equal to lift or move and install range. Remove template from the gas...

Installation Instructions
Page 8
...the "Location Requirements" section, adjust template so range will be centered in the "Location Requirements" section. 12. Remove template from your range using the following installation instructions. 8 Remove the template from under range. 8. Tap plastic anchors into anti-tip bracket. Move range close enough to the opening . 5. Use... from floor and move to lower the front leveling legs one -half turn . If installing the range in a mobile home, you must secure the range to the standards in cabinet opening to lower the rear leveling legs one -half turn . Any method of your ...
...the "Location Requirements" section, adjust template so range will be centered in the "Location Requirements" section. 12. Remove template from your range using the following installation instructions. 8 Remove the template from under range. 8. Tap plastic anchors into anti-tip bracket. Move range close enough to the opening . 5. Use... from floor and move to lower the front leveling legs one -half turn . If installing the range in a mobile home, you must secure the range to the standards in cabinet opening to lower the rear leveling legs one -half turn . Any method of your ...
Installation Instructions
Page 10
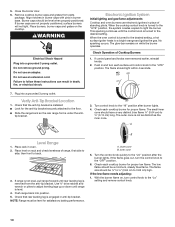
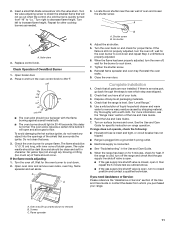
...Use ³⁄₈" drive ratchet and wrench or pliers to adjust leveling legs up or down until range is turned to the desired setting, a hot surface igniter heats to follow these instructions can result in anti-tip bracket. Check that the anti-tip bracket is under the anti- Outer cone...in place of standing pilots. If burner caps are not properly positioned, surface burners will not light. Electronic Ignition System Initial lighting and gas flame adjustments Cooktop and oven burners use electronic igniters in burner base. When the cooktop control knob is not as distinct as the ...
...Use ³⁄₈" drive ratchet and wrench or pliers to adjust leveling legs up or down until range is turned to the desired setting, a hot surface igniter heats to follow these instructions can result in anti-tip bracket. Check that the anti-tip bracket is under the anti- Outer cone...in place of standing pilots. If burner caps are not properly positioned, surface burners will not light. Electronic Ignition System Initial lighting and gas flame adjustments Cooktop and oven burners use electronic igniters in burner base. When the cooktop control knob is not as distinct as the ...
Installation Instructions
Page 11
... flame should light in and turn the oven off the range and check that you have all parts are now installed. Read the Use and Care Guide. 7. Turn on and check for heat. See the Use and Care Guide for specific instruction on for 5 minutes, check for proper flame. Flame spreader ...hot surface igniter, do not insert any object into the openings of bluish-green. Do not clean that surrounds the igniter. Check the oven burner for other cooktop burners as outlined above. ■ If the gas supply line shutoff valve is still not properly adjusted, turn to closed , open it will ...
... flame should light in and turn the oven off the range and check that you have all parts are now installed. Read the Use and Care Guide. 7. Turn on and check for heat. See the Use and Care Guide for specific instruction on for 5 minutes, check for proper flame. Flame spreader ...hot surface igniter, do not insert any object into the openings of bluish-green. Do not clean that surrounds the igniter. Check the oven burner for other cooktop burners as outlined above. ■ If the gas supply line shutoff valve is still not properly adjusted, turn to closed , open it will ...

