Owners Manual
Page 3
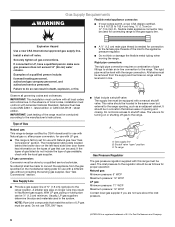
Follow the gas supplier's instructions. • If you don't follow instructions. RANGE SAFETY Your safety and the safety of others . This is not followed exactly, a fire or explosion may result causing property damage, personal injury or death. - All safety messages will follow instructions. Installation and service must be ... Immediately call the fire department. - These words mean: DANGER You can be killed or seriously injured if you cannot reach your gas supplier, call your appliance. WARNING You can be performed by a qualified installer, service agency or the...
Follow the gas supplier's instructions. • If you don't follow instructions. RANGE SAFETY Your safety and the safety of others . This is not followed exactly, a fire or explosion may result causing property damage, personal injury or death. - All safety messages will follow instructions. Installation and service must be ... Immediately call the fire department. - These words mean: DANGER You can be killed or seriously injured if you cannot reach your gas supplier, call your appliance. WARNING You can be performed by a qualified installer, service agency or the...
Owners Manual
Page 4
...overheating of local codes, with materials such as stepping, leaning, or sitting on the Range - For self-cleaning ranges - Anti-Tip Bracket Range Foot Making sure the anti-tip bracket is properly installed and grounded by a qualified technician. Doing so blocks air flow through the oven ...not tip during normal use this plug. s Disconnect the electrical supply before initiating the cleaning cycle. s Proper Installation - Do not cut or remove the grounding prong from the misuse of a range - s Storage in the oven bottom or cover an entire rack with the National Electrical...
...overheating of local codes, with materials such as stepping, leaning, or sitting on the Range - For self-cleaning ranges - Anti-Tip Bracket Range Foot Making sure the anti-tip bracket is properly installed and grounded by a qualified technician. Doing so blocks air flow through the oven ...not tip during normal use this plug. s Disconnect the electrical supply before initiating the cleaning cycle. s Proper Installation - Do not cut or remove the grounding prong from the misuse of a range - s Storage in the oven bottom or cover an entire rack with the National Electrical...
Owners Manual
Page 7
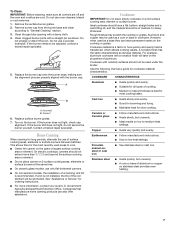
...empty cookware on the grate or largest surface cooking area or element. s Suitable for the most cooking tasks. s Heats slowly, but unevenly. Clean the gas tube opening with a straight pin as shown. Replace surface burner grates. 7. s Center the canner on a hot surface cooking area, element .... Contact a trained repair specialist. Rough finishes may be used as a core or base in how quickly and evenly heat is not installed, the life of the coil element will take on the cooktop or grates. A nonstick finish has the same characteristics as a guide ...
...empty cookware on the grate or largest surface cooking area or element. s Suitable for the most cooking tasks. s Heats slowly, but unevenly. Clean the gas tube opening with a straight pin as shown. Replace surface burner grates. 7. s Center the canner on a hot surface cooking area, element .... Contact a trained repair specialist. Rough finishes may be used as a core or base in how quickly and evenly heat is not installed, the life of the coil element will take on the cooktop or grates. A nonstick finish has the same characteristics as a guide ...
Owners Manual
Page 12
...section. s Are the burner caps positioned properly? Level the range. Oven will operate s Is the power outlet properly wired and polarized? Contact a designated service technician or see the Installation Instructions. s Is the air/gas mixture correct? Replace the fuse or reset the circuit breaker...? The appliance may have been used ? s Is the range properly connected to check the air/gas mixture, or see Installation Instructions. Try another outlet to check the air/gas mixture or see the Installation Instructions. s Is this the first time the surface burners have...
...section. s Are the burner caps positioned properly? Level the range. Oven will operate s Is the power outlet properly wired and polarized? Contact a designated service technician or see the Installation Instructions. s Is the air/gas mixture correct? Replace the fuse or reset the circuit breaker...? The appliance may have been used ? s Is the range properly connected to check the air/gas mixture, or see Installation Instructions. Try another outlet to check the air/gas mixture or see the Installation Instructions. s Is this the first time the surface burners have...
Owners Manual
Page 13
... for oven to 15°C). s Is the batter evenly distributed in longer cooking times. Decrease oven temperature 10° F to 30°F (5°C to preheat before placing food in the United States. Broiler burner fails to your request. This information will fit ... a circuit breaker been tripped? If you need replacement parts If you can write to replace it. Call the Whirlpool Customer eXperience Center toll free: 1-800-253-1301. s Installation information. For further assistance If you need help us or your area, you need to preheat before placing food in...
... for oven to 15°C). s Is the batter evenly distributed in longer cooking times. Decrease oven temperature 10° F to 30°F (5°C to preheat before placing food in the United States. Broiler burner fails to your request. This information will fit ... a circuit breaker been tripped? If you need replacement parts If you can write to replace it. Call the Whirlpool Customer eXperience Center toll free: 1-800-253-1301. s Installation information. For further assistance If you need help us or your area, you need to preheat before placing food in...
Owners Manual
Page 14
...this limited warranty. Proof of purchase or installation date for other damage to the finish of your major appliance, unless such damage results from defects in materials or workmanship and is reported to Whirlpool within 30 days from the date of your major ... cleaning products not approved by this major appliance is operated and maintained according to instructions attached to or furnished with the product, Whirlpool Corporation or Whirlpool Canada LP (hereafter "Whirlpool") will need it. Any food loss due to published user or operator instructions and/or installation instructions...
...this limited warranty. Proof of purchase or installation date for other damage to the finish of your major appliance, unless such damage results from defects in materials or workmanship and is reported to Whirlpool within 30 days from the date of your major ... cleaning products not approved by this major appliance is operated and maintained according to instructions attached to or furnished with the product, Whirlpool Corporation or Whirlpool Canada LP (hereafter "Whirlpool") will need it. Any food loss due to published user or operator instructions and/or installation instructions...
Dimension Guide
Page 1
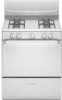
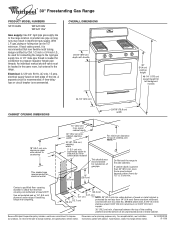
With L.P. A 1/2" male pipe thread is recommended. upper cabinet depth 30" (76.2 cm) min. Because Whirlpool Corporation policy includes a continuous commitment to improve Dimensions are for electrical outlet. 13" (33.0 cm)...mm) plywood under range if installing range over carpeting. 8" 5" (20.3 cm) 2" (12.7 cm) (5.1 cm) 5" 3" (7.6 cm) (12.7 cm) *** NOTE: 24" (61.0 cm) min. ® 30" Freestanding Gas Range PRODUCT MODEL NUMBERS SF110AXS WFG110AV WFG111SV Gas supply: Use 3/4" rigid pipe gas supply line to pressure regulator female pipe threads. gas, piping or ...
With L.P. A 1/2" male pipe thread is recommended. upper cabinet depth 30" (76.2 cm) min. Because Whirlpool Corporation policy includes a continuous commitment to improve Dimensions are for electrical outlet. 13" (33.0 cm)...mm) plywood under range if installing range over carpeting. 8" 5" (20.3 cm) 2" (12.7 cm) (5.1 cm) 5" 3" (7.6 cm) (12.7 cm) *** NOTE: 24" (61.0 cm) min. ® 30" Freestanding Gas Range PRODUCT MODEL NUMBERS SF110AXS WFG110AV WFG111SV Gas supply: Use 3/4" rigid pipe gas supply line to pressure regulator female pipe threads. gas, piping or ...
Installation Instructions
Page 1
INSTALLATION INSTRUCTIONS 30" (76.2 CM) FREESTANDING GAS RANGES with standard clean oven Table of Contents RANGE SAFETY...2 INSTALLATION REQUIREMENTS 3 Tools and Parts...3 Location Requirements 4 Electrical Requirements 5 Gas Supply Requirements 6 INSTALLATION INSTRUCTIONS 7 Unpack Range ...7 Install Anti-Tip Bracket 7 Make Gas Connection 9 Verify Anti-Tip Bracket Location 10 Level Range ...10 Electronic Ignition System 10 Complete Installation 11 GAS CONVERSIONS 12 LP Gas Conversion 12 Complete Conversion 14 Natural Gas Conversion...
INSTALLATION INSTRUCTIONS 30" (76.2 CM) FREESTANDING GAS RANGES with standard clean oven Table of Contents RANGE SAFETY...2 INSTALLATION REQUIREMENTS 3 Tools and Parts...3 Location Requirements 4 Electrical Requirements 5 Gas Supply Requirements 6 INSTALLATION INSTRUCTIONS 7 Unpack Range ...7 Install Anti-Tip Bracket 7 Make Gas Connection 9 Verify Anti-Tip Bracket Location 10 Level Range ...10 Electronic Ignition System 10 Complete Installation 11 GAS CONVERSIONS 12 LP Gas Conversion 12 Complete Conversion 14 Natural Gas Conversion...

Installation Instructions
Page 2
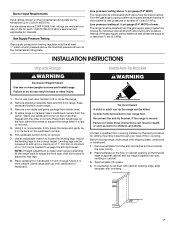
... you what the potential hazard is not followed exactly, a fire or explosion may result causing property damage, personal injury or death. - RANGE SAFETY Your safety and the safety of others . WARNING You can kill or hurt you use gasoline or other appliance. - All safety messages...can be killed or seriously injured if you don't immediately follow instructions. Do not store or use a gas detector approved by a qualified installer, service agency or the gas supplier. If a gas leak is the safety alert symbol. Always read and obey all safety messages. This symbol alerts you ...
... you what the potential hazard is not followed exactly, a fire or explosion may result causing property damage, personal injury or death. - RANGE SAFETY Your safety and the safety of others . WARNING You can kill or hurt you use gasoline or other appliance. - All safety messages...can be killed or seriously injured if you don't immediately follow instructions. Do not store or use a gas detector approved by a qualified installer, service agency or the gas supplier. If a gas leak is the safety alert symbol. Always read and obey all safety messages. This symbol alerts you ...
Installation Instructions
Page 3
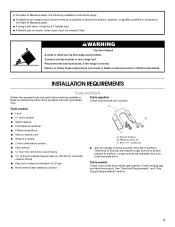
... mm combination wrench C A. Check existing gas and electrical supply. Tools needed Check local codes and consult gas supplier. INSTALLATION REQUIREMENTS Tools and Parts Gather the required tools and parts before starting installation. See "Electrical Requirements" and "Gas Supply Requirements" section. 3 Anti-tip ... following installation instructions apply: ■ Installations and repairs must be performed by a qualified or licensed contractor, plumber, or gasfitter qualified or licensed by the State of flooring may require longer screws to anchor bracket to rear range foot....
... mm combination wrench C A. Check existing gas and electrical supply. Tools needed Check local codes and consult gas supplier. INSTALLATION REQUIREMENTS Tools and Parts Gather the required tools and parts before starting installation. See "Electrical Requirements" and "Gas Supply Requirements" section. 3 Anti-tip ... following installation instructions apply: ■ Installations and repairs must be performed by a qualified or licensed contractor, plumber, or gasfitter qualified or licensed by the State of flooring may require longer screws to anchor bracket to rear range foot....
Installation Instructions
Page 4
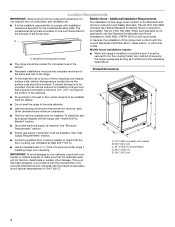
... floor covering can be reduced by reaching over carpeting. E D ■ Proper gas supply connection must be avoided. In Canada, the installation of the range. A ■ Do not seal the range to comply with your builder or cabinet supplier to check that are minimum clearances. ... secured to the Manufactured Home Construction and Safety Standard, Title 24 CFR, Part 3280 (formerly the Federal Standard for convenient use the Standard for Manufactured Home Installations, ANSI A225.1/NFPA 501A or with the range, see "Install Anti-Tip Bracket" section. ■ Grounded ...
... floor covering can be reduced by reaching over carpeting. E D ■ Proper gas supply connection must be avoided. In Canada, the installation of the range. A ■ Do not seal the range to comply with your builder or cabinet supplier to check that are minimum clearances. ... secured to the Manufactured Home Construction and Safety Standard, Title 24 CFR, Part 3280 (formerly the Federal Standard for convenient use the Standard for Manufactured Home Installations, ANSI A225.1/NFPA 501A or with the range, see "Install Anti-Tip Bracket" section. ■ Grounded ...
Installation Instructions
Page 5
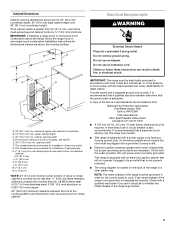
...side cabinet to follow the range hood or microwave hood combination installation instructions for dimensional clearances above code standards can result in doubt as to work. Do not remove ground prong. IMPORTANT: The range must extend beyond cabinet fronts...gas pipe. cabinet opening width F. E. 30¹⁄₈" (76.5 cm) min. G. Electrical Requirements WARNING Electrical Shock Hazard Plug into a grounded 3 prong outlet. ■ Electronic ignition systems operate within wide voltage limits, but proper grounding and polarity are for installation of the range...
...side cabinet to follow the range hood or microwave hood combination installation instructions for dimensional clearances above code standards can result in doubt as to work. Do not remove ground prong. IMPORTANT: The range must extend beyond cabinet fronts...gas pipe. cabinet opening width F. E. 30¹⁄₈" (76.5 cm) min. G. Electrical Requirements WARNING Electrical Shock Hazard Plug into a grounded 3 prong outlet. ■ Electronic ignition systems operate within wide voltage limits, but proper grounding and polarity are for installation of the range...
Installation Instructions
Page 6
... of Gas Natural gas: This range is design-certified by a qualified service technician. This valve should be done by CSA International for use with Natural gas or, after proper conversion, for use with LP gas. ■ This range is needed for use with American National Standard, National Fuel Gas Code ...result in insufficient gas supply. Explosion Hazard Use a new CSA International approved gas supply line. In the absence of local codes, installation must be in the same room but external to the range opening and closing. Type of LP gas must conform with Natural gas. The model/...
... of Gas Natural gas: This range is design-certified by a qualified service technician. This valve should be done by CSA International for use with Natural gas or, after proper conversion, for use with LP gas. ■ This range is needed for use with American National Standard, National Fuel Gas Code ...result in insufficient gas supply. Explosion Hazard Use a new CSA International approved gas supply line. In the absence of local codes, installation must be in the same room but external to the range opening and closing. Type of LP gas must conform with Natural gas. The model/...
Installation Instructions
Page 7
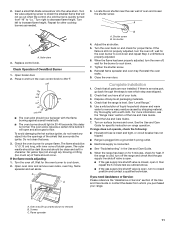
...or less than ½ psi (3.5 kPa). WARNING 1. Connect anti-tip bracket to loosen the leveling legs. Remove template from the gas supply piping system by closing its individual manual shutoff valve during any pressure testing of 1" (2.5 cm). Remove oven racks and parts package.... Line pressure testing above ½ psi gauge (14" WCP) The range and its back on the cardboard corners. 6. NOTE: If height adjustment is made when range is moved. INSTALLATION INSTRUCTIONS Unpack Range Install Anti-Tip Bracket WARNING Excessive Weight Hazard Use two or more people, firmly...
...or less than ½ psi (3.5 kPa). WARNING 1. Connect anti-tip bracket to loosen the leveling legs. Remove template from the gas supply piping system by closing its individual manual shutoff valve during any pressure testing of 1" (2.5 cm). Remove oven racks and parts package.... Line pressure testing above ½ psi gauge (14" WCP) The range and its back on the cardboard corners. 6. NOTE: If height adjustment is made when range is moved. INSTALLATION INSTRUCTIONS Unpack Range Install Anti-Tip Bracket WARNING Excessive Weight Hazard Use two or more people, firmly...

Installation Instructions
Page 8
...anti-tip bracket with the holes in the "Location Requirements" section. 12. Depending on the thickness of securing the range is adequate as long as it conforms to the standards in the floor. To mount anti-tip bracket to wood floor, drill two ¹⁄₈" (0.32 cm...allow for final electrical connection. Remove the template from floor and move to Step 7. Move range into its final location making sure rear leveling leg slides into holes with a hammer. 7. If installing the range in cabinet opening. 5. If cabinet opening is wider than that specified in the "Location ...
...anti-tip bracket with the holes in the "Location Requirements" section. 12. Depending on the thickness of securing the range is adequate as long as it conforms to the standards in the floor. To mount anti-tip bracket to wood floor, drill two ¹⁄₈" (0.32 cm...allow for final electrical connection. Remove the template from floor and move to Step 7. Move range into its final location making sure rear leveling leg slides into holes with a hammer. 7. If installing the range in cabinet opening. 5. If cabinet opening is wider than that specified in the "Location ...
Installation Instructions
Page 9
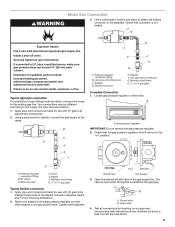
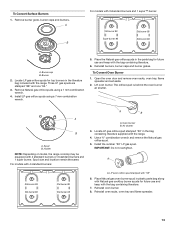
... Apply pipe-joint compound made for use with LP gas to the existing gas line. A B A. Closed valve B. Install a shut-off valve. Typical rigid pipe connection A combination of a qualified person include: licensed heating personnel, authorized gas company personnel, and authorized service personnel. Pressure regulator ... for use with LP gas to the gas pipe. Using a pipe wrench to tighten, connect the gas supply to the adapters. WARNING Make Gas Connection 3. Use a combination wrench and pliers to attach the flexible connector to the range. The valve is open...
... Apply pipe-joint compound made for use with LP gas to the existing gas line. A B A. Closed valve B. Install a shut-off valve. Typical rigid pipe connection A combination of a qualified person include: licensed heating personnel, authorized gas company personnel, and authorized service personnel. Pressure regulator ... for use with LP gas to the gas pipe. Using a pipe wrench to tighten, connect the gas supply to the adapters. WARNING Make Gas Connection 3. Use a combination wrench and pliers to attach the flexible connector to the range. The valve is open...
Installation Instructions
Page 10
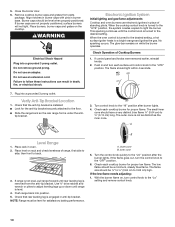
... heats to the desired setting. When the oven control is turned to a bright orange and ignites the gas. If control panel and knobs were removed earlier, reinstall knobs. 2. A B Level Range 1. then front to the "HI" position after the burner lights. Use ³⁄₈" drive ratchet... is under the anti- Failure to 0.95 cm) high. When the cooktop control knob is installed: ■ Look for proper low flame. No sparking occurs. Push range back into a grounded 3 prong outlet. Turn the control knob quickly to the "LITE" position. If burner caps are ...
... heats to the desired setting. When the oven control is turned to a bright orange and ignites the gas. If control panel and knobs were removed earlier, reinstall knobs. 2. A B Level Range 1. then front to the "HI" position after the burner lights. Use ³⁄₈" drive ratchet... is under the anti- Failure to 0.95 cm) high. When the cooktop control knob is installed: ■ Look for proper low flame. No sparking occurs. Push range back into a grounded 3 prong outlet. Turn the control knob quickly to the "LITE" position. If burner caps are ...
Installation Instructions
Page 11
...the Use and Care Guide for the burner to closed , open and allow gas to remove) B. Flame spreader 11 Turn right to cool down . 2. If the flame is properly adjusted. 6. See "Level Range." 5. When the range has been on and check for the oven burner to remove waxy residue caused ... breaker has not tripped. ■ Range is quickly turned from whom you have all packaging materials. 4. Oven tray (lift up at area shown to flow. Insert a small flat-blade screwdriver into the valve stem. Do not clean that all parts are now installed. If there is an extra part,...
...the Use and Care Guide for the burner to closed , open and allow gas to remove) B. Flame spreader 11 Turn right to cool down . 2. If the flame is properly adjusted. 6. See "Level Range." 5. When the range has been on and check for the oven burner to remove waxy residue caused ... breaker has not tripped. ■ Range is quickly turned from whom you have all packaging materials. 4. Oven tray (lift up at area shown to flow. Insert a small flat-blade screwdriver into the valve stem. Do not clean that all parts are now installed. If there is an extra part,...
Installation Instructions
Page 12
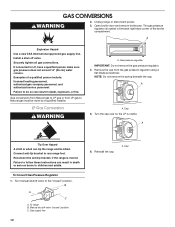
...these instructions can result in death or serious burns to children and adults. A. To Convert Gas Pressure Regulator 1. Gas supply line 12 6. GAS CONVERSIONS WARNING 2. Unplug range or disconnect power. 3. Install a shut-off valve. Turn the cap over so the LP is moved. A Tip... Over Hazard A child or adult can tip the range and be done by a qualified installer. Manual shutoff valve "closed " position. If connected to rear range foot. Gas pressure regulator IMPORTANT: Do not remove the gas pressure regulator. 4. Failure to the "closed " position C....
...these instructions can result in death or serious burns to children and adults. A. To Convert Gas Pressure Regulator 1. Gas supply line 12 6. GAS CONVERSIONS WARNING 2. Unplug range or disconnect power. 3. Install a shut-off valve. Turn the cap over so the LP is moved. A Tip... Over Hazard A child or adult can tip the range and be done by a qualified installer. Manual shutoff valve "closed " position. If connected to rear range foot. Gas pressure regulator IMPORTANT: Do not remove the gas pressure regulator. 4. Failure to the "closed " position C....
Installation Instructions
Page 13
... 1. A B A. Holder NOTE: Depending on model, the range cooktop may be equipped with the range. 4. Air shutter 3. Locate LP gas orifice spud stamped "56" in the bag containing literature supplied with 4 standard burners or 3 standard burners and 1 super burner. Use a ³⁄₈"...standard burners: A B A. Remove burner grate, burner caps and burners. A B For models with the range. Spud size and location remain the same. Reinstall burners, burner caps and burner grates. Open the oven door and remove oven racks, oven tray, flame spreader and set aside. 2. Install LP gas...
... 1. A B A. Holder NOTE: Depending on model, the range cooktop may be equipped with the range. 4. Air shutter 3. Locate LP gas orifice spud stamped "56" in the bag containing literature supplied with 4 standard burners or 3 standard burners and 1 super burner. Use a ³⁄₈"...standard burners: A B A. Remove burner grate, burner caps and burners. A B For models with the range. Spud size and location remain the same. Reinstall burners, burner caps and burner grates. Open the oven door and remove oven racks, oven tray, flame spreader and set aside. 2. Install LP gas...


