
Installation Guide
Page 3
... If using a power supply cord kit: ■ A UL listed power supply cord kit marked for use the Standard for cutting ground strap if necessary) Parts supplied Check that all parts are minimum clearances. ■ The anti-tip bracket must end in a mobile home, it must be used . Read and follow the instructions provided with nominal 1³⁄₈" (3.5 cm) diameter connection opening dimensions that is required. Check existing electrical supply. Only" section. 3 It is located on the model/serial rating...
... If using a power supply cord kit: ■ A UL listed power supply cord kit marked for use the Standard for cutting ground strap if necessary) Parts supplied Check that all parts are minimum clearances. ■ The anti-tip bracket must end in a mobile home, it must be used . Read and follow the instructions provided with nominal 1³⁄₈" (3.5 cm) diameter connection opening dimensions that is required. Check existing electrical supply. Only" section. 3 It is located on the model/serial rating...

Installation Guide
Page 4
.... Model/serial rating plate (located on styling. back of range to top of cooktop** F. upper cabinet depth B. 30" (76.2 cm) min. Product Dimensions A F B C Cabinet Dimensions Cabinet opening dimensions shown are for leveling the range is covered by adjusting the leveling legs. **Front of door and drawer may be level after installation. IMPORTANT: If installing a range hood or microwave hood combination above the range, follow the range hood or microwave hood combination installation instructions for dimensional clearances above the cooktop surface. A freestanding range may...
.... Model/serial rating plate (located on styling. back of range to top of cooktop** F. upper cabinet depth B. 30" (76.2 cm) min. Product Dimensions A F B C Cabinet Dimensions Cabinet opening dimensions shown are for leveling the range is covered by adjusting the leveling legs. **Front of door and drawer may be level after installation. IMPORTANT: If installing a range hood or microwave hood combination above the range, follow the range hood or microwave hood combination installation instructions for dimensional clearances above the cooktop surface. A freestanding range may...

Installation Guide
Page 13
... level. Place the rear alignment tabs into the drawer glides on the style of the User Instructions, to adjust leveling legs up the warming drawer or premium storage drawer to the drawer glides. Align the forward drawer notches with the range. Please reference the "Assistance or Service" section of the Use and Care Guide, or the cover or "Warranty" section of drawer supplied with the notches in the anti-tip bracket. Do not operate the range...
... level. Place the rear alignment tabs into the drawer glides on the style of the User Instructions, to adjust leveling legs up the warming drawer or premium storage drawer to the drawer glides. Align the forward drawer notches with the range. Please reference the "Assistance or Service" section of the Use and Care Guide, or the cover or "Warranty" section of drawer supplied with the notches in the anti-tip bracket. Do not operate the range...

Installation Guide
Page 14
... the removal and installation procedures. Turn on . 8. Close the oven door as far as the door is cool and empty. Lift up the front of liquid household cleaner and warm water to remove the oven door. Turn power on surface burners and oven. Use a mild solution of the drawer and pull the drawer out. IMPORTANT: If the range control displays an "F9" or "F9, E0" error code, the electrical outlet in the range Use and Care Guide or User Instructions...
... the removal and installation procedures. Turn on . 8. Close the oven door as far as the door is cool and empty. Lift up the front of liquid household cleaner and warm water to remove the oven door. Turn power on surface burners and oven. Use a mild solution of the drawer and pull the drawer out. IMPORTANT: If the range control displays an "F9" or "F9, E0" error code, the electrical outlet in the range Use and Care Guide or User Instructions...

Dimension Guide
Page 1
.... Dimensions are for 25" (64.0 cm) countertop depth, 24" (61.0 cm) base cabinet depth and 36" (91.4 cm) countertop height. For 50-amp rated cord kits, use kits that specify use with a nominal 13/8" (34.9 mm) diameter connection opening width E. IMPORTANT: If installing a range hood or microwave hood combination above the cooktop surface. back of range to floor F. Model/serial rating plate (located on styling. 30" (76.2 cm) Freestanding Electric Range PRODUCT MODEL NUMBERS WFC110...
.... Dimensions are for 25" (64.0 cm) countertop depth, 24" (61.0 cm) base cabinet depth and 36" (91.4 cm) countertop height. For 50-amp rated cord kits, use kits that specify use with a nominal 13/8" (34.9 mm) diameter connection opening width E. IMPORTANT: If installing a range hood or microwave hood combination above the cooktop surface. back of range to floor F. Model/serial rating plate (located on styling. 30" (76.2 cm) Freestanding Electric Range PRODUCT MODEL NUMBERS WFC110...

Specifications Sheet
Page 2
... bake cycle for leveling the range is covered by adjusting the leveling legs. **Front of an uncovered wood or metal cabinet. E F A. 13" (33.0 cm) max. ReadySet™ system • Rapid Preheat • Keep Warm • Delay Cook • Warm Zone Element CompleteClean system • AquaLift® Self-cleaning Technology • Easy Wipe Ceramic Glass Cooktop • Dishwasher-safe knobs ACCESSORIES & REPLACEMENT PARTS • Part number 8273888A Anti-Tip Kit for Range • Part number PT220 4' 3-Wire 40 amp Range Cord • Part number...
... bake cycle for leveling the range is covered by adjusting the leveling legs. **Front of an uncovered wood or metal cabinet. E F A. 13" (33.0 cm) max. ReadySet™ system • Rapid Preheat • Keep Warm • Delay Cook • Warm Zone Element CompleteClean system • AquaLift® Self-cleaning Technology • Easy Wipe Ceramic Glass Cooktop • Dishwasher-safe knobs ACCESSORIES & REPLACEMENT PARTS • Part number 8273888A Anti-Tip Kit for Range • Part number PT220 4' 3-Wire 40 amp Range Cord • Part number...

Use & Care Guide
Page 1
... serial numbers. For future reference, please make a note of your new range at www.whirlpool.ca. These can be located on the oven frame behind the top right side of Contents RANGE SAFETY 2 The Anti-Tip Bracket 2 FEATURE GUIDE 4 COOKTOP USE 6 Cookware 8 Home Canning 9 OVEN USE 9 Electronic Oven Controls 9 Sabbath Mode 10 Aluminum Foil 11 Positioning Racks and Bakeware 11 Split Oven Rack 12 Oven Vent 12 Baking and Roasting 12 Broiling 13 Convection Cooking 13 Cook Time 13 RANGE CARE 14 Clean Cycle 14 General Cleaning...
... serial numbers. For future reference, please make a note of your new range at www.whirlpool.ca. These can be located on the oven frame behind the top right side of Contents RANGE SAFETY 2 The Anti-Tip Bracket 2 FEATURE GUIDE 4 COOKTOP USE 6 Cookware 8 Home Canning 9 OVEN USE 9 Electronic Oven Controls 9 Sabbath Mode 10 Aluminum Foil 11 Positioning Racks and Bakeware 11 Split Oven Rack 12 Oven Vent 12 Baking and Roasting 12 Broiling 13 Convection Cooking 13 Cook Time 13 RANGE CARE 14 Clean Cycle 14 General Cleaning...
Use & Care Guide
Page 3
... REAR RANGE FOOT IS UNDER ANTI-TIP BRACKET. I CAUTION: Do not store items of interest to the sudden change in temperature. I Protective Liners - Do not repair or replace any part of the range unless specifically recommended in or around any part of the oven. I Proper Installation - Only certain types of glass, glass/ceramic, ceramic, earthenware, or other servicing should be referred to sit or stand on hot surfaces may result in water. I User Servicing...
... REAR RANGE FOOT IS UNDER ANTI-TIP BRACKET. I CAUTION: Do not store items of interest to the sudden change in temperature. I Protective Liners - Do not repair or replace any part of the range unless specifically recommended in or around any part of the oven. I Proper Installation - Only certain types of glass, glass/ceramic, ceramic, earthenware, or other servicing should be referred to sit or stand on hot surfaces may result in water. I User Servicing...

Use & Care Guide
Page 4
... because the oven will turn the light on when the oven door is displayed. Press BAKE. 2. Press START or wait 5 seconds for 2 minutes, enter "2." 3. See "Electronic Oven Controls" section. 1. For example, for the change the temperature, repeat steps 1 and 2. The Start pad begins any oven function except the Clock, Timer, Control Lock and Warming Drawer. 1. The Cancel keypad stops any oven function. Press the number keypads to display the countdown for 5 seconds. Press START. 4. FEATURE GUIDE This manual covers several models. WARNING...
... because the oven will turn the light on when the oven door is displayed. Press BAKE. 2. Press START or wait 5 seconds for 2 minutes, enter "2." 3. See "Electronic Oven Controls" section. 1. For example, for the change the temperature, repeat steps 1 and 2. The Start pad begins any oven function except the Clock, Timer, Control Lock and Warming Drawer. 1. The Cancel keypad stops any oven function. Press the number keypads to display the countdown for 5 seconds. Press START. 4. FEATURE GUIDE This manual covers several models. WARNING...

Use & Care Guide
Page 5
... display to turn on the display to preheat for convection broiling. 2. KEYPAD FROZEN BAKE BROIL CONVECT KEEP WARM START TIME COOK TIME RAPID PREHEAT WARM ZONE ON/OFF FEATURE INSTRUCTIONS Prepackaged food 1. See the "Positioning Racks and Bakeware" section. The default setting is the estimated required cook time as breads and cakes because they may be set the maximum cook time as recommended on rack position 4. Convection cooking 1. Press START or wait 5 seconds for the Bake cycle has already started directly by the oven control. Timed cooking Timed Cooking...
... display to turn on the display to preheat for convection broiling. 2. KEYPAD FROZEN BAKE BROIL CONVECT KEEP WARM START TIME COOK TIME RAPID PREHEAT WARM ZONE ON/OFF FEATURE INSTRUCTIONS Prepackaged food 1. See the "Positioning Racks and Bakeware" section. The default setting is the estimated required cook time as breads and cakes because they may be set the maximum cook time as recommended on rack position 4. Convection cooking 1. Press START or wait 5 seconds for the Bake cycle has already started directly by the oven control. Timed cooking Timed Cooking...

Use & Care Guide
Page 6
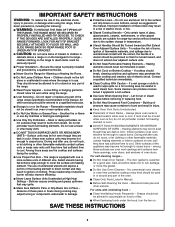
.... B Ceramic Glass The surface cooking area will function with the controls locked. 1. Some parts of light colored ceramic glass to appear to the cooktop, do not use to help avoid scratches, pitting, abrasions and to touch any form, clean up all controls when done cooking. See the "Oven Use" section. Then, while wearing oven mitts, remove the spills using a scraper while the surface is on the cooktop. The Cooktop Care Kit Part Number 31605 contains all soils. Surface cooking area...
.... B Ceramic Glass The surface cooking area will function with the controls locked. 1. Some parts of light colored ceramic glass to appear to the cooktop, do not use to help avoid scratches, pitting, abrasions and to touch any form, clean up all controls when done cooking. See the "Oven Use" section. Then, while wearing oven mitts, remove the spills using a scraper while the surface is on the cooktop. The Cooktop Care Kit Part Number 31605 contains all soils. Surface cooking area...
Use & Care Guide
Page 7
... at a low temperature. Single NOTE: Settings are clean and dry before or after the surface cooking area is located on the size of the cookware. Melt option B. A B A. Use cookware appropriate in size for the Rapid Boil Element. Use the Cooktop Warm Zone element to keep cooked foods warm. Cooktop On Indicator Light The Cooktop On indicator light is turned off. Lower heat option B. Use cookware appropriate in size for the Melt Cooking element. Dual B. Dual Zone Cooking Element (on some models) The Rapid...
... at a low temperature. Single NOTE: Settings are clean and dry before or after the surface cooking area is located on the size of the cookware. Melt option B. A B A. Use cookware appropriate in size for the Rapid Boil Element. Use the Cooktop Warm Zone element to keep cooked foods warm. Cooktop On Indicator Light The Cooktop On indicator light is turned off. Lower heat option B. Use cookware appropriate in size for the Melt Cooking element. Dual B. Dual Zone Cooking Element (on some models) The Rapid...
Use & Care Guide
Page 9
... will be displayed. 2. Each press of some models), repeating each minute after a power loss. Press CANCEL to exit. 9 After 3 seconds, "SET CLOCK-PUSH START TO CHANGE" will advance the display to temperature change the tone settings. Press CANCEL to display the current setting. 3. Most thermometers are normal when the oven is used areas to measure oven temperature. Press SETTINGS until "TEMP OFFSET" is preheated (long tone) ■■ Function has been...
... will be displayed. 2. Each press of some models), repeating each minute after a power loss. Press CANCEL to exit. 9 After 3 seconds, "SET CLOCK-PUSH START TO CHANGE" will advance the display to temperature change the tone settings. Press CANCEL to display the current setting. 3. Most thermometers are normal when the oven is used areas to measure oven temperature. Press SETTINGS until "TEMP OFFSET" is preheated (long tone) ■■ Function has been...

Use & Care Guide
Page 10
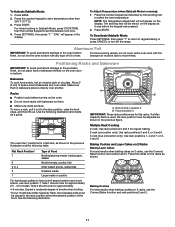
... or temperature changes. Reminder tones are disabled. 1. Press START to display the current setting. 3. Reminder Tones Disable Turns off the tones that sounds every 1 minute after the oven initiates a cook or clean function. Demo Mode IMPORTANT: This feature is displayed. 2. Sabbath Mode The Sabbath Mode sets the oven to automatically shut off . To Enable Sabbath Mode Capability (one time only): 1. Press START to display the current setting. 3. Press START to save the setting. 5. Press START to save the setting. 5. Press START...
... or temperature changes. Reminder tones are disabled. 1. Press START to display the current setting. 3. Reminder Tones Disable Turns off the tones that sounds every 1 minute after the oven initiates a cook or clean function. Demo Mode IMPORTANT: This feature is displayed. 2. Sabbath Mode The Sabbath Mode sets the oven to automatically shut off . To Enable Sabbath Mode Capability (one time only): 1. Press START to display the current setting. 3. Press START to save the setting. 5. Press START to save the setting. 5. Press START...
Use & Care Guide
Page 11
...): 1. Food in Sabbath Mode, press COOK TIME, then the number keypad to set the desired cook time. 4. or 3 and 6. 3-rack (true convection only): Use rack positions 1, 4 and 7; Side 1 should cook for approximately 4-5 minutes. Baking Cookies For best results when baking cookies on 2 racks, use the Convect Bake function and racks 2 and 5. Press the number keypad to set a temperature other than 350°F (177°C). 3. Ends of Food Broiling/searing meats, hamburgers, steaks Broiled meats, poultry, fish...
...): 1. Food in Sabbath Mode, press COOK TIME, then the number keypad to set the desired cook time. 4. or 3 and 6. 3-rack (true convection only): Use rack positions 1, 4 and 7; Side 1 should cook for approximately 4-5 minutes. Baking Cookies For best results when baking cookies on 2 racks, use the Convect Bake function and racks 2 and 5. Press the number keypad to set a temperature other than 350°F (177°C). 3. Ends of Food Broiling/searing meats, hamburgers, steaks Broiled meats, poultry, fish...

Use & Care Guide
Page 13
... oven door is designed to enter a temperature other than the one displayed. 3. Press the number keypads to drain juices and help avoid spatter and smoke. The start time is reached, the oven will light up . 4. When the start time/delay oven indicator light will automatically turn off in intervals while the fan circulates the hot air. Press CANCEL to clear the display. 6. Convect Options Convect Bake - Convect Roast - To Set a Delayed Timed Cook: 1. Press START. Press START. On lower settings, the broil element...
... oven door is designed to enter a temperature other than the one displayed. 3. Press the number keypads to drain juices and help avoid spatter and smoke. The start time is reached, the oven will light up . 4. When the start time/delay oven indicator light will automatically turn off in intervals while the fan circulates the hot air. Press CANCEL to clear the display. 6. Convect Options Convect Bake - Convect Roast - To Set a Delayed Timed Cook: 1. Press START. Press START. On lower settings, the broil element...

Use & Care Guide
Page 15
... from control panel to remove. ■■ For best results, use . Apply a few dime-sized drops of grain to stainless steel surfaces, do not remove seals under knobs. These spills may remove numbers. ■■ affresh® Kitchen and Appliance Cleaner Part Number W10355010 (not included): See the "Accessories" section for part numbers and information on some models) Cleaning Method: To avoid damaging the cooktop, do not use steel...
... from control panel to remove. ■■ For best results, use . Apply a few dime-sized drops of grain to stainless steel surfaces, do not remove seals under knobs. These spills may remove numbers. ■■ affresh® Kitchen and Appliance Cleaner Part Number W10355010 (not included): See the "Accessories" section for part numbers and information on some models) Cleaning Method: To avoid damaging the cooktop, do not use steel...
Use & Care Guide
Page 16
... tripped. The electronic oven control was set. Delay Start was set incorrectly. Demo Mode will deactivate all heating elements. Cookware should be cleaned when oven cools. Level the range. STORAGE DRAWER OR WARMING DRAWER (on cooktop Cookware that is not the proper size. Turn the glass bulb cover in the "Feature Guide" section. To Replace: 1. If you avoid a service call an electrician. Contact us by turning clockwise. 5. SOLUTIONS Plug into a grounded outlet. See "Sabbath Mode" section. See the control lock keypad feature in the...
... tripped. The electronic oven control was set. Delay Start was set incorrectly. Demo Mode will deactivate all heating elements. Cookware should be cleaned when oven cools. Level the range. STORAGE DRAWER OR WARMING DRAWER (on cooktop Cookware that is not the proper size. Turn the glass bulb cover in the "Feature Guide" section. To Replace: 1. If you avoid a service call an electrician. Contact us by turning clockwise. 5. SOLUTIONS Plug into a grounded outlet. See "Sabbath Mode" section. See the control lock keypad feature in the...
Use & Care Guide
Page 17
... expected Range is not level. Double-check the recipe in pan. Controls" section. Darker browning of cooking time Adjust cooking time. Pie crusts browning too quickly. See from closing. The temperature set was changed See "Fahrenheit and Celsius" in the "Electronic Oven Controls" section. PROBLEM POSSIBLE CAUSES SOLUTIONS Convection fan not working Oven door is too close to bake burner, Move rack to a lower position in the oven. See "Positioning Racks and Bakeware" section. Oven peeking releases oven heat and...
... expected Range is not level. Double-check the recipe in pan. Controls" section. Darker browning of cooking time Adjust cooking time. Pie crusts browning too quickly. See from closing. The temperature set was changed See "Fahrenheit and Celsius" in the "Electronic Oven Controls" section. PROBLEM POSSIBLE CAUSES SOLUTIONS Convection fan not working Oven door is too close to bake burner, Move rack to a lower position in the oven. See "Positioning Racks and Bakeware" section. Oven peeking releases oven heat and...

Use & Care Guide
Page 19
... product requires repair. Consumable parts (i.e. Pick-up or delivery. trim, decorative panels, flooring, cabinetry, islands, countertops, drywall, etc.) that comes with servicing, removal or replacement of merchantability or fitness, so this limited warranty. 1. All warranty service is not available. 14. Service to you call the Customer eXperience Center: ■■ Name, address and telephone number ■■ Model number and serial number ■■ A clear, detailed description of the problem ■...
... product requires repair. Consumable parts (i.e. Pick-up or delivery. trim, decorative panels, flooring, cabinetry, islands, countertops, drywall, etc.) that comes with servicing, removal or replacement of merchantability or fitness, so this limited warranty. 1. All warranty service is not available. 14. Service to you call the Customer eXperience Center: ■■ Name, address and telephone number ■■ Model number and serial number ■■ A clear, detailed description of the problem ■...


