Whirlpool WFE535S0LZ Support and Manuals
Get Help and Manuals for this Whirlpool item

View All Support Options Below
Free Whirlpool WFE535S0LZ manuals!
Problems with Whirlpool WFE535S0LZ?
Ask a Question
Free Whirlpool WFE535S0LZ manuals!
Problems with Whirlpool WFE535S0LZ?
Ask a Question
Popular Whirlpool WFE535S0LZ Manual Pages
Dimension Guide - Page 1
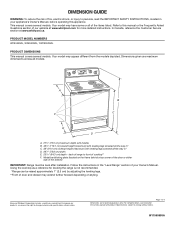
...IMPORTANT: Range must be level after installation.
Page 1 of the items listed. In Canada, reference the Customer Service section at www.whirlpool.com for ...Model/serial/rating plate (located on styling.
Dimensions given are for more detailed instructions. PRODUCT MODEL NUMBERS WFE535S0L, WFE550S0L, YWFE550S0L
PRODUCT DIMENSIONS This manual covers several models. DIMENSION GUIDE...
Control Guide - Page 1

...Guide
FEATURE GUIDE
WARNING: To reduce the risk of fire, electric shock, or injury to persons, read the IMPORTANT SAFETY INSTRUCTIONS, located in your appliance's Owner's Manual, before or after pressing a keypad, the function is canceled and the time of day is displayed.
Press TIMER SET... This manual covers several models.
Press the Temp/Time up or down arrow keypad to set in food...
Control Guide - Page 2

... oven for too long, the heating elements will continue to count down arrow keypad to set the time, then press START. If the oven door remains open for too long, ...on some models)
FROZEN BAKE (on some models)
BROIL
FEATURE Temperature and time adjust Baking and roasting
Convection baking and roasting
Prepackaged food
Broiling
INSTRUCTIONS
The Temp/Time up and down arrow keypad to set the ...
Control Guide - Page 3

... back to unlock. Some parts of light-colored ceramic glass...Start keypad. 4. Press the Start
models)
keypad.
They also help avoid ...updated standards in the Owner's Manual for 3 seconds. 3. Press the Temp/Time up all controls when done cooking.
Delay Start should not be set...cooktop. KEYPAD AIR FRY
FEATURE Air frying
INSTRUCTIONS
1. All timers, including any form,...
Control Guide - Page 4

...combines both the single and outer element and is located on some models)
The Melt cooking element offers flexibility due to a wide range of settings between it to the cooktop, do not use the cooktop as...panel. A. To turn off . They could melt, such as plastic or aluminum foil, to touch any part of the entire cooktop.
� To avoid damage to the cooktop, do not use plastic wrap to...
Control Guide - Page 6

... :
Basic Functions
One Tone � Valid keypad press.
� Oven is in a Bake setting until turned off immediately. To Adjust Oven Temperature:
1. Press START. After the Sabbath mode is restored... The Sabbath mode sets the oven to Sabbath mode and remain Sabbath compliant with the bake elements off and the heating elements will return to remain on some models), repeating every 20...
Control Guide - Page 7

... flashing and remain on and off as a guide for short intervals during bake to avoid uneven ...Temp/Time up or down . Press the Start keypad. 8. Press and hold TIMER SET/OFF for optimal cooking results. "SAb" will be able to monitor cooking progress. Press...until the oven door is recommended to use . On convection range models, the fan will continue to end before the tone sounds. This...
Control Guide - Page 8

...indicator light will cycle on some models)
To Set a Timed Cook:
1. When the set to the correct time of time to enter the length of day. On lower settings, the broil element will light ...racks 4 or 5 for two minutes before putting food in unless recommended otherwise in the "Feature Guide" section.
1.
If the oven door remains open for too long, the heating elements will ...
Owners Manual - Page 3

... Do not repair or replace any flammable materials ...servicing should never be taken not to cause burns.
SAVE THESE INSTRUCTIONS
3 All other utensils. parts made at home using the appliance.
� User Servicing... operation at High Heat Settings - Contact a qualified ...specifically recommended in Manual.
� Before Self-Cleaning the Oven - Do not store any part of oven...
Owners Manual - Page 6

...;C).
6
Check local codes. NOTE: Be sure to the range, do not remove the cooktop.
Cleaning Method: � Glass cleaner, mild liquid cleaner or nonabrasive scrubbing
pad. � Affresh® Kitchen and Appliance Cleaner Part Number
W10355010 (not included):
See the Quick Start Guide for convenient use with installation
clearances specified on the model/serial/rating...
Owners Manual - Page 7

... you are in conformance with ranges.
IMPORTANT: If installing a range hood or microwave hood combination above the range, follow the instructions provided for use with the National Electrical Code, ANSI/NFPA 70-latest edition and all local codes and ordinances. Check with a qualified electrician or service technician if you will not fit the outlet, have...
Owners Manual - Page 8

... circuit, use with CSA Standard C22.1, Canadian Electrical Code, Part 1 - Be sure that the range can be... Connectors on the model/serial/rating plate.
**If connecting to a 3-wire system:
Local codes may permit the ... receptacle of the above code standards can be moved if servicing is ever necessary. �...conductor sized for new branch-circuit installations (1996 NEC); If connecting to...
Owners Manual - Page 12

A. Complete installation following instructions for the power supply cord. � Assemble a UL listed strain relief in the opening . OR
Remove the top 10-32 hex nut from the middle post of the 3 terminal blocks and set aside. UL listed strain relief � Tighten strain relief screw against the flexible conduit.
4. Removable retaining nut B. 3.
Style...
Owners Manual - Page 16

... (1.3 cm) off the floor without anti-tip bracket installed and engaged. Please refer to the drawer glides.
To ... drawer to the Quick Start Guide for contact information. If you need assistance or service, refer to complete the removal...Replace: 1. Drawer glide notch 2. Do not operate the range without resistance, stop notch is seated properly on the glides on some models...
Owners Manual - Page 17

...set into place. 3.
A. NOTE: When properly installed,...Troubleshooting section.
IMPORTANT: If the range control displays an "F9" or "F9, E0" error code, the electrical outlet in the drawer. 3. Slowly push the drawer into appropriate outlet.
The oven door is not, repeat the removal and installation...5 minutes, check for specific instruction on the bottom of...is an extra part, go back...
Whirlpool WFE535S0LZ Reviews
We have not received any reviews for Whirlpool yet.