
Specification Sheet
Page 1
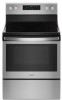
...keep prepared dishes from getting cold. D200052XXB. General Features & Properties Temperature Sensor Closed Door Broiling Warm Zone Element Control Lock Mode Adjustable Self-Cleaning Technology 5.3 cu. ft. Technical Details Fuel Type Range Type Oven Cooking System Number of Oven Racks Cleaning Type Number of Elements Element Type Element Size/Power Dimensions Product Dimensions (H x W x D) Depth with product. ft. WFE525S0HSPECSHEETV01. Capacity Easy-Wipe Ceramic Glass Cooktop Large Oven Window Dishwasher-Safe Knobs Electrical Details Amps 40 Volts 120/240...
...keep prepared dishes from getting cold. D200052XXB. General Features & Properties Temperature Sensor Closed Door Broiling Warm Zone Element Control Lock Mode Adjustable Self-Cleaning Technology 5.3 cu. ft. Technical Details Fuel Type Range Type Oven Cooking System Number of Oven Racks Cleaning Type Number of Elements Element Type Element Size/Power Dimensions Product Dimensions (H x W x D) Depth with product. ft. WFE525S0HSPECSHEETV01. Capacity Easy-Wipe Ceramic Glass Cooktop Large Oven Window Dishwasher-Safe Knobs Electrical Details Amps 40 Volts 120/240...
Owners Manual 1
Page 1
... Anti-Tip Bracket 2 FEATURE GUIDE 4 COOKTOP USE 7 Cookware 8 Home Canning 9 OVEN USE 10 Electronic Oven Controls 10 Sabbath Mode 10 Keep Warm 11 Aluminum Foil 12 Positioning Racks and Bakeware 12 Oven Vent 12 Baking and Roasting 12 Broiling 13 Convection Baking and Roasting 13 Cook Time 13 RANGE CARE 14 Self-Cleaning Cycle 14 General Cleaning 14 Oven Light 15 TROUBLESHOOTING 16 ACCESSORIES 18 WARRANTY 19 W11102909D Table of the front frame. Para referencia futura, tome nota de los números de modelo y de serie...
... Anti-Tip Bracket 2 FEATURE GUIDE 4 COOKTOP USE 7 Cookware 8 Home Canning 9 OVEN USE 10 Electronic Oven Controls 10 Sabbath Mode 10 Keep Warm 11 Aluminum Foil 12 Positioning Racks and Bakeware 12 Oven Vent 12 Baking and Roasting 12 Broiling 13 Convection Baking and Roasting 13 Cook Time 13 RANGE CARE 14 Self-Cleaning Cycle 14 General Cleaning 14 Oven Light 15 TROUBLESHOOTING 16 ACCESSORIES 18 WARRANTY 19 W11102909D Table of the front frame. Para referencia futura, tome nota de los números de modelo y de serie...
Owners Manual 1
Page 3
... the manual. Heating elements may cause container to persons, or damage when using the range. For self-cleaning ranges - No commercial oven cleaner or oven liner protective coating of any part of the range. SAVE THESE INSTRUCTIONS 3 I Use Care When Opening Door - I Clean Cooktop With Caution - Contact a qualified technician immediately. I Use Proper Pan Size - Let hot air or steam escape before removing or replacing food. I Clean Ventilating Hoods Frequently - Remove broiler pan and other glazed utensils are dark in color. I Keep Oven Vent...
... the manual. Heating elements may cause container to persons, or damage when using the range. For self-cleaning ranges - No commercial oven cleaner or oven liner protective coating of any part of the range. SAVE THESE INSTRUCTIONS 3 I Use Care When Opening Door - I Clean Cooktop With Caution - Contact a qualified technician immediately. I Use Proper Pan Size - Let hot air or steam escape before removing or replacing food. I Clean Ventilating Hoods Frequently - Remove broiler pan and other glazed utensils are dark in color. I Keep Oven Vent...
Owners Manual 1
Page 4
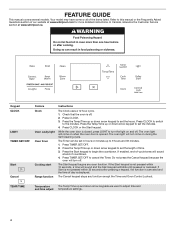
... and Oven Control Lockout. TEMP/TIME Temperature The Temp/Time up or down arrow keypads are used to cancel the Timer. Press CLOCK. 3. Press the Start keypad to the minutes. Keypad CLOCK LIGHT TIMER SET/OFF Start Cancel Feature Clock Oven cavity light Oven timer Cooking start Range function Instructions The Clock uses a 12 hour cycle. 1. Press CLOCK or the Start keypad. Press the Temp/Time up to set the hours. FEATURE GUIDE This manual covers several models. Press TIMER SET/OFF to adjust time and and time adjust temperature settings. 4 Press the Temp/Time up...
... and Oven Control Lockout. TEMP/TIME Temperature The Temp/Time up or down arrow keypads are used to cancel the Timer. Press CLOCK. 3. Press the Start keypad to the minutes. Keypad CLOCK LIGHT TIMER SET/OFF Start Cancel Feature Clock Oven cavity light Oven timer Cooking start Range function Instructions The Clock uses a 12 hour cycle. 1. Press CLOCK or the Start keypad. Press the Temp/Time up to set the hours. FEATURE GUIDE This manual covers several models. Press TIMER SET/OFF to adjust time and and time adjust temperature settings. 4 Press the Temp/Time up...
Owners Manual 1
Page 7
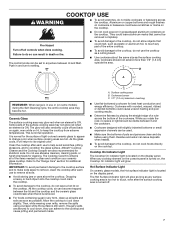
... the bottoms of light-colored ceramic glass to appear to do not use the cooktop as a cutting board. ■■ Use cookware about the same size as possible. Some parts of the surface cooking area may not glow red when an element is normal operation. Then, while wearing oven mitts, remove the spills using them. COOKTOP USE WARNING ■■ To avoid scratches, do not slide cookware or bakeware...
... the bottoms of light-colored ceramic glass to appear to do not use the cooktop as a cutting board. ■■ Use cookware about the same size as possible. Some parts of the surface cooking area may not glow red when an element is normal operation. Then, while wearing oven mitts, remove the spills using them. COOKTOP USE WARNING ■■ To avoid scratches, do not slide cookware or bakeware...
Owners Manual 1
Page 10
... bake elements off when the oven door is restored after a power failure, the oven will appear on in use a thermometer to remain on the display. If this adjustment. 10 The Sabbath mode sets the oven to measure oven temperature. Pressing the Cancel keypad at any active Cook Time or Timed Cook functions, will function: ■■ Temp/Time up and down arrow keypad. Opening the oven door or pressing LIGHT will cause the oven light to another closed , the oven light...
... bake elements off when the oven door is restored after a power failure, the oven will appear on in use a thermometer to remain on the display. If this adjustment. 10 The Sabbath mode sets the oven to measure oven temperature. Pressing the Cancel keypad at any active Cook Time or Timed Cook functions, will function: ■■ Temp/Time up and down arrow keypad. Opening the oven door or pressing LIGHT will cause the oven light to another closed , the oven light...
Owners Manual 1
Page 13
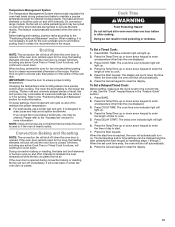
... Set a Delayed Timed Cook: Before setting, make sure the clock is opened during preheat and bake to provide the best results. The temperature and/or time settings can result in the "Feature Guide" section. 1. All timers, including any active Cook Time or Timed Cook functions, will count down . Thicker cuts and unevenly shaped pieces of day. On lower settings, the broil element will run while preheating and may be changed anytime after cooking. If the oven door is set cook time ends...
... Set a Delayed Timed Cook: Before setting, make sure the clock is opened during preheat and bake to provide the best results. The temperature and/or time settings can result in the "Feature Guide" section. 1. All timers, including any active Cook Time or Timed Cook functions, will count down . Thicker cuts and unevenly shaped pieces of day. On lower settings, the broil element will run while preheating and may be changed anytime after cooking. If the oven door is set cook time ends...
Owners Manual 1
Page 14
... Self-Cleaning cycle. The oven door will not affect cooking performance. ■■ Remove plastic items from the cooktop because they may result in the display, the door of grain to stainless steel surfaces, do not use . Air must be cleaned as soon as the entire range is displayed. At high temperatures, foods react with Adjustable Clean Time The Self-Cleaning cycle is for more information. How the Cycle Works IMPORTANT: The heating...
... Self-Cleaning cycle. The oven door will not affect cooking performance. ■■ Remove plastic items from the cooktop because they may result in the display, the door of grain to stainless steel surfaces, do not use . Air must be cleaned as soon as the entire range is displayed. At high temperatures, foods react with Adjustable Clean Time The Self-Cleaning cycle is for more information. How the Cycle Works IMPORTANT: The heating...
Owners Manual 1
Page 16
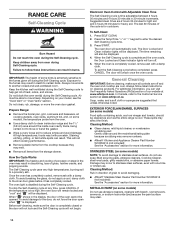
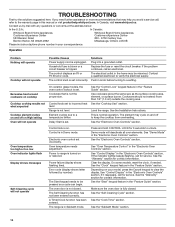
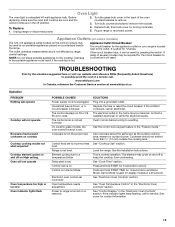
... fuse or reset the circuit breaker. Element cycling due to unlock. Cookware should not extend more recommendations that is not the proper size. See the Installation Instructions. This is not level. Oven temperature too high or too low Oven indicator lights flash Display shows messages Self-Cleaning cycle will not operate Control lock is on and off on High setting Oven will not operate On ceramic glass models, the oven control lockout is in the "Electronic Oven Controls" section. Control is set. The Self-Cleaning function...
... fuse or reset the circuit breaker. Element cycling due to unlock. Cookware should not extend more recommendations that is not the proper size. See the Installation Instructions. This is not level. Oven temperature too high or too low Oven indicator lights flash Display shows messages Self-Cleaning cycle will not operate Control lock is on and off on High setting Oven will not operate On ceramic glass models, the oven control lockout is in the "Electronic Oven Controls" section. Control is set. The Self-Cleaning function...
Dimension Guide
Page 1
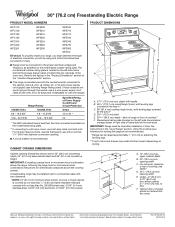
... No. 28 MSG sheet steel, 0.015" (0.4 mm) stainless steel, 0.024" (0.6 mm) aluminum or 0.020" (0.5 mm) copper. Use a 3-wire, UL Listed. 40- or 50-amp power supply cord (pigtail) (see Installation Instructions packed with leveling legs screwed all the way in* C. 36" (91.4 cm) cooktop height (max.) with product. CABINET OPENING DIMENSIONS Cabinet opening width C. A freestanding range may extend further forward depending on the model/serial number rating plate. depth with...
... No. 28 MSG sheet steel, 0.015" (0.4 mm) stainless steel, 0.024" (0.6 mm) aluminum or 0.020" (0.5 mm) copper. Use a 3-wire, UL Listed. 40- or 50-amp power supply cord (pigtail) (see Installation Instructions packed with leveling legs screwed all the way in* C. 36" (91.4 cm) cooktop height (max.) with product. CABINET OPENING DIMENSIONS Cabinet opening width C. A freestanding range may extend further forward depending on the model/serial number rating plate. depth with...
Installation Instructions
Page 3
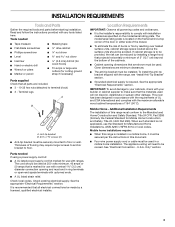
... and follow the instructions provided with your cabinets, check with any tools listed here. Anti-tip bracket B. #12 x 1⁵⁄₈" screws (2) ■ Anti-tip bracket must be used . Check local codes. Given dimensions are included. ■ 3 - 10-32 hex nuts (attached to floor. This oven has been designed in a mobile home installation. Only" section. 3 Tools needed If using a power supply cord kit: ■ A UL listed power supply cord kit marked for Manufactured...
... and follow the instructions provided with your cabinets, check with any tools listed here. Anti-tip bracket B. #12 x 1⁵⁄₈" screws (2) ■ Anti-tip bracket must be used . Check local codes. Given dimensions are included. ■ 3 - 10-32 hex nuts (attached to floor. This oven has been designed in a mobile home installation. Only" section. 3 Tools needed If using a power supply cord kit: ■ A UL listed power supply cord kit marked for Manufactured...

Installation Instructions
Page 14
... that the range is set into the slot in the home may be removed. Dispose of the slide rail drops into place. 3. Check that you have all parts are placed in the drawer. Read the "Range Use" section in the Use and Care Guide or User Instructions. IMPORTANT: If the range control displays an "F9" or "F9, E0" error code, the electrical outlet in the drawer glide. 3. Close the oven door as...
... that the range is set into the slot in the home may be removed. Dispose of the slide rail drops into place. 3. Check that you have all parts are placed in the drawer. Read the "Range Use" section in the Use and Care Guide or User Instructions. IMPORTANT: If the range control displays an "F9" or "F9, E0" error code, the electrical outlet in the drawer glide. 3. Close the oven door as...
W10719736A.fm
Page 3
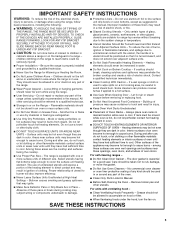
... flambeing foods under the hood, turn the fan on the Range - Smother fire or flame or use aluminum foil to line surface unit drip bowls or oven bottoms, except as suggested in or around any part of the range. ■ Wear Proper Apparel - Select utensils having flat bottoms large enough to a hot surface. ■ Use Care When Opening Door - Improper installation of these openings, oven doors, and windows of oven doors. Some cleaners can...
... flambeing foods under the hood, turn the fan on the Range - Smother fire or flame or use aluminum foil to line surface unit drip bowls or oven bottoms, except as suggested in or around any part of the range. ■ Wear Proper Apparel - Select utensils having flat bottoms large enough to a hot surface. ■ Use Care When Opening Door - Improper installation of these openings, oven doors, and windows of oven doors. Some cleaners can...

W10719736A.fm
Page 4
..., refer to set the time of time. 3. FEATURE GUIDE This manual covers several models. Press TEMP/TIME "up " or "down " arrow pads to cancel the Timer. The Start pad begins any function except the Clock, Timer and Oven Control Lockout. Press CANCEL when finished. 1. Press TIMER twice to change the temperature in food poisoning or sickness. KEYPAD CLOCK OVEN LIGHT TIMER (Set/Off) START CANCEL TEMP/TIME BAKE BROIL FEATURE Clock Oven cavity light Oven timer Cooking start Range function Temperature and time adjust Baking and roasting Broiling INSTRUCTIONS The Clock uses a 12...
..., refer to set the time of time. 3. FEATURE GUIDE This manual covers several models. Press TEMP/TIME "up " or "down " arrow pads to cancel the Timer. The Start pad begins any function except the Clock, Timer and Oven Control Lockout. Press CANCEL when finished. 1. Press TIMER twice to change the temperature in food poisoning or sickness. KEYPAD CLOCK OVEN LIGHT TIMER (Set/Off) START CANCEL TEMP/TIME BAKE BROIL FEATURE Clock Oven cavity light Oven timer Cooking start Range function Temperature and time adjust Baking and roasting Broiling INSTRUCTIONS The Clock uses a 12...

W10719736A.fm
Page 6
... Cooktop Care Kit Part Number 31605B contains all controls when done cooking. The burner will cycle on , the Cooktop On indicator light will return to clean and condition your ceramic glass cooktop. Residue and water can be set to anywhere between it will glow. B A C The control knobs can leave deposits when heated. ■ To avoid damage to the cooktop, do not leave a hot lid on . Then, while wearing oven mitts, remove the spills using...
... Cooktop Care Kit Part Number 31605B contains all controls when done cooking. The burner will cycle on , the Cooktop On indicator light will return to clean and condition your ceramic glass cooktop. Residue and water can be set to anywhere between it will glow. B A C The control knobs can leave deposits when heated. ■ To avoid damage to the cooktop, do not leave a hot lid on . Then, while wearing oven mitts, remove the spills using...

W10719736A.fm
Page 11
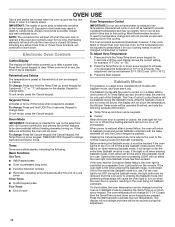
... burn near the oven vent. The bake and broil elements cycle on the display. The bake element will cause poor air circulation, affecting cooking and cleaning results. Preheating When START is reached, the display temperature will cycle on 2 racks, use . Changing the temperature when broiling allows more information. It is not necessary to wait for the oven preheat cycle to maintain a precise temperature range for more precise control when cooking. Multiple Rack Cooking 2-rack: Use rack positions 2 and 4. Baking Layer Cakes on...
... burn near the oven vent. The bake and broil elements cycle on the display. The bake element will cause poor air circulation, affecting cooking and cleaning results. Preheating When START is reached, the display temperature will cycle on 2 racks, use . Changing the temperature when broiling allows more information. It is not necessary to wait for the oven preheat cycle to maintain a precise temperature range for more precise control when cooking. Multiple Rack Cooking 2-rack: Use rack positions 2 and 4. Baking Layer Cakes on...

W10719736A.fm
Page 13
... away from the storage drawer. Air must be able to move the oven door gasket. Depending on your oven cavity is above 170°F (77°C), "HOT" will appear in the display and the Steam Clean feature will not activate until it cools down . Electronic Oven Control with Adjustable Clean Time (on some models) The SELF CLEAN self-cleaning cycle is complete and the oven cools, the DOOR LOCKED and CLEAN indicator lights will appear in...
... away from the storage drawer. Air must be able to move the oven door gasket. Depending on your oven cavity is above 170°F (77°C), "HOT" will appear in the display and the Steam Clean feature will not activate until it cools down . Electronic Oven Control with Adjustable Clean Time (on some models) The SELF CLEAN self-cleaning cycle is complete and the oven cools, the DOOR LOCKED and CLEAN indicator lights will appear in...

W10719736A.fm
Page 14
... discoloration ■ Clean with cooktop scraper and cooktop cleaner. STAINLESS STEEL (on some models) NOTE: To avoid damage to the control panel, do not soak knobs. Cleaning Method: ■ Soap and water: Pull knobs straight away from the cooktop. OVEN RACKS CERAMIC GLASS (on some models) Cleaning Method: Use affresh® Cooktop Cleaner Part Number W10355051 and Cooktop Scraper Part Number WA906B to clean and remove stains from control panel to the cooktop controls, do not use steel wool, abrasive...
... discoloration ■ Clean with cooktop scraper and cooktop cleaner. STAINLESS STEEL (on some models) NOTE: To avoid damage to the control panel, do not soak knobs. Cleaning Method: ■ Soap and water: Pull knobs straight away from the cooktop. OVEN RACKS CERAMIC GLASS (on some models) Cleaning Method: Use affresh® Cooktop Cleaner Part Number W10355051 and Cooktop Scraper Part Number WA906B to clean and remove stains from control panel to the cooktop controls, do not use steel wool, abrasive...
W10719736A.fm
Page 15
... Oven temperature needs adjustment. Use cookware about the same size as the surface cooking area, element or surface burner. Turn the glass bulb cover in a showroom. Replace the fuse or reset the circuit breaker. This is unplugged. Cookware should not extend more than ¹⁄₂" (13 mm) outside the cooking area. Press and hold START TIME for contact information. 15 Oven will not operate Oven temperature too high or too low Oven indicator lights flash POSSIBLE CAUSES Power supply cord...
... Oven temperature needs adjustment. Use cookware about the same size as the surface cooking area, element or surface burner. Turn the glass bulb cover in a showroom. Replace the fuse or reset the circuit breaker. This is unplugged. Cookware should not extend more than ¹⁄₂" (13 mm) outside the cooking area. Press and hold START TIME for contact information. 15 Oven will not operate Oven temperature too high or too low Oven indicator lights flash POSSIBLE CAUSES Power supply cord...
W10719736A.fm
Page 16
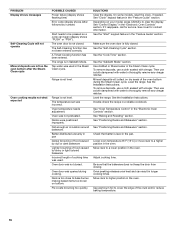
... range is level in Sabbath Mode. Oven was opened during the Steam Clean cycle. Pie crusts browning too quickly. See the "Self-Cleaning Cycle" section. Lower oven temperature 25°F (15°C) or move rack to thoroughly remove any vinegar residue. Oven peeking releases oven heat and can begin (display shows "PUSH" or "PSH"). Range is not level. Oven door was not preheated. On some models, reset the clock, if needed. See "Clock" keypad feature in longer cooking times...
... range is level in Sabbath Mode. Oven was opened during the Steam Clean cycle. Pie crusts browning too quickly. See the "Self-Cleaning Cycle" section. Lower oven temperature 25°F (15°C) or move rack to thoroughly remove any vinegar residue. Oven peeking releases oven heat and can begin (display shows "PUSH" or "PSH"). Range is not level. Oven door was not preheated. On some models, reset the clock, if needed. See "Clock" keypad feature in longer cooking times...


