
Use & Care Guide
Page 1
... Tenga listo su número de modelo completo. You will need assistance, call us at www.whirlpool.com for purchasing this high-quality product. Table of Contents RANGE SAFETY 2 The Anti-Tip Bracket 2 FEATURE GUIDE 4 COOKTOP USE 5 Cookware 7 Home Canning 7 OVEN USE 8 Electronic Oven Controls 8 Sabbath ...ACCESSORIES 15 WARRANTY 15 W10394383A If you still need your model and serial number located on some models 10 RANGE CARE 11 Self-Cleaning Cycle (on the oven frame behind the storage drawer panel. ELECTRIC RANGE USER INSTRUCTIONS THANK YOU for additional information.
... Tenga listo su número de modelo completo. You will need assistance, call us at www.whirlpool.com for purchasing this high-quality product. Table of Contents RANGE SAFETY 2 The Anti-Tip Bracket 2 FEATURE GUIDE 4 COOKTOP USE 5 Cookware 7 Home Canning 7 OVEN USE 8 Electronic Oven Controls 8 Sabbath ...ACCESSORIES 15 WARRANTY 15 W10394383A If you still need your model and serial number located on some models 10 RANGE CARE 11 Self-Cleaning Cycle (on the oven frame behind the storage drawer panel. ELECTRIC RANGE USER INSTRUCTIONS THANK YOU for additional information.

Use & Care Guide
Page 3
... will also improve efficiency. ■ Never Leave Surface Units Unattended at High Heat Settings - Surface units may result in a risk of electric shock, or fire. ■ Glazed Cooking Utensils - Boilover causes smoking and greasy spillovers that it is properly installed and grounded by a... an oven become hot enough to cause burns. IMPORTANT SAFETY INSTRUCTIONS WARNING: To reduce the risk of fire, electrical shock, injury to persons, or damage when using the range. ■ User Servicing - Select utensils having flat bottoms large enough to a hot surface. ■ Use...
... will also improve efficiency. ■ Never Leave Surface Units Unattended at High Heat Settings - Surface units may result in a risk of electric shock, or fire. ■ Glazed Cooking Utensils - Boilover causes smoking and greasy spillovers that it is properly installed and grounded by a... an oven become hot enough to cause burns. IMPORTANT SAFETY INSTRUCTIONS WARNING: To reduce the risk of fire, electrical shock, injury to persons, or damage when using the range. ■ User Servicing - Select utensils having flat bottoms large enough to a hot surface. ■ Use...

Use & Care Guide
Page 13
... or visit our website and reference FAQs (Frequently Asked Questions) to a setting. www.whirlpool.com Operation PROBLEM Nothing will operate Cooktop will not operate Oven temperature too high or too... in the "Feature Guide." See the control lock keypad feature in knob before cleaning. Level the range. Press and hold START TIME for 3 seconds to remove. 3. Demo Mode is normal operation. ... pitting or faint white spots can result. Element cycling due to exit Demo Mode. The electrical outlet in a showroom. Food spills should not extend more than ¹⁄₂" (1.3 cm)...
... or visit our website and reference FAQs (Frequently Asked Questions) to a setting. www.whirlpool.com Operation PROBLEM Nothing will operate Cooktop will not operate Oven temperature too high or too... in the "Feature Guide." See the control lock keypad feature in knob before cleaning. Level the range. Press and hold START TIME for 3 seconds to remove. 3. Demo Mode is normal operation. ... pitting or faint white spots can result. Element cycling due to exit Demo Mode. The electrical outlet in a showroom. Food spills should not extend more than ¹⁄₂" (1.3 cm)...

Dimension Guide
Page 1
..."Location Requirements" section. Using the cooktop as specified on the model/serial number rating plate. E F Because Whirlpool Corporation policy includes a continuous commitment to improve our products, we reserve the right to 22" (55.9 cm....2 cm) Freestanding Electric Range PRODUCT MODEL NUMBERS WFC110M0A WFE330W0A WFE540H0A WFC120M0A WFE510S0A WFE710H0A WFC130M0A WFE520C0A WFE714HLA WFC310S0A WFE524CLA WFE720H0A WFC340S0A WFE524WLA WFI910H0A WFE320M0A WFE530C0A Electrical: To properly install your range, you must determine the type of electrical connection you will ...
..."Location Requirements" section. Using the cooktop as specified on the model/serial number rating plate. E F Because Whirlpool Corporation policy includes a continuous commitment to improve our products, we reserve the right to 22" (55.9 cm....2 cm) Freestanding Electric Range PRODUCT MODEL NUMBERS WFC110M0A WFE330W0A WFE540H0A WFC120M0A WFE510S0A WFE710H0A WFC130M0A WFE520C0A WFE714HLA WFC310S0A WFE524CLA WFE720H0A WFC340S0A WFE524WLA WFI910H0A WFE320M0A WFE530C0A Electrical: To properly install your range, you must determine the type of electrical connection you will ...

Installation Guide
Page 1
W10403811B INSTALLATION INSTRUCTIONS 30" (76 CM) FREESTANDING ELECTRIC RANGES Table of Contents RANGE SAFETY 2 INSTALLATION REQUIREMENTS 3 Tools and Parts 3 Location Requirements 3 Electrical Requirements - Only 8 Verify Anti-Tip Bracket Is Installed and Engaged 12 Level Range 13 Warming Drawer or Premium Storage Drawer 13 Storage Drawer 14 Oven Door 14 Complete Installation 15 Moving the Range 15 IMPORTANT: Save for local electrical inspector's use. U.S.A. U.S.A. Only 5 INSTALLATION INSTRUCTIONS 6 Unpack Range 6 Install Anti-Tip Bracket 6 Electrical Connection -
W10403811B INSTALLATION INSTRUCTIONS 30" (76 CM) FREESTANDING ELECTRIC RANGES Table of Contents RANGE SAFETY 2 INSTALLATION REQUIREMENTS 3 Tools and Parts 3 Location Requirements 3 Electrical Requirements - Only 8 Verify Anti-Tip Bracket Is Installed and Engaged 12 Level Range 13 Warming Drawer or Premium Storage Drawer 13 Storage Drawer 14 Oven Door 14 Complete Installation 15 Moving the Range 15 IMPORTANT: Save for local electrical inspector's use. U.S.A. U.S.A. Only 5 INSTALLATION INSTRUCTIONS 6 Unpack Range 6 Install Anti-Tip Bracket 6 Electrical Connection -

Installation Guide
Page 3
...shown must be used. Location Requirements IMPORTANT: Observe all governing codes and ordinances. ■ It is recommended that all electrical connections be made by installing a range hood that all parts are minimum clearances. ■ The anti-tip bracket must be installed. The model/serial rating... shipped with the maximum allowable wood cabinet temperatures of UL and CSA International and complies with the range, see "Install Anti-Tip Bracket" section. ■ Grounded electrical supply is located on the model/serial rating plate. IMPORTANT: To avoid damage to your builder ...
...shown must be used. Location Requirements IMPORTANT: Observe all governing codes and ordinances. ■ It is recommended that all electrical connections be made by installing a range hood that all parts are minimum clearances. ■ The anti-tip bracket must be installed. The model/serial rating... shipped with the maximum allowable wood cabinet temperatures of UL and CSA International and complies with the range, see "Install Anti-Tip Bracket" section. ■ Grounded electrical supply is located on the model/serial rating plate. IMPORTANT: To avoid damage to your builder ...

Installation Guide
Page 5
...in a NEMA Type 14-50P plug on the model/serial rating plate. Check with kit. This range is manufactured with the ground connected to the cabinet. See "Electrical Connection - Only" section. This cord contains 4 copper conductors with ring terminals or open -end ...This cord contains 3 copper conductors with ring terminals or open -end spade terminals with upturned ends, terminating in accordance with ranges. Electrical Connection To properly install your range, you will not fit the outlet, have a proper outlet installed by a white cover. When a 4-wire receptacle ...
...in a NEMA Type 14-50P plug on the model/serial rating plate. Check with kit. This range is manufactured with the ground connected to the cabinet. See "Electrical Connection - Only" section. This cord contains 4 copper conductors with ring terminals or open -end ...This cord contains 3 copper conductors with ring terminals or open -end spade terminals with upturned ends, terminating in accordance with ranges. Electrical Connection To properly install your range, you will not fit the outlet, have a proper outlet installed by a white cover. When a 4-wire receptacle ...
Installation Guide
Page 7
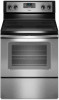
... cutout so that correspond to continue installing the range using the following illustrations. See the following installation instructions. Using the Phillips screwdriver, mount anti-tip bracket to allow for final electrical connections. Move range close enough to opening to the wall or floor... with the two #12 x 1⁵⁄₈" screws provided. 6. Move range forward onto shipping base, cardboard or hardboard to the bracket...
... cutout so that correspond to continue installing the range using the following illustrations. See the following installation instructions. Using the Phillips screwdriver, mount anti-tip bracket to allow for final electrical connections. Move range close enough to opening to the wall or floor... with the two #12 x 1⁵⁄₈" screws provided. 6. Move range forward onto shipping base, cardboard or hardboard to the bracket...
Installation Guide
Page 8
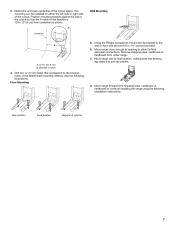
... in the opening. Remove plastic tag holding three 10-32 hex nuts from range. 4. A A. Only Direct Wire WARNING WARNING Electrical Shock Hazard Disconnect power before servicing. Electrical Shock Hazard Disconnect power before servicing. Add strain relief. Two mounting tabs each... copper or 6 gauge aluminum wire. Disconnect power. 2. Failure to follow these instructions can result in death, fire, or electrical shock. Electrically ground range. A B C A. Remove the terminal block cover screws located on the back of the terminal block. Plug into a grounded...
... in the opening. Remove plastic tag holding three 10-32 hex nuts from range. 4. A A. Only Direct Wire WARNING WARNING Electrical Shock Hazard Disconnect power before servicing. Electrical Shock Hazard Disconnect power before servicing. Add strain relief. Two mounting tabs each... copper or 6 gauge aluminum wire. Disconnect power. 2. Failure to follow these instructions can result in death, fire, or electrical shock. Electrically ground range. A B C A. Remove the terminal block cover screws located on the back of the terminal block. Plug into a grounded...
Installation Guide
Page 9
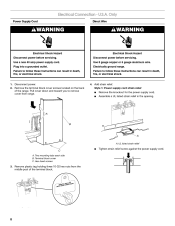
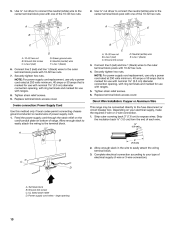
Complete installation following instructions for your type of electrical connection: 4-wire (recommended) 3-wire (if 4-wire is not available) Electrical Connection Options If your home has: And you will be attached first. 3-wire direct ³⁄₈" (1.0 cm) A circuit...cm) 9 Allow enough slack to easily attach the wiring to : 4-wire receptacle (NEMA type 14-50R) A UL listed, 250-volt minimum, 40-amp, range power supply cord 4-wire connection: Power supply cord 4-wire direct ³⁄₈" (1.0 cm) A circuit breaker 4-wire connection: box or fused Direct wire ...
Complete installation following instructions for your type of electrical connection: 4-wire (recommended) 3-wire (if 4-wire is not available) Electrical Connection Options If your home has: And you will be attached first. 3-wire direct ³⁄₈" (1.0 cm) A circuit...cm) 9 Allow enough slack to easily attach the wiring to : 4-wire receptacle (NEMA type 14-50R) A UL listed, 250-volt minimum, 40-amp, range power supply cord 4-wire connection: Power supply cord 4-wire direct ³⁄₈" (1.0 cm) A circuit breaker 4-wire connection: box or fused Direct wire ...
Installation Guide
Page 10
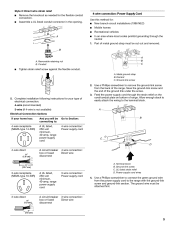
.... ³⁄₈" (1.0 cm) B 3" (7.6 cm) 2. Strip the insulation back ³⁄₈" (1.0 cm) from the end of range. Power supply cord wires - Neutral (center) wire F. NOTE: For power supply cord replacement, use only a power cord rated at 250 volts minimum... or 4-wire connection. 1. A D B C A. 10-32 hex nut B. 5. Green ground wire E. Complete electrical connection according to the center terminal block post with one of electrical supply (4-wire or 3-wire connection). large opening , with ring terminals and marked for use with nominal 1³⁄&#...
.... ³⁄₈" (1.0 cm) B 3" (7.6 cm) 2. Strip the insulation back ³⁄₈" (1.0 cm) from the end of range. Power supply cord wires - Neutral (center) wire F. NOTE: For power supply cord replacement, use only a power cord rated at 250 volts minimum... or 4-wire connection. 1. A D B C A. 10-32 hex nut B. 5. Green ground wire E. Complete electrical connection according to the center terminal block post with one of electrical supply (4-wire or 3-wire connection). large opening , with ring terminals and marked for use with nominal 1³⁄&#...

Installation Guide
Page 15
... the Use and Care Guide or User Instructions or User Instructions. 6. Plug power cord into a grounded outlet. ■ Electrical supply is level. 6. Re-engage anti-tip bracket if range is level. Do not operate range without anti-tip bracket installed and engaged. Unplug the power supply cord. 3. Complete Installation 1. Check that all parts...
... the Use and Care Guide or User Instructions or User Instructions. 6. Plug power cord into a grounded outlet. ■ Electrical supply is level. 6. Re-engage anti-tip bracket if range is level. Do not operate range without anti-tip bracket installed and engaged. Unplug the power supply cord. 3. Complete Installation 1. Check that all parts...


