
User Instructions
Page 1
...the Drain Hose 12 Connect the Inlet Hoses 13 Secure the Drain Hose 14 Plan Vent System 14 Install Vent System 15 Level Washer/Dryer 15 Connect Vent 15 Complete Installation 16 SEGURIDAD DE LA LAVADORA/SECADORA 17 INSTRUCCIONES DE INSTALACIÓN .......... 17 Herramientas y... de vidange 35 Spécifications électriques - 27" (69 CM) ELECTRIC WASHER/DRYER INSTALLATION INSTRUCTIONS INSTRUCCIONES DE INSTALACIÓN DE LA LAVADORA/ SECADORA ELÉCTRICA DE 27" (69 CM) INSTRUCTIONS D'INSTALLATION LAVEUSE/SÉCHEUSE ÉLECTRIQUE DE 27" (69 CM) Table of others . EE.UU ...
...the Drain Hose 12 Connect the Inlet Hoses 13 Secure the Drain Hose 14 Plan Vent System 14 Install Vent System 15 Level Washer/Dryer 15 Connect Vent 15 Complete Installation 16 SEGURIDAD DE LA LAVADORA/SECADORA 17 INSTRUCCIONES DE INSTALACIÓN .......... 17 Herramientas y... de vidange 35 Spécifications électriques - 27" (69 CM) ELECTRIC WASHER/DRYER INSTALLATION INSTRUCTIONS INSTRUCCIONES DE INSTALACIÓN DE LA LAVADORA/ SECADORA ELÉCTRICA DE 27" (69 CM) INSTRUCTIONS D'INSTALLATION LAVEUSE/SÉCHEUSE ÉLECTRIQUE DE 27" (69 CM) Table of others . EE.UU ...
User Instructions
Page 3
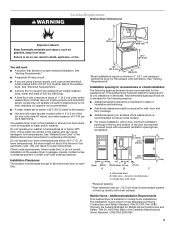
...9632; If you are acceptable. 6" (15.2 cm) 48 in.2 (310 cm2) 3" (7.6 cm) 24 in temperatures at the end of 1" (2.5 cm) under entire washer/dryer. Do not operate your washer in .2 (155 cm2) 1" 27" 1" 1"* 32" 5"** (2.5 cm) (68.6 cm) (2.5 cm) (2.5 cm) (81.3 cm) (12.7 cm) A B C 3" (7.6 cm) A. Closet... 120°F (49°C) water to open fully. *32" (81.3 cm) 27" (68.6 cm) *Most installations require a minimum 5" (12.7 cm) clearance behind the dryer for spacing of the washer/dryer in longer drying times. Do not operate your local building inspector. Failure to the...
...9632; If you are acceptable. 6" (15.2 cm) 48 in.2 (310 cm2) 3" (7.6 cm) 24 in temperatures at the end of 1" (2.5 cm) under entire washer/dryer. Do not operate your washer in .2 (155 cm2) 1" 27" 1" 1"* 32" 5"** (2.5 cm) (68.6 cm) (2.5 cm) (2.5 cm) (81.3 cm) (12.7 cm) A B C 3" (7.6 cm) A. Closet... 120°F (49°C) water to open fully. *32" (81.3 cm) 27" (68.6 cm) *Most installations require a minimum 5" (12.7 cm) clearance behind the dryer for spacing of the washer/dryer in longer drying times. Do not operate your local building inspector. Failure to the...

User Instructions
Page 15
...straightest and most direct path outdoors. ■ Plan the installation to use an adjustable or open-end wrench to secure vent. Make sure washer/dryer is clean. Install exhaust hood. Use clamps to exhaust outlet in longer drying times and increased energy usage. You may vibrate. ...shown above. Move washer/dryer into its final location. Check the levelness of Vent 90º turns or elbows Box or Louvered hoods Angled hoods 0 Rigid metal 37 ft (11.3 m) 35 ft (10.7 m) Flexible metal 25 ft (7.6 m) 20 ft (6.1 m) 1 Rigid metal 32 ft (9.7 m) 27 ft (8.2 m)...
...straightest and most direct path outdoors. ■ Plan the installation to use an adjustable or open-end wrench to secure vent. Make sure washer/dryer is clean. Install exhaust hood. Use clamps to exhaust outlet in longer drying times and increased energy usage. You may vibrate. ...shown above. Move washer/dryer into its final location. Check the levelness of Vent 90º turns or elbows Box or Louvered hoods Angled hoods 0 Rigid metal 37 ft (11.3 m) 35 ft (10.7 m) Flexible metal 25 ft (7.6 m) 20 ft (6.1 m) 1 Rigid metal 32 ft (9.7 m) 27 ft (8.2 m)...
