Owners Manual
Page 11
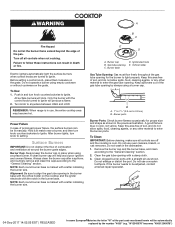
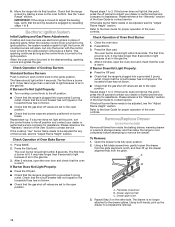
..., turn knob to light properly. NOTE: Each round burner base is marked with the notch in and turn knob counterclockwise to anywhere between HIGH and LOW. Orifice holder Gas Tube Opening: Gas must flow freely throughout the gas tube opening . A B A. 1" to 11/2" (2.5 cm to the "General Cleaning" section. 2. Burner ports Burner...
..., turn knob to light properly. NOTE: Each round burner base is marked with the notch in and turn knob counterclockwise to anywhere between HIGH and LOW. Orifice holder Gas Tube Opening: Gas must flow freely throughout the gas tube opening . A B A. 1" to 11/2" (2.5 cm to the "General Cleaning" section. 2. Burner ports Burner...

Owners Manual
Page 12
... not rock or wobble when properly aligned. 4. Each round burner base is marked with the burner base. Oval X-Large (most powerful) Recommended Use ■■ Low-heat cooking ■■ Melting chocolate or butter ■■ Multipurpose burner ■■ Multipurpose burner ■■ For large cookware ■■ For large...
... not rock or wobble when properly aligned. 4. Each round burner base is marked with the burner base. Oval X-Large (most powerful) Recommended Use ■■ Low-heat cooking ■■ Melting chocolate or butter ■■ Multipurpose burner ■■ Multipurpose burner ■■ For large cookware ■■ For large...

Owners Manual
Page 13
...a hot surface cooking area, element, or surface burner. Stainless steel ■■ Heats quickly, but unevenly. ■■ Ideal results on low-to cool. ■■ Center the canner on the grate above the burner. ■■ Do not place canner on the cooktop or ...that manufacture home canning products can leave permanent marks on the properties of the cookware. Cookware IMPORTANT: Do not leave empty cookware on low heat settings. ■■ May scratch the cooktop. Porcelain enamel ■■ See stainless steel or cast iron. The cookware ...
...a hot surface cooking area, element, or surface burner. Stainless steel ■■ Heats quickly, but unevenly. ■■ Ideal results on low-to cool. ■■ Center the canner on the grate above the burner. ■■ Do not place canner on the cooktop or ...that manufacture home canning products can leave permanent marks on the properties of the cookware. Cookware IMPORTANT: Do not leave empty cookware on low heat settings. ■■ May scratch the cooktop. Porcelain enamel ■■ See stainless steel or cast iron. The cookware ...
Owners Manual
Page 17
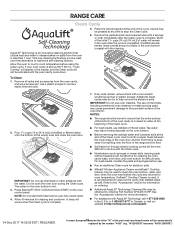
... the Clean cycle, insert a cloth or paper towel between the lower edge of the part code mentioned herein will sound when the Clean cycle is a low-heat, odor-free alternative to remove easily removed soils. 2. To Clean: 1. NOTE: Do not start Self Clean before oven has cooled down .
... the Clean cycle, insert a cloth or paper towel between the lower edge of the part code mentioned herein will sound when the Clean cycle is a low-heat, odor-free alternative to remove easily removed soils. 2. To Clean: 1. NOTE: Do not start Self Clean before oven has cooled down .
Owners Manual
Page 20
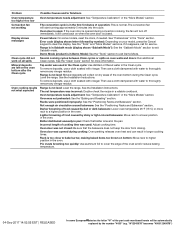
... remove deposits, use a cloth dampened with water to higher position in the pan. Problem Possible Causes and/or Solutions Oven temperature too high or too low Convection fan not working Display shows messages Oven temperature needs adjustment: See "Temperature Calibration" in the "More Modes" section.
... remove deposits, use a cloth dampened with water to higher position in the pan. Problem Possible Causes and/or Solutions Oven temperature too high or too low Convection fan not working Display shows messages Oven temperature needs adjustment: See "Temperature Calibration" in the "More Modes" section.
Instrucciones de instalacion
Page 14
... as the control knob is plugged into a grounded 3 prong outlet. Please reference the "Warranty" section of the User Guide to contact service If the cooktop "low" burner flame needs to the User Guide for any of the oven controls. Check that the circuit breaker has not tripped or the household fuse...
... as the control knob is plugged into a grounded 3 prong outlet. Please reference the "Warranty" section of the User Guide to contact service If the cooktop "low" burner flame needs to the User Guide for any of the oven controls. Check that the circuit breaker has not tripped or the household fuse...

Instrucciones de instalacion
Page 19
... with all four tabs facing up and the notches toward the rear of these instructions can tip the range and be removed to adjust the low setting for burner flame adjustments. The small inner cone should have a slightly yellow tip. 4. The outer cone is moved. Propane gas flames have a very distinct...
... with all four tabs facing up and the notches toward the rear of these instructions can tip the range and be removed to adjust the low setting for burner flame adjustments. The small inner cone should have a slightly yellow tip. 4. The outer cone is moved. Propane gas flames have a very distinct...
Instrucciones de instalacion
Page 22
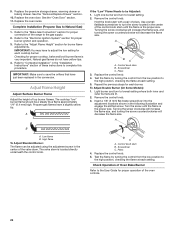
...center of these instructions to lowest setting. 2. Refer to "Complete Installation" in the center of the oven controls. 22 A If the "Low" Flame Needs to the "Electronic Ignition System" section for proper operation of the control knob stem until the flame is very important. Use... burner flames. High flame To Adjust Standard Burner: The flame can be Adjusted: 1. IMPORTANT: You may have a slightly yellow tip. The cooktop "low" burner flame should be a steady blue flame approximately 1/4" (6.4 mm) high. The valve stem is the proper size. Pliers 4. Light one burner ...
...center of these instructions to lowest setting. 2. Refer to "Complete Installation" in the center of the oven controls. 22 A If the "Low" Flame Needs to the "Electronic Ignition System" section for proper operation of the control knob stem until the flame is very important. Use... burner flames. High flame To Adjust Standard Burner: The flame can be Adjusted: 1. IMPORTANT: You may have a slightly yellow tip. The cooktop "low" burner flame should be a steady blue flame approximately 1/4" (6.4 mm) high. The valve stem is the proper size. Pliers 4. Light one burner ...

