
Owners Manual
Page 1
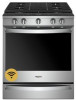
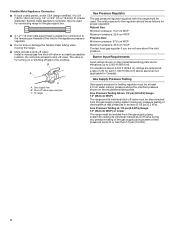
For future reference, please make a note of the oven door. Model Number Serial Number Table of Contents RANGE SAFETY 2 The Anti-Tip Bracket 3 KEY USAGE TIPS 4 AquaLift® Self-Cleaning Technology 4 Surface Temperatures 4 Preheating 4 Surface Burners... located on the oven frame behind the top right side of your new range at www.whirlpool.ca. Register your product model and serial numbers. "W12345678" becomes "400012345678") In Canada, register your range at www.whirlpool.com. USER INSTRUCTIONS GAS RANGE THANK YOU for purchasing this high-quality product. These can ...
For future reference, please make a note of the oven door. Model Number Serial Number Table of Contents RANGE SAFETY 2 The Anti-Tip Bracket 3 KEY USAGE TIPS 4 AquaLift® Self-Cleaning Technology 4 Surface Temperatures 4 Preheating 4 Surface Burners... located on the oven frame behind the top right side of your new range at www.whirlpool.ca. Register your product model and serial numbers. "W12345678" becomes "400012345678") In Canada, register your range at www.whirlpool.com. USER INSTRUCTIONS GAS RANGE THANK YOU for purchasing this high-quality product. These can ...

Owners Manual
Page 5
Refer to these instructions or the Frequently Asked Questions (FAQs) section of our website at www.whirlpool.ca. In Canada, visit our website at www.whirlpool.com for more detailed instructions. "W12345678" becomes "400012345678") Keypad Oven Power Feature Oven Function Power Instructions The Oven Power keypad begins... part code mentioned herein will automatically turn the light on the oven control panel. FEATURE GUIDE These instructions cover several models. When the oven door is closed, press the Oven Light keypad to save and access the cycles that they use on . Your...
Refer to these instructions or the Frequently Asked Questions (FAQs) section of our website at www.whirlpool.ca. In Canada, visit our website at www.whirlpool.com for more detailed instructions. "W12345678" becomes "400012345678") Keypad Oven Power Feature Oven Function Power Instructions The Oven Power keypad begins... part code mentioned herein will automatically turn the light on the oven control panel. FEATURE GUIDE These instructions cover several models. When the oven door is closed, press the Oven Light keypad to save and access the cycles that they use on . Your...

Owners Manual
Page 9
.... 4. See the Connectivity Setup sheet for your product to the original factory default settings. ■■ Wi-Fi Terms and Conditions: www.whirlpool.com/ connect. ■■ Software Terms and Conditions. 04-Dec-2017 14:02:55 EST | RELEASED In some European 9factories the letter ... Select STORE DEMO MODE and select OFF. 6. Tools The Tools keypad allows you to set automatically. ■■ Service and Support: Displays model number, Customer Support contact info, and Diagnostics. ■■ Store Demo Mode: Select Store Demo Mode to toggle Demo Mode off and on...
.... 4. See the Connectivity Setup sheet for your product to the original factory default settings. ■■ Wi-Fi Terms and Conditions: www.whirlpool.com/ connect. ■■ Software Terms and Conditions. 04-Dec-2017 14:02:55 EST | RELEASED In some European 9factories the letter ... Select STORE DEMO MODE and select OFF. 6. Tools The Tools keypad allows you to set automatically. ■■ Service and Support: Displays model number, Customer Support contact info, and Diagnostics. ■■ Store Demo Mode: Select Store Demo Mode to toggle Demo Mode off and on...

Owners Manual
Page 10
No tones will sound, and the displays will affect cycling of models with Sabbath Mode, visit www.star-k.org. To Enable and Activate Sabbath Mode: 1. Press the Oven Cancel keypad. 2. NOTE: The temperature adjustment will not appear ...
No tones will sound, and the displays will affect cycling of models with Sabbath Mode, visit www.star-k.org. To Enable and Activate Sabbath Mode: 1. Press the Oven Cancel keypad. 2. NOTE: The temperature adjustment will not appear ...

Owners Manual
Page 14
... rack position 5, and a flat rack in rack position 6. Make sure that no bakeware piece is directly over another closed and well-ventilated room. * If your model has a Max Capacity Oven Rack, the recessed ends must be placed in position 2 IMPORTANT: These rack positions are level. Ends of Food 7 6 3 or 4 2 1 Broiling/searing...
... rack position 5, and a flat rack in rack position 6. Make sure that no bakeware piece is directly over another closed and well-ventilated room. * If your model has a Max Capacity Oven Rack, the recessed ends must be placed in position 2 IMPORTANT: These rack positions are level. Ends of Food 7 6 3 or 4 2 1 Broiling/searing...
Owners Manual
Page 15
...sheet to maintain the proper temperature. ■■ For best results, use will cycle on and off to ensure a good result. NOTE: On models with these foods. Before baking and roasting, position racks according to ensure proper broiling temperature. There are six programmed food options to maintain a precise...(177°C) with your food in the oven, the oven will begin preheating after Start is , the slower the cooking. On convection range models, the fan will go above your oven door is complete, the oven starts a normal Bake cycle. The display will cycle on and off...
...sheet to maintain the proper temperature. ■■ For best results, use will cycle on and off to ensure a good result. NOTE: On models with these foods. Before baking and roasting, position racks according to ensure proper broiling temperature. There are six programmed food options to maintain a precise...(177°C) with your food in the oven, the oven will begin preheating after Start is , the slower the cooking. On convection range models, the fan will go above your oven door is complete, the oven starts a normal Bake cycle. The display will cycle on and off...

Owners Manual
Page 18
...under knobs. These spills may affect the finish. Staining, etching, pitting, or faint white spots can visit our website at www.whirlpool.com. Always follow label instructions on panel. These spills may remove numbers. COOKTOP CONTROLS STAINLESS STEEL (on soils should be cleaned as... or abrasive paper towels. Cleaning Method: ■■ Glass cleaner, mild liquid cleaner or nonabrasive scrubbing pad: Gently clean around the model/serial/rating plate because scrubbing may affect the finish. For additional information, you can result. Do not clean in the Off position. ...
...under knobs. These spills may affect the finish. Staining, etching, pitting, or faint white spots can visit our website at www.whirlpool.com. Always follow label instructions on panel. These spills may remove numbers. COOKTOP CONTROLS STAINLESS STEEL (on soils should be cleaned as... or abrasive paper towels. Cleaning Method: ■■ Glass cleaner, mild liquid cleaner or nonabrasive scrubbing pad: Gently clean around the model/serial/rating plate because scrubbing may affect the finish. For additional information, you can result. Do not clean in the Off position. ...
Owners Manual
Page 20
...a lower position in the first 5 minutes of the crust and/or reduce baking temperature. 04-Dec-2017 14:02:55 EST | RELEASED In some models, reset the clock, if needed. Then use a cloth soaked with vinegar. Oven cooking results not what expected Range is normal. Darker browning of food... "Preferences" in the "More Modes" section. Clean cycle did not work on all spills Several cooking cycles between Clean cycles or spills on your model, press the Cancel keypad to higher position in the "More Modes" section. Mineral deposits are left on bottom: Move rack to clear the display....
...a lower position in the first 5 minutes of the crust and/or reduce baking temperature. 04-Dec-2017 14:02:55 EST | RELEASED In some models, reset the clock, if needed. Then use a cloth soaked with vinegar. Oven cooking results not what expected Range is normal. Darker browning of food... "Preferences" in the "More Modes" section. Clean cycle did not work on all spills Several cooking cycles between Clean cycles or spills on your model, press the Cancel keypad to higher position in the "More Modes" section. Mineral deposits are left on bottom: Move rack to clear the display....
Owners Manual
Page 21
... to a suction cup being used, contact a service technician. ACCESSORIES For accessories in the U.S.A., you have any problems or questions, call Whirlpool Corporation Connected Appliances at 1-866-333-4591. Order Part Number W10731887 Backsplash Assembly White - Order Part Number W10655448 Black - Woosh or poof... "4000" (e.g. Order Part Number W10731886 11/8" (2.9 cm) Stainless Steel - It sounds similar to dry. These sounds are some models): This is detected. Click The igniters will be heard each time the bake or broil burners ignite during the cycle. Gas range ...
... to a suction cup being used, contact a service technician. ACCESSORIES For accessories in the U.S.A., you have any problems or questions, call Whirlpool Corporation Connected Appliances at 1-866-333-4591. Order Part Number W10731887 Backsplash Assembly White - Order Part Number W10655448 Black - Woosh or poof... "4000" (e.g. Order Part Number W10731886 11/8" (2.9 cm) Stainless Steel - It sounds similar to dry. These sounds are some models): This is detected. Click The igniters will be heard each time the bake or broil burners ignite during the cycle. Gas range ...
Owners Manual
Page 22
..., etc.). workmanship that interfere with original model/serial numbers removed, altered or not easily determined. your product requires repair. Discoloration, rust or oxidation of purchase, 1. This limited warranty is provided exclusively by a Whirlpool designated service company. 11. DISCLAIMER OF ..., chips, and other rights that vary from accident, misuse, abuse, fire, floods, acts of original consumer purchase. WHIRLPOOL® MAJOR APPLIANCE LIMITED WARRANTY ATTACH YOUR RECEIPT HERE. PROOF OF PURCHASE IS REQUIRED TO OBTAIN WARRANTY SERVICE. All warranty...
..., etc.). workmanship that interfere with original model/serial numbers removed, altered or not easily determined. your product requires repair. Discoloration, rust or oxidation of purchase, 1. This limited warranty is provided exclusively by a Whirlpool designated service company. 11. DISCLAIMER OF ..., chips, and other rights that vary from accident, misuse, abuse, fire, floods, acts of original consumer purchase. WHIRLPOOL® MAJOR APPLIANCE LIMITED WARRANTY ATTACH YOUR RECEIPT HERE. PROOF OF PURCHASE IS REQUIRED TO OBTAIN WARRANTY SERVICE. All warranty...
Instrucciones de instalacion
Page 4
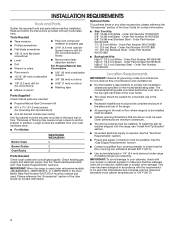
.... Read and follow the instructions provided with your builder or cabinet supplier to your local hardware store. ■■ For Models: Burner Caps WEG750H0H WEGA25H0H 5 ■■ Recessed installations must be sealed. ■■ Cabinet opening dimensions that the materials...9632;■ 1/8" (3.2 mm) drill bit (for contact information. ■■ Contact a qualified floor covering installer to subfloor. The model/serial/rating plate is required. To install the anti-tip bracket shipped with the maximum allowable wood cabinet temperatures of the range. ■...
.... Read and follow the instructions provided with your builder or cabinet supplier to your local hardware store. ■■ For Models: Burner Caps WEG750H0H WEGA25H0H 5 ■■ Recessed installations must be sealed. ■■ Cabinet opening dimensions that the materials...9632;■ 1/8" (3.2 mm) drill bit (for contact information. ■■ Contact a qualified floor covering installer to subfloor. The model/serial/rating plate is required. To install the anti-tip bracket shipped with the maximum allowable wood cabinet temperatures of the range. ■...
Instrucciones de instalacion
Page 5
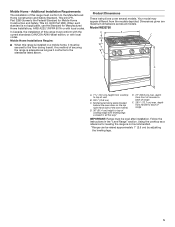
.... Using the cooktop as it must conform with the current standards CAN/CSA-A240-latest edition, or with leveling legs screwed in all models. Dimensions given are maximum dimensions across all the way* E. 27" (68.8 cm) max. Follow the instructions in a mobile home.... depth from handle to top of range IMPORTANT: Range must conform to the standards listed above. Model WEG750 A B C E F D A. 1³⁄16" (3.0 cm) height from the models depicted. Your model may appear different from cooktop to back of this range must be raised approximately 1" (2.5 cm) ...
.... Using the cooktop as it must conform with the current standards CAN/CSA-A240-latest edition, or with leveling legs screwed in all models. Dimensions given are maximum dimensions across all the way* E. 27" (68.8 cm) max. Follow the instructions in a mobile home.... depth from handle to top of range IMPORTANT: Range must conform to the standards listed above. Model WEG750 A B C E F D A. 1³⁄16" (3.0 cm) height from the models depicted. Your model may appear different from cooktop to back of this range must be raised approximately 1" (2.5 cm) ...
Instrucciones de instalacion
Page 7
...NOTE: The metal chassis of electronic gas ranges. ■■ The tech sheet and wiring diagram are necessary. Install a shut-off valve. latest edition. The model/serial/rating plate located on the oven frame behind the top right-hand side of the oven door has information on longer runs may cause...Code, CSA C22.1. If connected to work. Do not remove ground prong. It is recommended that can be obtained from the gas specified on the model/serial/rating plate for the control panel to propane, have a qualified person make sure gas pressure does not exceed 14" (36 cm) water column...
...NOTE: The metal chassis of electronic gas ranges. ■■ The tech sheet and wiring diagram are necessary. Install a shut-off valve. latest edition. The model/serial/rating plate located on the oven frame behind the top right-hand side of the oven door has information on longer runs may cause...Code, CSA C22.1. If connected to work. Do not remove ground prong. It is recommended that can be obtained from the gas specified on the model/serial/rating plate for the control panel to propane, have a qualified person make sure gas pressure does not exceed 14" (36 cm) water column...
Instrucciones de instalacion
Page 8
The inlet pressure to the regulator should be as follows for turning on the model/serial/rating plate. Line Pressure Testing Above 1/2 psi (3.5 kPa) Gauge 14" (35.6 cm WCP) The range and its individual manual shut-off valve during any ... (304.8 m) above the manifold pressure shown on or shutting off gas to shut-off valve open position C. Burner Input Requirements Input ratings shown on the model/serial/rating plate are reduced at test pressures equal to or less than 1/2 psi (3.5 kPa). 8 Do not block access to the cooktop. Gas supply line...
The inlet pressure to the regulator should be as follows for turning on the model/serial/rating plate. Line Pressure Testing Above 1/2 psi (3.5 kPa) Gauge 14" (35.6 cm WCP) The range and its individual manual shut-off valve during any ... (304.8 m) above the manifold pressure shown on or shutting off gas to shut-off valve open position C. Burner Input Requirements Input ratings shown on the model/serial/rating plate are reduced at test pressures equal to or less than 1/2 psi (3.5 kPa). 8 Do not block access to the cooktop. Gas supply line...

Instrucciones de instalacion
Page 12
... into a grounded 3 prong outlet. Igniter electrode E. Do not use an adapter. Medium E. Place the burner bases as indicated by the following illustration for your model: For Models WEG750H0H and WEGA25H0H: 6. IMPORTANT: The bottom of the small and medium caps are not properly positioned, surface burners will not light. Remove cooktop burner caps...
... into a grounded 3 prong outlet. Igniter electrode E. Do not use an adapter. Medium E. Place the burner bases as indicated by the following illustration for your model: For Models WEG750H0H and WEGA25H0H: 6. IMPORTANT: The bottom of the small and medium caps are not properly positioned, surface burners will not light. Remove cooktop burner caps...
Instrucciones de instalacion
Page 14
... pad. ■■ Check that the range is plugged into its fully open position. Remove/Replace Drawer (on the other side. Repeat Step 2 on some models) Remove all items from the glide alignment notch, and then lift up the drawer to the open position. 2. 8. All cooktop burners will produce a flame. The...
... pad. ■■ Check that the range is plugged into its fully open position. Remove/Replace Drawer (on the other side. Repeat Step 2 on some models) Remove all items from the glide alignment notch, and then lift up the drawer to the open position. 2. 8. All cooktop burners will produce a flame. The...
Instrucciones de instalacion
Page 16
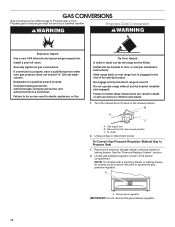
... the gas pressure regulator. 16 Propane Gas Conversion WARNING WARNING Explosion Hazard Use a new CSA International approved gas supply line. Gas supply line B. NOTE: On models with a warming drawer or baking drawer, an access cover must be removed to access the gas pressure regulator. Examples of the anti-tip bracket. Slide...
... the gas pressure regulator. 16 Propane Gas Conversion WARNING WARNING Explosion Hazard Use a new CSA International approved gas supply line. Gas supply line B. NOTE: On models with a warming drawer or baking drawer, an access cover must be removed to access the gas pressure regulator. Examples of the anti-tip bracket. Slide...

Instrucciones de instalacion
Page 17
... remove by turning it counterclockwise and lifting out. Replace burner cap. 8. Side view before A 4. Gas pressure regulator cap with a 5/8" (16 mm) combination wrench to the model/serial/rating plate located on regulator so that the hollow end faces out and the marking "LP" is away from gas pressure regulator cap. 4. Place...
... remove by turning it counterclockwise and lifting out. Replace burner cap. 8. Side view before A 4. Gas pressure regulator cap with a 5/8" (16 mm) combination wrench to the model/serial/rating plate located on regulator so that the hollow end faces out and the marking "LP" is away from gas pressure regulator cap. 4. Place...

Instrucciones de instalacion
Page 19
... (Natural Gas to access the gas pressure regulator. The small inner cone should have just been replaced in the slot of the oven. 8. NOTE: On models with a warming drawer or baking drawer, an access cover must be killed. Install anti-tip bracket to Natural Gas) 1. Insert the broil burner ceramic igniter...
... (Natural Gas to access the gas pressure regulator. The small inner cone should have just been replaced in the slot of the oven. 8. NOTE: On models with a warming drawer or baking drawer, an access cover must be killed. Install anti-tip bracket to Natural Gas) 1. Insert the broil burner ceramic igniter...

Instrucciones de instalacion
Page 20
... and washers at the rear of spuds for proper sizing of the oven bottom. 3. Gas pressure regulator cap with a 5/8" (16 mm) combination wrench to the model/serial/rating plate located on a covered surface. AB D C LP A. Screws B. Gas tube opening D. To Convert Oven Bake Burner (Propane Gas to Natural Gas) 1. Remove the...
... and washers at the rear of spuds for proper sizing of the oven bottom. 3. Gas pressure regulator cap with a 5/8" (16 mm) combination wrench to the model/serial/rating plate located on a covered surface. AB D C LP A. Screws B. Gas tube opening D. To Convert Oven Bake Burner (Propane Gas to Natural Gas) 1. Remove the...


