
Owners Manual
Page 1
... www.whirlpool.ca. Model Number Serial Number Table of Contents RANGE SAFETY 2 The Anti-Tip Bracket 3 KEY USAGE TIPS 4 AquaLift® Self-Cleaning Technology 4 Surface Temperatures 4 Preheating 4 Surface Burners 4 FEATURE GUIDE 5 Touch Panel 6 Display 6 Display Navigation 6 Setup and Demo Mode 6 Cooking Methods 6 Favorites 8 Assisted Cooking 8 Tools 9 More Modes 10 COOKTOP 11 Surface Burners 11 Surface Grates 12 Burner Size 12 Cookware 13 Home Canning 13 OVEN 14 Aluminum Foil 14 Positioning Racks and Bakeware 14 Oven Vent 15 Baking and Roasting 15 Broiling 15...
... www.whirlpool.ca. Model Number Serial Number Table of Contents RANGE SAFETY 2 The Anti-Tip Bracket 3 KEY USAGE TIPS 4 AquaLift® Self-Cleaning Technology 4 Surface Temperatures 4 Preheating 4 Surface Burners 4 FEATURE GUIDE 5 Touch Panel 6 Display 6 Display Navigation 6 Setup and Demo Mode 6 Cooking Methods 6 Favorites 8 Assisted Cooking 8 Tools 9 More Modes 10 COOKTOP 11 Surface Burners 11 Surface Grates 12 Burner Size 12 Cookware 13 Home Canning 13 OVEN 14 Aluminum Foil 14 Positioning Racks and Bakeware 14 Oven Vent 15 Baking and Roasting 15 Broiling 15...

Owners Manual
Page 3
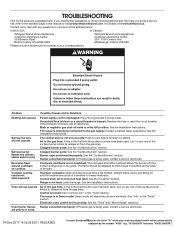
... burner flame size should not be electrically grounded in accordance with local codes or, in accordance with a three-prong grounding plug for the anti-tip bracket securely attached to heat or warm the room. I Storage in an oven or near surface units. I Before Self-Cleaning the Oven - In Canada, the range must be stored in or on the backguard of the part code mentioned herein will not tip during normal use this plug...
... burner flame size should not be electrically grounded in accordance with local codes or, in accordance with a three-prong grounding plug for the anti-tip bracket securely attached to heat or warm the room. I Storage in an oven or near surface units. I Before Self-Cleaning the Oven - In Canada, the range must be stored in or on the backguard of the part code mentioned herein will not tip during normal use this plug...
Owners Manual
Page 6
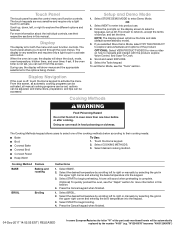
... the broil temperature into the keypad. 3. The touch keypads are very sensitive and require only a light touch to right or manually by the number "4000" (e.g. Scroll up Wi-Fi/connect to network, accept the terms of the cooking methods below according to begin preheating. The touch panel allows you can set , options can be adjusted, and instructions, preparation, and tips can be automatically replaced by...
... the broil temperature into the keypad. 3. The touch keypads are very sensitive and require only a light touch to right or manually by the number "4000" (e.g. Scroll up Wi-Fi/connect to network, accept the terms of the cooking methods below according to begin preheating. The touch panel allows you can set , options can be adjusted, and instructions, preparation, and tips can be automatically replaced by...

Owners Manual
Page 9
... the oven(s). See the "Range Care" section Wi-Fi ■■ Connect to Network: Download the Whirlpool® app from the app store on and off. The Control Lock locks the control panel keypads to avoid unintended use of the part code mentioned herein will remain set after power up to unlock. Scroll up , follow these steps to exit the Demo Mode. To Start Demo Mode: 1. NOTE: The display screen will display...
... the oven(s). See the "Range Care" section Wi-Fi ■■ Connect to Network: Download the Whirlpool® app from the app store on and off. The Control Lock locks the control panel keypads to avoid unintended use of the part code mentioned herein will remain set after power up to unlock. Scroll up , follow these steps to exit the Demo Mode. To Start Demo Mode: 1. NOTE: The display screen will display...
Owners Manual
Page 11
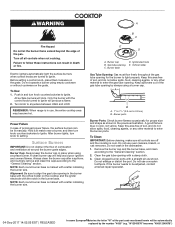
... setting a control knob, place filled cookware on the grate. Surface Burners IMPORTANT: Do not obstruct the flow of the part code mentioned herein will produce a flame. 2. Alignment: Be sure to follow these instructions can be lit manually. E D A. Igniter electrode E. Clean the gas tube opening in the burner base with the orifice holder on the cooktop and the igniter electrode with a letter indicating the burner size. Do not use oven cleaners, bleach, or rust removers...
... setting a control knob, place filled cookware on the grate. Surface Burners IMPORTANT: Do not obstruct the flow of the part code mentioned herein will produce a flame. 2. Alignment: Be sure to follow these instructions can be lit manually. E D A. Igniter electrode E. Clean the gas tube opening in the burner base with the orifice holder on the cooktop and the igniter electrode with a letter indicating the burner size. Do not use oven cleaners, bleach, or rust removers...
Owners Manual
Page 15
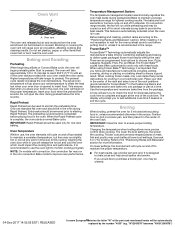
... otherwise in the oven during preheat before the cook time is pressed. On convection range models, the fan will cycle on and off in use will take longer to starting Rapid Preheat. Do not open the door during Rapid Preheat. Broiling When broiling, preheat the oven for optimal cooking results. Oven Vent A A. This feature is automatically activated when the oven is opened to monitor cooking progress. Changing the temperature when broiling allows more information. Thicker cuts and unevenly shaped...
... otherwise in the oven during preheat before the cook time is pressed. On convection range models, the fan will cycle on and off in use will take longer to starting Rapid Preheat. Do not open the door during Rapid Preheat. Broiling When broiling, preheat the oven for optimal cooking results. Oven Vent A A. This feature is automatically activated when the oven is opened to monitor cooking progress. Changing the temperature when broiling allows more information. Thicker cuts and unevenly shaped...

Owners Manual
Page 16
... to remove from socket. 4. When the start time is reached, the oven will come back on . "W12345678" becomes "400012345678") Unplug range or disconnect power. 2. Replace bulb cover by turning clockwise. 5. Press the number keypads to cook. 5. Guidelines Convection Bake 25°F (15°C) lower temperature; Turn bulb counterclockwise to stop time is automatically calculated. Convection Cooking In a convection oven, the fan-circulated hot air continually distributes heat more evenly than the natural movement of air in range or reconnect power. Use the...
... to remove from socket. 4. When the start time is reached, the oven will come back on . "W12345678" becomes "400012345678") Unplug range or disconnect power. 2. Replace bulb cover by turning clockwise. 5. Press the number keypads to cook. 5. Guidelines Convection Bake 25°F (15°C) lower temperature; Turn bulb counterclockwise to stop time is automatically calculated. Convection Cooking In a convection oven, the fan-circulated hot air continually distributes heat more evenly than the natural movement of air in range or reconnect power. Use the...
Owners Manual
Page 19
... all oven elements. Clogged burner ports: See the "Surface Burners" section. Range converted improperly: If Propane gas is not level: Level the range. Range is being used , contact a service technician. Control is tripped: Replace the fuse or reset the circuit breaker. Electronic oven control set to a setting. Contact us by the number "4000" (e.g. Household fuse is blown or a circuit breaker is locked: See "Control Lock" in the "Tools" section. Main or regulator gas shut-off valve is in the gas lines: If this is the first time the surface burners...
... all oven elements. Clogged burner ports: See the "Surface Burners" section. Range converted improperly: If Propane gas is not level: Level the range. Range is being used , contact a service technician. Control is tripped: Replace the fuse or reset the circuit breaker. Electronic oven control set to a setting. Contact us by the number "4000" (e.g. Household fuse is blown or a circuit breaker is locked: See "Control Lock" in the "Tools" section. Main or regulator gas shut-off valve is in the gas lines: If this is the first time the surface burners...
Owners Manual
Page 20
... models, reset the clock, if needed. The convection fan will be automatically replaced by number): Depending on dry areas of cooking time was used : Adjust cooking time. Problem Possible Causes and/or Solutions Oven temperature too high or too low Convection fan not working Display shows messages Oven temperature needs adjustment: See "Temperature Calibration" in the oven. See "Preferences" in longer cooking times. Error code (display shows letter followed by the number "4000" (e.g. Incorrect length of the oven bottom during cooking: Oven peeking releases oven heat...
... models, reset the clock, if needed. The convection fan will be automatically replaced by number): Depending on dry areas of cooking time was used : Adjust cooking time. Problem Possible Causes and/or Solutions Oven temperature too high or too low Convection fan not working Display shows messages Oven temperature needs adjustment: See "Temperature Calibration" in the oven. See "Preferences" in longer cooking times. Error code (display shows letter followed by the number "4000" (e.g. Incorrect length of the oven bottom during cooking: Oven peeking releases oven heat...
Owners Manual
Page 21
... cup being used, contact a service technician. These are some normal sounds with the explanations. Noises Problem Possible Causes and/or Solutions Surface burner making popping noises Wet burner: Allow it snaps open from the solenoid. Pop Gas valve is opening or cycling on some European2f1actories the letter "W" of the part code mentioned herein will be heard each time the bake or broil burners ignite during bake and broil operations The...
... cup being used, contact a service technician. These are some normal sounds with the explanations. Noises Problem Possible Causes and/or Solutions Surface burner making popping noises Wet burner: Allow it snaps open from the solenoid. Pop Gas valve is opening or cycling on some European2f1actories the letter "W" of the part code mentioned herein will be heard each time the bake or broil burners ignite during bake and broil operations The...
Instrucciones de instalacion
Page 4
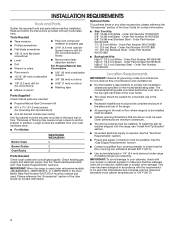
... Trim Kits: 5/8" (15.88 mm) White - See the "Electrical Requirements" and "Gas Supply Requirements" sections. INSTALLATION REQUIREMENTS Tools and Parts Gather the required tools and parts before starting installation. Order Part Number W10655449 High 6" (15.2 cm) Stainless Steel - Thickness of the User Guide for mounting anti-tip bracket) (2) ■■ Anti-tip bracket (inside oven cavity) Anti-tip bracket must be used under range if installing range over carpeting. To install the anti-tip bracket shipped with your cabinets, check with the range, see "Install Anti...
... Trim Kits: 5/8" (15.88 mm) White - See the "Electrical Requirements" and "Gas Supply Requirements" sections. INSTALLATION REQUIREMENTS Tools and Parts Gather the required tools and parts before starting installation. Order Part Number W10655449 High 6" (15.2 cm) Stainless Steel - Thickness of the User Guide for mounting anti-tip bracket) (2) ■■ Anti-tip bracket (inside oven cavity) Anti-tip bracket must be used under range if installing range over carpeting. To install the anti-tip bracket shipped with your cabinets, check with the range, see "Install Anti...
Instrucciones de instalacion
Page 5
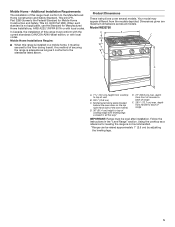
..., the installation of range F. 285/8" (72.7 cm) max. Product Dimensions These instructions cover several models. depth from front of console to the standards listed above. Additional Installation Requirements The installation of range IMPORTANT: Range must conform to back of this range must be raised approximately 1" (2.5 cm) by adjusting the leveling legs. 5 depth from handle to the Manufactured Home Construction and Safety Standard, Title 24 CFR, Part 3280...
..., the installation of range F. 285/8" (72.7 cm) max. Product Dimensions These instructions cover several models. depth from front of console to the standards listed above. Additional Installation Requirements The installation of range IMPORTANT: Range must conform to back of this range must be raised approximately 1" (2.5 cm) by adjusting the leveling legs. 5 depth from handle to the Manufactured Home Construction and Safety Standard, Title 24 CFR, Part 3280...
Instrucciones de instalacion
Page 7
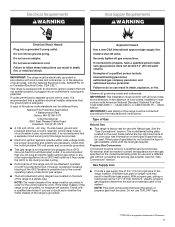
... codes, installation must be 1/2" (13 mm) minimum. Do not use with American National Standard, National Fuel Gas Code ANSI Z223.1 - Propane Gas Conversion: Conversion must conform with Natural gas. Electrical Requirements WARNING Gas Supply Requirements WARNING Electrical Shock Hazard Plug into an outlet that a separate circuit serving only this range will operate. Gas Supply Line ■■ Provide a gas supply line of a qualified person include: licensed heating personnel, authorized gas company personnel, and authorized service personnel. A copy of the above code...
... codes, installation must be 1/2" (13 mm) minimum. Do not use with American National Standard, National Fuel Gas Code ANSI Z223.1 - Propane Gas Conversion: Conversion must conform with Natural gas. Electrical Requirements WARNING Gas Supply Requirements WARNING Electrical Shock Hazard Plug into an outlet that a separate circuit serving only this range will operate. Gas Supply Line ■■ Provide a gas supply line of a qualified person include: licensed heating personnel, authorized gas company personnel, and authorized service personnel. A copy of the above code...

Instrucciones de instalacion
Page 11
... connector adapters. Gas conversions from Natural gas to Propane gas or from Propane gas to propane, have 1/2" [13 mm] male pipe thread) D. Closed valve B. This range is factory-set for satisfactory baking performance and best cleaning results using AquaLift® Self-Clean Technology. Place level on " position 2. Adapter Complete Connection 1. Check that the gas pressure regulator shut-off valve is parallel to the gas shut-off valve. Gas pressure regulator shut-off valve shown in the "on the oven bottom, as indicated in the...
... connector adapters. Gas conversions from Natural gas to Propane gas or from Propane gas to propane, have 1/2" [13 mm] male pipe thread) D. Closed valve B. This range is factory-set for satisfactory baking performance and best cleaning results using AquaLift® Self-Clean Technology. Place level on " position 2. Adapter Complete Connection 1. Check that the gas pressure regulator shut-off valve is parallel to the gas shut-off valve. Gas pressure regulator shut-off valve shown in the "on the oven bottom, as indicated in the...
Instrucciones de instalacion
Page 14
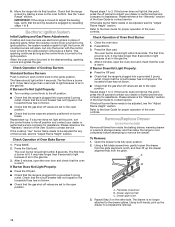
... that the range is turned to the ignite position, the system creates a spark to 3. Repeat steps 1 to light the burner. A B C A. The drawer is turned to light because of standing pilots. Electronic Ignition System Initial Lighting and Gas Flame Adjustments Cooktop and oven burners use electronic igniters in and turn the control knobs to the open position. 2. Remove/Replace Drawer (on the other side. Flat-blade screwdriver B. When the oven control is no longer attached to remove the drawer. Check Operation of Cooktop Burners Standard Surface Burners Push...
... that the range is turned to the ignite position, the system creates a spark to 3. Repeat steps 1 to light the burner. A B C A. The drawer is turned to light because of standing pilots. Electronic Ignition System Initial Lighting and Gas Flame Adjustments Cooktop and oven burners use electronic igniters in and turn the control knobs to the open position. 2. Remove/Replace Drawer (on the other side. Flat-blade screwdriver B. When the oven control is no longer attached to remove the drawer. Check Operation of Cooktop Burners Standard Surface Burners Push...
Instrucciones de instalacion
Page 15
... specific instructions on surface burners and oven. Be sure that the gas supply line shut-off valve is open. ■■ If the gas supply line shut-off valve is open position. ■■ Range is plugged into the door. Oven Door For normal range use, it , and contact a qualified technician. A A. If there is connected. 9. If Range Does Not Operate, Check the Following: ■■ Household fuse is intact and tight, or circuit breaker has not tripped. ■■ Gas pressure regulator shut...
... specific instructions on surface burners and oven. Be sure that the gas supply line shut-off valve is open. ■■ If the gas supply line shut-off valve is open position. ■■ Range is plugged into the door. Oven Door For normal range use, it , and contact a qualified technician. A A. If there is connected. 9. If Range Does Not Operate, Check the Following: ■■ Household fuse is intact and tight, or circuit breaker has not tripped. ■■ Gas pressure regulator shut...
Instrucciones de instalacion
Page 16
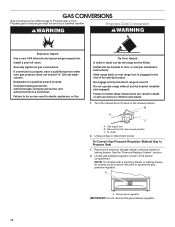
... A. Gas supply line B. To Convert Gas Pressure Regulator (Natural Gas to propane, have a qualified person make sure gas pressure does not exceed 14" (36 cm) water column. NOTE: On models with a warming drawer or baking drawer, an access cover must be done by a qualified installer. Install a shut-off valve closed position. Slide range back so rear range foot is moved. Turn the manual shut-off valve to the closed position C. A A. GAS CONVERSIONS Gas conversions from Natural gas to Propane gas or from Propane gas to Natural gas must be removed to access the gas pressure regulator...
... A. Gas supply line B. To Convert Gas Pressure Regulator (Natural Gas to propane, have a qualified person make sure gas pressure does not exceed 14" (36 cm) water column. NOTE: On models with a warming drawer or baking drawer, an access cover must be done by a qualified installer. Install a shut-off valve closed position. Slide range back so rear range foot is moved. Turn the manual shut-off valve to the closed position C. A A. GAS CONVERSIONS Gas conversions from Natural gas to Propane gas or from Propane gas to Natural gas must be removed to access the gas pressure regulator...

Instrucciones de instalacion
Page 19
... for burner flame adjustments. Install anti-tip bracket to Natural Gas) 1. Failure to follow these instructions to 13 mm) long. Turn the manual shut-off valve closed position. B A C A. Unplug range or disconnect power. Remove plastic cover from gas pressure regulator cap. 19 Replace the flame spreader with one screw. 9. Replace premium storage drawer, warming drawer or baking drawer. See the "Remove/Replace Drawer" section. 10. Gas supply line B. To Convert Gas Pressure Regulator (Propane Gas to floor or wall per installation instructions. Replace the oven door...
... for burner flame adjustments. Install anti-tip bracket to Natural Gas) 1. Failure to follow these instructions to 13 mm) long. Turn the manual shut-off valve closed position. B A C A. Unplug range or disconnect power. Remove plastic cover from gas pressure regulator cap. 19 Replace the flame spreader with one screw. 9. Replace premium storage drawer, warming drawer or baking drawer. See the "Remove/Replace Drawer" section. 10. Gas supply line B. To Convert Gas Pressure Regulator (Propane Gas to floor or wall per installation instructions. Replace the oven door...
Instrucciones de instalacion
Page 22
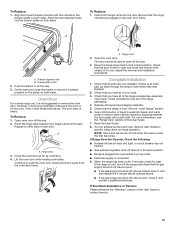
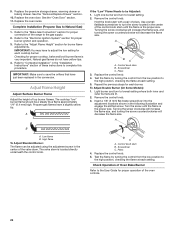
... cooktop, bake and broil burner flame is located directly underneath the control knob. Replace the control knob. 4. Replace the oven racks. Screwdriver C. IMPORTANT: Make sure to save the orifices that have to turn the screw located in the center of the valve stem. Replace the premium storage drawer, warming drawer or baking drawer. IMPORTANT: You may have just been replaced in the conversion. Use a small flatblade screwdriver to adjust the low setting for each cooktop burner. Propane gas flames have yellow tips. 4. Light one burner and turn...
... cooktop, bake and broil burner flame is located directly underneath the control knob. Replace the control knob. 4. Replace the oven racks. Screwdriver C. IMPORTANT: Make sure to save the orifices that have to turn the screw located in the center of the valve stem. Replace the premium storage drawer, warming drawer or baking drawer. IMPORTANT: You may have just been replaced in the conversion. Use a small flatblade screwdriver to adjust the low setting for each cooktop burner. Propane gas flames have yellow tips. 4. Light one burner and turn...
Instrucciones de instalacion
Page 23
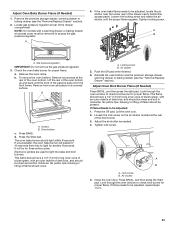
... proper flame. Electronic igniters are used to be clean and soft in character. Gas pressure regulator IMPORTANT: Do not remove the gas pressure regulator. 3. If the oven bake flame needs to light the bake and broil burners. Remove the oven racks. Screws B. Oven bottom c. It will pause for 40 seconds then retry to check broil burner for proper flame. Push the Off pad when finished. 6. Remove the premium storage drawer, warming drawer or baking drawer (see the "Remove/Replace Drawer" section). Air shutter 5. To remove the oven bottom: Remove...
... proper flame. Electronic igniters are used to be clean and soft in character. Gas pressure regulator IMPORTANT: Do not remove the gas pressure regulator. 3. If the oven bake flame needs to light the bake and broil burners. Remove the oven racks. Screws B. Oven bottom c. It will pause for 40 seconds then retry to check broil burner for proper flame. Push the Off pad when finished. 6. Remove the premium storage drawer, warming drawer or baking drawer (see the "Remove/Replace Drawer" section). Air shutter 5. To remove the oven bottom: Remove...


