
Use & Care Guide
Page 1
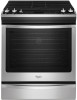
... serial numbers. In Canada, register your range at www.whirlpool.ca For future reference, please make a note of your range at www.whirlpool.com. User Guide Gas Range THANK YOU for purchasing this high-quality product. Model Number Serial Number Para una versión de estas instrucciones en ...español, visite www.whirlpool.com. Table of the oven door. Deberá ...
... serial numbers. In Canada, register your range at www.whirlpool.ca For future reference, please make a note of your range at www.whirlpool.com. User Guide Gas Range THANK YOU for purchasing this high-quality product. Model Number Serial Number Para una versión de estas instrucciones en ...español, visite www.whirlpool.com. Table of the oven door. Deberá ...

Use & Care Guide
Page 5
... setting. The Start keypad begins any function except the Clock and Timer. 1. Press the number keypads to the Product Help Section at www.whirlpool.com for 5 seconds. Press CANCEL when finished. 5 Do not press the Cancel keypad because the oven will automatically come on the oven control... panel. FEATURE GUIDE This manual covers several models. When the oven door is running, but not in hr-min-min. If the Timer is opened, the oven light will turn the...
... setting. The Start keypad begins any function except the Clock and Timer. 1. Press the number keypads to the Product Help Section at www.whirlpool.com for 5 seconds. Press CANCEL when finished. 5 Do not press the Cancel keypad because the oven will automatically come on the oven control... panel. FEATURE GUIDE This manual covers several models. When the oven door is running, but not in hr-min-min. If the Timer is opened, the oven light will turn the...

Use & Care Guide
Page 8
... disabled. The current setting will be displayed. 3. Press SETTINGS/CLOCK until "REMINDER TONE" is set to adjust the setting. 4. The range is displayed. 2. (On some models) Press "1" to +18°C). 4. The current setting will be displayed. 3. Press SETTINGS/CLOCK until "TEMP CALIB" is from -30°F to +30°F (-18°...
... disabled. The current setting will be displayed. 3. Press SETTINGS/CLOCK until "REMINDER TONE" is set to adjust the setting. 4. The range is displayed. 2. (On some models) Press "1" to +18°C). 4. The current setting will be displayed. 3. Press SETTINGS/CLOCK until "TEMP CALIB" is from -30°F to +30°F (-18°...
Use & Care Guide
Page 12
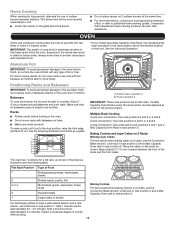
... For best results when baking cakes on them. ■ Make sure racks are level. Keep at the same time. ■ For more information, contact your model has a Max Capacity Oven Rack, the recessed ends must be placed in death to the stop position, raise the front edge, and then lift out...
... For best results when baking cakes on them. ■ Make sure racks are level. Keep at the same time. ■ For more information, contact your model has a Max Capacity Oven Rack, the recessed ends must be placed in death to the stop position, raise the front edge, and then lift out...
Use & Care Guide
Page 13
... OFF." Press RAPID PREHEAT and follow the oven control prompts, or, if preheating has already started, simply press RAPID PREHEAT. NOTE: On models with your oven door is set plastics, paper or other items that when you place your food when the preheat tone sounds. The bake and... one standard flat oven rack should be completed before placing food in intervals. It is completed and again at the proper temperature. On convection range models, the fan will alert you to add to "Positioning Racks and Bakeware" section. Cook only 1 package at any point in a bake setting until...
... OFF." Press RAPID PREHEAT and follow the oven control prompts, or, if preheating has already started, simply press RAPID PREHEAT. NOTE: On models with your oven door is set plastics, paper or other items that when you place your food when the preheat tone sounds. The bake and... one standard flat oven rack should be completed before placing food in intervals. It is completed and again at the proper temperature. On convection range models, the fan will alert you to add to "Positioning Racks and Bakeware" section. Cook only 1 package at any point in a bake setting until...
Use & Care Guide
Page 16
...gritty washcloths or abrasive paper towels. In Canada, visit our website at www.whirlpool.com. METALLIC PAINT (on soils should be cleaned when oven cools. These spills may affect the finish. Cooked-on some models) Food spills containing acids, such as vinegar and tomato, should be cleaned ...staining, etching, pitting or faint white spots can visit our website at www.whirlpool.ca. Cleaning Method: Rub in direction of vegetable oil applied to soft cloth or sponge, not directly on some models) Do not use abrasive cleaners, cleaners with one-time or limited use steel ...
...gritty washcloths or abrasive paper towels. In Canada, visit our website at www.whirlpool.com. METALLIC PAINT (on soils should be cleaned when oven cools. These spills may affect the finish. Cooked-on some models) Food spills containing acids, such as vinegar and tomato, should be cleaned ...staining, etching, pitting or faint white spots can visit our website at www.whirlpool.ca. Cleaning Method: Rub in direction of vegetable oil applied to soft cloth or sponge, not directly on some models) Do not use abrasive cleaners, cleaners with one-time or limited use steel ...

Use & Care Guide
Page 18
...see cover for 10 seconds to exit Sabbath Mode. If this is too close to bake burner, making baked items too brown on your model, press CANCEL to thoroughly remove any vinegar residue. Press and hold START for service. Oven burner flames are left on the oven bottom ...To remove deposits, use a cloth dampened with vinegar. Racks were positioned improperly - Oven door was used - Be sure that batter is used for display models in the first 5 minutes of the oven bottom during convention cooking, the fan will turn off immediately. Control is in a showroom. Error code (display ...
...see cover for 10 seconds to exit Sabbath Mode. If this is too close to bake burner, making baked items too brown on your model, press CANCEL to thoroughly remove any vinegar residue. Press and hold START for service. Oven burner flames are left on the oven bottom ...To remove deposits, use a cloth dampened with vinegar. Racks were positioned improperly - Oven door was used - Be sure that batter is used for display models in the first 5 minutes of the oven bottom during convention cooking, the fan will turn off immediately. Control is in a showroom. Error code (display ...

Use & Care Guide
Page 19
...174; Kitchen and Appliance Cleaner Order Part Number W10355010 AquaLift® Oven Cleaning Kit Order Part Number W10423113RP Cooktop Scraper (ceramic glass models) Order Part Number WA906B Granite Cleaner and Polish Order Part Number W10275756 Gas Grate and Drip Pan Cleaner Order Part Number 31617A ...with the explanations. These sounds are yellow or noisy POSSIBLE CAUSES AND/OR SOLUTIONS Wet burner - In Canada, visit our website at www.whirlpool.ca or call us at 1-800-253-1301. Order Part Number W10675028 Backsplash Assembly White - Order Part Number W10655449 Stainless Steel - ...
...174; Kitchen and Appliance Cleaner Order Part Number W10355010 AquaLift® Oven Cleaning Kit Order Part Number W10423113RP Cooktop Scraper (ceramic glass models) Order Part Number WA906B Granite Cleaner and Polish Order Part Number W10275756 Gas Grate and Drip Pan Cleaner Order Part Number 31617A ...with the explanations. These sounds are yellow or noisy POSSIBLE CAUSES AND/OR SOLUTIONS Wet burner - In Canada, visit our website at www.whirlpool.ca or call us at 1-800-253-1301. Order Part Number W10675028 Backsplash Assembly White - Order Part Number W10655449 Stainless Steel - ...

Use & Care Guide
Page 20
...This warranty gives you specific legal rights, and you call the Customer eXperience Center: ■ Name, address and telephone number ■ Model number and serial number ■ A clear, detailed description of the problem ■ Proof of products from state to state or province ...warranty service to correct improper product maintenance or installation, installation not in materials and workmanship and is provided exclusively by our authorized Whirlpool Service Providers. Service or parts for service in -home repair. 12. This limited warranty is not available. 13. Travel ...
...This warranty gives you specific legal rights, and you call the Customer eXperience Center: ■ Name, address and telephone number ■ Model number and serial number ■ A clear, detailed description of the problem ■ Proof of products from state to state or province ...warranty service to correct improper product maintenance or installation, installation not in materials and workmanship and is provided exclusively by our authorized Whirlpool Service Providers. Service or parts for service in -home repair. 12. This limited warranty is not available. 13. Travel ...

Warranty Information
Page 1
... from natural gas or L.P. house wiring, fuses or water inlet hoses). 4. Food or medicine loss due to : Whirlpool Customer eXperience Center www.whirlpool.com/product_help In the U.S.A., call 1-800-807-6777. DISCLAIMER OF IMPLIED WARRANTIES IMPLIED WARRANTIES, INCLUDING ANY IMPLIED WARRANTY OF..., operated and maintained according to instructions attached to province. If you should ask Whirlpool or your retailer about the quality, durability, or need for in accordance with original model/serial numbers removed, altered or not easily determined. Some states and provinces do ...
... from natural gas or L.P. house wiring, fuses or water inlet hoses). 4. Food or medicine loss due to : Whirlpool Customer eXperience Center www.whirlpool.com/product_help In the U.S.A., call 1-800-807-6777. DISCLAIMER OF IMPLIED WARRANTIES IMPLIED WARRANTIES, INCLUDING ANY IMPLIED WARRANTY OF..., operated and maintained according to instructions attached to province. If you should ask Whirlpool or your retailer about the quality, durability, or need for in accordance with original model/serial numbers removed, altered or not easily determined. Some states and provinces do ...
Installation Guide
Page 4
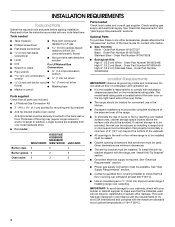
...the cabinets. ■ All openings in accordance with the requirements of UL and CSA International and complies with your local hardware store. ■ For model: WEG730H0D KSGG700E KSGB900E MGS8880D WEG760H0D JGS1450D Burner caps 5 5 4 Burner grates 2 2 3 Oven racks 2 3 3 Parts needed ■ Tape measure &#...cavity) Anti-tip bracket must be avoided. Order Part Number W10675028 ■ Backsplash Kits: High 6" (15.2 cm) White - The model/serial rating plate is to subfloor. Thickness of 194°F (90°C). 4 Longer screws are minimum clearances. ■ The anti-...
...the cabinets. ■ All openings in accordance with the requirements of UL and CSA International and complies with your local hardware store. ■ For model: WEG730H0D KSGG700E KSGB900E MGS8880D WEG760H0D JGS1450D Burner caps 5 5 4 Burner grates 2 2 3 Oven racks 2 3 3 Parts needed ■ Tape measure &#...cavity) Anti-tip bracket must be avoided. Order Part Number W10675028 ■ Backsplash Kits: High 6" (15.2 cm) White - The model/serial rating plate is to subfloor. Thickness of 194°F (90°C). 4 Longer screws are minimum clearances. ■ The anti-...

Installation Guide
Page 5
...in * E. 28 71.9 cm) max. Any method of vent B. 29⁷⁄₈" (75.9 cm) C. Product Dimensions This manual covers several models. Mobile Home - Dimensions given are maximum dimensions across all the way in the "Level Range" section. depth from cooktop to the floor during transit. ... CAN/CSA-A240-latest edition, or with local codes. Using the cooktop as it must be level after installation. depth from the models depicted. When such standard is not applicable, use the Standard for leveling the range is installed in a mobile home, it conforms ...
...in * E. 28 71.9 cm) max. Any method of vent B. 29⁷⁄₈" (75.9 cm) C. Product Dimensions This manual covers several models. Mobile Home - Dimensions given are maximum dimensions across all the way in the "Level Range" section. depth from cooktop to the floor during transit. ... CAN/CSA-A240-latest edition, or with local codes. Using the cooktop as it must be level after installation. depth from the models depicted. When such standard is not applicable, use the Standard for leveling the range is installed in a mobile home, it conforms ...

Installation Guide
Page 7
... in doubt as it is recommended that a qualified electrical installer determine that a separate circuit serving only this range will operate. The model/serial rating plate located on the oven frame behind the top right side of this range be electrically grounded in accordance with a different...the range must be provided. ■ Electronic ignition systems operate within wide voltage limits, but proper grounding and polarity are located on the model/serial rating plate for use with local codes and ordinances, or in a plastic bag. If the types of a qualified person include: ...
... in doubt as it is recommended that a qualified electrical installer determine that a separate circuit serving only this range will operate. The model/serial rating plate located on the oven frame behind the top right side of this range be electrically grounded in accordance with a different...the range must be provided. ■ Electronic ignition systems operate within wide voltage limits, but proper grounding and polarity are located on the model/serial rating plate for use with local codes and ordinances, or in a plastic bag. If the types of a qualified person include: ...

Installation Guide
Page 8
... gas must be used for connecting range to the gas supply line. ■ A ½" (1.3 cm) male pipe thread is laid on the model/serial rating plate. Gas Pressure Regulator The gas pressure regulator supplied with the other injury. 3. Using 2 or more people, firmly grasp the range and...the system. The inlet pressure to protect the flooring. See the "Adjust Leveling Legs" section. Burner Input Requirements Input ratings shown on the model/serial rating plate are for Canada). Failure to support the range when it on longer runs may be adjusted while the range is complete. ...
... gas must be used for connecting range to the gas supply line. ■ A ½" (1.3 cm) male pipe thread is laid on the model/serial rating plate. Gas Pressure Regulator The gas pressure regulator supplied with the other injury. 3. Using 2 or more people, firmly grasp the range and...the system. The inlet pressure to protect the flooring. See the "Adjust Leveling Legs" section. Burner Input Requirements Input ratings shown on the model/serial rating plate are for Canada). Failure to support the range when it on longer runs may be adjusted while the range is complete. ...

Installation Guide
Page 11
... valve is open when the handle is parallel to the gas regulator too tight. Test all connections by the following illustration for your model: B E A. Medium D. Flexible connector HG F E. For models MGS8880D, WEG730H0D, and WEG760H0D: A D C B E A. Large For models KSGG700E and KSGB900E: A D C A A. Gas pressure regulator shutoff valve shown in the gas supply line. Medium B. Large For...
... valve is open when the handle is parallel to the gas regulator too tight. Test all connections by the following illustration for your model: B E A. Medium D. Flexible connector HG F E. For models MGS8880D, WEG730H0D, and WEG760H0D: A D C B E A. Large For models KSGG700E and KSGB900E: A D C A A. Gas pressure regulator shutoff valve shown in the gas supply line. Medium B. Large For...
Installation Guide
Page 14
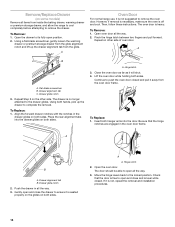
... oven door as far as it is not, repeat the removal and installation procedures. 14 Drawer glide notch 2. Hinge notch 2. Remove/Replace Drawer (on some models) Remove all the way. 2. The oven door is off and cool. Flat-blade screwdriver B. To Replace: 1. Be sure that the door is no longer attached...
... oven door as far as it is not, repeat the removal and installation procedures. 14 Drawer glide notch 2. Hinge notch 2. Remove/Replace Drawer (on some models) Remove all the way. 2. The oven door is off and cool. Flat-blade screwdriver B. To Replace: 1. Be sure that the door is no longer attached...

Installation Guide
Page 16
...-tip bracket. Examples of the drawer compartment. Turn the manual shutoff valve to follow these instructions can tip the range and be killed. NOTE: On models with a warming drawer or baking drawer, an access cover must be removed to floor or wall per installation instructions. B A C A. LP Gas Conversion WARNING WARNING Explosion...
...-tip bracket. Examples of the drawer compartment. Turn the manual shutoff valve to follow these instructions can tip the range and be killed. NOTE: On models with a warming drawer or baking drawer, an access cover must be removed to floor or wall per installation instructions. B A C A. LP Gas Conversion WARNING WARNING Explosion...
Installation Guide
Page 17
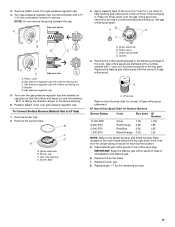
... burner location. 5. 3. Remove plastic cover from gas pressure regulator cap. 4. Igniter electrode B. Gas tube opening D. Igniter electrode B. Orifice spud holder D. LP groove Refer to the Model Number and Serial Number Plate located on regulator so that the hollow end faces out and the marking "LP" is facing the direction shown...
... burner location. 5. 3. Remove plastic cover from gas pressure regulator cap. 4. Igniter electrode B. Gas tube opening D. Igniter electrode B. Orifice spud holder D. LP groove Refer to the Model Number and Serial Number Plate located on regulator so that the hollow end faces out and the marking "LP" is facing the direction shown...

Installation Guide
Page 19
... moved. Install anti-tip bracket to Natural Gas) 1. Re-engage anti-tip bracket if range is not as distinct as the inner cone. NOTE: On models with all four tabs facing up and the notches toward the rear of the oven and attach it clockwise until snug. Replace the flame spreader...
... moved. Install anti-tip bracket to Natural Gas) 1. Re-engage anti-tip bracket if range is not as distinct as the inner cone. NOTE: On models with all four tabs facing up and the notches toward the rear of the oven and attach it clockwise until snug. Replace the flame spreader...

Installation Guide
Page 20
... cap with a number on the oven frame behind the top right side of the oven door for proper sizing of a 7 mm nut driver to the Model Number and Serial Number Plate located on the side. Orifice spud C. Stamped number Refer to the following chart for each burner location. 5. Turn over gas...
... cap with a number on the oven frame behind the top right side of the oven door for proper sizing of a 7 mm nut driver to the Model Number and Serial Number Plate located on the side. Orifice spud C. Stamped number Refer to the following chart for each burner location. 5. Turn over gas...


