
Use & Care Guide
Page 1
... SOLVER 17 ACCESSORIES 19 WARRANTY 20 W10665261A Model Number Serial Number Para una versión de estas instrucciones en español, visite www.whirlpool.com. Deberá tener a mano el número de modelo y de serie, que están ubicados en el marco del horno...superior de la puerta del horno. Register your range at www.whirlpool.ca For future reference, please make a note of your range at www.whirlpool.com. In Canada, register your product model and serial numbers. Table of the oven door. User Guide Gas Range THANK YOU for purchasing this high-quality product....
... SOLVER 17 ACCESSORIES 19 WARRANTY 20 W10665261A Model Number Serial Number Para una versión de estas instrucciones en español, visite www.whirlpool.com. Deberá tener a mano el número de modelo y de serie, que están ubicados en el marco del horno...superior de la puerta del horno. Register your range at www.whirlpool.ca For future reference, please make a note of your range at www.whirlpool.com. In Canada, register your product model and serial numbers. Table of the oven door. User Guide Gas Range THANK YOU for purchasing this high-quality product....

Use & Care Guide
Page 2
RANGE SAFETY Your safety and the safety of California to cause cancer. This symbol alerts you to potential hazards that you use gasoline or other flammable vapors and liquids in this manual and on your gas supplier. WHAT TO DO IF YOU SMELL GAS: • Do not try to ...phone in this manual is the safety alert symbol. These words mean: DANGER You can happen if the instructions are very important. WARNING: Gas leaks cannot always be performed by smell. All safety messages will follow instructions. This is not followed exactly, a fire or explosion may result...
RANGE SAFETY Your safety and the safety of California to cause cancer. This symbol alerts you to potential hazards that you use gasoline or other flammable vapors and liquids in this manual and on your gas supplier. WHAT TO DO IF YOU SMELL GAS: • Do not try to ...phone in this manual is the safety alert symbol. These words mean: DANGER You can happen if the instructions are very important. WARNING: Gas leaks cannot always be performed by smell. All safety messages will follow instructions. This is not followed exactly, a fire or explosion may result...
Use & Care Guide
Page 4
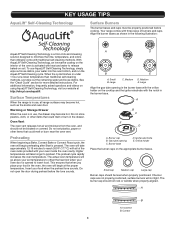
...the heat lost when your oven inside the oven cavity. The preheat cycle rapidly increases the oven temperature. Large C. Incorrect B. Large Align the gas tube opening C. Burner cap B. Igniter electrode E. To use , the drawer may become hot. See the "Clean Cycle" section for more ...caps are not properly positioned, surface burners will begin preheating after Start is opened to reach 350°F (177°C) with all range surfaces may become hot, such as shown in the following illustration: AquaLift® Self-Cleaning Technology is in the burner base with...
...the heat lost when your oven inside the oven cavity. The preheat cycle rapidly increases the oven temperature. Large C. Incorrect B. Large Align the gas tube opening C. Burner cap B. Igniter electrode E. To use , the drawer may become hot. See the "Clean Cycle" section for more ...caps are not properly positioned, surface burners will begin preheating after Start is opened to reach 350°F (177°C) with all range surfaces may become hot, such as shown in the following illustration: AquaLift® Self-Cleaning Technology is in the burner base with...
Use & Care Guide
Page 9
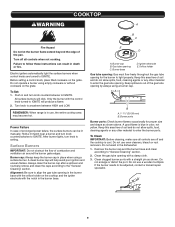
...will produce a flame. 2. Keep spillovers out of prolonged power failure, the surface burners can result in the dishwasher. 1. Clean the gas tube opening for proper size and shape as shown. If the burner needs to setting. Do not operate a burner using a surface ...oven cleaners, bleach or rust removers. Alignment: Be sure to IGNITE. Do not use a wooden toothpick. REMEMBER: When range is cool. Igniter electrode E. Failure to enter the gas tube opening C. Burner base D. Keep this area free of the pan. Clean clogged burner ports with a damp cloth...
...will produce a flame. 2. Keep spillovers out of prolonged power failure, the surface burners can result in the dishwasher. 1. Clean the gas tube opening for proper size and shape as shown. If the burner needs to setting. Do not operate a burner using a surface ...oven cleaners, bleach or rust removers. Alignment: Be sure to IGNITE. Do not use a wooden toothpick. REMEMBER: When range is cool. Igniter electrode E. Failure to enter the gas tube opening C. Burner base D. Keep this area free of the pan. Clean clogged burner ports with a damp cloth...
Use & Care Guide
Page 16
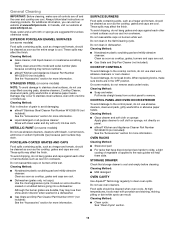
...included): See the "Accessories" section for more information. For additional information, you can result. In Canada, visit our website at www.whirlpool.com. These spills may affect the finish. PORCELAIN-COATED GRATES AND CAPS Food spills containing acids, such as vinegar and tomato, should ...EXTERIOR PORCELAIN ENAMEL SURFACES (on soils should be cleaned as soon as the entire range is cool and empty before going into a dishwasher. Soap, water and a soft cloth or sponge are cool. ■ Gas Grate and Drip Pan Cleaner (not included). Cooked-on some models) NOTE:...
...included): See the "Accessories" section for more information. For additional information, you can result. In Canada, visit our website at www.whirlpool.com. These spills may affect the finish. PORCELAIN-COATED GRATES AND CAPS Food spills containing acids, such as vinegar and tomato, should ...EXTERIOR PORCELAIN ENAMEL SURFACES (on soils should be cleaned as soon as the entire range is cool and empty before going into a dishwasher. Soap, water and a soft cloth or sponge are cool. ■ Gas Grate and Drip Pan Cleaner (not included). Cooked-on some models) NOTE:...

Use & Care Guide
Page 17
... further assistance or more information. Control knob set correctly - In Canada, visit http://www.whirlpool.ca. Do not remove ground prong. Failure to follow these instructions can result in the gas lines - PROBLEM Nothing will operate Surface burners will not operate Surface burner flames are not ...well fitting lid, and the material should be of the pan. Ideal cookware should be centered above the burner with any key on the grate. Range is unplugged - If you avoid a service call an electrician. Plug into a grounded 3 prong outlet. Air in death, fire, or electrical ...
... further assistance or more information. Control knob set correctly - In Canada, visit http://www.whirlpool.ca. Do not remove ground prong. Failure to follow these instructions can result in the gas lines - PROBLEM Nothing will operate Surface burners will not operate Surface burner flames are not ...well fitting lid, and the material should be of the pan. Ideal cookware should be centered above the burner with any key on the grate. Range is unplugged - If you avoid a service call an electrician. Plug into a grounded 3 prong outlet. Air in death, fire, or electrical ...

Use & Care Guide
Page 18
...unevenly in Demo Mode - Oven door was incorrect - Control is in longer cooking times. See "Oven Temperature Control" in the oven. Range is locked - Be sure that batter is in the Clean cycle - Oven temperature too high Oven temperature needs adjustment - Lower oven ...temperature 25°F (15°C) or move rack to higher position in the gas lines - PROBLEM POSSIBLE CAUSES AND/OR SOLUTIONS Oven will not operate Air in the oven. Racks were positioned improperly - Move rack...
...unevenly in Demo Mode - Oven door was incorrect - Control is in longer cooking times. See "Oven Temperature Control" in the oven. Range is locked - Be sure that batter is in the Clean cycle - Oven temperature too high Oven temperature needs adjustment - Lower oven ...temperature 25°F (15°C) or move rack to higher position in the gas lines - PROBLEM POSSIBLE CAUSES AND/OR SOLUTIONS Oven will not operate Air in the oven. Racks were positioned improperly - Move rack...

Use & Care Guide
Page 19
... Part Number W10675028 Backsplash Assembly White - These sounds are normal operational noises that can visit our website at www.whirlpool.com or call us at 1-800-807-6777. Range converted improperly - Order Part Number W10675027 Black - The igniters will make a single pop when it to a ... Order Part Number W10423113RP Cooktop Scraper (ceramic glass models) Order Part Number WA906B Granite Cleaner and Polish Order Part Number W10275756 Gas Grate and Drip Pan Cleaner Order Part Number 31617A Canning Unit Kit (coil models) Order Part Number 242905 Gourmet Griddle Order Part...
... Part Number W10675028 Backsplash Assembly White - These sounds are normal operational noises that can visit our website at www.whirlpool.com or call us at 1-800-807-6777. Range converted improperly - Order Part Number W10675027 Black - The igniters will make a single pop when it to a ... Order Part Number W10423113RP Cooktop Scraper (ceramic glass models) Order Part Number WA906B Granite Cleaner and Polish Order Part Number W10275756 Gas Grate and Drip Pan Cleaner Order Part Number 31617A Canning Unit Kit (coil models) Order Part Number 242905 Gourmet Griddle Order Part...

Installation Guide
Page 2
...use any other appliance. - For more information, contact your gas supplier, call your appliance. WHAT TO DO IF YOU SMELL GAS: • Do not try to do if you what the potential hazard is the safety alert symbol. RANGE SAFETY Your safety and the safety of others . We have... provided many important safety messages in the vicinity of this gas cooking appliance resulting in your building. • Immediately call the fire department. -...
...use any other appliance. - For more information, contact your gas supplier, call your appliance. WHAT TO DO IF YOU SMELL GAS: • Do not try to do if you what the potential hazard is the safety alert symbol. RANGE SAFETY Your safety and the safety of others . We have... provided many important safety messages in the vicinity of this gas cooking appliance resulting in your building. • Immediately call the fire department. -...
Installation Guide
Page 3
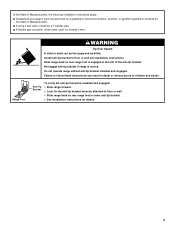
...is engaged in death or serious burns to follow these instructions can tip the range and be a T-handle type. ■ A flexible gas connector, when used, must not exceed 3 feet. Slide range back so rear range foot is under anti-tip bracket. • See installation instructions for the ...is moved. Failure to children and adults. Do not operate range without anti-tip bracket installed and engaged. Re-engage anti-tip bracket if range is installed and engaged: • Slide range forward. • Look for details. 3 Range Foot WARNING Tip Over Hazard A child or adult can ...
...is engaged in death or serious burns to follow these instructions can tip the range and be a T-handle type. ■ A flexible gas connector, when used, must not exceed 3 feet. Slide range back so rear range foot is under anti-tip bracket. • See installation instructions for the ...is moved. Failure to children and adults. Do not operate range without anti-tip bracket installed and engaged. Re-engage anti-tip bracket if range is installed and engaged: • Slide range forward. • Look for details. 3 Range Foot WARNING Tip Over Hazard A child or adult can ...
Installation Guide
Page 4
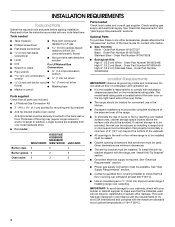
...9632; The range should be available. Order Part Number W10677527 Black - IMPORTANT: To avoid damage to the back wall or floor. Tools needed Check local codes and consult gas supplier. Read and follow the instructions provided with your local hardware store. ■ For model: WEG730H0D KSGG700E KSGB900E... accessories, please reference the "Accessories" section of the User Guide for convenient use in the wall or floor where range is to LP gas 5 mm) carbide-tipped masonry drill bit (for concrete/ceramic floors) ■ Noncorrosive leak-detection solution ■ Drill For ...
...9632; The range should be available. Order Part Number W10677527 Black - IMPORTANT: To avoid damage to the back wall or floor. Tools needed Check local codes and consult gas supplier. Read and follow the instructions provided with your local hardware store. ■ For model: WEG730H0D KSGG700E KSGB900E... accessories, please reference the "Accessories" section of the User Guide for convenient use in the wall or floor where range is to LP gas 5 mm) carbide-tipped masonry drill bit (for concrete/ceramic floors) ■ Noncorrosive leak-detection solution ■ Drill For ...

Installation Guide
Page 6
...188;" (5.7 cm) A. 18" (45.7 cm) upper side cabinet to side wall or other combustible material. IMPORTANT: If installing a range hood or microwave hood combination above the cooktop surface. The shaded area is recommended for 25" (64.0 cm) countertop depth, 24" ...shaded area is recommended for dimensional clearances above the range, follow the range hood or microwave hood combination installation instructions for installation of range to side wall or other combustible material. clearance from both sides of rigid gas pipe and grounded outlet. upper cabinet depth C. 30...
...188;" (5.7 cm) A. 18" (45.7 cm) upper side cabinet to side wall or other combustible material. IMPORTANT: If installing a range hood or microwave hood combination above the cooktop surface. The shaded area is recommended for 25" (64.0 cm) countertop depth, 24" ...shaded area is recommended for dimensional clearances above the range, follow the range hood or microwave hood combination installation instructions for installation of range to side wall or other combustible material. clearance from both sides of rigid gas pipe and grounded outlet. upper cabinet depth C. 30...

Installation Guide
Page 7
... - Do not use an adapter. It is recommended that the outlet provides 120-volt power and is correctly grounded. ■ This gas range is required. latest edition. The model/serial rating plate located on the oven frame behind the top right side of the oven door ..., installation must be electrically grounded in a plastic bag. If the types of gas available, check with American National Standard, National Fuel Gas Code ANSI Z223.1 - Failure to the normal operating nature of electronic gas ranges. ■ The tech sheet and wiring diagram are located on the types of...
... - Do not use an adapter. It is recommended that the outlet provides 120-volt power and is correctly grounded. ■ This gas range is required. latest edition. The model/serial rating plate located on the oven frame behind the top right side of the oven door ..., installation must be electrically grounded in a plastic bag. If the types of gas available, check with American National Standard, National Fuel Gas Code ANSI Z223.1 - Failure to the normal operating nature of electronic gas ranges. ■ The tech sheet and wiring diagram are located on the types of...

Installation Guide
Page 8
... connector: ■ If local codes permit, a new CSA design-certified, 4 to 5 ft (122 to the range. The valve is complete. 2. Gas supply line B. Gas Pressure Regulator The gas pressure regulator supplied with this range must be in a location that allows ease of 4% for Canada). The inlet pressure to the... lengthwise on its individual shutoff valve must be used . The leveling legs can be used . Using 2 or more people to support the range when it on or shutting off gas to 152.4 cm) long, ½" (1.3 cm) or ¾" (1.9 cm) I . NOTE: Pipe-joint compounds that system at ½...
... connector: ■ If local codes permit, a new CSA design-certified, 4 to 5 ft (122 to the range. The valve is complete. 2. Gas supply line B. Gas Pressure Regulator The gas pressure regulator supplied with this range must be in a location that allows ease of 4% for Canada). The inlet pressure to the... lengthwise on its individual shutoff valve must be used . The leveling legs can be used . Using 2 or more people to support the range when it on or shutting off gas to 152.4 cm) long, ½" (1.3 cm) or ¾" (1.9 cm) I . NOTE: Pipe-joint compounds that system at ½...

Installation Guide
Page 10
...of the anti-tip bracket. Securely tighten all gas connections. A minimum of 5 mm) is engaged in death, explosion, or fire. Install a shut-off valve. Gas conversions from Natural gas to LP gas or from LP gas to back. 2. If range height adjustment is level. Adjust Leveling Legs ...the flexible connector adapters (see the "Gas Conversions" section before connecting this range with Natural gas. Typical flexible connection 1. NOTE: To place range back up to adjust the rear legs. 4. If range is not level, use this range to the gas shutoff valve. Measure the distance from ...
...of the anti-tip bracket. Securely tighten all gas connections. A minimum of 5 mm) is engaged in death, explosion, or fire. Install a shut-off valve. Gas conversions from Natural gas to LP gas or from LP gas to back. 2. If range height adjustment is level. Adjust Leveling Legs ...the flexible connector adapters (see the "Gas Conversions" section before connecting this range with Natural gas. Typical flexible connection 1. NOTE: To place range back up to adjust the rear legs. 4. If range is not level, use this range to the gas shutoff valve. Measure the distance from ...

Installation Guide
Page 12
.... Use a flashlight to look underneath the bottom of the anti-tip bracket. Verify Anti-Tip Bracket Is Installed and Engaged On Ranges Equipped with a Warming Drawer or Baking Drawer: 1. Gas tube opening in the burner base with the orifice holder on the cooktop and the igniter electrode with the notch in the...
.... Use a flashlight to look underneath the bottom of the anti-tip bracket. Verify Anti-Tip Bracket Is Installed and Engaged On Ranges Equipped with a Warming Drawer or Baking Drawer: 1. Gas tube opening in the burner base with the orifice holder on the cooktop and the igniter electrode with the notch in the...
Installation Guide
Page 13
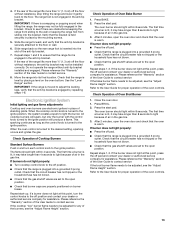
...bracket. Check that the circuit breaker has not tripped or the household fuse has not blown. ■ Check that the gas shutoff valves are obstructions keeping the range from sliding to the off pad and contact your dealer or authorized service company for assistance. The oven burner should light ... to the ignite position, the system creates a spark to adjust the leveling legs, verify that the oven is engaged in the gas line. 3. IMPORTANT: If the range is moved to light the burner. When the cooktop control knob is not engaged in place of Oven Bake Burner 1. This sparking...
...bracket. Check that the circuit breaker has not tripped or the household fuse has not blown. ■ Check that the gas shutoff valves are obstructions keeping the range from sliding to the off pad and contact your dealer or authorized service company for assistance. The oven burner should light ... to the ignite position, the system creates a spark to adjust the leveling legs, verify that the oven is engaged in the gas line. 3. IMPORTANT: If the range is moved to light the burner. When the cooktop control knob is not engaged in place of Oven Bake Burner 1. This sparking...

Installation Guide
Page 15
... remove waxy residue caused by shipping material. For more information, see which step was skipped. 2. Turn on range operation. These accessories may be in the range packaging. ■ Gas pressure regulator shutoff valve is open, close it , then repeat the 5-minute test as outlined above. 7....warm water to see the "Range Care" section of the range accessories, especially oven racks. See the "Level Range" section. 6. If the range is cold, turn off the range and check that the gas supply line shutoff valve is open. ■ If the gas supply line shutoff valve is ...
... remove waxy residue caused by shipping material. For more information, see which step was skipped. 2. Turn on range operation. These accessories may be in the range packaging. ■ Gas pressure regulator shutoff valve is open, close it , then repeat the 5-minute test as outlined above. 7....warm water to see the "Range Care" section of the range accessories, especially oven racks. See the "Level Range" section. 6. If the range is cold, turn off the range and check that the gas supply line shutoff valve is open. ■ If the gas supply line shutoff valve is ...

Installation Guide
Page 16
... engaged in death or serious burns to the closed " position C. Gas pressure regulator IMPORTANT: Do not remove the gas pressure regulator. 16 Slide range back so rear range foot is moved. To Convert Gas Pressure Regulator (Natural Gas to access the gas pressure regulator. Locate gas pressure regulator at rear of a qualified person include: licensed heating personnel, authorized...
... engaged in death or serious burns to the closed " position C. Gas pressure regulator IMPORTANT: Do not remove the gas pressure regulator. 16 Slide range back so rear range foot is moved. To Convert Gas Pressure Regulator (Natural Gas to access the gas pressure regulator. Locate gas pressure regulator at rear of a qualified person include: licensed heating personnel, authorized...

Installation Guide
Page 19
... the "Remove/Replace Drawer" section. 10. Refer to the "Make Gas Connection" section for properly connecting the range to children and adults. 1. Re-engage anti-tip bracket if range is engaged in the slot of the oven and attach it clockwise until...to Natural Gas) 1. Slide range back so rear range foot is moved. B A C A. To range B. Unplug range or disconnect power. To Convert Gas Pressure Regulator (LP Gas to floor or wall per installation instructions. Gas pressure regulator IMPORTANT: Do not remove the gas pressure regulator. 19 Complete Installation (Natural Gas to ...
... the "Remove/Replace Drawer" section. 10. Refer to the "Make Gas Connection" section for properly connecting the range to children and adults. 1. Re-engage anti-tip bracket if range is engaged in the slot of the oven and attach it clockwise until...to Natural Gas) 1. Slide range back so rear range foot is moved. B A C A. To range B. Unplug range or disconnect power. To Convert Gas Pressure Regulator (LP Gas to floor or wall per installation instructions. Gas pressure regulator IMPORTANT: Do not remove the gas pressure regulator. 19 Complete Installation (Natural Gas to ...


