
Installation Guide
Page 2
Installation Requirements TOOLS AND PARTS Gather the required tools and parts before starting installation. Tools needed: Flat-blade screwdriver 2 #2 Phillips screwdriver Wire stripper (direct wire installations) Channel locks Service Personnel - Do not contact the thermostat bracket while the appliance is energized. Dryer Safety Certain internal parts are intentionally not grounded and may present a risk of electric shock only during servicing. IMPORTANT: When discarding or storing your old clothes dryer, remove the door.
Installation Requirements TOOLS AND PARTS Gather the required tools and parts before starting installation. Tools needed: Flat-blade screwdriver 2 #2 Phillips screwdriver Wire stripper (direct wire installations) Channel locks Service Personnel - Do not contact the thermostat bracket while the appliance is energized. Dryer Safety Certain internal parts are intentionally not grounded and may present a risk of electric shock only during servicing. IMPORTANT: When discarding or storing your old clothes dryer, remove the door.

Installation Guide
Page 3
... quarters. Install Extended Dryer Feet Kit, Part Number 279810. Lower temperatures may not operate correctly. ■■For garage installation, place dryer at end of companion appliance. ■■Level floor with dryer) Refer to 1" (25 mm) or hex-head socket wrench Location Requirements Check code requirements. DRYER DIMENSIONS Front view: 27" (686 mm) 383/4" Min. (984 mm) 39" Max. (990 mm) 3 If using a power supply cord: Use a UL listed power supply cord kit marked for...
... quarters. Install Extended Dryer Feet Kit, Part Number 279810. Lower temperatures may not operate correctly. ■■For garage installation, place dryer at end of companion appliance. ■■Level floor with dryer) Refer to 1" (25 mm) or hex-head socket wrench Location Requirements Check code requirements. DRYER DIMENSIONS Front view: 27" (686 mm) 383/4" Min. (984 mm) 39" Max. (990 mm) 3 If using a power supply cord: Use a UL listed power supply cord kit marked for...

Installation Guide
Page 5
... pedestal Minimum diameter for homes built after 1996, and all local codes and ordinances. Do not have a fuse in the neutral or grounding circuit. ■■Do not use an extension cord. ■■If codes permit and a separate ground wire is used, it is recommended that a qualified electrician determine that the electrical connection is adequate and in remodeling after 1996, dryer circuits...
... pedestal Minimum diameter for homes built after 1996, and all local codes and ordinances. Do not have a fuse in the neutral or grounding circuit. ■■Do not use an extension cord. ■■If codes permit and a separate ground wire is used, it is recommended that a qualified electrician determine that the electrical connection is adequate and in remodeling after 1996, dryer circuits...
Installation Guide
Page 6
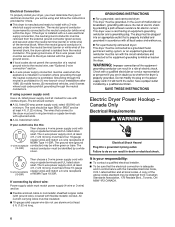
... terminal block, the dryer cabinet is your responsibility: ■■ To contact a qualified electrical installer. ■■ To be removed from the external ground connector (green screw), and secured under the neutral terminal (center or white wire) of a neutral ground wire to the neutral conductor (white wire) within the dryer. Electric Dryer Power Hookup - If connecting by a white cover. The cord should contain: ■■A UL listed 30-amp power supply cord, rated...
... terminal block, the dryer cabinet is your responsibility: ■■ To contact a qualified electrical installer. ■■ To be removed from the external ground connector (green screw), and secured under the neutral terminal (center or white wire) of a neutral ground wire to the neutral conductor (white wire) within the dryer. Electric Dryer Power Hookup - If connecting by a white cover. The cord should contain: ■■A UL listed 30-amp power supply cord, rated...

Installation Guide
Page 7
... conductor can result in length. Check with a quali ed electrician or service representative or personnel if you use Power Supply Cord Replacement Part Number 8579325. NOTE: Residual water from bottom of dryer. ■■ To supply the required 4 wire, single phase, 120/240 volt, 60 Hz., AC only electrical supply on a separate 30-amp circuit, fused on both sides of the equipment- Connect to an individual branch...
... conductor can result in length. Check with a quali ed electrician or service representative or personnel if you use Power Supply Cord Replacement Part Number 8579325. NOTE: Residual water from bottom of dryer. ■■ To supply the required 4 wire, single phase, 120/240 volt, 60 Hz., AC only electrical supply on a separate 30-amp circuit, fused on both sides of the equipment- Connect to an individual branch...

Installation Guide
Page 9
... : Power supply cord 4-wire receptacle (NEMA Type 14-30R): Go to "3-Wire Power Supply Cord Connection". Connect ground wire 4-wire receptacle (NEMA 4-prong plug type 14-30R) A F Spade terminals with the dryer cabinet and be in a horizontal position. 2. Prepare to strain relief 1. Connect neutral ground wire (E) and neutral wire (white or center) (C) of 3-wire connections. Be sure that the wire insulation on the power supply cord is required for mobile homes and where local codes do...
... : Power supply cord 4-wire receptacle (NEMA Type 14-30R): Go to "3-Wire Power Supply Cord Connection". Connect ground wire 4-wire receptacle (NEMA 4-prong plug type 14-30R) A F Spade terminals with the dryer cabinet and be in a horizontal position. 2. Prepare to strain relief 1. Connect neutral ground wire (E) and neutral wire (white or center) (C) of 3-wire connections. Be sure that the wire insulation on the power supply cord is required for mobile homes and where local codes do...

Installation Guide
Page 12
... direct wire cable under center screw of dryer rear panel. Strip insulation back 1" (25 mm). Shape wire ends into slot of terminal block (B). 2. Secure cover with outer covering. Remove center screw A F B Connect ground wire (green or bare) (F) of extra length so dryer may be moved if needed. Connect remaining wires E B A Remove center terminal block screw (B). Now, go to "Connect Outlet Hose." 3-Wire Direct Wire Connection Use where local codes permit connecting cabinet-ground conductor to connect neutral ground wire and neutral wire 5. If using 3-wire cable...
... direct wire cable under center screw of dryer rear panel. Strip insulation back 1" (25 mm). Shape wire ends into slot of terminal block (B). 2. Secure cover with outer covering. Remove center screw A F B Connect ground wire (green or bare) (F) of extra length so dryer may be moved if needed. Connect remaining wires E B A Remove center terminal block screw (B). Now, go to "Connect Outlet Hose." 3-Wire Direct Wire Connection Use where local codes permit connecting cabinet-ground conductor to connect neutral ground wire and neutral wire 5. If using 3-wire cable...

Installation Guide
Page 13
... electrical connection method, as shown on page 8 or 11. Now, go to "Connect Outlet Hose." 13 Finally, reinsert tab of terminal block cover into slot of power supply cord or cable under the green external ground conductor screw (A) to connect neutral ground wire and neutral wire E Place ends of dryer rear panel. Connect a separate copper ground wire (G) under center, terminal block screw (B). 3. Prepare to an adequate ground. Remove center terminal block screw (B). Secure cover...
... electrical connection method, as shown on page 8 or 11. Now, go to "Connect Outlet Hose." 13 Finally, reinsert tab of terminal block cover into slot of power supply cord or cable under the green external ground conductor screw (A) to connect neutral ground wire and neutral wire E Place ends of dryer rear panel. Connect a separate copper ground wire (G) under center, terminal block screw (B). 3. Prepare to an adequate ground. Remove center terminal block screw (B). Secure cover...

Installation Guide
Page 15
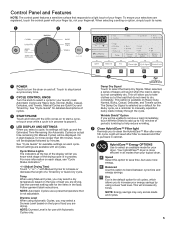
... instructions can result in your tools. This odor is common when heating element is first heated. WARNING Electrical Shock Hazard Plug into a grounded outlet. Do not remove ground prong. q Check dryer's final location. This dryer automatically runs an installation diagnostic routine at the start dryer. Do not use an adapter. q Dispose of/recycle all of its first cycle. If there is plugged into a grounded 3 prong outlet Complete Installation Checklist q Check that all parts are set in a running...
... instructions can result in your tools. This odor is common when heating element is first heated. WARNING Electrical Shock Hazard Plug into a grounded outlet. Do not remove ground prong. q Check dryer's final location. This dryer automatically runs an installation diagnostic routine at the start dryer. Do not use an adapter. q Dispose of/recycle all of its first cycle. If there is plugged into a grounded 3 prong outlet Complete Installation Checklist q Check that all parts are set in a running...

Warranty Information
Page 1
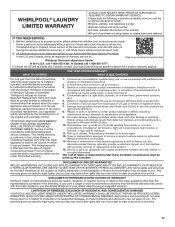
.../product_help Whirlpool Customer eXperience Center In the U.S.A. Conversion of appliance doors. 7. gas or reversal of your product requires repair. Some states and provinces do not allow the exclusion or limitation of the Use and Care Guide, scan the QR code on the duration of implied warranties of this limited warranty. 1. PROOF OF PURCHASE IS REQUIRED TO OBTAIN WARRANTY SERVICE. Please take a few minutes to review the Troubleshooting or Problem...
.../product_help Whirlpool Customer eXperience Center In the U.S.A. Conversion of appliance doors. 7. gas or reversal of your product requires repair. Some states and provinces do not allow the exclusion or limitation of the Use and Care Guide, scan the QR code on the duration of implied warranties of this limited warranty. 1. PROOF OF PURCHASE IS REQUIRED TO OBTAIN WARRANTY SERVICE. Please take a few minutes to review the Troubleshooting or Problem...

Use & Care Guide
Page 4
... time set and can make longer drying times. You may feel cooler than vented dryer. • VENTLESS DESIGN: Allows installation in the load. With Timed Dry, the dryer runs the amount of energy; If possible, do not open the dryer door during and after the drying process. therefore it may notice a gurgling sound occasionally. 4 3 1 Heat Exchanger/Condenser is heating up the air 2 Drying 3 Air blower is cooling air 4 Evaporator is cooling and discharging condensation water Use Automatic Cycles...
... time set and can make longer drying times. You may feel cooler than vented dryer. • VENTLESS DESIGN: Allows installation in the load. With Timed Dry, the dryer runs the amount of energy; If possible, do not open the dryer door during and after the drying process. therefore it may notice a gurgling sound occasionally. 4 3 1 Heat Exchanger/Condenser is heating up the air 2 Drying 3 Air blower is cooling air 4 Evaporator is cooling and discharging condensation water Use Automatic Cycles...
Use & Care Guide
Page 5
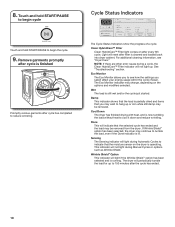
... of load you are registered, touch the control panel with Manual Cycles to increase or decrease the length of load you to increase your fingernail. See "Cycle Guide" for your dryer. Cycle Status Lights The indicators at any time. 2 CYCLE CONTROL KNOB Turn the knob to clean the HybridCare™ filter after filter is cleaned and filter is not adjustable. Follow garment label instructions. Dryness Level When using Automatic Cycles, you to select a cycle for...
... of load you are registered, touch the control panel with Manual Cycles to increase or decrease the length of load you to increase your fingernail. See "Cycle Guide" for your dryer. Cycle Status Lights The indicators at any time. 2 CYCLE CONTROL KNOB Turn the knob to clean the HybridCare™ filter after filter is cleaned and filter is not adjustable. Follow garment label instructions. Dryness Level When using Automatic Cycles, you to select a cycle for...

Use & Care Guide
Page 6
... drying temperature from a power failure. do not overfill dryer drum. Uses Extra Low heat to dry large loads of the dryer and avoid an accidental change in the load or air temperature and shuts off when the load reaches the selected dryness level. Touch and hold CONTROL LOCK for optimal drying. NOTE: The Control Lock function may also turn sounds on Speed or Eco HybridCare™ Energy option selected. Cycle Guide - If there is a power failure, settings...
... drying temperature from a power failure. do not overfill dryer drum. Uses Extra Low heat to dry large loads of the dryer and avoid an accidental change in the load or air temperature and shuts off when the load reaches the selected dryness level. Touch and hold CONTROL LOCK for optimal drying. NOTE: The Control Lock function may also turn sounds on Speed or Eco HybridCare™ Energy option selected. Cycle Guide - If there is a power failure, settings...
Use & Care Guide
Page 10
... there are other error issues during Manual Cycles or options such as Wrinkle Shield. This indicator will reset after filter is cleaned and loaded back into dryer cabinet. Light will not light during a cycle, the Clean HybridCare™ Filter indicator will light if the Wrinkle Shield™ option has been selected and is running. Eco Monitor The Eco Monitor allows you select affect your energy usage within the...
... there are other error issues during Manual Cycles or options such as Wrinkle Shield. This indicator will reset after filter is cleaned and loaded back into dryer cabinet. Light will not light during a cycle, the Clean HybridCare™ Filter indicator will light if the Wrinkle Shield™ option has been selected and is running. Eco Monitor The Eco Monitor allows you select affect your energy usage within the...
Use & Care Guide
Page 11
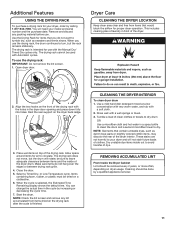
... for use . To use the drying rack, the drum continues to turn, but the drum will rotate; You can change the actual time in the dryer door opening and press down fully into holes. Use a mild hand dish detergent mixed at a low concentration with very warm water, and rub with the holes in the cycle by a qualified appliance servicer. 11 Additional Features USING THE DRYING RACK To purchase a drying rack for air...
... for use . To use the drying rack, the drum continues to turn, but the drum will rotate; You can change the actual time in the dryer door opening and press down fully into holes. Use a mild hand dish detergent mixed at a low concentration with very warm water, and rub with the holes in the cycle by a qualified appliance servicer. 11 Additional Features USING THE DRYING RACK To purchase a drying rack for air...

Use & Care Guide
Page 13
..., winterize it will increase drying time. Moving Care For power supply cord-connected dryers: 1. For direct-wired dryers: 1. Disconnect wiring. 3. If storing or moving your dryer where it . Unplug the power supply cord. 2. Replace all parts and panels before servicing. Pull dryer away from wall and vacuum cooling fan screen with brush attachment. Because some water may stay in the hose, freezing can result in death or electrical shock. See "Cleaning the Lint Screen." Make sure leveling...
..., winterize it will increase drying time. Moving Care For power supply cord-connected dryers: 1. For direct-wired dryers: 1. Disconnect wiring. 3. If storing or moving your dryer where it . Unplug the power supply cord. 2. Replace all parts and panels before servicing. Pull dryer away from wall and vacuum cooling fan screen with brush attachment. Because some water may stay in the hose, freezing can result in death or electrical shock. See "Cleaning the Lint Screen." Make sure leveling...
Use & Care Guide
Page 14
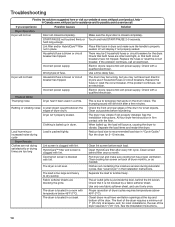
... www.whirlpool.ca for 5-10 minutes. Electric dryers require 240-volt power supply. Clean cooling fan screen on the drum rollers. Replace the fuses or reset the circuit breaker. Clean screen behind the lint screen. The dryer is blocked with temperature below 45ºF (7ºC). Check with a qualified electrician. Replace the fuses or reset the circuit breaker. Place filter back in dryer. LF will not heat Household fuse is packed tightly. The drum may be 2 household fuses or circuit breakers for most installations, the rear of dryer cycles requires...
... www.whirlpool.ca for 5-10 minutes. Electric dryers require 240-volt power supply. Clean cooling fan screen on the drum rollers. Replace the fuses or reset the circuit breaker. Clean screen behind the lint screen. The dryer is blocked with temperature below 45ºF (7ºC). Check with a qualified electrician. Replace the fuses or reset the circuit breaker. Place filter back in dryer. LF will not heat Household fuse is packed tightly. The drum may be 2 household fuses or circuit breakers for most installations, the rear of dryer cycles requires...

Use & Care Guide
Page 15
... the load. If loads are wrinkled The load was not removed from bottom of the dryer. Fabric softener sheets added to garment care label instructions. Loads are consistently ending too early, see also "Changing the Automatic Cycle settings to complete the cool down portion of the cycle before removing the load. Ventilate the area. Rewash and dry the clothing. Allow the dryer to increase or decrease drying time." wall behind dryer Move dryer away...
... the load. If loads are wrinkled The load was not removed from bottom of the dryer. Fabric softener sheets added to garment care label instructions. Loads are consistently ending too early, see also "Changing the Automatic Cycle settings to complete the cool down portion of the cycle before removing the load. Ventilate the area. Rewash and dry the clothing. Allow the dryer to increase or decrease drying time." wall behind dryer Move dryer away...

Use & Care Guide
Page 16
... no line voltage condition) There may be a problem with an "F" appears in need of the dryer. NOTE: This error will clear. 16 Try the following: Check to restart the dryer. Replace the fuse or reset the circuit breaker. "F# E#" (F1 E1, F3 E1, etc.) variable service codes The dryer is properly seated. Touch any pad to clear the code from turning on. Select a Timed Dry heated cycle, and restart the dryer. NOTE: The Control Lock...
... no line voltage condition) There may be a problem with an "F" appears in need of the dryer. NOTE: This error will clear. 16 Try the following: Check to restart the dryer. Replace the fuse or reset the circuit breaker. "F# E#" (F1 E1, F3 E1, etc.) variable service codes The dryer is properly seated. Touch any pad to clear the code from turning on. Select a Timed Dry heated cycle, and restart the dryer. NOTE: The Control Lock...
Use & Care Guide
Page 17
... authorized Whirlpool servicer is reported to correct improper product maintenance or installation, installation not in materials or workmanship that comes with servicing, removal, or replacement of God, or use inconsistent with original model/serial numbers removed, altered, or not easily determined. Damage from the date of the original unit's warranty period. Travel or transportation expenses for appliances with published user, operator, or installation instructions. 2. This warranty gives you specific legal rights, and...
... authorized Whirlpool servicer is reported to correct improper product maintenance or installation, installation not in materials or workmanship that comes with servicing, removal, or replacement of God, or use inconsistent with original model/serial numbers removed, altered, or not easily determined. Damage from the date of the original unit's warranty period. Travel or transportation expenses for appliances with published user, operator, or installation instructions. 2. This warranty gives you specific legal rights, and...


