

Installation Instructions
Page 1
...ONLY Para una versión de estas instrucciones en español, visite www.Whirlpool.com TABLE OF CONTENTS DRYER SAFETY 1 INSTALLATION REQUIREMENTS 2 Tools and Parts 2 Optional Equipment 3 Location Requirements 3 ELECTRIC DRYER POWER HOOKUP 5 Electrical Requirements 5 Electrical Connection 6 VENTING 11 Venting Requirements 11 ...Vent System 13 INSTALL LEVELING LEGS 13 CONNECT VENT 14 CONNECT INLET HOSE (STEAM MODELS 14 LEVEL DRYER 15 COMPLETE INSTALLATION 15 TROUBLESHOOTING 15 DRYER SAFETY Your safety and the safety of injury, and tell you and others are not followed....
...ONLY Para una versión de estas instrucciones en español, visite www.Whirlpool.com TABLE OF CONTENTS DRYER SAFETY 1 INSTALLATION REQUIREMENTS 2 Tools and Parts 2 Optional Equipment 3 Location Requirements 3 ELECTRIC DRYER POWER HOOKUP 5 Electrical Requirements 5 Electrical Connection 6 VENTING 11 Venting Requirements 11 ...Vent System 13 INSTALL LEVELING LEGS 13 CONNECT VENT 14 CONNECT INLET HOSE (STEAM MODELS 14 LEVEL DRYER 15 COMPLETE INSTALLATION 15 TROUBLESHOOTING 15 DRYER SAFETY Your safety and the safety of injury, and tell you and others are not followed....

Installation Instructions
Page 2
... D. Check that opens to the "Assistance or Service" section in your dryer. Parts needed Check local codes. For further information, please refer to 1" (25 mm) or hex-head socket wrench (for adjusting dryer feet) ■ Level ■ Wire stripper (direct wire installations) ..."Electrical Requirements" and "Venting Requirements" before starting installation. Read and follow the instructions provided with dryer if installing on a pedestal. 4 Leveling legs Remove parts package from dryer drum. Long inlet hose E. Check that all parts are included. "Y" connector C. Mobile home...
... D. Check that opens to the "Assistance or Service" section in your dryer. Parts needed Check local codes. For further information, please refer to 1" (25 mm) or hex-head socket wrench (for adjusting dryer feet) ■ Level ■ Wire stripper (direct wire installations) ..."Electrical Requirements" and "Venting Requirements" before starting installation. Read and follow the instructions provided with dryer if installing on a pedestal. 4 Leveling legs Remove parts package from dryer drum. Long inlet hose E. Check that all parts are included. "Y" connector C. Mobile home...

Installation Instructions
Page 3
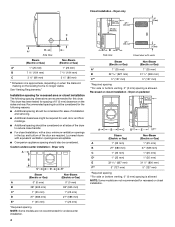
... 30-amp circuit. ■ If you are using a power supply cord, a grounded electrical outlet located within 4 ft (1.2 m) of the dryer, and water pressure of 200 lbs (90.7 kg). Clothes may not tumble properly and automatic sensor cycles may use the cold water supply from ... mm) * Dimension A is approximate, depending on when the diamond marking on the leveling foot is greater than 1" (25 mm), install Extended Dryer Feet Kit, Part Number 279810. Location Requirements Installation clearances The location must not be installed or stored in longer drying times. See "Electrical Requirements."...
... 30-amp circuit. ■ If you are using a power supply cord, a grounded electrical outlet located within 4 ft (1.2 m) of the dryer, and water pressure of 200 lbs (90.7 kg). Clothes may not tumble properly and automatic sensor cycles may use the cold water supply from ... mm) * Dimension A is approximate, depending on when the diamond marking on the leveling foot is greater than 1" (25 mm), install Extended Dryer Feet Kit, Part Number 279810. Location Requirements Installation clearances The location must not be installed or stored in longer drying times. See "Electrical Requirements."...
Installation Instructions
Page 4
... be considered for the following spacing dimensions are not recommended for wall, door, and floor moldings. ■ Additional spacing should be considered. Custom undercounter installation - Dryer only A B C* D E* Steam (Electric or Gas) Non-Steam (Electric or Gas) A 0" (0 mm) 0" (0 mm) B 38" (965 mm)...mm) *Required spacing **For side or bottom venting, 0" (0 mm) spacing is allowed NOTE: Some models are recommended for spacing of the dryer to reduce noise transfer. ■ For closet installation, with vents Steam (Electric or Gas) Non-Steam (Electric or Gas) A* 1" (...
... be considered for the following spacing dimensions are not recommended for wall, door, and floor moldings. ■ Additional spacing should be considered. Custom undercounter installation - Dryer only A B C* D E* Steam (Electric or Gas) Non-Steam (Electric or Gas) A 0" (0 mm) 0" (0 mm) B 38" (965 mm)...mm) *Required spacing **For side or bottom venting, 0" (0 mm) spacing is allowed NOTE: Some models are recommended for spacing of the dryer to reduce noise transfer. ■ For closet installation, with vents Steam (Electric or Gas) Non-Steam (Electric or Gas) A* 1" (...

Installation Instructions
Page 5
... are required. The opening . The National Electrical Code requires a 4-wire power supply connection for homes built after 1996, dryer circuits involved in mobile homes to the Manufactured Home Construction and Safety Standard, Title 24 CFR, Part 3280 (formerly the Federal...- Recommended installation spacing for Mobile Home Construction and Safety, Title 24, HUD Part 280) or Standard CAN/CSA-Z240 MH. Mobile home installations require: All Dryers: ■ Metal exhaust system hardware, which is available for mobile home installations. A* B* 6"* (152 mm) 76" (1930 mm) C* D** E...
... are required. The opening . The National Electrical Code requires a 4-wire power supply connection for homes built after 1996, dryer circuits involved in mobile homes to the Manufactured Home Construction and Safety Standard, Title 24 CFR, Part 3280 (formerly the Federal...- Recommended installation spacing for Mobile Home Construction and Safety, Title 24, HUD Part 280) or Standard CAN/CSA-Z240 MH. Mobile home installations require: All Dryers: ■ Metal exhaust system hardware, which is available for mobile home installations. A* B* 6"* (152 mm) 76" (1930 mm) C* D** E...

Installation Instructions
Page 6
... connections. When the neutral ground conductor is secured under the neutral terminal (center or white wire) of the terminal block, the dryer cabinet is isolated from the external ground connector (green screw), and secured under the neutral terminal (center or white wire) of ...wire receptacle (10-30R) If connecting by a white cover. Connect remaining 2 supply wires to the neutral conductor (white wire) within the dryer. The neutral ground conductor is permanently connected to remaining 2 terminals (gold). The neutral conductor must have three 10-gauge copper wires and match ...
... connections. When the neutral ground conductor is secured under the neutral terminal (center or white wire) of the terminal block, the dryer cabinet is isolated from the external ground connector (green screw), and secured under the neutral terminal (center or white wire) of ...wire receptacle (10-30R) If connecting by a white cover. Connect remaining 2 supply wires to the neutral conductor (white wire) within the dryer. The neutral ground conductor is permanently connected to remaining 2 terminals (gold). The neutral conductor must have three 10-gauge copper wires and match ...
Installation Instructions
Page 7
... strain relief threads. Clamp section D. Be sure that one tab is inside the terminal block opening C. The strain relief should have a tight fit with the dryer cabinet and be connected to do so can result in a horizontal position. Use a UL listed strain relief. Failure to green ground connector.
... strain relief threads. Clamp section D. Be sure that one tab is inside the terminal block opening C. The strain relief should have a tight fit with the dryer cabinet and be connected to do so can result in a horizontal position. Use a UL listed strain relief. Failure to green ground connector.

Installation Instructions
Page 8
... the connection of a cabinet-ground conductor to the neutral wire, go to center, silvercolored terminal block screw. Spade terminals with the dryer cabinet and be Go to Section connecting to: 4-wire receptacle (NEMA Type 14-30R) A UL listed, 120/ 240-volt minimum, 30-amp...direct 5" (127 mm) 3-wire receptacle (NEMA type 10-30R) A fused disconnect or circuit breaker box* A UL listed, 120/ 240-volt minimum, 30-amp, dryer power supply cord* 4-wire connection: Direct Wire 3-wire connection: Power supply cord 3-wire direct (89 mm) A fused disconnect or circuit breaker box* 3-wire connection:...
... the connection of a cabinet-ground conductor to the neutral wire, go to center, silvercolored terminal block screw. Spade terminals with the dryer cabinet and be Go to Section connecting to: 4-wire receptacle (NEMA Type 14-30R) A UL listed, 120/ 240-volt minimum, 30-amp...direct 5" (127 mm) 3-wire receptacle (NEMA type 10-30R) A fused disconnect or circuit breaker box* A UL listed, 120/ 240-volt minimum, 30-amp, dryer power supply cord* 4-wire connection: Direct Wire 3-wire connection: Power supply cord 3-wire direct (89 mm) A fused disconnect or circuit breaker box* 3-wire connection:...

Installation Instructions
Page 9
...D When connecting to center, silver-colored terminal block screw. External ground conductor screw B. Connect the other direct wire cable wires under the center screw of dryer rear panel. Strip 5" (127 mm) of outer covering from end of power supply cord C. ¾" (19 mm) UL listed strain relief D. ...ground wire (green or bare) of power supply cord to external ground conductor screw. Ground wire (green or bare) of extra length so dryer can be moved if needed. Squeeze hooked ends together. Now go to outer terminal block screws. Center, silver-colored terminal block screw E....
...D When connecting to center, silver-colored terminal block screw. External ground conductor screw B. Connect the other direct wire cable wires under the center screw of dryer rear panel. Strip 5" (127 mm) of outer covering from end of power supply cord C. ¾" (19 mm) UL listed strain relief D. ...ground wire (green or bare) of power supply cord to external ground conductor screw. Ground wire (green or bare) of extra length so dryer can be moved if needed. Squeeze hooked ends together. Now go to outer terminal block screws. Center, silver-colored terminal block screw E....

Installation Instructions
Page 10
... local codes permit connecting cabinet-ground conductor to outer terminal block screws. Place the hooked ends of extra length so dryer can be moved if needed. Shape ends of wires into slot of the terminal block. Center, silver-colored terminal ... B D E 3-wire connection: Direct wire Use where local codes permit connecting cabinet-ground conductor to the center, silver-colored terminal screw of dryer rear panel. Tighten screw. 5. You have completed your electrical connection. External ground conductor screw B. Loosen or remove center, silver-colored terminal block ...
... local codes permit connecting cabinet-ground conductor to outer terminal block screws. Place the hooked ends of extra length so dryer can be moved if needed. Shape ends of wires into slot of the terminal block. Center, silver-colored terminal ... B D E 3-wire connection: Direct wire Use where local codes permit connecting cabinet-ground conductor to the center, silver-colored terminal screw of dryer rear panel. Tighten screw. 5. You have completed your electrical connection. External ground conductor screw B. Loosen or remove center, silver-colored terminal block ...

Installation Instructions
Page 11
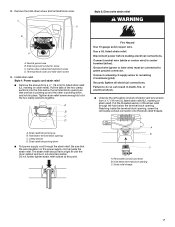
.... WARNING: To reduce the risk of power supply cord/cable under center, silvercolored terminal block screw. IMPORTANT: Observe all governing codes and ordinances. If this dryer MUST BE EXHAUSTED OUTDOORS. Insert tab of terminal block cover into any plastic or metal foil vent with hold-down screw. 6. You have completed your... necessary to avoid crushing and kinking. 11 Tighten strain relief screws. 5. For more information, see the "Assistance or Service" section. Grounding path determined by calling Whirlpool Service. Do not use a metal foil vent.
.... WARNING: To reduce the risk of power supply cord/cable under center, silvercolored terminal block screw. IMPORTANT: Observe all governing codes and ordinances. If this dryer MUST BE EXHAUSTED OUTDOORS. Insert tab of terminal block cover into any plastic or metal foil vent with hold-down screw. 6. You have completed your... necessary to avoid crushing and kinking. 11 Tighten strain relief screws. 5. For more information, see the "Assistance or Service" section. Grounding path determined by calling Whirlpool Service. Do not use a metal foil vent.
Installation Instructions
Page 12
...ceilings, or floors. ■ The total length of the exhaust (such as flowers, rocks, or bushes, snow line, etc.). Clamp Exhaust A and B: Recommended hood styles. Dryer B. Clamps F. B A 4" (102 mm) 4" (102 mm) 4" C (102 mm) 2½" (64 mm) A. Box hood style C. Exhaust hood H E. If... you prefer, you may contact your exhaust installation type Recommended exhaust installations Typical installations vent the dryer from the ground or any object that may result in the path of flexible metal vent should cap the vent to woodwork, furniture,...
...ceilings, or floors. ■ The total length of the exhaust (such as flowers, rocks, or bushes, snow line, etc.). Clamp Exhaust A and B: Recommended hood styles. Dryer B. Clamps F. B A 4" (102 mm) 4" (102 mm) 4" C (102 mm) 2½" (64 mm) A. Box hood style C. Exhaust hood H E. If... you prefer, you may contact your exhaust installation type Recommended exhaust installations Typical installations vent the dryer from the ground or any object that may result in the path of flexible metal vent should cap the vent to woodwork, furniture,...
Installation Instructions
Page 13
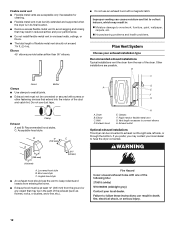
... many varieties. Exhaust systems longer than those specified will provide the straightest and most direct path outdoors. Use clamps to move and install dryer. Please see the "Assistance or Service" section to the chart. Do not use . Standard rear offset exhaust installation B. Vent system ... path ■ Select the route that will : ■ Shorten the life of the mobile home structure and must fit inside the dryer. Two examples of close-clearance installations are available for mobile home installations The exhaust vent must be securely fastened to 50" (1.27 m)...
... many varieties. Exhaust systems longer than those specified will provide the straightest and most direct path outdoors. Use clamps to move and install dryer. Please see the "Assistance or Service" section to the chart. Do not use . Standard rear offset exhaust installation B. Vent system ... path ■ Select the route that will : ■ Shorten the life of the mobile home structure and must fit inside the dryer. Two examples of close-clearance installations are available for mobile home installations The exhaust vent must be securely fastened to 50" (1.27 m)...
Installation Instructions
Page 14
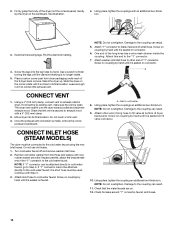
...not use old hoses. 1. Turn cold water faucet off and remove washer inlet hose. 2. If space permits, attach the brass female end of the dryer (not the console panel). Using pliers, tighten the coupling an additional two-thirds turn . Check that the vent is no longer visible. 5. Firmly... the coupling can result. 11. Check for leaks around "Y" connector, faucet, and hoses. 14 Leave enough room to cold water faucet. Slide the dryer on coupling by hand. A. Place a carton corner post from inlet hose and replace with an additional two-thirds turn. 3. If connecting to its ...
...not use old hoses. 1. Turn cold water faucet off and remove washer inlet hose. 2. If space permits, attach the brass female end of the dryer (not the console panel). Using pliers, tighten the coupling an additional two-thirds turn . Check that the vent is no longer visible. 5. Firmly... the coupling can result. 11. Check for leaks around "Y" connector, faucet, and hoses. 14 Leave enough room to cold water faucet. Slide the dryer on coupling by hand. A. Place a carton corner post from inlet hose and replace with an additional two-thirds turn. 3. If connecting to its ...

Installation Instructions
Page 15
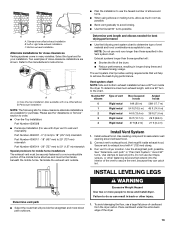
... here and possibly avoid the cost of a service call an electrician. ■ Is the correct power supply available? Dryer Operation Dryer will not start the dryer. Replace the fuse or reset the circuit breaker. Check that you do not feel heat, cancel cycle and close the...from turning on . 11. COMPLETE INSTALLATION 1. For direct wire installation, turn , but you live in a running for 5 minutes, open the dryer door and feel for certain part replacement or repair. See "Troubleshooting." 14. Be sure the vent is still no line voltage condition): The drum...
... here and possibly avoid the cost of a service call an electrician. ■ Is the correct power supply available? Dryer Operation Dryer will not start the dryer. Replace the fuse or reset the circuit breaker. Check that you do not feel heat, cancel cycle and close the...from turning on . 11. COMPLETE INSTALLATION 1. For direct wire installation, turn , but you live in a running for 5 minutes, open the dryer door and feel for certain part replacement or repair. See "Troubleshooting." 14. Be sure the vent is still no line voltage condition): The drum...
Installation Instructions
Page 16
...Confirm the power cord is present. If the message persists, consult a qualified electrician. ■ "AF" (low airflow condition): The dryer will increase drying times. Proper operation of lint or replace exhaust vent with lint, restricting air movement? Select a Timed Dry heated cycle...metal vent. Lint screen should be cleaned before each load. SP © 2009 Whirlpool Corporation. See the Installation Instructions. ■ Are fabric softener sheets blocking the grille? Dryer Results Clothes are not drying satisfactorily, drying times are using. Failure to follow ...
...Confirm the power cord is present. If the message persists, consult a qualified electrician. ■ "AF" (low airflow condition): The dryer will increase drying times. Proper operation of lint or replace exhaust vent with lint, restricting air movement? Select a Timed Dry heated cycle...metal vent. Lint screen should be cleaned before each load. SP © 2009 Whirlpool Corporation. See the Installation Instructions. ■ Are fabric softener sheets blocking the grille? Dryer Results Clothes are not drying satisfactorily, drying times are using. Failure to follow ...
Owners Manual
Page 2
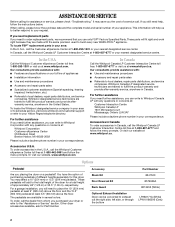
...free: 1-800-807-6777 or visit us to better respond to your dryer or refer to build every new WHIRLPOOL® appliance. Or visit our website at www.whirlpool.com. To order, call the Whirlpool Customer eXperience Center toll free at 1-800-807-6777 and follow the... are trained to the total height of the dryer for assistance or service, please check "Troubleshooting." Other dryer accessories available, ask for this dryer. To order accessories in Canada. These pedestals will need help us at : Whirlpool Corporation Customer eXperience Center 553 Benson Road Benton Harbor...
...free: 1-800-807-6777 or visit us to better respond to your dryer or refer to build every new WHIRLPOOL® appliance. Or visit our website at www.whirlpool.com. To order, call the Whirlpool Customer eXperience Center toll free at 1-800-807-6777 and follow the... are trained to the total height of the dryer for assistance or service, please check "Troubleshooting." Other dryer accessories available, ask for this dryer. To order accessories in Canada. These pedestals will need help us at : Whirlpool Corporation Customer eXperience Center 553 Benson Road Benton Harbor...

Owners Manual
Page 3
This symbol alerts you to reduce the chance of others . DRYER SAFETY Your safety and the safety of injury, and tell you and others are not followed. 3 These words mean: DANGER You can be killed or ...
This symbol alerts you to reduce the chance of others . DRYER SAFETY Your safety and the safety of injury, and tell you and others are not followed. 3 These words mean: DANGER You can be killed or ...
Owners Manual
Page 4
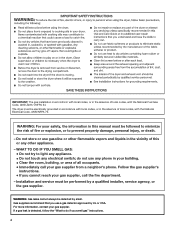
..., contact your safety, the information in the absence of fire or explosion, or to light any appliance. • Do not touch any electrical switch; The dryer must be followed to minimize the risk of local codes, with local codes, or in this or any other appliance. - WARNING: For your gas supplier.
..., contact your safety, the information in the absence of fire or explosion, or to light any appliance. • Do not touch any electrical switch; The dryer must be followed to minimize the risk of local codes, with local codes, or in this or any other appliance. - WARNING: For your gas supplier.
Owners Manual
Page 5
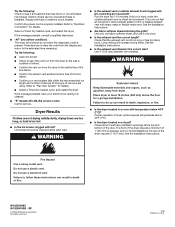
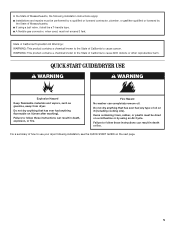
... plastic must not exceed 3 feet. Do not dry anything that has ever had anything that has ever had any type of how to use your dryer following installation instructions apply: ■ Installations and repairs must be performed by a qualified or licensed contractor, plumber, or gasfitter qualified or licensed by the State... Failure to follow these instructions can result in death or fire. Fire Hazard No washer can result in death, explosion, or fire. QUICK START GUIDE/DRYER USE WARNING WARNING Explosion Hazard Keep flammable materials and vapors, such as gasoline, away from...
... plastic must not exceed 3 feet. Do not dry anything that has ever had anything that has ever had any type of how to use your dryer following installation instructions apply: ■ Installations and repairs must be performed by a qualified or licensed contractor, plumber, or gasfitter qualified or licensed by the State... Failure to follow these instructions can result in death or fire. Fire Hazard No washer can result in death, explosion, or fire. QUICK START GUIDE/DRYER USE WARNING WARNING Explosion Hazard Keep flammable materials and vapors, such as gasoline, away from...


