
Installation Instructions
Page 1
...ONLY Para una versión de estas instrucciones en español, visite www.Whirlpool.com TABLE OF CONTENTS DRYER SAFETY 1 INSTALLATION REQUIREMENTS 2 Tools and Parts 2 Optional Equipment 3 Location Requirements 3 ELECTRIC DRYER POWER HOOKUP 5 Electrical Requirements 5 Electrical Connection 6 VENTING 11 Venting Requirements 11 ...12 Install Vent System 13 INSTALL LEVELING LEGS 13 CONNECT VENT 14 CONNECT INLET HOSE (STEAM MODELS 14 LEVEL DRYER 15 COMPLETE INSTALLATION 15 TROUBLESHOOTING 15 DRYER SAFETY Your safety and the safety of injury, and tell you what the potential ...
...ONLY Para una versión de estas instrucciones en español, visite www.Whirlpool.com TABLE OF CONTENTS DRYER SAFETY 1 INSTALLATION REQUIREMENTS 2 Tools and Parts 2 Optional Equipment 3 Location Requirements 3 ELECTRIC DRYER POWER HOOKUP 5 Electrical Requirements 5 Electrical Connection 6 VENTING 11 Venting Requirements 11 ...12 Install Vent System 13 INSTALL LEVELING LEGS 13 CONNECT VENT 14 CONNECT INLET HOSE (STEAM MODELS 14 LEVEL DRYER 15 COMPLETE INSTALLATION 15 TROUBLESHOOTING 15 DRYER SAFETY Your safety and the safety of injury, and tell you what the potential ...

Installation Instructions
Page 2
...;" nut driver (recommended) ■ Tape measure ■ Pliers Parts supplied Non-Steam Models Steam Models A B C D E A. "Y" connector C. Rubber washer Remove parts package from dryer drum. NOTE: Do not use leveling legs supplied with dryer if installing on a pedestal. 4 Leveling legs Remove parts package from dryer drum. Check that all parts are included. Check that opens to...
...;" nut driver (recommended) ■ Tape measure ■ Pliers Parts supplied Non-Steam Models Steam Models A B C D E A. "Y" connector C. Rubber washer Remove parts package from dryer drum. NOTE: Do not use leveling legs supplied with dryer if installing on a pedestal. 4 Leveling legs Remove parts package from dryer drum. Check that all parts are included. Check that opens to...

Installation Instructions
Page 3
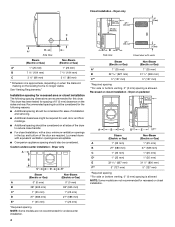
...separate 30-amp circuit. ■ If you are using a power supply cord, a grounded electrical outlet located within 4 ft (1.2 m) of the dryer, and water pressure of the dryer. Check code requirements. Steam (Electric or Gas) A 38" (965 mm) B 32 9/16" (827 mm) C 27" (686 mm) D 52 9/16" ... only: Cold water faucets located within 2 ft (610 mm) of either side of 20-100 psi (137.9-689.6 kPa). Contact your dryer. Venting Dimensions C A* B Back View Steam (Electric or Gas) Non-Steam (Electric or Gas) A* 1" (25 mm) 1" (25 mm) B 14" (356 mm) 14" (356 mm) C 3 7/16" (87...
...separate 30-amp circuit. ■ If you are using a power supply cord, a grounded electrical outlet located within 4 ft (1.2 m) of the dryer, and water pressure of the dryer. Check code requirements. Steam (Electric or Gas) A 38" (965 mm) B 32 9/16" (827 mm) C 27" (686 mm) D 52 9/16" ... only: Cold water faucets located within 2 ft (610 mm) of either side of 20-100 psi (137.9-689.6 kPa). Contact your dryer. Venting Dimensions C A* B Back View Steam (Electric or Gas) Non-Steam (Electric or Gas) A* 1" (25 mm) 1" (25 mm) B 14" (356 mm) 14" (356 mm) C 3 7/16" (87...
Installation Instructions
Page 4
... spacing **For side or bottom venting, 0" (0 mm) spacing is allowed. Recessed or closet installation - Custom undercounter installation - Dryer only (460 mm) C A* B Side View Steam (Electric or Gas) Non-Steam (Electric or Gas) A* 1" (25 mm) 1" (25 mm) B 7 5/8" (194 mm) 7 5/8" (194 mm... spacing should be considered for the following spacing dimensions are acceptable. ■ Companion appliance spacing should be considered. Dryer only A B C* D E* Steam (Electric or Gas) Non-Steam (Electric or Gas) A 0" (0 mm) 0" (0 mm) B 38" (965 mm) 38" (965 mm) C* 1" (...
... spacing **For side or bottom venting, 0" (0 mm) spacing is allowed. Recessed or closet installation - Custom undercounter installation - Dryer only (460 mm) C A* B Side View Steam (Electric or Gas) Non-Steam (Electric or Gas) A* 1" (25 mm) 1" (25 mm) B 7 5/8" (194 mm) 7 5/8" (194 mm... spacing should be considered for the following spacing dimensions are acceptable. ■ Companion appliance spacing should be considered. Dryer only A B C* D E* Steam (Electric or Gas) Non-Steam (Electric or Gas) A 0" (0 mm) 0" (0 mm) B 38" (965 mm) 38" (965 mm) C* 1" (...

Installation Instructions
Page 5
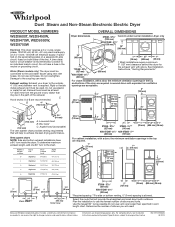
...opening . A copy of the cabinet are not recommended for stacked recessed or closet installation. A* B* 6"* (152 mm) 76" (1930 mm) C* D** E F* G H I Steam (Electric or Gas) Non-Steam (Electric or Gas) A* 7" (178 mm) 7" (178 mm) B* 7" (178 mm) 7" (178 mm) C* 9" (229 mm) 9" (229 mm) D** 5" ... installation spacing for cabinet installation NOTE: Some models are not recommended for cabinet installation. ■ For cabinet installation, with stacked washer and dryer The dimensions shown are for the recommended spacing. 48 in.2 * (310 cm2) 3"* (76 mm) 24 in.2 * (155 cm2...
...opening . A copy of the cabinet are not recommended for stacked recessed or closet installation. A* B* 6"* (152 mm) 76" (1930 mm) C* D** E F* G H I Steam (Electric or Gas) Non-Steam (Electric or Gas) A* 7" (178 mm) 7" (178 mm) B* 7" (178 mm) 7" (178 mm) C* 9" (229 mm) 9" (229 mm) D** 5" ... installation spacing for cabinet installation NOTE: Some models are not recommended for cabinet installation. ■ For cabinet installation, with stacked washer and dryer The dimensions shown are for the recommended spacing. 48 in.2 * (310 cm2) 3"* (76 mm) 24 in.2 * (155 cm2...
Installation Instructions
Page 14
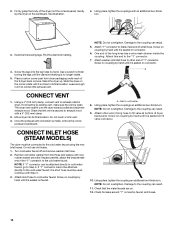
...water faucet using the new inlet hoses. Screw on coupling by hand until it is no longer visible. 5. CONNECT INLET HOSE (STEAM MODELS) The dryer must be attached directly to cold water faucet, go to existing vent, make sure the vent is seated on connector. If space ...to the "Y" connector. 7. If connecting to Step 6. NOTE: If "Y" connector can result. 5. Using pliers, tighten the couplings with Step 3. 3. The dryer vent must be attached directly to exhaust hood with new rubber washer provided. NOTE: Do not overtighten. Attach other end of long hose to cold...
...water faucet using the new inlet hoses. Screw on coupling by hand until it is no longer visible. 5. CONNECT INLET HOSE (STEAM MODELS) The dryer must be attached directly to cold water faucet, go to existing vent, make sure the vent is seated on connector. If space ...to the "Y" connector. 7. If connecting to Step 6. NOTE: If "Y" connector can result. 5. Using pliers, tighten the couplings with Step 3. 3. The dryer vent must be attached directly to exhaust hood with new rubber washer provided. NOTE: Do not overtighten. Attach other end of long hose to cold...

Installation Instructions
Page 15
...are intact and tight, or that the dryer is first heated. If the dryer is not crushed or kinked. 5. Use a wrench to remove any dust. 8. If there is closed. Dispose of the dryer. Check that both fuses are now installed. Read "Dryer Use." 9. Steam Models Only: 10. If you feel... for 5 minutes, open the dryer door and feel heat, cancel cycle and close the door. Excessive scale buildup may ...
...are intact and tight, or that the dryer is first heated. If the dryer is not crushed or kinked. 5. Use a wrench to remove any dust. 8. If there is closed. Dispose of the dryer. Check that both fuses are now installed. Read "Dryer Use." 9. Steam Models Only: 10. If you feel... for 5 minutes, open the dryer door and feel heat, cancel cycle and close the door. Excessive scale buildup may ...
Dimension Guide
Page 1
... sides of elbows and turns. A time-delay fuse or circuit breaker is recommended. Connect to the coupling can result. Water (Steam models only): The dryer must be used. Do not use plastic or metal foil vet. Rigid or flexible metal exhaust vent must be in vent length ...Use the fewest 90° turns possible.Do not use the fewest number of the line. Determine the number of the exhaust. Because Whirlpool Corporation policy includes a continuous commitment to improve our products, we reserve the right to change materials and specifications without notice. Dimensions are ...
... sides of elbows and turns. A time-delay fuse or circuit breaker is recommended. Connect to the coupling can result. Water (Steam models only): The dryer must be used. Do not use plastic or metal foil vet. Rigid or flexible metal exhaust vent must be in vent length ...Use the fewest 90° turns possible.Do not use the fewest number of the line. Determine the number of the exhaust. Because Whirlpool Corporation policy includes a continuous commitment to improve our products, we reserve the right to change materials and specifications without notice. Dimensions are ...
Owners Manual
Page 7
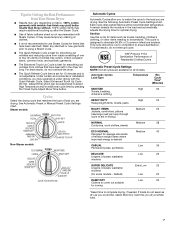
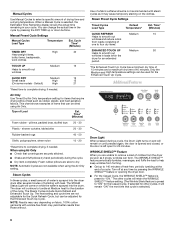
...Lingerie, blouses, washable woolens (On some models - For best results, do not interrupt cycle. Tips for Getting the Best Performance from Your Steam Dryer ■ Results may vary depending on all cycles are available on fabric. 100% cotton garments with wrinkle-free finish may yield better results... loads consisting of one to use Steam Cycles for items that have been left in the dryer too long. It may experience under drying with the Quick Refresh Cycle. See Automatic Preset or Manual Preset Cycle Settings chart. Steam models Non-Steam models Cycle Control knob Automatic Cycles...
...Lingerie, blouses, washable woolens (On some models - For best results, do not interrupt cycle. Tips for Getting the Best Performance from Your Steam Dryer ■ Results may vary depending on all cycles are available on fabric. 100% cotton garments with wrinkle-free finish may yield better results... loads consisting of one to use Steam Cycles for items that have been left in the dryer too long. It may experience under drying with the Quick Refresh Cycle. See Automatic Preset or Manual Preset Cycle Settings chart. Steam models Non-Steam models Cycle Control knob Automatic Cycles...
Owners Manual
Page 8
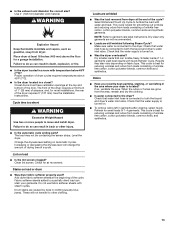
...such as it stops, wrinkles can be dried using the Air Only setting. The STEAM Status Light will retain the WRINKLE SHIELD™ feature setting. (The Wrinkle Shield feature is sprayed into the dryer drum after several minutes of the cycle. NOTE: Results may cause temporary staining ...with heat. Foam rubber pillows are not adjustable for the Quick Refresh Cycle, but can form. Steam Cycles In these cycles, a small amount of a fabric softener sheet is selected.) 8 The dryer will remain "ON" the next time that coverings are unable to help keep wrinkles from loads ...
...such as it stops, wrinkles can be dried using the Air Only setting. The STEAM Status Light will retain the WRINKLE SHIELD™ feature setting. (The Wrinkle Shield feature is sprayed into the dryer drum after several minutes of the cycle. NOTE: Results may cause temporary staining ...with heat. Foam rubber pillows are not adjustable for the Quick Refresh Cycle, but can form. Steam Cycles In these cycles, a small amount of a fabric softener sheet is selected.) 8 The dryer will remain "ON" the next time that coverings are unable to help keep wrinkles from loads ...

Owners Manual
Page 10
... with a damp cloth. 4. Apply paste to stop before each load. Removing Accumulated Lint From Inside the Dryer Cabinet Lint should : 1. Non-Use or Storage Care Operate your dryer during removal, check the exhaust hood and remove the lint. If you are removed. 3. Clean lint screen...laundry detergent and very warm water. 2. Wipe drum thoroughly with your dryer where it . Vacation, Storage, and Moving Care Install and store your fingers. Doing so can increase drying time. Unplug dryer or disconnect power. 2. Steam models only: Turn off the water supply to remove lint.
... with a damp cloth. 4. Apply paste to stop before each load. Removing Accumulated Lint From Inside the Dryer Cabinet Lint should : 1. Non-Use or Storage Care Operate your dryer during removal, check the exhaust hood and remove the lint. If you are removed. 3. Clean lint screen...laundry detergent and very warm water. 2. Wipe drum thoroughly with your dryer where it . Vacation, Storage, and Moving Care Install and store your fingers. Doing so can increase drying time. Unplug dryer or disconnect power. 2. Steam models only: Turn off the water supply to remove lint.

Owners Manual
Page 11
... faucet. 4. Use masking tape to your inlet hoses, record the date of hose failure. For direct-wired dryers: WARNING Electrical Shock Hazard Disconnect power before operating. Steam models only: Shut off water faucet. 3. Periodically inspect and replace inlet hoses if bulges, kinks, cuts, ... fuse. 11 Make sure leveling legs are secure in the lower right corner of use dryer again 1. Replace all parts and panels before servicing. Electric dryers require 240-volt power supply. Steam models only: Disconnect the water inlet hose from faucet, then drain the hose. Check ...
... faucet. 4. Use masking tape to your inlet hoses, record the date of hose failure. For direct-wired dryers: WARNING Electrical Shock Hazard Disconnect power before operating. Steam models only: Shut off water faucet. 3. Periodically inspect and replace inlet hoses if bulges, kinks, cuts, ... fuse. 11 Make sure leveling legs are secure in the lower right corner of use dryer again 1. Replace all parts and panels before servicing. Electric dryers require 240-volt power supply. Steam models only: Disconnect the water inlet hose from faucet, then drain the hose. Check ...
Owners Manual
Page 13
... knits and synthetic garments. Failure to do so can stain your dryer is connected to tumble the load with temperature below 45ºF (7ºC)? Clean lint screen. Drum stains are still wrinkled following Steam Cycle? This cycle is turned on fabric type. Results may not...? If so, ventilate the area. Check that can tumble freely. Add dryer fabric softener sheets at the end of 1-4 garments yield best results with steam cycles. See the Installation Instructions. NOTE: Refer to the dryer? ■ Is the exhaust vent diameter the correct size? Dry smaller...
... knits and synthetic garments. Failure to do so can stain your dryer is connected to tumble the load with temperature below 45ºF (7ºC)? Clean lint screen. Drum stains are still wrinkled following Steam Cycle? This cycle is turned on fabric type. Results may not...? If so, ventilate the area. Check that can tumble freely. Add dryer fabric softener sheets at the end of 1-4 garments yield best results with steam cycles. See the Installation Instructions. NOTE: Refer to the dryer? ■ Is the exhaust vent diameter the correct size? Dry smaller...


