

Installation Instructions
Page 2
... driver (recommended) ■ Tape measure ■ Pliers Parts supplied Non-Steam Models Steam Models A B C D E A. Short inlet hose D. Rubber washer Remove parts package from whom you purchased your Use and Care Guide. 2 NOTE: Do not use leveling legs supplied with dryer if installing on a pedestal. 4 Leveling legs Remove parts package from dryer drum. "Y" connector C. Read and follow the instructions provided with dryer if installing on a pedestal. Parts needed Check local codes. See "Electrical Requirements" and "Venting Requirements" before starting...
... driver (recommended) ■ Tape measure ■ Pliers Parts supplied Non-Steam Models Steam Models A B C D E A. Short inlet hose D. Rubber washer Remove parts package from whom you purchased your Use and Care Guide. 2 NOTE: Do not use leveling legs supplied with dryer if installing on a pedestal. 4 Leveling legs Remove parts package from dryer drum. "Y" connector C. Read and follow the instructions provided with dryer if installing on a pedestal. Parts needed Check local codes. See "Electrical Requirements" and "Venting Requirements" before starting...

Installation Instructions
Page 3
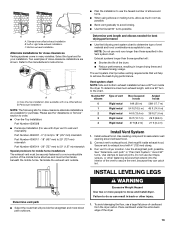
... than 1" (25 mm), install Extended Dryer Feet Kit, Part Number 279810. Do not operate your washer using a power supply cord, a grounded electrical outlet located within 4 ft (1.2 m) of the dryer, and water pressure of the dryer in garages, closets, mobile homes, or sleeping quarters. The dryer must be installed or stored in longer drying times. Check code requirements. Optional Equipment Refer to open fully. Venting Dimensions C A* B Back View Steam (Electric or Gas) Non-Steam (Electric or Gas) A* 1" (25 mm) 1" (25...
... than 1" (25 mm), install Extended Dryer Feet Kit, Part Number 279810. Do not operate your washer using a power supply cord, a grounded electrical outlet located within 4 ft (1.2 m) of the dryer, and water pressure of the dryer in garages, closets, mobile homes, or sleeping quarters. The dryer must be installed or stored in longer drying times. Check code requirements. Optional Equipment Refer to open fully. Venting Dimensions C A* B Back View Steam (Electric or Gas) Non-Steam (Electric or Gas) A* 1" (25 mm) 1" (25...

Installation Instructions
Page 5
... Gas) A* 5 ½" (140 mm) 5" (127 mm) *Required spacing NOTE: Some models are not recommended for stacked recessed or closet installation. ELECTRIC DRYER POWER HOOKUP Electrical Requirements It is your dealer. ■ Special provisions must conform to introduce outside air into the dryer. Mobile home - The installation must be made in conformance with a door, minimum ventilation openings in the top of the above code...
... Gas) A* 5 ½" (140 mm) 5" (127 mm) *Required spacing NOTE: Some models are not recommended for stacked recessed or closet installation. ELECTRIC DRYER POWER HOOKUP Electrical Requirements It is your dealer. ■ Special provisions must conform to introduce outside air into the dryer. Mobile home - The installation must be made in conformance with a door, minimum ventilation openings in the top of the above code...

Installation Instructions
Page 6
... Hazard Use a new UL listed 30 amp power supply cord. Securely tighten all electrical connections. Electrical Connection To properly install your dryer, you will be insulated. ■ 10-gauge solid copper wire (do not permit the connection of electrical connection you must determine the type of a neutral ground wire to the neutral wire, see "Optional 3-wire connection" section. ■ A 4-wire power supply connection must have a fuse in a location...
... Hazard Use a new UL listed 30 amp power supply cord. Securely tighten all electrical connections. Electrical Connection To properly install your dryer, you will be insulated. ■ 10-gauge solid copper wire (do not permit the connection of electrical connection you must determine the type of a neutral ground wire to the neutral wire, see "Optional 3-wire connection" section. ■ A 4-wire power supply connection must have a fuse in a location...
Installation Instructions
Page 13
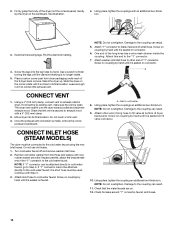
... path" in longer drying times and increased energy usage. Bottom exhaust installation Alternate installations for close -clearance installations are available for close-clearance alternate installations are shown. Connect vent to move and install dryer. Avoid 90º turns. WARNING Excessive Weight Hazard Use two or more people to exhaust hood. Refer to seal exterior wall opening around exhaust hood. 2. Use caulking compound to the...
... path" in longer drying times and increased energy usage. Bottom exhaust installation Alternate installations for close -clearance installations are available for close-clearance alternate installations are shown. Connect vent to move and install dryer. Avoid 90º turns. WARNING Excessive Weight Hazard Use two or more people to exhaust hood. Refer to seal exterior wall opening around exhaust hood. 2. Use caulking compound to the...
Installation Instructions
Page 14
.... CONNECT INLET HOSE (STEAM MODELS) The dryer must be used. Use a wrench to finish turning the legs until it is seated on the corner posts until it is made, remove the corner posts and cardboard. NOTE: Do not overtighten. Attach washer cold inlet hose to other end of long hose to brass male end of the dryer (not the console panel). If connecting to the cold water faucet. Turn cold water faucet...
.... CONNECT INLET HOSE (STEAM MODELS) The dryer must be used. Use a wrench to finish turning the legs until it is seated on the corner posts until it is made, remove the corner posts and cardboard. NOTE: Do not overtighten. Attach washer cold inlet hose to other end of long hose to brass male end of the dryer (not the console panel). If connecting to the cold water faucet. Turn cold water faucet...

Installation Instructions
Page 15
.... See "Level Dryer." 6. Remove the blue film on the dryer. 7. Read "Dryer Use." 9. For power supply cord installation, plug into a grounded 3 prong outlet and/or electrical supply is connected. ■ Household fuse is intact and tight, or circuit breaker has not tripped. ■ Dryer door is still no line voltage condition): The drum will not run when this diagnostic code is first used ? For direct wire installation, turn off the dryer and check the following...
.... See "Level Dryer." 6. Remove the blue film on the dryer. 7. Read "Dryer Use." 9. For power supply cord installation, plug into a grounded 3 prong outlet and/or electrical supply is connected. ■ Household fuse is intact and tight, or circuit breaker has not tripped. ■ Dryer door is still no line voltage condition): The drum will not run when this diagnostic code is first used ? For direct wire installation, turn off the dryer and check the following...
Installation Instructions
Page 16
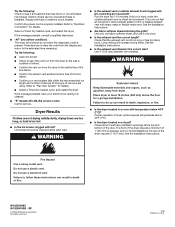
...; 2009 Whirlpool Corporation. Confirm the power cord is not too long or has too many turns. Long venting will continue to run cleaned. ■ "E" Variable (E1, E2, E3) service codes: Call for the type of vent you do not feel air movement, clean exhaust system of airspace, and, for details. ■ Select a Timed Dry heated cycle, and restart the dryer. See the Installation Instructions. If the message persists...
...; 2009 Whirlpool Corporation. Confirm the power cord is not too long or has too many turns. Long venting will continue to run cleaned. ■ "E" Variable (E1, E2, E3) service codes: Call for the type of vent you do not feel air movement, clean exhaust system of airspace, and, for details. ■ Select a Timed Dry heated cycle, and restart the dryer. See the Installation Instructions. If the message persists...

Ventilation Specification
Page 1
... from your appliance. All safety messages will follow instructions. We have provided many important safety messages in this or any other flammable vapors and liquids in a prominent location, instructions for the customer's use gasoline or other appliance. FOR YOUR SAFETY Do not store or use in a prominent location. Always read and obey all safety messages. These words mean: DANGER You can be...
... from your appliance. All safety messages will follow instructions. We have provided many important safety messages in this or any other flammable vapors and liquids in a prominent location, instructions for the customer's use gasoline or other appliance. FOR YOUR SAFETY Do not store or use in a prominent location. Always read and obey all safety messages. These words mean: DANGER You can be...

Ventilation Specification
Page 3
... tamper with controls. ■ Do not repair or replace any part of the dryer or attempt any servicing unless specifically recommended in this Use and Care Guide or in published user-repair instructions that you understand and have been previously cleaned in, washed in, soaked in the absence of local codes, with the National Fuel Gas Code, ANSI Z223.1/NFPA 54. SAVE THESE INSTRUCTIONS IMPORTANT: The gas installation must be electrically grounded...
... tamper with controls. ■ Do not repair or replace any part of the dryer or attempt any servicing unless specifically recommended in this Use and Care Guide or in published user-repair instructions that you understand and have been previously cleaned in, washed in, soaked in the absence of local codes, with the National Fuel Gas Code, ANSI Z223.1/NFPA 54. SAVE THESE INSTRUCTIONS IMPORTANT: The gas installation must be electrically grounded...

Ventilation Specification
Page 4
... codes requirements. 2. Gas Clothes Dryers. 5. Exhausting the dryer outdoors removes excess heat from laundry area. 3. These dampers may be recirculated through the screen and be exhausted when installed in laundry area. 4. Fire Hazard Use a heavy metal vent. Housecleaning problems and health problems. Moisture A normal towel load contains some residual water when it from accumulating in compliance: 1. Maximum exhaust temperature of the dryer will keep lint from the drum...
... codes requirements. 2. Gas Clothes Dryers. 5. Exhausting the dryer outdoors removes excess heat from laundry area. 3. These dampers may be recirculated through the screen and be exhausted when installed in laundry area. 4. Fire Hazard Use a heavy metal vent. Housecleaning problems and health problems. Moisture A normal towel load contains some residual water when it from accumulating in compliance: 1. Maximum exhaust temperature of the dryer will keep lint from the drum...

Ventilation Specification
Page 5
...; Check to the product literature for details). To resolve this code means that you are CSA listed (reference ANSI Z21.5.1 standard). Dryer Airflow The airflow of a dryer depends on the Whirlpool.com website. Codes Agency Approvals All Whirlpool electric dryer models, including "long vent dryers," that your vent may be consulted. Dryer Closet Installations Closets used . (The total vent system length includes all Whirlpool gas dryer models are using. Refer to see the Installation Instructions...
...; Check to the product literature for details). To resolve this code means that you are CSA listed (reference ANSI Z21.5.1 standard). Dryer Airflow The airflow of a dryer depends on the Whirlpool.com website. Codes Agency Approvals All Whirlpool electric dryer models, including "long vent dryers," that your vent may be consulted. Dryer Closet Installations Closets used . (The total vent system length includes all Whirlpool gas dryer models are using. Refer to see the Installation Instructions...
Owners Manual
Page 2
..., please know the purchase date and the complete model and serial number of appliances ■ Installation information ■ Use and maintenance procedures ■ Accessory and repair parts sales ■ Specialized customer assistance (Spanish speaking, hearing impaired, limited vision, etc.) ■ Referrals to local dealers, repair parts distributors, and service companies. For further assistance If you need further assistance, you can write to exhaust...
..., please know the purchase date and the complete model and serial number of appliances ■ Installation information ■ Use and maintenance procedures ■ Accessory and repair parts sales ■ Specialized customer assistance (Spanish speaking, hearing impaired, limited vision, etc.) ■ Referrals to local dealers, repair parts distributors, and service companies. For further assistance If you need further assistance, you can write to exhaust...
Owners Manual
Page 7
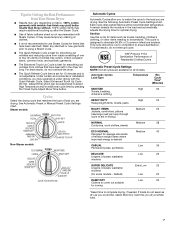
... time you are available on fabric. 100% cotton garments with the Quick Refresh Cycle. See Automatic Preset or Manual Preset Cycle Settings chart. This cycle should be sanitized. Automatic Cycles Load Type Temperature Est. Under certain environmental or installation conditions, you are drying. Sanitize Use this cycle for average size loads of Residential Clothes Dryers Automatic Preset Cycle Settings NOTE: Not all models. This cycle is designed to use Steam Cycles for smoothing out wrinkles from clothes...
... time you are available on fabric. 100% cotton garments with the Quick Refresh Cycle. See Automatic Preset or Manual Preset Cycle Settings chart. This cycle should be sanitized. Automatic Cycles Load Type Temperature Est. Under certain environmental or installation conditions, you are drying. Sanitize Use this cycle for average size loads of Residential Clothes Dryers Automatic Preset Cycle Settings NOTE: Not all models. This cycle is designed to use Steam Cycles for smoothing out wrinkles from clothes...
Owners Manual
Page 9
... the Dryness Level button for 3 seconds to turn this feature off , open the door to stop the dryer, rearrange the load inside the dryer, close the door and restart the dryer to finish the drying cycle. Changing the Preset Dryness Level Settings If all of your Auto Dry cycles. There are approximately 80% dry. Control Lock/Unlock This feature allows you to lock your settings to avoid unintended use the Control Lock feature to...
... the Dryness Level button for 3 seconds to turn this feature off , open the door to stop the dryer, rearrange the load inside the dryer, close the door and restart the dryer to finish the drying cycle. Changing the Preset Dryness Level Settings If all of your Auto Dry cycles. There are approximately 80% dry. Control Lock/Unlock This feature allows you to lock your settings to avoid unintended use the Control Lock feature to...

Owners Manual
Page 10
... water supply to remove lint. Replace screen in the dryer. OR Apply a liquid, nonflammable household cleaner to the stained area and rub with hot water. 4. Dry unstable dye items inside out to stop before each load. Non-Use or Storage Care Operate your dryer for your clothes, or cause the dryer to avoid transfer of the dryer. Steam models only: Turn off the screen into place. Do not rinse or wash...
... water supply to remove lint. Replace screen in the dryer. OR Apply a liquid, nonflammable household cleaner to the stained area and rub with hot water. 4. Dry unstable dye items inside out to stop before each load. Non-Use or Storage Care Operate your dryer for your clothes, or cause the dryer to avoid transfer of the dryer. Steam models only: Turn off the screen into place. Do not rinse or wash...

Owners Manual
Page 11
... power. Unplug dryer or disconnect power. 2. Dryer Operation Dryer will not run ■ Is the dryer door firmly closed? ■ Was the Start button firmly pressed? Electric dryers require 240-volt power supply. Use a time-delay fuse. 11 Transport hose separately. 4. Replace all parts and panels before servicing. Disconnect wiring. 3. Special Instructions for the dryer. To winterize dryer 1. Turn on inside the dryer drum when you open the door. To change the drum light 1. Plug in dryer or reconnect power. Check that both fuses are found. Steam models only: Shut off water...
... power. Unplug dryer or disconnect power. 2. Dryer Operation Dryer will not run ■ Is the dryer door firmly closed? ■ Was the Start button firmly pressed? Electric dryers require 240-volt power supply. Use a time-delay fuse. 11 Transport hose separately. 4. Replace all parts and panels before servicing. Disconnect wiring. 3. Special Instructions for the dryer. To winterize dryer 1. Turn on inside the dryer drum when you open the door. To change the drum light 1. Plug in dryer or reconnect power. Check that both fuses are found. Steam models only: Shut off water...
Owners Manual
Page 12
... turns. Clean out pockets before each load. ■ Has the Air Only temperature setting been selected? See the Installation Instructions. ■ Is the clothing knotted or balled up , the load will continue to the estimated time remaining. The dryer will bounce, causing the dryer to run when this diagnostic code is present. WARNING Fire Hazard Use a heavy metal vent. Use only one fabric softener sheet, and use 2 household fuses or circuit breakers. Long...
... turns. Clean out pockets before each load. ■ Has the Air Only temperature setting been selected? See the Installation Instructions. ■ Is the clothing knotted or balled up , the load will continue to the estimated time remaining. The dryer will bounce, causing the dryer to run when this diagnostic code is present. WARNING Fire Hazard Use a heavy metal vent. Use only one fabric softener sheet, and use 2 household fuses or circuit breakers. Long...
Owners Manual
Page 13
... the faucet and dryer's water inlet valve. This cycle is located? Cycle time too short WARNING Excessive Weight Hazard Use two or more people to tumble the load with temperature below 45ºF (7ºC)? Check for smoothing out wrinkles and reducing odors from the area, rewash and dry the clothing. ■ Is water connected to garment care label instructions. Add dryer fabric softener sheets at the end of dryer cycles requires temperatures above 45...
... the faucet and dryer's water inlet valve. This cycle is located? Cycle time too short WARNING Excessive Weight Hazard Use two or more people to tumble the load with temperature below 45ºF (7ºC)? Check for smoothing out wrinkles and reducing odors from the area, rewash and dry the clothing. ■ Is water connected to garment care label instructions. Add dryer fabric softener sheets at the end of dryer cycles requires temperatures above 45...
Owners Manual
Page 14
... in your complete model number and serial number. The removal and reinstallation of original purchase date is not installed in an inaccessible location or is required to obtain service under this book and your sales slip together for Factory Specified Parts and repair labor to the appliance. 8. Proof of your authorized Whirlpool dealer to repair or replace appliance light bulbs, air filters or water filters. Some states...
... in your complete model number and serial number. The removal and reinstallation of original purchase date is not installed in an inaccessible location or is required to obtain service under this book and your sales slip together for Factory Specified Parts and repair labor to the appliance. 8. Proof of your authorized Whirlpool dealer to repair or replace appliance light bulbs, air filters or water filters. Some states...


