Use and Care Guide
Page 1
www.whirlpool.com Table of Contents 2 W10110850A ® ® ELECTRONIC ELECTRIC DRYER Use & Care Guide For questions about features, operation/performance, parts, accessories or service, call: 1-800-253-1301 or visit our website at...
www.whirlpool.com Table of Contents 2 W10110850A ® ® ELECTRONIC ELECTRIC DRYER Use & Care Guide For questions about features, operation/performance, parts, accessories or service, call: 1-800-253-1301 or visit our website at...
Use and Care Guide
Page 2
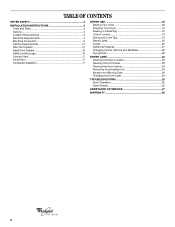
... 14 Plan Vent System 15 Install Vent System 16 Install Leveling Legs 16 Connect Vent 17 Level Dryer 17 Complete Installation 17 DRYER USE 18 Starting Your Dryer 18 Stopping Your Dryer 19 Pausing or Restarting 19 Control Locked 19 Drying and Cycle Tips 19 Status Lights 20 Cycles ...20 Additional Features 21 Changing Cycles, Options and Modifiers 22 Drying Rack 22 DRYER CARE 23 Cleaning the Dryer Location 23 Cleaning the Lint Screen 23 Cleaning the Dryer Interior 24 Removing Accumulated Lint 24 Vacation and Moving Care 24 Changing the Drum Light 24...
... 14 Plan Vent System 15 Install Vent System 16 Install Leveling Legs 16 Connect Vent 17 Level Dryer 17 Complete Installation 17 DRYER USE 18 Starting Your Dryer 18 Stopping Your Dryer 19 Pausing or Restarting 19 Control Locked 19 Drying and Cycle Tips 19 Status Lights 20 Cycles ...20 Additional Features 21 Changing Cycles, Options and Modifiers 22 Drying Rack 22 DRYER CARE 23 Cleaning the Dryer Location 23 Cleaning the Lint Screen 23 Cleaning the Dryer Interior 24 Removing Accumulated Lint 24 Vacation and Moving Care 24 Changing the Drum Light 24...
Use and Care Guide
Page 3
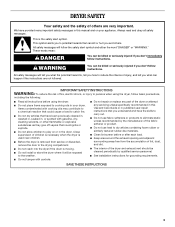
...can be killed or seriously injured if you and others are not followed. s Do not repair or replace any part of the dryer or attempt any servicing unless specifically recommended in , or spotted with cooking oils may contribute to a chemical reaction that have the ...skills to persons when using the dryer. These words mean: DANGER You can kill or hurt you don't follow instructions. All safety messages will follow basic precautions, including the ...
...can be killed or seriously injured if you and others are not followed. s Do not repair or replace any part of the dryer or attempt any servicing unless specifically recommended in , or spotted with cooking oils may contribute to a chemical reaction that have the ...skills to persons when using the dryer. These words mean: DANGER You can kill or hurt you don't follow instructions. All safety messages will follow basic precautions, including the ...
Use and Care Guide
Page 4
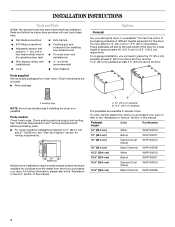
... parts before purchasing parts. You have the option of purchasing pedestals of different heights separately for a total height of the dryer for this dryer. Parts needed Check local codes. s For close-clearance installations between 31.5" (80.01 cm) and 37" (93....installations) s Wire stripper (direct wire s ¼" nut driver installations) (recommended) s Level s Tape measure Parts supplied Remove parts packages from dryer drum. s Flat-blade screwdriver s #2 Phillips screwdriver s Adjustable wrench that all parts are available in several colors. Read and follow the instructions ...
... parts before purchasing parts. You have the option of purchasing pedestals of different heights separately for a total height of the dryer for this dryer. Parts needed Check local codes. s For close-clearance installations between 31.5" (80.01 cm) and 37" (93....installations) s Wire stripper (direct wire s ¼" nut driver installations) (recommended) s Level s Tape measure Parts supplied Remove parts packages from dryer drum. s Flat-blade screwdriver s #2 Phillips screwdriver s Adjustable wrench that all parts are available in several colors. Read and follow the instructions ...

Use and Care Guide
Page 5
...s A separate 30-amp circuit. s A level floor with a maximum slope of 200 lbs (90.7 kg). These will reduce the chance of the dryer. If using a power supply cord, a grounded electrical outlet located within 2 ft (61 cm) of either side of items falling behind your DUET®... washer and dryer? The dryer must be installed or stored in longer drying times. Door Reversal and Stack Combination Kit Are you will be considered. See "Electrical Requirements." ...
...s A separate 30-amp circuit. s A level floor with a maximum slope of 200 lbs (90.7 kg). These will reduce the chance of the dryer. If using a power supply cord, a grounded electrical outlet located within 2 ft (61 cm) of either side of items falling behind your DUET®... washer and dryer? The dryer must be installed or stored in longer drying times. Door Reversal and Stack Combination Kit Are you will be considered. See "Electrical Requirements." ...
Use and Care Guide
Page 6
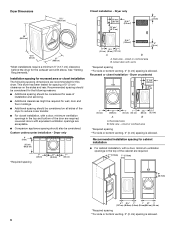
... or closet installation The following reasons: s Additional spacing should be considered. s Additional clearances might be considered for this dryer. Louvered doors with elbow. closet or confined area B. Custom undercounter installation - Recommended installation spacing for the exhaust vent with...sides and rear. Recessed area B. s For closet installation, with vents 3"* (7.6 cm) *Required spacing **For side or bottom venting, 0" (0 cm) spacing is allowed. Dryer on pedestal 14" max.* (35.6 cm) 18" min.* (45.72 cm) 1" (2.5 cm) 27" (68.6 cm) 1" 1"* (2.5 cm) (2.5 cm) ...
... or closet installation The following reasons: s Additional spacing should be considered. s Additional clearances might be considered for this dryer. Louvered doors with elbow. closet or confined area B. Custom undercounter installation - Recommended installation spacing for the exhaust vent with...sides and rear. Recessed area B. s For closet installation, with vents 3"* (7.6 cm) *Required spacing **For side or bottom venting, 0" (0 cm) spacing is allowed. Dryer on pedestal 14" max.* (35.6 cm) 18" min.* (45.72 cm) 1" (2.5 cm) 27" (68.6 cm) 1" 1"* (2.5 cm) (2.5 cm) ...

Use and Care Guide
Page 7
... mobile homes, (3) recreational vehicles, and (4) areas where local codes prohibit grounding through the neutral is recommended. Additional installation requirements This dryer is prohibited. s To be removed from : National Fire Protection Association, One Batterymarch Park, Quincy, MA 02269. A copy of the... or grounding circuit. Electrical Connection To properly install your dealer. s Do not use an extension cord. s This dryer is available for it is recommended that a qualified electrician determine that the electrical connection is your responsibility s To contact...
... mobile homes, (3) recreational vehicles, and (4) areas where local codes prohibit grounding through the neutral is recommended. Additional installation requirements This dryer is prohibited. s To be removed from : National Fire Protection Association, One Batterymarch Park, Quincy, MA 02269. A copy of the... or grounding circuit. Electrical Connection To properly install your dealer. s Do not use an extension cord. s This dryer is available for it is recommended that a qualified electrician determine that the electrical connection is your responsibility s To contact...
Use and Care Guide
Page 8
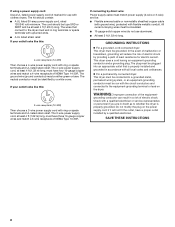
... conductor must be : s Flexible armored cable or nonmetallic sheathed copper cable (with ground wire), protected with upturned ends. Do not modify the plug on the dryer. The 4-wire power supply cord, at least 4 ft (1.22 m) long, must match power supply (4-wire or 3-wire) and be identified by providing a ...-grounding terminal or lead on the power supply cord: if it will reduce the risk of the equipment- The wires that connect to the dryer must be grounded. WARNING: Improper connection of electric shock by a white cover. The kit should be type SRD or SRDT and be either...
... conductor must be : s Flexible armored cable or nonmetallic sheathed copper cable (with ground wire), protected with upturned ends. Do not modify the plug on the dryer. The 4-wire power supply cord, at least 4 ft (1.22 m) long, must match power supply (4-wire or 3-wire) and be identified by providing a ...-grounding terminal or lead on the power supply cord: if it will reduce the risk of the equipment- The wires that connect to the dryer must be grounded. WARNING: Improper connection of electric shock by a white cover. The kit should be type SRD or SRDT and be either...

Use and Care Guide
Page 10
... E. A B C A. Ground prong D. s Put power supply cord through the strain relief. The strain relief should have a tight fit with the dryer cabinet and be in a horizontal position. The strain relief should have a tight fit with upturned ends F. ¾" (1.9 cm) UL listed strain relief... G. Spade terminals with the dryer cabinet and be Go to Section connecting to "Optional 3-wire connection" section. 4-wire connection: Power supply cord IMPORTANT: A 4-wire connection is...
... E. A B C A. Ground prong D. s Put power supply cord through the strain relief. The strain relief should have a tight fit with the dryer cabinet and be in a horizontal position. The strain relief should have a tight fit with upturned ends F. ¾" (1.9 cm) UL listed strain relief... G. Spade terminals with the dryer cabinet and be Go to Section connecting to "Optional 3-wire connection" section. 4-wire connection: Power supply cord IMPORTANT: A 4-wire connection is...
Use and Care Guide
Page 11
... Now go to outer terminal block screws. Direct wire cable must have completed your electrical connection. Shape ends of extra length so dryer can be moved if needed. B. Remove center silver-colored terminal block screw. 2. Insert tab of terminal block cover into a hook... shape. (2.15" cm) A. Secure cover with hold-down screw. 7. External ground conductor screw - Ground wire (green or bare) of dryer rear panel. Center silver-colored terminal block screw E. Connect the other wires to "Venting Requirements." B. A C B D E 4-wire connection: Direct wire...
... Now go to outer terminal block screws. Direct wire cable must have completed your electrical connection. Shape ends of extra length so dryer can be moved if needed. B. Remove center silver-colored terminal block screw. 2. Insert tab of terminal block cover into a hook... shape. (2.15" cm) A. Secure cover with hold-down screw. 7. External ground conductor screw - Ground wire (green or bare) of dryer rear panel. Center silver-colored terminal block screw E. Connect the other wires to "Venting Requirements." B. A C B D E 4-wire connection: Direct wire...

Use and Care Guide
Page 12
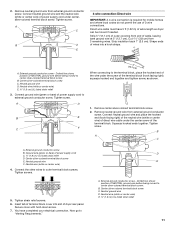
...or remove center silver-colored terminal block screw. 4. Strip insulation back 1" (2.5 cm). C A B D E A. External ground conductor screw B. Place the hooked ends of dryer rear panel. Tighten screws. B D E A C GF A. 3-wire receptacle (NEMA type 10-30R) B. 3-wire plug C. Neutral prong D. Neutral (white or center wire... cover with hold -down screw. 7. Direct wire cable must have completed your electrical connection. Shape ends of extra length so dryer can be moved if needed. Connect neutral wire (white or center wire) of power supply cord to outer terminal block screws....
...or remove center silver-colored terminal block screw. 4. Strip insulation back 1" (2.5 cm). C A B D E A. External ground conductor screw B. Place the hooked ends of dryer rear panel. Tighten screws. B D E A C GF A. 3-wire receptacle (NEMA type 10-30R) B. 3-wire plug C. Neutral prong D. Neutral (white or center wire... cover with hold -down screw. 7. Direct wire cable must have completed your electrical connection. Shape ends of extra length so dryer can be moved if needed. Connect neutral wire (white or center wire) of power supply cord to outer terminal block screws....

Use and Care Guide
Page 13
.... Place the hooked ends of the other wires to outer terminal block screws. Neutral ground wire D. Insert tab of terminal block cover into slot of dryer rear panel. Connect neutral ground wire and the neutral wire (white or center wire) of power supply cord/cable under the outer terminal block screws..., silver-colored terminal block screw. Place the hooked end of the neutral wire (white or center wire) of direct wire cable under the screw of dryer rear panel.
.... Place the hooked ends of the other wires to outer terminal block screws. Neutral ground wire D. Insert tab of terminal block cover into slot of dryer rear panel. Connect neutral ground wire and the neutral wire (white or center wire) of power supply cord/cable under the outer terminal block screws..., silver-colored terminal block screw. Place the hooked end of the neutral wire (white or center wire) of direct wire cable under the screw of dryer rear panel.
Use and Care Guide
Page 14
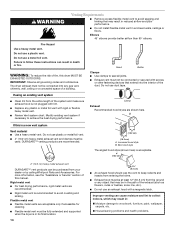
...10.2 cm) 2½" (6.4 cm) s An exhaust hood should cap the vent to keep rodents and insects from your dealer or by calling Whirlpool Parts and Accessories. The dryer exhaust must not be used. Good Better Clamps s Use clamps to seal all governing codes and ordinances. s 4" (10.2 cm) heavy metal... into any plastic or metal foil vent with a magnetic latch. s Flexible metal vent must be fully extended and supported when the dryer is recommended to avoid crushing and kinking. If this is not plugged with screws or other fastening devices that may be purchased from...
...10.2 cm) 2½" (6.4 cm) s An exhaust hood should cap the vent to keep rodents and insects from your dealer or by calling Whirlpool Parts and Accessories. The dryer exhaust must not be used. Good Better Clamps s Use clamps to seal all governing codes and ordinances. s 4" (10.2 cm) heavy metal... into any plastic or metal foil vent with a magnetic latch. s Flexible metal vent must be fully extended and supported when the dryer is recommended to avoid crushing and kinking. If this is not plugged with screws or other fastening devices that may be purchased from...
Use and Care Guide
Page 15
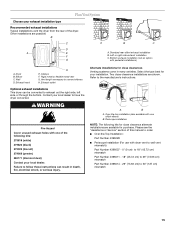
...biscuit) 279969 (pewter) 280171 (diamond dust) Contact your exhaust installation type Recommended exhaust installations Typical installations vent the dryer from the rear of the dryer. Dryer B. Elbow C. Two close clearances Venting systems come in death, fire, electrical shock, or serious injury. Refer ...A. Left or right side exhaust installation C. Wall D. Contact your installation. Select the type best for your local dealer to have the dryer converted. Other installations are possible. Clamps F. Over-the-top installation (also available with one offset elbow) B. s Over-the-Top ...
...biscuit) 279969 (pewter) 280171 (diamond dust) Contact your exhaust installation type Recommended exhaust installations Typical installations vent the dryer from the rear of the dryer. Dryer B. Elbow C. Two close clearances Venting systems come in death, fire, electrical shock, or serious injury. Refer ...A. Left or right side exhaust installation C. Wall D. Contact your installation. Select the type best for your local dealer to have the dryer converted. Other installations are possible. Clamps F. Over-the-top installation (also available with one offset elbow) B. s Over-the-Top ...
Use and Care Guide
Page 16
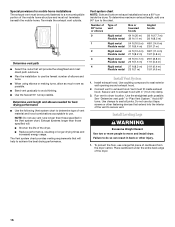
...90° turns possible. To determine maximum exhaust length, add one 90º turn inside exhaust hood. Connect vent to move and install dryer. Use the straightest path possible. Avoid 90º turns. Install Leveling Legs WARNING Excessive Weight Hazard Use two or more people to exhaust... home installations The exhaust vent must be securely fastened to a noncombustible portion of the mobile home structure and must fit inside the dryer. Use caulking compound to use vent runs longer than those specified in back or other fastening devices that will provide the straightest and...
...90° turns possible. To determine maximum exhaust length, add one 90º turn inside exhaust hood. Connect vent to move and install dryer. Use the straightest path possible. Avoid 90º turns. Install Leveling Legs WARNING Excessive Weight Hazard Use two or more people to exhaust... home installations The exhaust vent must be securely fastened to a noncombustible portion of the mobile home structure and must fit inside the dryer. Use caulking compound to use vent runs longer than those specified in back or other fastening devices that will provide the straightest and...

Use and Care Guide
Page 17
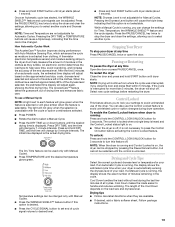
... supply is still no longer visible. 5. Check that both fuses are intact and tight, or that all parts are no kinks in dryer. Be sure the vent is made, remove the corner posts and cardboard. For power supply cord installation, plug into the leg holes by..., cancel cycle and close to adjust the legs up . Check that there are now installed. Check the dryer's final location. See "Level Dryer." 6. If the dryer is first heated. The dryer vent must fit over the dryer exhaust outlet and inside the exhaust hood. 2. Firmly grasp the body of your tools. 3. Using a...
... supply is still no longer visible. 5. Check that both fuses are intact and tight, or that all parts are no kinks in dryer. Be sure the vent is made, remove the corner posts and cardboard. For power supply cord installation, plug into the leg holes by..., cancel cycle and close to adjust the legs up . Check that there are now installed. Check the dryer's final location. See "Level Dryer." 6. If the dryer is first heated. The dryer vent must fit over the dryer exhaust outlet and inside the exhaust hood. 2. Firmly grasp the body of your tools. 3. Using a...
Use and Care Guide
Page 18
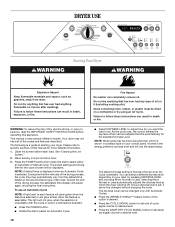
...your control panel. Once a dryness level is the energy preferred dryness level and will not glow when the selection is selected. DRYER USE WARNING Starting Your Dryer WARNING Explosion Hazard Keep flammable materials and vapors, such as gasoline, away from the default time based on it (including cooking oils...load. You can result in death, explosion, or fire. s Press the DAMP DRY CYCLE SIGNAL button to set end of oil on your dryer. Do not dry anything flammable on the size and fabric type of this appliance. NOTE: A default time is displayed when an Automatic Cycle ...
...your control panel. Once a dryness level is the energy preferred dryness level and will not glow when the selection is selected. DRYER USE WARNING Starting Your Dryer WARNING Explosion Hazard Keep flammable materials and vapors, such as gasoline, away from the default time based on it (including cooking oils...load. You can result in death, explosion, or fire. s Press the DAMP DRY CYCLE SIGNAL button to set end of oil on your dryer. Do not dry anything flammable on the size and fabric type of this appliance. NOTE: A default time is displayed when an Automatic Cycle ...
Use and Care Guide
Page 19
... cycle signals. If an Automatic Cycle is running : Press and hold the CONTROL LOCK/UNLOCK button for more than 5 minutes, the dryer will change by pressing the Pause/Cancel button, but cannot be changed . Follow package instructions. 19 A thermistor (electronic temperature sensor) ...and moisture sensing strips in the dryer drum help save time, avoid overdrying, and increase the accuracy of cycle signal volume to avoid unintended cycle or option changes during ...
... cycle signals. If an Automatic Cycle is running : Press and hold the CONTROL LOCK/UNLOCK button for more than 5 minutes, the dryer will change by pressing the Pause/Cancel button, but cannot be changed . Follow package instructions. 19 A thermistor (electronic temperature sensor) ...and moisture sensing strips in the dryer drum help save time, avoid overdrying, and increase the accuracy of cycle signal volume to avoid unintended cycle or option changes during ...
Use and Care Guide
Page 20
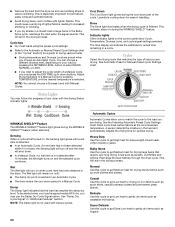
...drying sturdy fabrics such as sport shirts, casual business clothes and permanent press blends. Wet The Wet light will turn off and the dryer will turn on until the desired temperature is especially important for optimal drying. Each cycle dries certain fabrics at the recommended temperature. .... Damp The Damp light indicates that require very long drying times such as washable knit fabrics. Rearrange the load halfway through the dryer cycle. Normal Use this cycle to get Medium heat for drying no-iron fabrics such as work clothes with manual cycles. Super ...
...drying sturdy fabrics such as sport shirts, casual business clothes and permanent press blends. Wet The Wet light will turn off and the dryer will turn on until the desired temperature is especially important for optimal drying. Each cycle dries certain fabrics at the recommended temperature. .... Damp The Damp light indicates that require very long drying times such as washable knit fabrics. Rearrange the load halfway through the dryer cycle. Normal Use this cycle to get Medium heat for drying no-iron fabrics such as work clothes with manual cycles. Super ...

Use and Care Guide
Page 21
... and load size. This chart shows examples of clothes from forming. s Stop at any time to turn on when DRUM LIGHT is pressed or the dryer door is complete, select the End of dampness. Damp Dry Use this cycle to dry items to a damp level using the Air Only setting. The... have different levels of Cycle Signal. You can form. Timed Dry Use this setting to dry. Timed Dry is also useful for 20 minutes, the dryer door is closed , or the door is not running, the drum light will turn the drum light ON or OFF. Touch Up Use this cycle...
... and load size. This chart shows examples of clothes from forming. s Stop at any time to turn on when DRUM LIGHT is pressed or the dryer door is complete, select the End of dampness. Damp Dry Use this cycle to dry items to a damp level using the Air Only setting. The... have different levels of Cycle Signal. You can form. Timed Dry Use this setting to dry. Timed Dry is also useful for 20 minutes, the dryer door is closed , or the door is not running, the drum light will turn the drum light ON or OFF. Touch Up Use this cycle...


