Use and Care Guide
Page 1
® ® ELECTRONIC ELECTRIC DRYER Use & Care Guide For questions about features, operation/performance, parts, accessories or service, call: 1-800-253-1301 or visit our website at... www.whirlpool.com Table of Contents 2 W10110850A
® ® ELECTRONIC ELECTRIC DRYER Use & Care Guide For questions about features, operation/performance, parts, accessories or service, call: 1-800-253-1301 or visit our website at... www.whirlpool.com Table of Contents 2 W10110850A
Use and Care Guide
Page 2
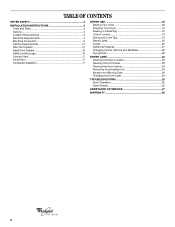
... Options 4 Location Requirements 5 Electrical Requirements 7 Electrical Connection 9 Venting Requirements 14 Plan Vent System 15 Install Vent System 16 Install Leveling Legs 16 Connect Vent 17 Level Dryer 17 Complete Installation 17 DRYER USE 18 Starting Your Dryer 18 Stopping Your Dryer 19 Pausing or Restarting 19 ...Additional Features 21 Changing Cycles, Options and Modifiers 22 Drying Rack 22 DRYER CARE 23 Cleaning the Dryer Location 23 Cleaning the Lint Screen 23 Cleaning the Dryer Interior 24 Removing Accumulated Lint 24 Vacation and Moving Care 24 Changing the...
... Options 4 Location Requirements 5 Electrical Requirements 7 Electrical Connection 9 Venting Requirements 14 Plan Vent System 15 Install Vent System 16 Install Leveling Legs 16 Connect Vent 17 Level Dryer 17 Complete Installation 17 DRYER USE 18 Starting Your Dryer 18 Stopping Your Dryer 19 Pausing or Restarting 19 ...Additional Features 21 Changing Cycles, Options and Modifiers 22 Drying Rack 22 DRYER CARE 23 Cleaning the Dryer Location 23 Cleaning the Lint Screen 23 Cleaning the Dryer Interior 24 Removing Accumulated Lint 24 Vacation and Moving Care 24 Changing the...
Use and Care Guide
Page 3
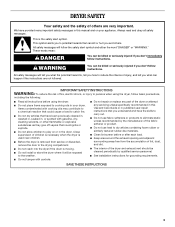
... the safety alert symbol. This is removed from the accumulation of fire, electric shock, or injury to cooking oils in the dryer. s Do not install or store the dryer where it will follow instructions. s Do not use heat to the drying compartment. All safety ...messages. s Do not dry articles that can happen if the instructions are very important. s Clean lint screen before using the dryer, follow instructions. DRYER SAFETY Your safety and the safety of others . Always read and obey all instructions before or after each load. IMPORTANT SAFETY INSTRUCTIONS...
... the safety alert symbol. This is removed from the accumulation of fire, electric shock, or injury to cooking oils in the dryer. s Do not install or store the dryer where it will follow instructions. s Do not use heat to the drying compartment. All safety ...messages. s Do not dry articles that can happen if the instructions are very important. s Clean lint screen before using the dryer, follow instructions. DRYER SAFETY Your safety and the safety of others . Always read and obey all instructions before or after each load. IMPORTANT SAFETY INSTRUCTIONS...
Use and Care Guide
Page 4
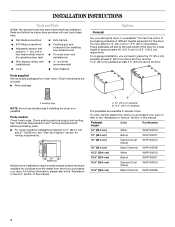
... pedestals are included. For a garage installation, you purchased your dryer. s Parts package Options Pedestal Are you purchased your dryer or refer to the total height of the dryer for this dryer. You may select a 10" (25.4 cm) or 15.5" (39.4 cm) pedestal. Check existing electrical supply and venting. To order, call the dealer from whom...
... pedestals are included. For a garage installation, you purchased your dryer. s Parts package Options Pedestal Are you purchased your dryer or refer to the total height of the dryer for this dryer. You may select a 10" (25.4 cm) or 15.5" (39.4 cm) pedestal. Check existing electrical supply and venting. To order, call the dealer from whom...

Use and Care Guide
Page 5
...of items falling behind your machines, you may not operate correctly if dryer is greater than 1" (2.5 cm), install Extended Dryer Feet Kit, Part Number 279810. Ask for Part Number 8579666. s A separate 30-amp circuit. See "Electrical Requirements." The combined weight of a companion appliance should also be ... to the "Assistance or Service" section of the dryer. To do so, you can result in an area where it will need to the "Assistance or Service" section of this manual. If using a power supply cord, a grounded electrical outlet located within 2 ft (61 cm) of ...
...of items falling behind your machines, you may not operate correctly if dryer is greater than 1" (2.5 cm), install Extended Dryer Feet Kit, Part Number 279810. Ask for Part Number 8579666. s A separate 30-amp circuit. See "Electrical Requirements." The combined weight of a companion appliance should also be ... to the "Assistance or Service" section of the dryer. To do so, you can result in an area where it will need to the "Assistance or Service" section of this manual. If using a power supply cord, a grounded electrical outlet located within 2 ft (61 cm) of ...

Use and Care Guide
Page 7
...Do not have a fuse in remodeling after 1996, dryer circuits involved in the neutral or grounding circuit. Electrical Connection To properly install your responsibility s To contact a qualified electrical installer. A copy of electrical connection you will be using and follow the instructions provided... block. s If local codes do not permit the connection of the line. The installation must conform to introduce outside air into the dryer. Electrical Requirements It is recommended. s If codes permit and a separate ground wire is used when the appliance is installed in .2 * (...
...Do not have a fuse in remodeling after 1996, dryer circuits involved in the neutral or grounding circuit. Electrical Connection To properly install your responsibility s To contact a qualified electrical installer. A copy of electrical connection you will be using and follow the instructions provided... block. s If local codes do not permit the connection of the line. The installation must conform to introduce outside air into the dryer. Electrical Requirements It is recommended. s If codes permit and a separate ground wire is used when the appliance is installed in .2 * (...
Use and Care Guide
Page 8
...a 4-wire receptacle of least resistance for use aluminum). s For a permanently connected dryer: This dryer must be connected to the equipment-grounding terminal or lead on the power supply cord: if it will reduce the risk of electric shock by providing a path of NEMA Type 14-30R. grounding conductor can result ...in doubt as to whether the dryer is properly installed and grounded in ring terminals or spade terminals with the circuit ...
...a 4-wire receptacle of least resistance for use aluminum). s For a permanently connected dryer: This dryer must be connected to the equipment-grounding terminal or lead on the power supply cord: if it will reduce the risk of electric shock by providing a path of NEMA Type 14-30R. grounding conductor can result ...in doubt as to whether the dryer is properly installed and grounded in ring terminals or spade terminals with the circuit ...

Use and Care Guide
Page 10
...connector B. Hole below the terminal block opening , screw the removable conduit connector onto the strain relief threads. Spade terminals with the dryer cabinet and be in a horizontal position. Be sure that the wire insulation on strain relief). Ring terminals 1. s Put power...connections. The strain relief should have a tight fit with upturned ends F. ¾" (1.9 cm) UL listed strain relief G. Electrical Connection Options If your type of electrical connection: 4-wire (recommended) 3-wire (if 4-wire is not available) Style 2: Direct wire strain relief s Unscrew the removable ...
...connector B. Hole below the terminal block opening , screw the removable conduit connector onto the strain relief threads. Spade terminals with the dryer cabinet and be in a horizontal position. Be sure that the wire insulation on strain relief). Ring terminals 1. s Put power...connections. The strain relief should have a tight fit with upturned ends F. ¾" (1.9 cm) UL listed strain relief G. Electrical Connection Options If your type of electrical connection: 4-wire (recommended) 3-wire (if 4-wire is not available) Style 2: Direct wire strain relief s Unscrew the removable ...
Use and Care Guide
Page 11
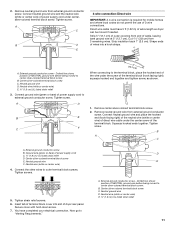
... have completed your electrical connection. External ground conductor screw - Neutral ground wire D. Connect ground wire (green or bare) of power supply cord to the terminal block, place the hooked end of the wire under the screw of extra length so dryer can be moved... A C B D E 4-wire connection: Direct wire IMPORTANT: A 4-wire connection is required for mobile homes and where local codes do not permit the use of dryer rear panel. A D B E C F (12.75c"m) When connecting to external ground conductor screw. Tighten screw. You have 5 ft (1.52 m) of the ...
... have completed your electrical connection. External ground conductor screw - Neutral ground wire D. Connect ground wire (green or bare) of power supply cord to the terminal block, place the hooked end of the wire under the screw of extra length so dryer can be moved... A C B D E 4-wire connection: Direct wire IMPORTANT: A 4-wire connection is required for mobile homes and where local codes do not permit the use of dryer rear panel. A D B E C F (12.75c"m) When connecting to external ground conductor screw. Tighten screw. You have 5 ft (1.52 m) of the ...

Use and Care Guide
Page 12
...block cover into a hook shape. 1" (2.5 cm) 3¹⁄₂" (8.9 cm) 12 3. Connect ground wire (green or bare) of dryer rear panel. C A B D E A. Squeeze hooked ends together. Tighten screws. 5. Insert tab of terminal block cover into slot of direct...Tighten screws. External ground conductor screw B. Neutral ground wire C. Secure cover with hold -down screw. 6. You have completed your electrical connection. Now go to "Venting Requirements." 3-wire connection: Direct wire Use where local codes permit connecting cabinet-ground conductor to neutral ...
...block cover into a hook shape. 1" (2.5 cm) 3¹⁄₂" (8.9 cm) 12 3. Connect ground wire (green or bare) of dryer rear panel. C A B D E A. Squeeze hooked ends together. Tighten screws. 5. Insert tab of terminal block cover into slot of direct...Tighten screws. External ground conductor screw B. Neutral ground wire C. Secure cover with hold -down screw. 6. You have completed your electrical connection. Now go to "Venting Requirements." 3-wire connection: Direct wire Use where local codes permit connecting cabinet-ground conductor to neutral ...

Use and Care Guide
Page 13
...wire from external ground conductor screw. Insert tab of terminal block cover into slot of dryer rear panel. Place the hooked ends of terminal block (hook facing right). External ground conductor screw B. You have completed your electrical connection. Tighten strain relief screws. 5. Tighten screw. Tighten strain relief screw. 5. ...2. B A C D E B D F E A. Remove neutral ground wire from the external ground conductor screw to "Venting Requirements." 4. Insert tab of terminal block cover into slot of dryer rear panel. Secure cover with hold -down screw. 13
...wire from external ground conductor screw. Insert tab of terminal block cover into slot of dryer rear panel. Place the hooked ends of terminal block (hook facing right). External ground conductor screw B. You have completed your electrical connection. Tighten strain relief screws. 5. Tighten screw. Tighten strain relief screw. 5. ...2. B A C D E B D F E A. Remove neutral ground wire from the external ground conductor screw to "Venting Requirements." 4. Insert tab of terminal block cover into slot of dryer rear panel. Secure cover with hold -down screw. 13
Use and Care Guide
Page 15
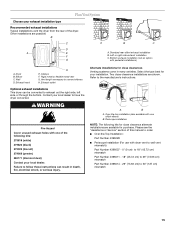
Standard rear offset exhaust installation B. Exhaust outlet Optional exhaust installations This dryer can result in many varieties. Contact your installation. Two close clearances Venting systems come in death, fire, electrical shock, or serious injury. Left or right side exhaust installation C. Exhaust hood H E. Please see the "Assistance or Service" section of this manual to...
Standard rear offset exhaust installation B. Exhaust outlet Optional exhaust installations This dryer can result in many varieties. Contact your installation. Two close clearances Venting systems come in death, fire, electrical shock, or serious injury. Left or right side exhaust installation C. Exhaust hood H E. Please see the "Assistance or Service" section of this manual to...

Use and Care Guide
Page 17
...legs. Screw the legs into its final location. Using a 4" (10.2 cm) clamp, connect vent to see which step was skipped. 2. Move dryer into the leg holes by hand. Complete Installation 1. Check that both circuit breakers have all of your tools. 3. Check that the vent is first ...first used. Remove the blue protective film on the cardboard. For power supply cord installation, plug into an outlet and/or electrical supply is still no kinks in dryer. Firmly grasp the body of /recycle all parts are no heat, contact a qualified technician. Do not crush or kink ...
...legs. Screw the legs into its final location. Using a 4" (10.2 cm) clamp, connect vent to see which step was skipped. 2. Move dryer into the leg holes by hand. Complete Installation 1. Check that both circuit breakers have all of your tools. 3. Check that the vent is first ...first used. Remove the blue protective film on the cardboard. For power supply cord installation, plug into an outlet and/or electrical supply is still no kinks in dryer. Firmly grasp the body of /recycle all parts are no heat, contact a qualified technician. Do not crush or kink ...
Use and Care Guide
Page 18
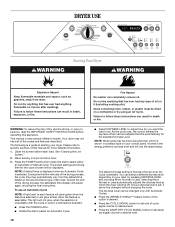
...must be . Normal is the energy preferred dryness level and will not glow when the selection is unavailable with Automatic Cycles. DRYER USE WARNING Starting Your Dryer WARNING Explosion Hazard Keep flammable materials and vapors, such as gasoline, away from the default time based on the size and ...18 Fire Hazard No washer can be dried using an Air Cycle. To use the least energy. WARNING: To reduce the risk of fire, electric shock, or injury to specific sections of oil on it (even after washing). Once a dryness level is selected or will adjust again, showing...
...must be . Normal is the energy preferred dryness level and will not glow when the selection is unavailable with Automatic Cycles. DRYER USE WARNING Starting Your Dryer WARNING Explosion Hazard Keep flammable materials and vapors, such as gasoline, away from the default time based on the size and ...18 Fire Hazard No washer can be dried using an Air Cycle. To use the least energy. WARNING: To reduce the risk of fire, electric shock, or injury to specific sections of oil on it (even after washing). Once a dryness level is selected or will adjust again, showing...
Use and Care Guide
Page 24
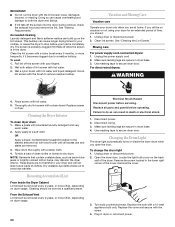
... you are removed. 3. See "Cleaning the Lint Screen." Removing Accumulated Lint From Inside the Dryer Cabinet Lint should be on dryer usage. 24 Electrical Shock Hazard Disconnect power before operating. OR Apply a liquid, nonflammable household cleaner to your dryer only when you will not stain future loads of time, you open the door. Failure...
... you are removed. 3. See "Cleaning the Lint Screen." Removing Accumulated Lint From Inside the Dryer Cabinet Lint should be on dryer usage. 24 Electrical Shock Hazard Disconnect power before operating. OR Apply a liquid, nonflammable household cleaner to your dryer only when you will not stain future loads of time, you open the door. Failure...
Use and Care Guide
Page 25
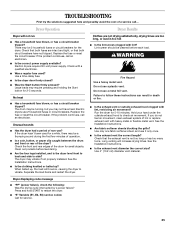
...exhaust hood clogged with lint? Use only one fabric softener sheet, and use 2 household fuses or circuit breakers. Electric dryers use it only once. Dryer Results Clothes are not drying satisfactorily, drying times are intact and tight, or that both circuit breakers have heat.... for small objects. Unusual sounds s Has the dryer had a period of the dryer? WARNING Fire Hazard Use a heavy metal vent. Failure to check air movement. Dryer Operation Dryer will increase drying times. If the problem continues, call an electrician. Electric dryers require 240-volt power supply. s Is the ...
...exhaust hood clogged with lint? Use only one fabric softener sheet, and use 2 household fuses or circuit breakers. Electric dryers use it only once. Dryer Results Clothes are not drying satisfactorily, drying times are intact and tight, or that both circuit breakers have heat.... for small objects. Unusual sounds s Has the dryer had a period of the dryer? WARNING Fire Hazard Use a heavy metal vent. Failure to check air movement. Dryer Operation Dryer will increase drying times. If the problem continues, call an electrician. Electric dryers require 240-volt power supply. s Is the ...

Use and Care Guide
Page 26
... with temperature below 45ºF (7ºC)? s Is the automatic cycle ending early? s Is the dryer located in the area where your garments. Dry smaller loads that can stain your dryer is located? s Is the dryer being dried. The new electric heating element may not be gone after the first cycle. Closet doors must have...
... with temperature below 45ºF (7ºC)? s Is the automatic cycle ending early? s Is the dryer located in the area where your garments. Dry smaller loads that can stain your dryer is located? s Is the dryer being dried. The new electric heating element may not be gone after the first cycle. Closet doors must have...


