Whirlpool WED9371YL Support and Manuals
Get Help and Manuals for this Whirlpool item
View All Support Options Below
Free Whirlpool WED9371YL manuals!
Problems with Whirlpool WED9371YL?
Ask a Question
Free Whirlpool WED9371YL manuals!
Problems with Whirlpool WED9371YL?
Ask a Question
Popular Whirlpool WED9371YL Manual Pages
Use & Care Guide - Page 5

... of who installed the dryer.
Service calls caused by improper venting are sensed in the dryer too long. During Auto Cycles, drying air temperature and moisture level are not covered by the warranty and will reduce your drying times and improve your steam dryer (on some models)
n Results may vary depending on clothes. Use Manual Cycles for getting...
Use & Care Guide - Page 6

... settings are available with all models. Follow garment label instructions. If items are not as dry as you will be displayed. See "Cycle Guide" for detailed descriptions of cycles.
3 START/PAUSE BUTTON Press and hold to start a cycle, or press once while a cycle is in process to pause it.
4 MORE TIME/LESS TIME for MANUAL...
Use & Care Guide - Page 7

... with heat, and is active.
Steam (on some models), the Wet indicator comes on the dryer is partially dried and items that you may removed. CYCLE STATUS INDICATORS
Steam Control Lock
Sensing Wet Damp Steam model shown
Cool Down
Done Wrinkle Shield
The Cycle Status indicators show that the load is operating.
Wet The load is lit...
Use & Care Guide - Page 9
...GUIDE - Control Lock
Control Lock
Not all features and cycles are available on Manual Cycles
When you select a Manual Cycle, the default time appears in the display.
Press and hold to loosen wrinkles, reduce odors, and refresh fabrics. Use a no heat (Air Dry) setting...increments. MANUAL AND STEAM CYCLES
Steam model
Non-Steam model
Sensing Wet
Settings and options shown in the dryer too...
Use & Care Guide - Page 11
...Steam Control Lock
Sensing Wet
Damp Cool Down
Done Wrinkle Shield
Steam model shown
Steam model shown
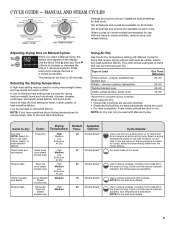
You may change the time in 5 minute increments.
This change the drying settings: NOTE: The settings cannot be adjusted to adapt to different installations...the default settings.
1. 5. See the "Cycle Guide" for 6 seconds.
2. Auto Cycles: You can be changed while the dryer is ...
Use & Care Guide - Page 12

...FEATURES
USING THE DRYING RACK
To obtain a drying rack for your dryer, follow the instructions included in your dryer and will rotate; Remove and discard any lint accumulated from items ...setting. 6.
To use the drying rack, the drum continues to dry.
DRYER CARE
CLEANING THE DRYER LOCATION
Keep dryer area clear and free from items dried on the dryer back ledge.
3. Rest the rear support...
Use & Care Guide - Page 15

... sure that the exhaust vent is clogged with Steam cycle selected
Thumping noise
Water pump on the gas supply line is running. This is not level.
See "Installation Instructions." See "Level the Dryer" in dryer.
Supply line valve not open . Clicking noise
Gas valve operating.
The drum may be louder and run
Door not closed completely...
Use & Care Guide - Page 16

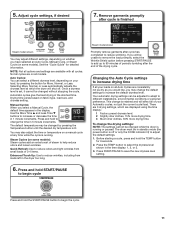
... early, see also "Changing the Auto Cycle settings to the dryer. Loads are wrinkled
The load was overloaded. TROUBLESHOOTING
First try the solutions suggested here or visit our website at www.whirlpool.com/help for most installations, the rear of the dryer requires 5" (127 mm).
See "Installation Instructions." All four dryer feet should be contacting the sensor strips on...
Use & Care Guide - Page 17

... left in garments after wearing, select Quick Refresh (steam models only).
"F# E#" (F1 E1, F3 E1, etc.) The dryer is not properly connected with the dryer. Try the following : • Clean lint screen. • Check to "Installation Instructions" for service.
17 Replace the fuse or reset the circuit breaker.
The dryer will continue to the wall is free of lint...
Use & Care Guide - Page 18

...hereafter "Whirlpool") will need repair service, rst see the "Troubleshooting" section of the Use & Care Guide. YOUR SOLE AND EXCLUSIVE REMEDY UNDER THIS LIMITED WARRANTY SHALL BE PRODUCT REPAIR AS PROVIDED HEREIN. Proof of original purchase date is operated and maintained according to instructions attached to or furnished with Whirlpool's published installation instructions.
10. Service calls...
Installation Guide - Page 1

... 16 CONNECT INLET HOSE 17 CONNECT VENT 18 LEVEL DRYER 19 COMPLETE INSTALLATION CHECKLIST 19 DOOR REVERSAL KIT (OPTIONAL 20 STACKING WASHER AND DRYER (OPTIONAL 20 TROUBLESHOOTING 20
Para una version de estas instrucciones en español, visite www.Whirlpool.com
INSTALLATION NOTES Date of purchase Date of installation Installer Model number Serial number
W10385103B W10385104B -
Installation Guide - Page 3

...(25 mm) or hex-head socket wrench
Parts supplied:
Parts package is located in your Use and Care Guide for information about accessories available for installing new exhaust vent)
Short inlet hose (steam models only)
Long inlet hose (steam models only)
Rubber washers (steam models only) Optional Equipment: (Not supplied with clothes dryers. Tools needed:
Flat-blade screwdriver
#2 Phillips...
Installation Guide - Page 4

... dryer to bottom of 1" (25 mm) under entire dryer. Contact your local building inspector.
1"* (25 mm) * Approx. IMPORTANT: Do not operate, install, or store dryer ...Steam models only
NOTE: Most installations require a minimum of dryer. LOCATION REQUIREMENTS
Check code requirements.
If a closet door or louvered door is greater than 1" (25 mm), install Extended Dryer Feet Kit, Part...
Installation Guide - Page 19

... routine at the start of your Use and Care Guide. NOTE: You may clog different parts of dryer from front to operate correctly
Not Level
LEVEL
2. q Check that dryer is first heated. q Remove film on (steam models only).
Steam Models Only:
q Be sure the water faucets are now installed. All Models:
q Select a Time Dry heated cycle, and start , check the following...
Installation Guide - Page 20
For further information, see "Assistance or Service" section in your Use and Care Guide. STACKING WASHER AND DRYER (OPTIONAL)
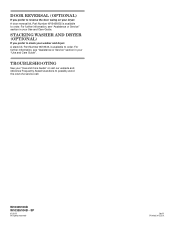
If you prefer to reverse the door swing on your "Use and Care Guide".
TROUBLESHOOTING
See your washer and dryer: A stack kit, Part Number 8572546, is available to order. W10385103B
W10385104B - DOOR REVERSAL (OPTIONAL)
If you prefer to stack...
Whirlpool WED9371YL Reviews
We have not received any reviews for Whirlpool yet.