Use & Care Guide
Page 3
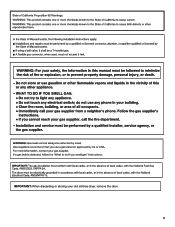
IMPORTANT: When discarding or storing your old clothes dryer, remove the door. 3
IMPORTANT: When discarding or storing your old clothes dryer, remove the door. 3
Use & Care Guide
Page 4
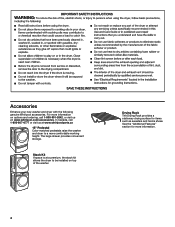
...or visit us at www.whirlpoolparts.ca 15" Pedestal Color-matched pedestals raise the washer and dryer to be installed on top of the washer. Stack Kit If space is at : www.whirlpool.com/accessories. Drying Rack The Drying Rack provides a stationary drying surface for more information on ...options and ordering, call 1-800-807-6777 or visit us at a premium, the stack kit allows the dryer to a more comfortable working height. For more ...
...or visit us at www.whirlpoolparts.ca 15" Pedestal Color-matched pedestals raise the washer and dryer to be installed on top of the washer. Stack Kit If space is at : www.whirlpool.com/accessories. Drying Rack The Drying Rack provides a stationary drying surface for more information on ...options and ordering, call 1-800-807-6777 or visit us at a premium, the stack kit allows the dryer to a more comfortable working height. For more ...

Use & Care Guide
Page 5
... blend, common knits, and synthetics. 5 Proper venting will be sure to using the drying rack. The venting system attached to the dryer plays a big role in shrinkage, wrinkling, and static due to provide the most energy savings and enhanced fabric care from the entire length...Steam Refresh Cycle is not recommended with 4" (102 mm) diameter heavy, rigid vent material. See Installation Instructions. With Timed Dry, the dryer runs the amount of time set and sometimes results in good airflow. Use Automatic Cycles for better fabric care and energy savings Use the Automatic...
... blend, common knits, and synthetics. 5 Proper venting will be sure to using the drying rack. The venting system attached to the dryer plays a big role in shrinkage, wrinkling, and static due to provide the most energy savings and enhanced fabric care from the entire length...Steam Refresh Cycle is not recommended with 4" (102 mm) diameter heavy, rigid vent material. See Installation Instructions. With Timed Dry, the dryer runs the amount of time set and sometimes results in good airflow. Use Automatic Cycles for better fabric care and energy savings Use the Automatic...

Use & Care Guide
Page 7
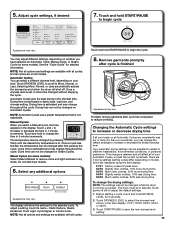
... a feature, setting, or option is Steam Refresh. Wrinkle Shield™ Option If you select a cycle, its settings will light up to 140 minutes of the dryer and avoid an accidental change in the load. A Static Reduce Touch to add the Static Reduce option to selected Automatic cycles (see "Cycle Status Indicators...; option will sound when the load is open, and turn off automatically after 60 minutes to help smooth out wrinkles. 1 POWER Touch to turn the dryer on or off. NOTE: Dryness Level is for the Sanitize cycle), you may select a dry temperature based on the type of the...
... a feature, setting, or option is Steam Refresh. Wrinkle Shield™ Option If you select a cycle, its settings will light up to 140 minutes of the dryer and avoid an accidental change in the load. A Static Reduce Touch to add the Static Reduce option to selected Automatic cycles (see "Cycle Status Indicators...; option will sound when the load is open, and turn off automatically after 60 minutes to help smooth out wrinkles. 1 POWER Touch to turn the dryer on or off. NOTE: Dryness Level is for the Sanitize cycle), you may select a dry temperature based on the type of the...

Use & Care Guide
Page 8
... Uses Extra Low heat to gently dry delicate items. Uses a stepped drying temperature from Medium to about 1/2 full. Medium load: Fill the dryer drum up to Low for large loads of mixed fabrics and items. Normal is the preferred energy cycle. Use for drying large, bulky items...the default. Load Size Recommendations For best results, follow the wet load size recommendations noted for better fabric care and energy savings The dryer senses moisture in bold are changed, the new settings will return to dry large loads of heavyweight fabrics. Use Automatic Cycles for each ...
... Uses Extra Low heat to gently dry delicate items. Uses a stepped drying temperature from Medium to about 1/2 full. Medium load: Fill the dryer drum up to Low for large loads of mixed fabrics and items. Normal is the preferred energy cycle. Use for drying large, bulky items...the default. Load Size Recommendations For best results, follow the wet load size recommendations noted for better fabric care and energy savings The dryer senses moisture in bold are changed, the new settings will return to dry large loads of heavyweight fabrics. Use Automatic Cycles for each ...

Use & Care Guide
Page 9
...Available Options: Cycle Details: Small loads and sportswear Any load NOTE: Select Air Only to tumble freely. 9 Small load: Fill the dryer drum with dry loads to the default. Load Size Recommendations For best results, follow the load size recommendations noted for drying heavyweight items such...Use to dry items to about drying temperatures for that cycle. Select a drying temperature based on each cycle. Large load: Fill the dryer drum up to a damp level for foam, rubber, plastic, or heat-sensitive fabrics. Not all settings and options are default settings for...
...Available Options: Cycle Details: Small loads and sportswear Any load NOTE: Select Air Only to tumble freely. 9 Small load: Fill the dryer drum with dry loads to the default. Load Size Recommendations For best results, follow the load size recommendations noted for drying heavyweight items such...Use to dry items to about drying temperatures for that cycle. Select a drying temperature based on each cycle. Large load: Fill the dryer drum up to a damp level for foam, rubber, plastic, or heat-sensitive fabrics. Not all settings and options are default settings for...
Use & Care Guide
Page 10
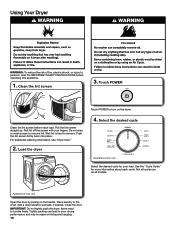
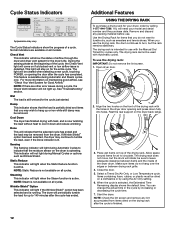
...each load. Push the lint screen firmly back into place. Appearance may vary. Clean the lint screen 3. For additional cleaning information, see "Dryer Care." 2. Using Your Dryer WARNING: To reduce the risk of fire, electric shock, or injury to poor drying performance and may increase wrinkling and tangling. 10 Roll ...lint off the screen with your load. See the "Cycle Guide" for your fingers. Pull the lint screen straight up. Add a dryer sheet to remove lint. Do not rinse or wash screen to wet load, if desired. Items need to tumble freely. Touch POWER Clean the lint...
...each load. Push the lint screen firmly back into place. Appearance may vary. Clean the lint screen 3. For additional cleaning information, see "Dryer Care." 2. Using Your Dryer WARNING: To reduce the risk of fire, electric shock, or injury to poor drying performance and may increase wrinkling and tangling. 10 Roll ...lint off the screen with your load. See the "Cycle Guide" for your fingers. Pull the lint screen straight up. Add a dryer sheet to remove lint. Do not rinse or wash screen to wet load, if desired. Items need to tumble freely. Touch POWER Clean the lint...
Use & Care Guide
Page 11
... touch and hold to change is estimated and may be changed after first pausing the cycle. Drying time can not be changed while the dryer is lit. The temperature may change throughout the cycle. The display will affect all models. Touch and hold START/PAUSE to different installations... Appearance may adjust different settings, depending on whether you have selected an Automatic Cycle, Manual Cycle, or Steam Cycle (on model), which the dryer will shut off ) to begin cycle Appearance may change throughout the cycle. to More, Normal, or Less. Once a cycle has started, ...
... touch and hold to change is estimated and may be changed after first pausing the cycle. Drying time can not be changed while the dryer is lit. The temperature may change throughout the cycle. The display will affect all models. Touch and hold START/PAUSE to different installations... Appearance may adjust different settings, depending on whether you have selected an Automatic Cycle, Manual Cycle, or Steam Cycle (on model), which the dryer will shut off ) to begin cycle Appearance may change throughout the cycle. to More, Normal, or Less. Once a cycle has started, ...
Use & Care Guide
Page 12
...heat to 140 minutes after the cycle has ended. be sure to indicate that the moisture sensor on the front of airflow through the dryer and dryer vent system for up or iron while still damp may vary. Select a Timed Dry/Air Only, or Low Temperature cycle. See "...Troubleshooting" section. Wet The load is available during a cycle, the Check Vent indicator will periodically tumble the load for the dryer's life. This indicator will come on top of the cycle, the Check Vent light will not light during Automatic Cycles to leave adequate clearance...
...heat to 140 minutes after the cycle has ended. be sure to indicate that the moisture sensor on the front of airflow through the dryer and dryer vent system for up or iron while still damp may vary. Select a Timed Dry/Air Only, or Low Temperature cycle. See "...Troubleshooting" section. Wet The load is available during a cycle, the Check Vent indicator will periodically tumble the load for the dryer's life. This indicator will come on top of the cycle, the Check Vent light will not light during Automatic Cycles to leave adequate clearance...
Use & Care Guide
Page 13
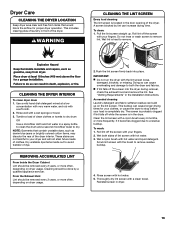
... concentration with very warm water, and rub with a clean towel. Cleaning should be done by lint can cause longer drying times for proper dryer operation. To wash: 1. Thoroughly dry lint screen with a soft cloth. 2. This includes clearing piles of clothes. NOTE: Garments that would...lint screen is hard to remove lint. Wet lint is located in the Installation Instructions. CLEANING THE DRYER INTERIOR To clean dryer drum 1. Dryer Care CLEANING THE DRYER LOCATION Keep dryer area clear and free from items that contain unstable dyes, such as denim blue jeans or brightly ...
... concentration with very warm water, and rub with a clean towel. Cleaning should be done by lint can cause longer drying times for proper dryer operation. To wash: 1. Thoroughly dry lint screen with a soft cloth. 2. This includes clearing piles of clothes. NOTE: Garments that would...lint screen is hard to remove lint. Wet lint is located in the Installation Instructions. CLEANING THE DRYER INTERIOR To clean dryer drum 1. Dryer Care CLEANING THE DRYER LOCATION Keep dryer area clear and free from items that contain unstable dyes, such as denim blue jeans or brightly ...
Use & Care Guide
Page 14
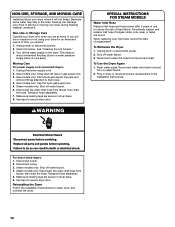
...from faucet, then drain the hose. Reconnect water inlet hose to locate, level, and connect the dryer. 14 For direct-wired dryers: 1. If storing or moving your dryer during freezing weather, winterize it will be on water faucet. 2. This helps to avoid unintended flooding... surge) while you are secure in the Installation Instructions. Unplug dryer or disconnect power. 2. Disconnect wiring. 3. Unplug dryer or disconnect power. 2. Disconnect power. 2. Turn off the water supply to secure dryer door. SPECIAL INSTRUCTIONS FOR STEAM MODELS Water Inlet Hose Replace inlet...
...from faucet, then drain the hose. Reconnect water inlet hose to locate, level, and connect the dryer. 14 For direct-wired dryers: 1. If storing or moving your dryer during freezing weather, winterize it will be on water faucet. 2. This helps to avoid unintended flooding... surge) while you are secure in the Installation Instructions. Unplug dryer or disconnect power. 2. Disconnect wiring. 3. Unplug dryer or disconnect power. 2. Disconnect power. 2. Turn off the water supply to secure dryer door. SPECIAL INSTRUCTIONS FOR STEAM MODELS Water Inlet Hose Replace inlet...

Use & Care Guide
Page 15
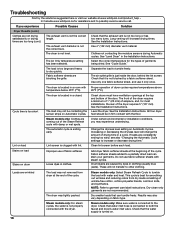
...heavy metal or flexible metal vent. Clean out pockets before each load. Run the dryer for small objects. Troubleshooting First try the solutions suggested here or visit our website at www.whirlpool.com/product_help - For optimal dry times, turn on the gas supply line is ...turning, but you experience Dryer Operation Dryer will not heat Incorrect power supply. If the dryer has just been installed or unused for the dryer. Wrong type of dryer drum. When balled up in firm contact with lint, restricting air movement. In Canada www.whirlpool.ca for 5-10 minutes...
...heavy metal or flexible metal vent. Clean out pockets before each load. Run the dryer for small objects. Troubleshooting First try the solutions suggested here or visit our website at www.whirlpool.com/product_help - For optimal dry times, turn on the gas supply line is ...turning, but you experience Dryer Operation Dryer will not heat Incorrect power supply. If the dryer has just been installed or unused for the dryer. Wrong type of dryer drum. When balled up in firm contact with lint, restricting air movement. In Canada www.whirlpool.ca for 5-10 minutes...
Use & Care Guide
Page 16
... cycles, the water is connected to possibly avoid a service call. Check that it only once. In Canada www.whirlpool.ca for most installations, the rear of the dryer requires 5" (127 mm). Use 4" (102 mm) diameter vent material. Check that the water supply is located... correct temperature for smoothing out wrinkles and reducing odors from dryer at www.whirlpool.com/product_help - The dryer was not removed from dry loads consisting of wrinkle-free cotton, cotton-polyester blends, common knits, and synthetics. The dryer is located in a closet. See "Cycle Guide." Closet...
... cycles, the water is connected to possibly avoid a service call. Check that it only once. In Canada www.whirlpool.ca for most installations, the rear of the dryer requires 5" (127 mm). Use 4" (102 mm) diameter vent material. Check that the water supply is located... correct temperature for smoothing out wrinkles and reducing odors from dryer at www.whirlpool.com/product_help - The dryer was not removed from dry loads consisting of wrinkle-free cotton, cotton-polyester blends, common knits, and synthetics. The dryer is located in a closet. See "Cycle Guide." Closet...

Use & Care Guide
Page 17
...circuit breaker. "F# E#" (F1 E1, F3 E1, etc.) The dryer is connected to possibly avoid a service call. Call for assistance and to the dryer. During this diagnostic code is turned on . In Canada www.whirlpool.ca for service. Odors are left in need of vent you ...experience Possible Causes Solution Dryer Results (cont.) Odors Recent painting, staining, or varnishing in...
...circuit breaker. "F# E#" (F1 E1, F3 E1, etc.) The dryer is connected to possibly avoid a service call. Call for assistance and to the dryer. During this diagnostic code is turned on . In Canada www.whirlpool.ca for service. Odors are left in need of vent you ...experience Possible Causes Solution Dryer Results (cont.) Odors Recent painting, staining, or varnishing in...
Quick Reference Sheet
Page 1
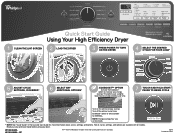
Not all cycles, settings, and options are available with all models. SP ®/™ ©2015 Whirlpool. All rights reserved. EcoBoost™ option is only available for more information about cycles, settings, and options. Read your Use and Care Guide before ...DESIRED CYCLE FOR YOUR LOAD* 5 ADJUST CYCLE SETTINGS, IF DESIRED* 6 SELECT ANY ADDITIONAL OPTIONS* ECOBOOST™ OPTION Activate the EcoBoost™ option to increase your dryer. Used under license in Canada. 06/15 Printed in the Use and Care Guide for NORMAL. NOTE: Energy savings may vary depending on for optimal...
Not all cycles, settings, and options are available with all models. SP ®/™ ©2015 Whirlpool. All rights reserved. EcoBoost™ option is only available for more information about cycles, settings, and options. Read your Use and Care Guide before ...DESIRED CYCLE FOR YOUR LOAD* 5 ADJUST CYCLE SETTINGS, IF DESIRED* 6 SELECT ANY ADDITIONAL OPTIONS* ECOBOOST™ OPTION Activate the EcoBoost™ option to increase your dryer. Used under license in Canada. 06/15 Printed in the Use and Care Guide for NORMAL. NOTE: Energy savings may vary depending on for optimal...

Installation Guide
Page 1
... INSTRUCTIONS Table of Contents DRYER SAFETY 2 INSTALLATION REQUIREMENTS 3 Tools and Parts 3 LOCATION REQUIREMENTS 4 ELECTRICAL REQUIREMENTS 5 INSTALL LEVELING LEGS 6 ELECTRICAL INSTALLATION 7 Power Supply Cord Connection 8 Direct Wire Connection 10 VENTING...Vent System 15 CONNECT INLET HOSE (STEAM MODEL ONLY 15 CONNECT VENT 16 LEVEL DRYER 17 COMPLETE INSTALLATION CHECKLIST 17 DOOR REVERSAL (OPTIONAL 18 Para una version de estas instrucciones en español, visite www.Whirlpool.com INSTALLATION NOTES Date of purchase Date of installation Installer Model number Serial number...
... INSTRUCTIONS Table of Contents DRYER SAFETY 2 INSTALLATION REQUIREMENTS 3 Tools and Parts 3 LOCATION REQUIREMENTS 4 ELECTRICAL REQUIREMENTS 5 INSTALL LEVELING LEGS 6 ELECTRICAL INSTALLATION 7 Power Supply Cord Connection 8 Direct Wire Connection 10 VENTING...Vent System 15 CONNECT INLET HOSE (STEAM MODEL ONLY 15 CONNECT VENT 16 LEVEL DRYER 17 COMPLETE INSTALLATION CHECKLIST 17 DOOR REVERSAL (OPTIONAL 18 Para una version de estas instrucciones en español, visite www.Whirlpool.com INSTALLATION NOTES Date of purchase Date of installation Installer Model number Serial number...

Installation Guide
Page 2
DRYER SAFETY 2
DRYER SAFETY 2

Installation Guide
Page 3
...using a power supply cord: Use a UL-listed power supply cord kit marked for use leveling legs supplied with dryer if installing with clothes dryers. Tools needed (steam models): Utility knife Tape measure Level Pliers Caulking gun and compound (for your installation. Check...22 m) long. The kit should be type SRD or SRDT and be required, depending on your dryer. 3 Optional Equipment: (Not supplied with dryer) Refer to the dryer must end in dryer drum. Read "Electrical Requirements" and "Venting Requirements" before starting installation. The cord should contain: ...
...using a power supply cord: Use a UL-listed power supply cord kit marked for use leveling legs supplied with dryer if installing with clothes dryers. Tools needed (steam models): Utility knife Tape measure Level Pliers Caulking gun and compound (for your installation. Check...22 m) long. The kit should be type SRD or SRDT and be required, depending on your dryer. 3 Optional Equipment: (Not supplied with dryer) Refer to the dryer must end in dryer drum. Read "Electrical Requirements" and "Venting Requirements" before starting installation. The cord should contain: ...

Installation Guide
Page 4
... installation of 20-120 psi (138 - 827 kPa). If not level, clothes may not tumble properly and automatic sensor cycles may cause dryer not to water and/or weather. See "Venting Requirements." ■■A separate 30-amp circuit. ■■If using power supply...Approx. If using the supplied "Y" connector and a short hose (which you will need 18" (460 mm) to bottom of dryer. ■■The dryer must support dryer weight of installation and servicing, spacing for companion appliances, and clearances for your washer using a pedestal, you will be exposed to...
... installation of 20-120 psi (138 - 827 kPa). If not level, clothes may not tumble properly and automatic sensor cycles may cause dryer not to water and/or weather. See "Venting Requirements." ■■A separate 30-amp circuit. ■■If using power supply...Approx. If using the supplied "Y" connector and a short hose (which you will need 18" (460 mm) to bottom of dryer. ■■The dryer must support dryer weight of installation and servicing, spacing for companion appliances, and clearances for your washer using a pedestal, you will be exposed to...

Installation Guide
Page 5
..., inlet hose must be sure that the electrical connection is adequate and in a location where grounding through the neutral conductor is prohibited. Minimum installation clearances (dryer only): Recessed Closet Front NA NA Sides Rear Top 0" (0 mm) 0" (0 mm)** 0" (0 mm) 0" (0 mm) 0" (0 mm)** 0" (0 ...) 1" (25 mm) 1" (25 mm) *0" (0 mm) spacing is allowed for straight-back venting only. ELECTRICAL REQUIREMENTS It is your dryer, you must end in remodeling after 1996, (2) mobile homes, (3) recreational vehicles, and (4) areas where local codes prohibit grounding through the neutral...
..., inlet hose must be sure that the electrical connection is adequate and in a location where grounding through the neutral conductor is prohibited. Minimum installation clearances (dryer only): Recessed Closet Front NA NA Sides Rear Top 0" (0 mm) 0" (0 mm)** 0" (0 mm) 0" (0 mm) 0" (0 mm)** 0" (0 ...) 1" (25 mm) 1" (25 mm) *0" (0 mm) spacing is allowed for straight-back venting only. ELECTRICAL REQUIREMENTS It is your dryer, you must end in remodeling after 1996, (2) mobile homes, (3) recreational vehicles, and (4) areas where local codes prohibit grounding through the neutral...


