Owners Manual
Page 5
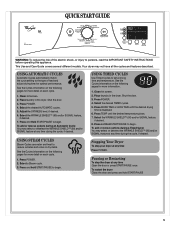
This Use and Care Guide covers several different models. Clean lint screen. 2. Press and hold START/PAUSE 5 Press POWER. 4. See the Cycles information on the following pages for more detail on each cycle. 1. Place ...
This Use and Care Guide covers several different models. Clean lint screen. 2. Press and hold START/PAUSE 5 Press POWER. 4. See the Cycles information on the following pages for more detail on each cycle. 1. Place ...
Owners Manual
Page 6
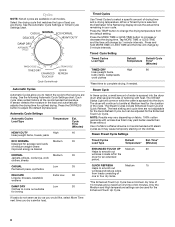
Cycles NOTE: Not all models. See the Automatic Cycle Settings or Timed Cycle Settings chart. Press the DRYNESS button to increase or decrease the drying time. Press the MORE TIME ...
Cycles NOTE: Not all models. See the Automatic Cycle Settings or Timed Cycle Settings chart. Press the DRYNESS button to increase or decrease the drying time. Press the MORE TIME ...
Owners Manual
Page 7
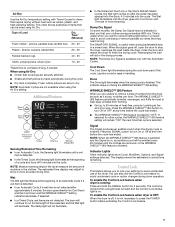
.... shower curtains, tablecloths 20 - 30 Rubber-backed rugs 40 - 50 Olefin, polypropylene, sheer nylon 10 - 20 *Reset time to dry. Damp Dry Signal On some models, the Damp Dry Signal may need ironing. When the signal goes off , it stops, wrinkles can form. This indicator stays on , an audible sound will...
.... shower curtains, tablecloths 20 - 30 Rubber-backed rugs 40 - 50 Olefin, polypropylene, sheer nylon 10 - 20 *Reset time to dry. Damp Dry Signal On some models, the Damp Dry Signal may need ironing. When the signal goes off , it stops, wrinkles can form. This indicator stays on , an audible sound will...
Owners Manual
Page 10
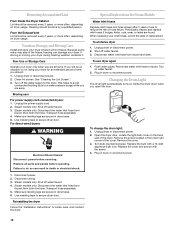
...you are away. Transport hose separately. 4. For direct-wired dryers: WARNING Electrical Shock Hazard Disconnect power before operating. Disconnect power. 2. Steam models only: Shut off water faucet. 3. Use masking tape to locate, level, and connect the dryer. Reinstalling the dryer Follow the "Installation ... cord-connected dryers: 1. Make sure leveling legs are at home. If you will not freeze. Turn off water faucet. 3. Steam models only: Disconnect the water inlet hose from faucet, then drain the hose. Transport hose separately. 5. Changing the Drum Light The dryer ...
...you are away. Transport hose separately. 4. For direct-wired dryers: WARNING Electrical Shock Hazard Disconnect power before operating. Disconnect power. 2. Steam models only: Shut off water faucet. 3. Use masking tape to locate, level, and connect the dryer. Reinstalling the dryer Follow the "Installation ... cord-connected dryers: 1. Make sure leveling legs are at home. If you will not freeze. Turn off water faucet. 3. Steam models only: Disconnect the water inlet hose from faucet, then drain the hose. Transport hose separately. 5. Changing the Drum Light The dryer ...
Owners Manual
Page 13
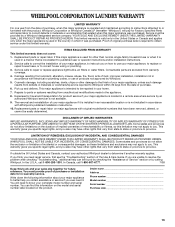
...and repair labor to correct defects in materials or workmanship that existed when this information on the model and serial number label located on the product. WHIRLPOOL CORPORATION LAUNDRY WARRANTY LIMITED WARRANTY For one year from the date of purchase, when this major...to instructions attached to or furnished with the product, Whirlpool Corporation or Whirlpool Canada LP (hereafter "Whirlpool") will need to know your authorized Whirlpool dealer to determine if another warranty applies. Dealer name Address Phone number Model number Serial number Purchase date 13 In Canada, call ...
...and repair labor to correct defects in materials or workmanship that existed when this information on the model and serial number label located on the product. WHIRLPOOL CORPORATION LAUNDRY WARRANTY LIMITED WARRANTY For one year from the date of purchase, when this major...to instructions attached to or furnished with the product, Whirlpool Corporation or Whirlpool Canada LP (hereafter "Whirlpool") will need to know your authorized Whirlpool dealer to determine if another warranty applies. Dealer name Address Phone number Model number Serial number Purchase date 13 In Canada, call ...
Dimension Guide
Page 1
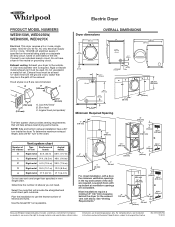
...) 48 in.2 (310 cm2) 3" (76 mm) 24 in.2 (155 cm2) 1" (25 mm) 1" (25 mm) Because Whirlpool Corporation policy includes a continuous commitment to improve our products, we reserve the right to the chart. Electric Dryer PRODUCT MODEL NUMBERS WED9150W, WED9250W, WED9050X, WED9270X Electrical: This dryer requires a 3 or 4 wire, single phase, 120/240 volt...
...) 48 in.2 (310 cm2) 3" (76 mm) 24 in.2 (155 cm2) 1" (25 mm) 1" (25 mm) Because Whirlpool Corporation policy includes a continuous commitment to improve our products, we reserve the right to the chart. Electric Dryer PRODUCT MODEL NUMBERS WED9150W, WED9250W, WED9050X, WED9270X Electrical: This dryer requires a 3 or 4 wire, single phase, 120/240 volt...
Installation Instructions
Page 3
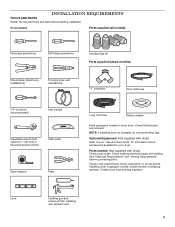
... Long inlet hose Rubber washer Parts package is located in garages, closets, mobile homes, or sleeping quarters. Check that all models): Flat-blade screwdriver #2 Phillips screwdriver Leveling legs (4) Parts supplied (steam models): Wire stripper (direct wire installations) Tin snips (new vent installations) "Y" connector Short inlet hose 1/4" nut driver (recommended) Vent clamps Adjustable...
... Long inlet hose Rubber washer Parts package is located in garages, closets, mobile homes, or sleeping quarters. Check that all models): Flat-blade screwdriver #2 Phillips screwdriver Leveling legs (4) Parts supplied (steam models): Wire stripper (direct wire installations) Tin snips (new vent installations) "Y" connector Short inlet hose 1/4" nut driver (recommended) Vent clamps Adjustable...
Installation Instructions
Page 6
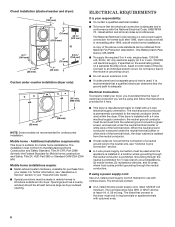
... mm) 3" (76 mm) 24 in.2 (155 cm2) 1" (25 mm) Custom under counter installation (dryer only): 39" min. (990 mm) 1" (25 mm) 1" (25 mm) NOTE: Some models not recommended for it is recommended that a qualified electrician determine that the ground path is adequate. Do not have a fuse in the neutral or grounding...
... mm) 3" (76 mm) 24 in.2 (155 cm2) 1" (25 mm) Custom under counter installation (dryer only): 39" min. (990 mm) 1" (25 mm) 1" (25 mm) NOTE: Some models not recommended for it is recommended that a qualified electrician determine that the ground path is adequate. Do not have a fuse in the neutral or grounding...
Installation Instructions
Page 17
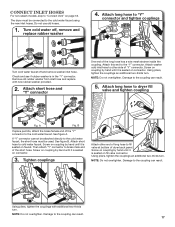
... is seated on connector. 3. Screw on coupling by hand until it is in the "Y" connector. NOTE: Do not overtighten. CONNECT INLET HOSES For non-steam models, skip to "Connect Vent" on fill valve connector. Attach long hose to the cold water faucet. See figure A. See figure B. Then attach "Y" connector to brass...
... is seated on connector. 3. Screw on coupling by hand until it is in the "Y" connector. NOTE: Do not overtighten. CONNECT INLET HOSES For non-steam models, skip to "Connect Vent" on fill valve connector. Attach long hose to the cold water faucet. See figure A. See figure B. Then attach "Y" connector to brass...

Warranty
Page 1
...that have been removed, altered, or cannot be repaired in your complete model number and serial number. You must be found by checking the "Assistance or Service" section or by a Whirlpool designated service company. Write down the following information about your major appliance to... know your home. 7. Dealer name Address Phone number Model number Serial number Purchase date 13 WHIRLPOOL SHALL NOT BE LIABLE FOR INCIDENTAL OR CONSEQUENTIAL DAMAGES. If you think you . WHIRLPOOL CORPORATION LAUNDRY WARRANTY LIMITED WARRANTY For one year from the date of ...
...that have been removed, altered, or cannot be repaired in your complete model number and serial number. You must be found by checking the "Assistance or Service" section or by a Whirlpool designated service company. Write down the following information about your major appliance to... know your home. 7. Dealer name Address Phone number Model number Serial number Purchase date 13 WHIRLPOOL SHALL NOT BE LIABLE FOR INCIDENTAL OR CONSEQUENTIAL DAMAGES. If you think you . WHIRLPOOL CORPORATION LAUNDRY WARRANTY LIMITED WARRANTY For one year from the date of ...


