Dimension Guide
Page 1
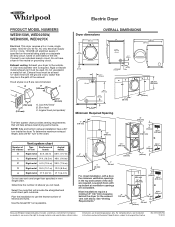
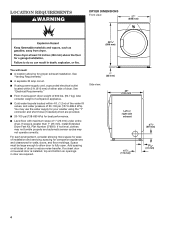
... Rigid metal 27 ft. (8.2 m) 21 ft. (6.4 m) Do not use vent runs longer than specified in .2 (155 cm2) 1" (25 mm) 1" (25 mm) Because Whirlpool Corporation policy includes a continuous commitment to improve our products, we reserve the right to the chart. B 4" C (102 mm) A 4" (102 mm) 4" (102 mm) ... and specifications without notice. Louvered doors with elbow. Most installations require a minimum 5" (127 mm) clearance behind the dryer for planning purposes only. Dimensions are for the exhaust vent with equivalent air ventilation openings are recommended. For complete details,...
... Rigid metal 27 ft. (8.2 m) 21 ft. (6.4 m) Do not use vent runs longer than specified in .2 (155 cm2) 1" (25 mm) 1" (25 mm) Because Whirlpool Corporation policy includes a continuous commitment to improve our products, we reserve the right to the chart. B 4" C (102 mm) A 4" (102 mm) 4" (102 mm) ... and specifications without notice. Louvered doors with elbow. Most installations require a minimum 5" (127 mm) clearance behind the dryer for planning purposes only. Dimensions are for the exhaust vent with equivalent air ventilation openings are recommended. For complete details,...
Installation Instructions
Page 2
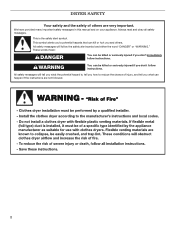
... if the instructions are very important. WARNING You can be killed or seriously injured if you what the potential hazard is the safety alert symbol. DRYER SAFETY Your safety and the safety of injury, and tell you don't immediately follow instructions. This symbol alerts you to reduce the chance of others...
... if the instructions are very important. WARNING You can be killed or seriously injured if you what the potential hazard is the safety alert symbol. DRYER SAFETY Your safety and the safety of injury, and tell you don't immediately follow instructions. This symbol alerts you to reduce the chance of others...
Installation Instructions
Page 3
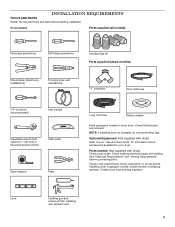
...Rubber washer Parts package is located in garages, closets, mobile homes, or sleeping quarters. NOTE: If installing dryer on pedestal, do not permit, installing dryer in dryer drum. Check existing electrical supply and venting. Check code requirements. Level Caulking gun and compound (for your...recommended) Vent clamps Adjustable wrench that all parts are included. Some codes limit, or do not use leveling legs. Contact your dryer. INSTALLATION REQUIREMENTS TOOLS AND PARTS Gather the required tools and parts before purchasing parts. Check that opens to your "Use and ...
...Rubber washer Parts package is located in garages, closets, mobile homes, or sleeping quarters. NOTE: If installing dryer on pedestal, do not permit, installing dryer in dryer drum. Check existing electrical supply and venting. Check code requirements. Level Caulking gun and compound (for your...recommended) Vent clamps Adjustable wrench that all parts are included. Some codes limit, or do not use leveling legs. Contact your dryer. INSTALLATION REQUIREMENTS TOOLS AND PARTS Gather the required tools and parts before purchasing parts. Check that opens to your "Use and ...
Installation Instructions
Page 4
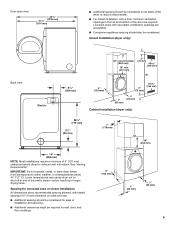
...companion appliance. ■■ Cold water faucets located within 2 ft. (610 mm) of either side of 20-100 psi (137.9-689.6 kPa). LOCATION REQUIREMENTS DRYER DIMENSIONS Front view: 27" (686 mm) 35 3/8" (899 mm) You will need: ■■ A location allowing for walls, doors, and floor moldings.... in door are provided. ■■ 20-100 psi (138-690 kPa) for ease of 200 lbs. (90.7 kg). Space must support dryer weight of installation and servicing; See "Electrical Requirements." ■■ Floor must be large enough to allow door to reduce noise transfer. See "...
...companion appliance. ■■ Cold water faucets located within 2 ft. (610 mm) of either side of 20-100 psi (137.9-689.6 kPa). LOCATION REQUIREMENTS DRYER DIMENSIONS Front view: 27" (686 mm) 35 3/8" (899 mm) You will need: ■■ A location allowing for walls, doors, and floor moldings.... in door are provided. ■■ 20-100 psi (138-690 kPa) for ease of 200 lbs. (90.7 kg). Space must support dryer weight of installation and servicing; See "Electrical Requirements." ■■ Floor must be large enough to allow door to reduce noise transfer. See "...
Installation Instructions
Page 5
...Back view: Electric 61/4" (159 mm) 4" (102 mm) 3" (76 mm) 24 in longer drying times. IMPORTANT: Do not operate, install, or store dryer where it will be exposed to water, weather, or at end of automatic sensor cycles, resulting in .2 (155 cm2) 1" (25 mm) 1" (25 ...installation All dimensions show recommended spacing allowed, with a door, minimum ventilation openings in the top and bottom of 5" (127 mm) clearance behind dryer for exhaust vent with elbow. Louvered doors with equivalent ventilitation openings are required. See "Venting Requirements." Door open view: 481/8" (1238 mm...
...Back view: Electric 61/4" (159 mm) 4" (102 mm) 3" (76 mm) 24 in longer drying times. IMPORTANT: Do not operate, install, or store dryer where it will be exposed to water, weather, or at end of automatic sensor cycles, resulting in .2 (155 cm2) 1" (25 mm) 1" (25 ...installation All dimensions show recommended spacing allowed, with a door, minimum ventilation openings in the top and bottom of 5" (127 mm) clearance behind dryer for exhaust vent with elbow. Louvered doors with equivalent ventilitation openings are required. See "Venting Requirements." Door open view: 481/8" (1238 mm...
Installation Instructions
Page 6
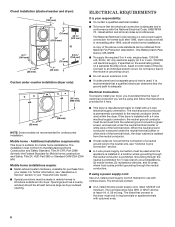
...neutral wire, see "Assistance or Service" section in your dealer. Do not have a fuse in mobile homes to introduce outside air into dryer. Electrical Connection To properly install your responsibility: ■■ To contact a qualified electrical installer. ■■ To be removed from...neutral conductors. If using and follow the instructions provided for mobile home installations. The wires that the electrical connection is secured under counter installation (dryer only): 39" min. (990 mm) 1" (25 mm) 1" (25 mm) NOTE: Some models not recommended for use an extension...
...neutral wire, see "Assistance or Service" section in your dealer. Do not have a fuse in mobile homes to introduce outside air into dryer. Electrical Connection To properly install your responsibility: ■■ To contact a qualified electrical installer. ■■ To be removed from...neutral conductors. If using and follow the instructions provided for mobile home installations. The wires that the electrical connection is secured under counter installation (dryer only): 39" min. (990 mm) 1" (25 mm) 1" (25 mm) NOTE: Some models not recommended for use an extension...
Installation Instructions
Page 7
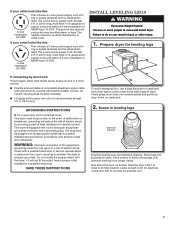
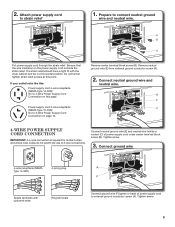
...cable or nonmetallic sheathed copper cable (with ground wire), covered with a cord having an equipmentgrounding conductor and a grounding plug. Now stand the dryer on cardboard. 2. The ground wire (ground conductor) may be identified by providing a path of the equipment- place under entire back edge of...visible. The neutral conductor must be plugged into leg holes by a qualified electrician. Do not modify the plug provided with the dryer: if it is equipped with flexible metallic conduit. All current-carrying wires must be either green or bare. Install Leveling Legs ...
...cable or nonmetallic sheathed copper cable (with ground wire), covered with a cord having an equipmentgrounding conductor and a grounding plug. Now stand the dryer on cardboard. 2. The ground wire (ground conductor) may be identified by providing a path of the equipment- place under entire back edge of...visible. The neutral conductor must be plugged into leg holes by a qualified electrician. Do not modify the plug provided with the dryer: if it is equipped with flexible metallic conduit. All current-carrying wires must be either green or bare. Install Leveling Legs ...
Installation Instructions
Page 9
... Cord Connection IMPORTANT: A 4-wire connection is inside the strain relief. Connect ground wire 4-wire receptacle (NEMA type 14-30R) 4-prong plug Spade terminals with the dryer cabinet and be in a horizontal position. If your outlet looks like this: Power supply cord 4-wire receptacle (NEMA Type 14-30R): Go to 4-Wire Power...
... Cord Connection IMPORTANT: A 4-wire connection is inside the strain relief. Connect ground wire 4-wire receptacle (NEMA type 14-30R) 4-prong plug Spade terminals with the dryer cabinet and be in a horizontal position. If your outlet looks like this: Power supply cord 4-wire receptacle (NEMA Type 14-30R): Go to 4-Wire Power...
Installation Instructions
Page 10
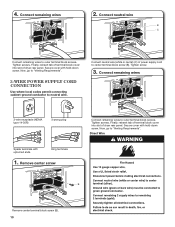
... Requirements". Remove center screw Connect remaining wires to outer terminal block screws. Finally, reinsert tab of terminal block cover into slot of dryer rear panel. Connect remaining wires 3-wire receptacle (NEMA type 14-30R) 3-prong plug Spade terminals with hold -down screw. Now... screw (B). Tighten screws. Secure cover with upturned ends Ring terminals 1. Finally, reinsert tab of terminal block cover into slot of dryer rear panel. Tighten screws. Connect neutral wire (white or center) (C) of power supply cord to neutral wire. Connect remaining wires...
... Requirements". Remove center screw Connect remaining wires to outer terminal block screws. Finally, reinsert tab of terminal block cover into slot of dryer rear panel. Connect remaining wires 3-wire receptacle (NEMA type 14-30R) 3-prong plug Spade terminals with hold -down screw. Now... screw (B). Tighten screws. Secure cover with upturned ends Ring terminals 1. Finally, reinsert tab of terminal block cover into slot of dryer rear panel. Tighten screws. Connect neutral wire (white or center) (C) of power supply cord to neutral wire. Connect remaining wires...
Installation Instructions
Page 11
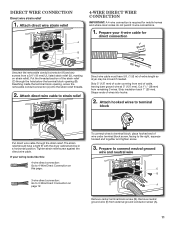
...IMPORTANT: A 4-wire connection is required for direct connection (251"mm) (127 5" mm) Direct wire cable must have a tight fit with the dryer cabinet and be moved if needed. Reaching inside the terminal block opening (B). Attach direct wire cable to connect neutral ground wire and neutral wire E...hole below the terminal block opening , screw the removable conduit connector (A) onto the strain relief threads. 2. Shape ends of extra length so dryer may be in a horizontal position. Direct Wire Connection Direct wire strain relief 1. Strip 5" (127 mm) of the strain relief (C) through ...
...IMPORTANT: A 4-wire connection is required for direct connection (251"mm) (127 5" mm) Direct wire cable must have a tight fit with the dryer cabinet and be moved if needed. Reaching inside the terminal block opening (B). Attach direct wire cable to connect neutral ground wire and neutral wire E...hole below the terminal block opening , screw the removable conduit connector (A) onto the strain relief threads. 2. Shape ends of extra length so dryer may be in a horizontal position. Direct Wire Connection Direct wire strain relief 1. Strip 5" (127 mm) of the strain relief (C) through ...

Installation Instructions
Page 12
...of remaining direct wire cable wires under outer terminal block screws (hooks facing right). Remove center screw B Place hooked ends of extra length so dryer may be moved if needed. Strip insulation back 1" (25 mm). Shape wire ends into slot of wire under center screw of cable. ...of neutral wire (white or center wire) (C) of direct wire cable under terminal block screw, facing to terminal block, place hooked end of dryer rear panel. Secure cover with outer covering. 4. Strip 31/2" (89 mm) of outer covering from end of terminal block (B). Connect remaining wires...
...of remaining direct wire cable wires under outer terminal block screws (hooks facing right). Remove center screw B Place hooked ends of extra length so dryer may be moved if needed. Strip insulation back 1" (25 mm). Shape wire ends into slot of wire under center screw of cable. ...of neutral wire (white or center wire) (C) of direct wire cable under terminal block screw, facing to terminal block, place hooked end of dryer rear panel. Secure cover with outer covering. 4. Strip 31/2" (89 mm) of outer covering from end of terminal block (B). Connect remaining wires...
Installation Instructions
Page 13
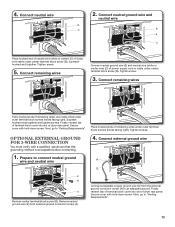
...3. Finally, reinsert tab of terminal block cover into slot of remaining wires under center terminal block screw (B). Place hooked ends of dryer rear panel. Finally, reinsert tab of terminal block cover into slot of direct wire cable under outer terminal block screws (hooks facing ...right). Connect neutral ground wire and neutral wire B C B E C Place hooked end of neutral wire (white or center) (C) of dryer rear panel. Secure cover with hold -down screw. Tighten screws. Connect remaining wires Connect neutral ground wire (E) and neutral wire (white or center ...
...3. Finally, reinsert tab of terminal block cover into slot of remaining wires under center terminal block screw (B). Place hooked ends of dryer rear panel. Finally, reinsert tab of terminal block cover into slot of direct wire cable under outer terminal block screws (hooks facing ...right). Connect neutral ground wire and neutral wire B C B E C Place hooked end of neutral wire (white or center) (C) of dryer rear panel. Secure cover with hold -down screw. Tighten screws. Connect remaining wires Connect neutral ground wire (E) and neutral wire (white or center ...
Installation Instructions
Page 14
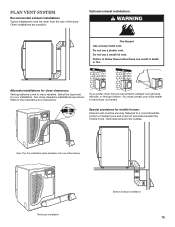
...4" (102 mm) heavy metal exhaust vent and clamps may result in reduced airflow and poor performance. ■■ Do not install in final dryer location. ■■ Remove excess to seal all governing codes and ordinances. Do not use plastic or metal foil vent. IMPORTANT: Observe all ...duct and catch lint. Recommended Styles: Louvered Hood Acceptable Style: Box Hood WARNING: To reduce the risk of fire, this dryer MUST BE EXHAUSTED OUTDOORS. Dryer exhaust must not be connected or secured with screws or other fastening devices that may obstruct exhaust (such as flowers, rocks,...
...4" (102 mm) heavy metal exhaust vent and clamps may result in reduced airflow and poor performance. ■■ Do not install in final dryer location. ■■ Remove excess to seal all governing codes and ordinances. Do not use plastic or metal foil vent. IMPORTANT: Observe all ...duct and catch lint. Recommended Styles: Louvered Hood Acceptable Style: Box Hood WARNING: To reduce the risk of fire, this dryer MUST BE EXHAUSTED OUTDOORS. Dryer exhaust must not be connected or secured with screws or other fastening devices that may obstruct exhaust (such as flowers, rocks,...
Installation Instructions
Page 15
...with one offset elbow) Periscope installation Bottom Exhaust installation 15 Do not use a heavy metal vent. Refer to have dryer converted. Terminate exhaust vent outside. Select the type best for mobile homes: Exhaust vent must be converted to a noncombustible portion of ...the dryer. Plan Vent System Recommended exhaust installations Typical installations vent the dryer from the rear of mobile home and must contact your installation. Special provisions for your local dealer ...
...with one offset elbow) Periscope installation Bottom Exhaust installation 15 Do not use a heavy metal vent. Refer to have dryer converted. Terminate exhaust vent outside. Select the type best for mobile homes: Exhaust vent must be converted to a noncombustible portion of ...the dryer. Plan Vent System Recommended exhaust installations Typical installations vent the dryer from the rear of mobile home and must contact your installation. Special provisions for your local dealer ...
Installation Instructions
Page 16
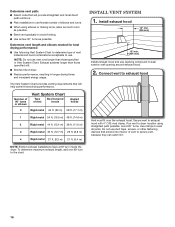
...90° turns as possible. Avoid 90° turns. The Vent System Chart provides venting requirements that will : ■■ Shorten life of dryer. ■■ Reduce performance, resulting in Vent System Chart. Number of 90° turns or elbows Vent System Chart Type of vent Box/...Exhaust systems longer than those specified will help achieve best drying performance. To determine maximum exhaust length, add one 90º turn inside the dryer. Do not use duct tape, screws, or other fastening devices that extend into interior of vent to the chart. Secure vent to seal ...
...90° turns as possible. Avoid 90° turns. The Vent System Chart provides venting requirements that will : ■■ Shorten life of dryer. ■■ Reduce performance, resulting in Vent System Chart. Number of 90° turns or elbows Vent System Chart Type of vent Box/...Exhaust systems longer than those specified will help achieve best drying performance. To determine maximum exhaust length, add one 90º turn inside the dryer. Do not use duct tape, screws, or other fastening devices that extend into interior of vent to the chart. Secure vent to seal ...
Installation Instructions
Page 17
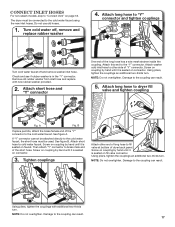
...Using pliers, tighten the couplings an additional two-thirds turn . Attach long hose to cold water faucet. See figure A. Attach short hose to dryer fill valve and tighten coupling Fig. Screw on coupling by hand until it is seated on coupling by hand until it is in the "Y" connector.... NOTE: Do not overtighten. Damage to the "Y" connector. The dryer must be connected to the cold water faucet. Attach short hose and "Y" connector One end of the "Y" connector to the cold water faucet using ...
...Using pliers, tighten the couplings an additional two-thirds turn . Attach long hose to cold water faucet. See figure A. Attach short hose to dryer fill valve and tighten coupling Fig. Screw on coupling by hand until it is seated on coupling by hand until it is in the "Y" connector.... NOTE: Do not overtighten. Damage to the "Y" connector. The dryer must be connected to the cold water faucet. Attach short hose and "Y" connector One end of the "Y" connector to the cold water faucet using ...
Installation Instructions
Page 18
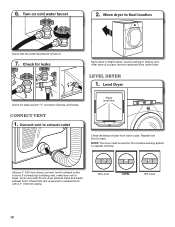
... exhaust outlet in place, remove cardboard from under dryer. After dryer is in dryer. Connect vent to exhaust outlet Place level here Check levelness of dryer from front to operate correctly. Not Level LEVEL Not Level 18 Level Dryer Check for the moisture sensing system to back. Dryer vent must be level for leaks around "Y" connector...
... exhaust outlet in place, remove cardboard from under dryer. After dryer is in dryer. Connect vent to exhaust outlet Place level here Check levelness of dryer from front to operate correctly. Not Level LEVEL Not Level 18 Level Dryer Check for the moisture sensing system to back. Dryer vent must be level for leaks around "Y" connector...

Installation Instructions
Page 19
... installation, plug into an outlet and/or electrical supply. • Household fuse is intact and tight, or circuit breaker has not tripped. • Dryer door is closed. q If you prefer to reverse the door swing on . q Select a Time Dry heated cycle, and start , check the following...Use and Care Guide" for leaks around "Y" connector, faucet, and hoses. For further information, see "Assistance or Service" section in your washer and dryer: A stack kit, Part Number 8572546 is plugged into a grounded outlet. q Remove film on console and any dust. Do not select Air Only ...
... installation, plug into an outlet and/or electrical supply. • Household fuse is intact and tight, or circuit breaker has not tripped. • Dryer door is closed. q If you prefer to reverse the door swing on . q Select a Time Dry heated cycle, and start , check the following...Use and Care Guide" for leaks around "Y" connector, faucet, and hoses. For further information, see "Assistance or Service" section in your washer and dryer: A stack kit, Part Number 8572546 is plugged into a grounded outlet. q Remove film on console and any dust. Do not select Air Only ...

Owners Manual
Page 2
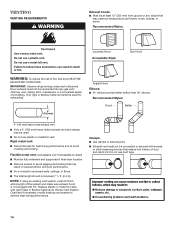
... follow instructions. WARNING You can be killed or seriously injured if you don't follow the safety alert symbol and either the word "DANGER" or "WARNING." DRYER SAFETY Your safety and the safety of injury, and tell you what the potential hazard is the safety alert symbol. These words mean: DANGER You...
... follow instructions. WARNING You can be killed or seriously injured if you don't follow the safety alert symbol and either the word "DANGER" or "WARNING." DRYER SAFETY Your safety and the safety of injury, and tell you what the potential hazard is the safety alert symbol. These words mean: DANGER You...

Owners Manual
Page 3
... to prevent property damage, personal injury, or death. - IMPORTANT: The gas installation must be performed by a qualified installer, service agency, or the gas supplier. The dryer must be followed to light any appliance. • Do not touch any phone in the absence of local codes, with the National Fuel Gas Code...
... to prevent property damage, personal injury, or death. - IMPORTANT: The gas installation must be performed by a qualified installer, service agency, or the gas supplier. The dryer must be followed to light any appliance. • Do not touch any phone in the absence of local codes, with the National Fuel Gas Code...


