Whirlpool WED9050XW Support Question
Whirlpool WED9050XW Support Question
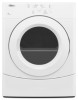
Find answers below for this question about Whirlpool WED9050XW.Need a Whirlpool WED9050XW manual? We have 4 online manuals for this item!
Question posted by kikosbo on July 12th, 2014
Why Would A Dryer Just Stop
The person who posted this question about this Whirlpool product did not include a detailed explanation. Please use the "Request More Information" button to the right if more details would help you to answer this question.
Current Answers
Related Whirlpool WED9050XW Manual Pages
Dimension Guide - Page 1
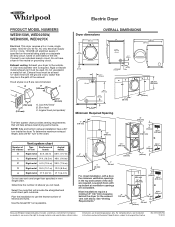
...Plan the installation to the chart.
Most installations require a minimum 5" (127 mm) clearance behind the dryer for planning purposes only. See "Venting Requirements."
4" (102 mm)
34" recommended (864 mm)
18... without notice.
Select the route that will need. Exhaust venting: Exhaust your dryer to an individual branch circuit.
Rigid or flexible metal exhaust vent must be ...
Installation Instructions - Page 2
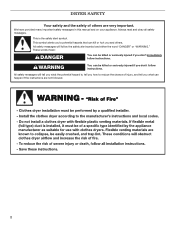
DRYER SAFETY
Your safety and the safety of injury, and tell you what the potential hazard is the safety alert symbol. This is , tell you and ...
Installation Instructions - Page 3
... exhaust vent)
3
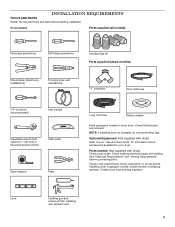
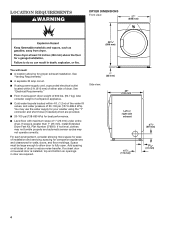
Parts needed :
Parts supplied (all parts are included. Contact your dryer. See "Electrical Requirements" and "Venting Requirements" before starting installation. Some codes limit,... compound (for your local building inspector. Optional Equipment: (Not supplied with dryer) Check local codes.
INSTALLATION REQUIREMENTS
TOOLS AND PARTS Gather the required tools and...
Installation Instructions - Page 4
... spacing for companion appliances and clearances for proper exhaust installation.
Space must support dryer weight of dryer. For each arrangement, consider allowing more space for best performance.
■■... of the water fill valves, and water pressure of 1" (25 mm) under entire dryer. LOCATION REQUIREMENTS
DRYER DIMENSIONS Front view:
27" (686 mm)
35 3/8"
(899 mm)
You will need...
Installation Instructions - Page 5
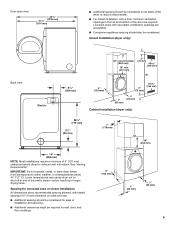
...of the door are acceptable.
■■ Companion appliance spacing should be considered for ease of the dryer to shut off at temperatures below 45° F (7° C). Door open view:
481/8" (... doors with a door, minimum ventilation openings in .2 (155 cm2)
1" (25 mm)
1" (25 mm)
Cabinet installation (dryer only):
281/8"
(715 mm)
31/2"
(89 mm)
7" (178 mm)
18" (460 mm)
14" (358 mm)...
Installation Instructions - Page 6
...9632; To be at least 4 ft. (1.22 m) long. Openings (such as dryer exhaust opening.
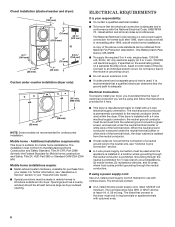
If the dryer is adequate. The wires that connect to the Manufactured Home Construction and Safety Standard, Title...Mobile home - If using and follow the instructions provided for homes built after 1996, dryer circuits involved in remodeling after 1996, and all local codes and ordinances. The cord should...
Installation Instructions - Page 7
..., at least 4 ft. (1.22 m) long, must be identified by providing a path of electric shock by a white cover.
GROUNDING INSTRUCTIONS
� For a grounded, cord-connected dryer: This dryer must be plugged into leg holes by a qualified electrician.
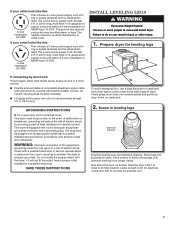
Install Leveling Legs
WARNING
Excessive Weight Hazard Use two or more people to its feet. The...
Installation Instructions - Page 9
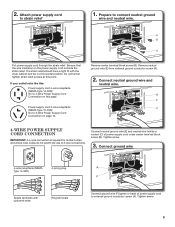
... neutral ground wire (E) from external ground conductor screw (A).
2. Tighten screw.
3. Connect ground wire
4-wire receptacle (NEMA type 14-30R)
4-prong plug
Spade terminals with the dryer cabinet and be in a horizontal position. Prepare to strain relief
1. Do not further tighten strain relief screws at this page. Power supply cord 3-wire receptacle...
Installation Instructions - Page 10
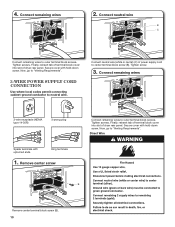
Tighten screws. Finally, reinsert tab of terminal block cover into slot of dryer rear panel. Connect neutral wire (white or center) (C) of dryer rear panel. Remove center screw
Connect remaining wires to outer terminal block screws. Now, go to "Venting Requirements". Tighten screws. Direct Wire
B
Remove center terminal ...
Installation Instructions - Page 11
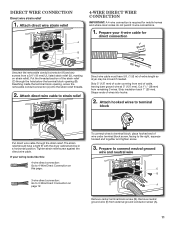
...)
(127
5" mm)
Direct wire cable must have a tight fit with the dryer cabinet and be moved if needed. Remove neutral ground wire (E) from remaining 3 wires. Shape ends of extra length... so dryer may be in a horizontal position. Cut 11/2" (38 mm) from external ground conductor screw ...
Installation Instructions - Page 12

...(white or center wire) (C) of direct wire cable under center screw of extra length so dryer may be moved if needed. If using 3-wire cable with ground wire, cut bare wire ...;m" )
Direct wire cable must have 5 ft. (1.52 m) of terminal block (B). Shape wire ends into slot of dryer rear panel. Now, go to neutral wire.
1. Squeeze hooked ends together and tighten screw.
5. Tighten screw.
6. ...
Installation Instructions - Page 13
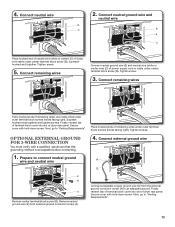
... ground wire (E) and neutral wire (white or center wire) (C) of dryer rear panel. Tighten screws. Squeeze hooked end together. Finally, reinsert tab ...wire and neutral wire
B
C
B
E
C
Place hooked end of neutral wire (white or center) (C) of dryer rear panel. Connect remaining wires
Place hooked ends of remaining wires under outer terminal block screws (hooks facing right). ...
Installation Instructions - Page 14
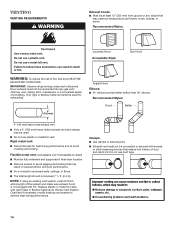
... in reduced airflow and poor performance.
■■ Do not install in final dryer location.
■■ Remove excess to avoid crushing and kinking. Do not use...Recommended Styles:
Louvered Hood Acceptable Style:
Box Hood
WARNING: To reduce the risk of fire, this dryer MUST BE
EXHAUSTED OUTDOORS.
Recommended Styles:
Good
Better
4" (102 mm) heavy metal exhaust vent
■...
Installation Instructions - Page 15
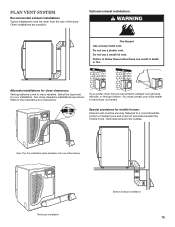
... vent outside. Over-The-Top installation (also available with one offset elbow)
Periscope installation
Bottom Exhaust installation
15 Other installations are shown. If you prefer, dryer may be securely fastened to exhaust out right side, left side, or through bottom. Select the type best for mobile homes:
Exhaust vent must be...
Installation Instructions - Page 16
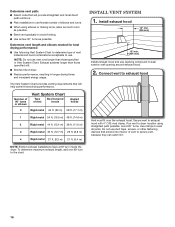
...; turn to the chart. To determine maximum exhaust length, add one 90º turn inside the dryer. Install Vent System
1. Secure vent to seal all joints. Exhaust systems longer than those specified will ... tape, screws, or other fastening devices that will :
■■ Shorten life of dryer.
■■ Reduce performance, resulting in Vent System Chart.
NOTE: Do not use ...
Installation Instructions - Page 17
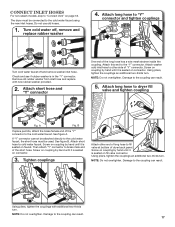
... INLET HOSES
For non-steam models, skip to "Connect Vent" on fill valve connector. The dryer must be attached directly to brass male end of the "Y" connector to the cold water faucet ... short hose must be connected to the cold water faucet.
Attach short hose to other end of dryer back panel. NOTE: Do not overtighten. Attach washer cold inlet hose to cold water faucet. See...
Installation Instructions - Page 18
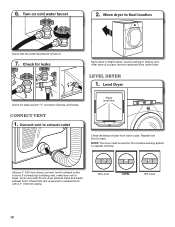
...moisture sensing system to side. Check for leaks around "Y" connector, faucets, and hoses.
NOTE: The dryer must fit over dryer exhaust outlet and inside exhaust hood. Using a 4" (102 mm) clamp, connect vent to final ...vent is clean. Not Level
LEVEL
Not Level
18 Turn on .
7. Move dryer to exhaust hood with a 4" (102 mm) clamp.
Check that the water faucets are turned on cold water...
Owners Manual - Page 4
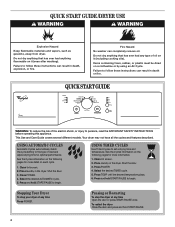
...door. 3. Press POWER. 4. Press TEMP until the desired temperature glows. 6. Stopping Your Dryer
To stop the dryer at any time Open the door or press START/PAUSE once.
Items containing foam... Cycle. Clean lint screen. 2. Place laundry in the dryer.
Pausing or Restarting
To stop your dryer at any time
Press POWER. To restart the dryer Close the door and press and hold START/...
Owners Manual - Page 6
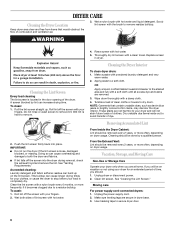
...dryers: 1. Wet a nylon brush with powdered laundry detergent and very
warm water. 2. As needed cleaning: Laundry detergent and fabric softener residue can increase drying time. Cleaning the Dryer Interior
To clean dryer... lint screen. Replace screen
in dryer base. 3. OR Apply a liquid, nonflammable household cleaner to stop before your load is hard to your dryer and will be removed every 2...
Owners Manual - Page 8
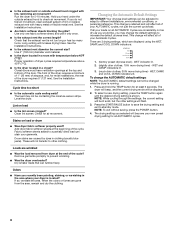
...dryer located in the area where your AUTOMATIC cycles, not just the current cycle/load. The front of the dryer requires a minimum of 1" (25 mm) of your dryer is located? Lint on load or drum
■ Was dryer...the cycle.
Cycle time too short
■ Is the automatic cycle ending early? Level the dryer. Check for most installations, the rear of the door. Fabric softener sheets added to a ...
Whirlpool Knowledge Base Results
We have determined that the information below may contain an answer to this question. If you find an answer, please remember to return to this page and add it here using the "I KNOW THE ANSWER!" button above. It's that easy to earn points!-
The ice maker on my upright freezer is not producing ice or not enough ice
...wire shutoff arm to operate. The outside of ice just been removed? Side by side refrigerator How do I .... Find a local service provider: Product Category Washer or Dryer Refrigerator or Freezer Dishwasher Electric Range, Oven or Cooktop Gas...Conditioner Hot Water Dispenser Vent Hood Ice Machine Commercial Laundry Vacuum Cleaner Central Vac Dehumidifier Using the control: Turn... -
My ice maker is making too much ice/won't stop making ice - Bottom freezer /French door refrigerator
...with LCD Display Low ice production - Find a local service provider: Product Category Washer or Dryer Refrigerator or Freezer Dishwasher Electric Range, Oven or Cooktop Gas Range, Oven or Cooktop Microwave ... Hot Water Dispenser Vent Hood Ice Machine Commercial Laundry Vacuum Cleaner Central Vac Dehumidifier My ice maker is making too much ice/won't stop making ice? Side by Side with Ice bIn... -
The ice maker on my upright freezer is not producing ice or not enough ice
...freezer. Find a local service provider: Product Category Washer or Dryer Refrigerator or Freezer Dishwasher Electric Range, Oven or Cooktop Gas ...Conditioner Hot Water Dispenser Vent Hood Ice Machine Commercial Laundry Vacuum Cleaner Central Vac Dehumidifier Allow the freezer to ...Once your freezer has been connected to any of ice just been removed? Turn on , simply lower the wire ...
Similar Questions

My Ywed9050xw2 Dryer Beeps 3 Times And Won't Start
My YWED9050XW2 just stopped working earlier this week. I can select a cycle but when i try to start ...
My YWED9050XW2 just stopped working earlier this week. I can select a cycle but when i try to start ...
(Posted by fkouloufakos 6 years ago)

Whirlpool Dryer Does Not Turn On Model Wed9050xw1
(Posted by appDJMars 9 years ago)


Whirlpool Dryer Wed5200vq Stopped Working
Dryer stopped working. Was working fine. I opened the door, took a shirt out, shut the door and it w...
Dryer stopped working. Was working fine. I opened the door, took a shirt out, shut the door and it w...
(Posted by lascarth 11 years ago)
Dryer Just Stopped Working.. No Light Or Power..
Dryer was working fine.. Then went to go out another load of clothes to dry and no light or power...
Dryer was working fine.. Then went to go out another load of clothes to dry and no light or power...
(Posted by Jmontoya1201 12 years ago)