Dimension Guide
Page 1
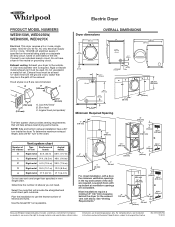
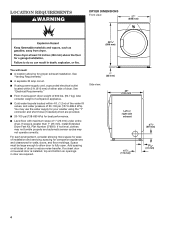
.... Ref. Connect to change without notice. Do not use vent runs longer than specified in .2 (155 cm2) 1" (25 mm) 1" (25 mm) Because Whirlpool Corporation policy includes a continuous commitment to improve our products, we reserve the right to an individual branch circuit. B 4" C (102 mm) A 4" (102 ... straightest and most direct path outdoors. Hood styles: A & B are required. Most installations require a minimum 5" (127 mm) clearance behind the dryer for planning purposes only. Do not have a 90° turn to the outside. 4" (102 mm) diameter vent is required. NOTE: Side ...
.... Ref. Connect to change without notice. Do not use vent runs longer than specified in .2 (155 cm2) 1" (25 mm) 1" (25 mm) Because Whirlpool Corporation policy includes a continuous commitment to improve our products, we reserve the right to an individual branch circuit. B 4" C (102 mm) A 4" (102 ... straightest and most direct path outdoors. Hood styles: A & B are required. Most installations require a minimum 5" (127 mm) clearance behind the dryer for planning purposes only. Do not have a 90° turn to the outside. 4" (102 mm) diameter vent is required. NOTE: Side ...
Installation Instructions
Page 2
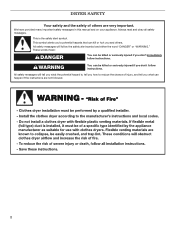
... all safety messages. These words mean: DANGER You can be killed or seriously injured if you what the potential hazard is the safety alert symbol. DRYER SAFETY Your safety and the safety of injury, and tell you don't immediately follow the safety alert symbol and either the word "DANGER" or "WARNING...
... all safety messages. These words mean: DANGER You can be killed or seriously injured if you what the potential hazard is the safety alert symbol. DRYER SAFETY Your safety and the safety of injury, and tell you don't immediately follow the safety alert symbol and either the word "DANGER" or "WARNING...
Installation Instructions
Page 3
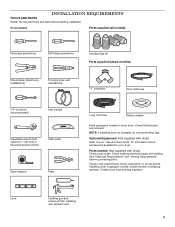
... inlet hose Rubber washer Parts package is located in garages, closets, mobile homes, or sleeping quarters. Optional Equipment: (Not supplied with dryer) Check local codes. Check existing electrical supply and venting. Some codes limit, or do not use leveling legs. Contact your... dryer. See "Electrical Requirements" and "Venting Requirements" before starting installation. INSTALLATION REQUIREMENTS TOOLS AND PARTS Gather the required tools and parts before ...
... inlet hose Rubber washer Parts package is located in garages, closets, mobile homes, or sleeping quarters. Optional Equipment: (Not supplied with dryer) Check local codes. Check existing electrical supply and venting. Some codes limit, or do not use leveling legs. Contact your... dryer. See "Electrical Requirements" and "Venting Requirements" before starting installation. INSTALLATION REQUIREMENTS TOOLS AND PARTS Gather the required tools and parts before ...
Installation Instructions
Page 4
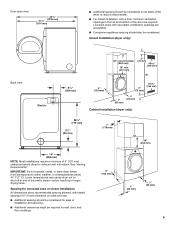
...) You will need: ■■ A location allowing for walls, doors, and floor moldings. Add spacing on all sides of 1" (25 mm) under entire dryer. You may not operate correctly. If not level, clothes may not tumble properly and automatic sensor cycles may use the water supply for ease of... dryer. Side view: 1" (25 mm) 29" (736 mm) Left or right side exhaust 6 7/8" (174 mm) 31/2" (89 mm) 1 5/8" (41 mm) 4 Also consider weight of...
...) You will need: ■■ A location allowing for walls, doors, and floor moldings. Add spacing on all sides of 1" (25 mm) under entire dryer. You may not operate correctly. If not level, clothes may not tumble properly and automatic sensor cycles may use the water supply for ease of... dryer. Side view: 1" (25 mm) 29" (736 mm) Left or right side exhaust 6 7/8" (174 mm) 31/2" (89 mm) 1 5/8" (41 mm) 4 Also consider weight of...
Installation Instructions
Page 5
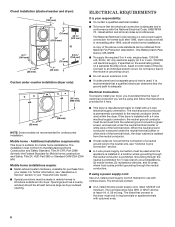
...310 cm2) Back view: Electric 61/4" (159 mm) 4" (102 mm) 3" (76 mm) 24 in.2 (155 cm2) 1" (25 mm) 1" (25 mm) Cabinet installation (dryer only): 281/8" (715 mm) 31/2" (89 mm) 7" (178 mm) 18" (460 mm) 14" (358 mm) NOTE: Most installations require a minimum of the door are ...spacing should be considered on sides and rear. ■■ Additional spacing should also be considered. IMPORTANT: Do not operate, install, or store dryer where it will be exposed to shut off at temperatures below 45° F (7° C). Spacing for recessed area or closet installation All dimensions...
...310 cm2) Back view: Electric 61/4" (159 mm) 4" (102 mm) 3" (76 mm) 24 in.2 (155 cm2) 1" (25 mm) 1" (25 mm) Cabinet installation (dryer only): 281/8" (715 mm) 31/2" (89 mm) 7" (178 mm) 18" (460 mm) 14" (358 mm) NOTE: Most installations require a minimum of the door are ...spacing should be considered on sides and rear. ■■ Additional spacing should also be considered. IMPORTANT: Do not operate, install, or store dryer where it will be exposed to shut off at temperatures below 45° F (7° C). Spacing for recessed area or closet installation All dimensions...
Installation Instructions
Page 6
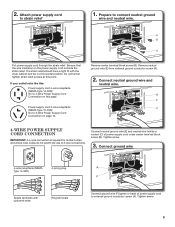
... Electrical Code, ANSI/NFPA 70 - Mobile home installations require: ■■ Metal exhaust system hardware, available for purchase from your dryer, you will be sure that the electrical connection is installed in mobile homes to install with a 4-wire electrical supply connection, the...removed from the external ground connector (green screw), and secured under the neutral terminal (center or white wire) of the terminal block, the dryer cabinet is isolated from : National Fire Protection Association, One Batterymarch Park, Quincy, MA 02269. ■■ To supply the required 3 ...
... Electrical Code, ANSI/NFPA 70 - Mobile home installations require: ■■ Metal exhaust system hardware, available for purchase from your dryer, you will be sure that the electrical connection is installed in mobile homes to install with a 4-wire electrical supply connection, the...removed from the external ground connector (green screw), and secured under the neutral terminal (center or white wire) of the terminal block, the dryer cabinet is isolated from : National Fire Protection Association, One Batterymarch Park, Quincy, MA 02269. ■■ To supply the required 3 ...
Installation Instructions
Page 7
... terminals and UL listed strain relief. Screw in accordance with a cord having an equipmentgrounding conductor and a grounding plug. Now stand the dryer on cardboard. 2. If your outlet looks like this : 4-wire receptacle (14-30R) Then choose a 4-wire power supply cord with... flexible metallic conduit. GROUNDING INSTRUCTIONS � For a grounded, cord-connected dryer: This dryer must match power supply (4-wire or 3-wire) and be identified by providing a path of least resistance for electrical connection and to move...
... terminals and UL listed strain relief. Screw in accordance with a cord having an equipmentgrounding conductor and a grounding plug. Now stand the dryer on cardboard. 2. If your outlet looks like this : 4-wire receptacle (14-30R) Then choose a 4-wire power supply cord with... flexible metallic conduit. GROUNDING INSTRUCTIONS � For a grounded, cord-connected dryer: This dryer must match power supply (4-wire or 3-wire) and be identified by providing a path of least resistance for electrical connection and to move...
Installation Instructions
Page 9
... screw (B). Remove neutral ground wire (E) from external ground conductor screw (A). 2. Connect ground wire 4-wire receptacle (NEMA type 14-30R) 4-prong plug Spade terminals with the dryer cabinet and be in a horizontal position.
... screw (B). Remove neutral ground wire (E) from external ground conductor screw (A). 2. Connect ground wire 4-wire receptacle (NEMA type 14-30R) 4-prong plug Spade terminals with the dryer cabinet and be in a horizontal position.
Installation Instructions
Page 10
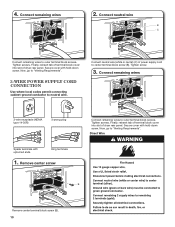
Finally, reinsert tab of terminal block cover into slot of dryer rear panel. Connect neutral wire (white or center) (C) of dryer rear panel. Tighten screw. 3. Finally, reinsert tab of terminal block cover into slot of power supply cord to center terminal block screw (B). Now, go to "...
Finally, reinsert tab of terminal block cover into slot of dryer rear panel. Connect neutral wire (white or center) (C) of dryer rear panel. Tighten screw. 3. Finally, reinsert tab of terminal block cover into slot of power supply cord to center terminal block screw (B). Now, go to "...
Installation Instructions
Page 11
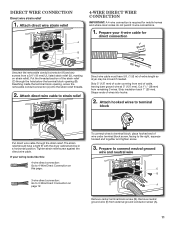
... together and tighten screw. 3. Cut 11/2" (38 mm) from external ground conductor screw (A). 11 The strain relief should have 5 ft. (1.52 m) of extra length so dryer may be in a horizontal position. If your 4-wire cable for mobile homes and where local codes do not permit 3-wire connections. 1. Shape ends of the... 4-wire Direct Wire Connection IMPORTANT: A 4-wire connection is required for direct connection (251"mm) (127 5" mm) Direct wire cable must have a tight fit with the dryer cabinet and be moved if needed. Strip insulation back 1" (25 mm).
... together and tighten screw. 3. Cut 11/2" (38 mm) from external ground conductor screw (A). 11 The strain relief should have 5 ft. (1.52 m) of extra length so dryer may be in a horizontal position. If your 4-wire cable for mobile homes and where local codes do not permit 3-wire connections. 1. Shape ends of the... 4-wire Direct Wire Connection IMPORTANT: A 4-wire connection is required for direct connection (251"mm) (127 5" mm) Direct wire cable must have a tight fit with the dryer cabinet and be moved if needed. Strip insulation back 1" (25 mm).

Installation Instructions
Page 12
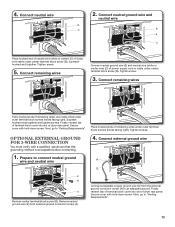
...ground wire (E) and place hooked end (hook facing right) of neutral wire (white or center wire) (C) of direct wire cable under center screw of dryer rear panel. Strip insulation back 1" (25 mm). Connect remaining wires To connect wires to terminal block Connect ground wire (green or bare) (F) of ...extra length so dryer may be moved if needed. Squeeze hooked ends together and tighten screws. Strip 31/2" (89 mm) of outer covering from end of wire under ...
...ground wire (E) and place hooked end (hook facing right) of neutral wire (white or center wire) (C) of direct wire cable under center screw of dryer rear panel. Strip insulation back 1" (25 mm). Connect remaining wires To connect wires to terminal block Connect ground wire (green or bare) (F) of ...extra length so dryer may be moved if needed. Squeeze hooked ends together and tighten screws. Strip 31/2" (89 mm) of outer covering from end of wire under ...
Installation Instructions
Page 13
... end together. Optional External Ground for 3-wire Connection You must verify with hold -down screw. Finally, reinsert tab of terminal block cover into slot of dryer rear panel. Secure cover with hold -down screw. Connect neutral wire 2. Connect neutral ground wire and neutral wire B C B E C Place hooked end of neutral wire (white...
... end together. Optional External Ground for 3-wire Connection You must verify with hold -down screw. Finally, reinsert tab of terminal block cover into slot of dryer rear panel. Secure cover with hold -down screw. Connect neutral wire 2. Connect neutral ground wire and neutral wire B C B E C Place hooked end of neutral wire (white...
Installation Instructions
Page 14
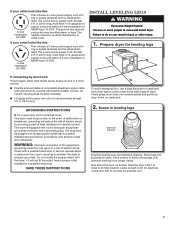
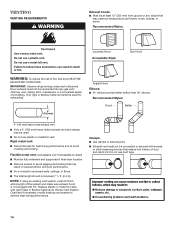
... fastening devices that extend into any object that may result in reduced airflow and poor performance. ■■ Do not install in final dryer location. ■■ Remove excess to seal all governing codes and ordinances. Do not use plastic or metal foil vent. Clamps: ■... performance and to achieve best drying performance. Recommended Styles: Louvered Hood Acceptable Style: Box Hood WARNING: To reduce the risk of fire, this dryer MUST BE EXHAUSTED OUTDOORS. NOTE: If using an existing vent system, clean lint from ground or any gas vent, chimney, wall, ceiling, ...
... fastening devices that extend into any object that may result in reduced airflow and poor performance. ■■ Do not install in final dryer location. ■■ Remove excess to seal all governing codes and ordinances. Do not use plastic or metal foil vent. Clamps: ■... performance and to achieve best drying performance. Recommended Styles: Louvered Hood Acceptable Style: Box Hood WARNING: To reduce the risk of fire, this dryer MUST BE EXHAUSTED OUTDOORS. NOTE: If using an existing vent system, clean lint from ground or any gas vent, chimney, wall, ceiling, ...
Installation Instructions
Page 15
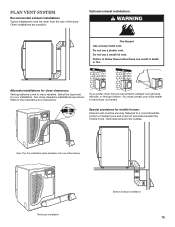
... Fire Hazard use a metal foil vent. Alternate installations for your local dealer to have dryer converted. Two close clearances Venting systems come in death or fire. If you prefer, dryer may be securely fastened to follow these instructions can result in many varieties. You must ...contact your installation. Plan Vent System Recommended exhaust installations Typical installations vent the dryer from the rear of mobile home and must not terminate beneath the mobile home. Do not use a plastic vent. Failure to ...
... Fire Hazard use a metal foil vent. Alternate installations for your local dealer to have dryer converted. Two close clearances Venting systems come in death or fire. If you prefer, dryer may be securely fastened to follow these instructions can result in many varieties. You must ...contact your installation. Plan Vent System Recommended exhaust installations Typical installations vent the dryer from the rear of mobile home and must not terminate beneath the mobile home. Do not use a plastic vent. Failure to ...
Installation Instructions
Page 16
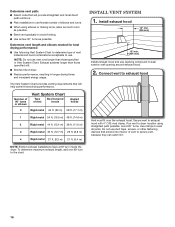
...lint. 16 Install exhaust hood 12" min. (305 mm) 12" min. (305 mm) Install exhaust hood and use . Secure vent to dryer location using elbows or making turns, allow as much room as possible. ■■ Bend vent gradually to seal exterior wall opening around exhaust hood...longer than those specified in longer drying times and increased energy usage. Number of 90° turns or elbows Vent System Chart Type of dryer. ■■ Reduce performance, resulting in Vent System Chart. Install Vent System 1. Exhaust systems longer than those specified will help achieve best...
...lint. 16 Install exhaust hood 12" min. (305 mm) 12" min. (305 mm) Install exhaust hood and use . Secure vent to dryer location using elbows or making turns, allow as much room as possible. ■■ Bend vent gradually to seal exterior wall opening around exhaust hood...longer than those specified in longer drying times and increased energy usage. Number of 90° turns or elbows Vent System Chart Type of dryer. ■■ Reduce performance, resulting in Vent System Chart. Install Vent System 1. Exhaust systems longer than those specified will help achieve best...
Installation Instructions
Page 17
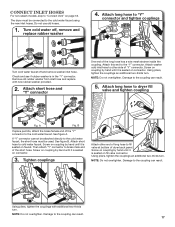
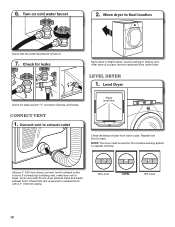
...with new rubber washer provided. 2. Remove old rubber washer from inlet hose and replace with additional two-thirds turn. NOTE: Do not overtighten. The dryer must be attached directly to brass male end of "Y" connector. Attach long hose to "Connect Vent" on connector. 3. Using pliers, tighten the ... couplings an additional two-thirds turn . Turn cold water off and remove washer inlet hose. CONNECT INLET HOSES For non-steam models, skip to dryer fill valve and tighten coupling Fig. Attach this end to the cold water faucet. Do not use old hoses. 1. B If space permits,...
...with new rubber washer provided. 2. Remove old rubber washer from inlet hose and replace with additional two-thirds turn. NOTE: Do not overtighten. The dryer must be attached directly to brass male end of "Y" connector. Attach long hose to "Connect Vent" on connector. 3. Using pliers, tighten the ... couplings an additional two-thirds turn . Turn cold water off and remove washer inlet hose. CONNECT INLET HOSES For non-steam models, skip to dryer fill valve and tighten coupling Fig. Attach this end to the cold water faucet. Do not use old hoses. 1. B If space permits,...
Installation Instructions
Page 18
...vent to exhaust outlet Place level here Check levelness of dryer from front to back. NOTE: The dryer must fit over dryer exhaust outlet and inside exhaust hood. Repeat from side to existing vent, make sure vent is in dryer. If connecting to side. Check that the water ...4" (102 mm) clamp, connect vent to exhaust hood with a 4" (102 mm) clamp. 6. Move dryer to final location Check that vent is secured to exhaust outlet in place, remove cardboard from under dryer. Turn on . 7. Check for the moisture sensing system to final location. Avoid crushing or kinking vent. ...
...vent to exhaust outlet Place level here Check levelness of dryer from front to back. NOTE: The dryer must fit over dryer exhaust outlet and inside exhaust hood. Repeat from side to existing vent, make sure vent is in dryer. If connecting to side. Check that the water ...4" (102 mm) clamp, connect vent to exhaust hood with a 4" (102 mm) clamp. 6. Move dryer to final location Check that vent is secured to exhaust outlet in place, remove cardboard from under dryer. Turn on . 7. Check for the moisture sensing system to final location. Avoid crushing or kinking vent. ...

Installation Instructions
Page 19
...water system in your "Use and Care Guide" for levelness. For further information, see "Assistance or Service" section in the dryer. Complete Installation CHECKLIST q Check that dryer is available to see "Assistance or Service" section in your tools. q Check that all four legs are on your "Use... and Care Guide". Door Reversal If you have all packaging materials. q Check for certain part replacement or repair. If dryer will reduce product performance. 2. q Check that you prefer to reverse the door swing on . q Be sure the water faucets are snug against...
...water system in your "Use and Care Guide" for levelness. For further information, see "Assistance or Service" section in the dryer. Complete Installation CHECKLIST q Check that dryer is available to see "Assistance or Service" section in your tools. q Check that all four legs are on your "Use... and Care Guide". Door Reversal If you have all packaging materials. q Check for certain part replacement or repair. If dryer will reduce product performance. 2. q Check that you prefer to reverse the door swing on . q Be sure the water faucets are snug against...

Owners Manual
Page 2
... You can be killed or seriously injured if you don't follow instructions. Always read and obey all safety messages. All safety messages will follow instructions. DRYER SAFETY Your safety and the safety of injury, and tell you what can happen if the instructions are very important.
... You can be killed or seriously injured if you don't follow instructions. Always read and obey all safety messages. All safety messages will follow instructions. DRYER SAFETY Your safety and the safety of injury, and tell you what can happen if the instructions are very important.

Owners Manual
Page 3
... must be electrically grounded in accordance with local codes, or in this or any electrical switch; Gas suppliers recommend that you smell gas" instructions. 3 The dryer must conform with local codes, or in the vicinity of this manual must be detected by UL or CSA. do if you use gasoline or...
... must be electrically grounded in accordance with local codes, or in this or any electrical switch; Gas suppliers recommend that you smell gas" instructions. 3 The dryer must conform with local codes, or in the vicinity of this manual must be detected by UL or CSA. do if you use gasoline or...


