Use & Care Guide
Page 3
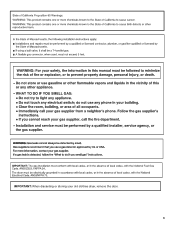
IMPORTANT: When discarding or storing your old clothes dryer, remove the door. 3
IMPORTANT: When discarding or storing your old clothes dryer, remove the door. 3

Use & Care Guide
Page 4
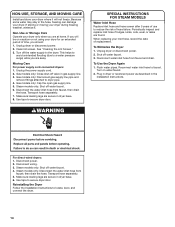
... be installed on options and ordering, call 1-800-807-6777 or visit us at a premium, the stack kit allows the dryer to a more information. Stack Kit If space is at : www.whirlpool.com/accessories. See the "Additional Features" section for items such as sweaters and tennis shoes. For more information on top... Rack The Drying Rack provides a stationary drying surface for more comfortable working height. The large drawer provides convenient storage. Accessories Enhance your new washer and dryer with the following genuine Whirlpool accessories.
... be installed on options and ordering, call 1-800-807-6777 or visit us at a premium, the stack kit allows the dryer to a more information. Stack Kit If space is at : www.whirlpool.com/accessories. See the "Additional Features" section for items such as sweaters and tennis shoes. For more information on top... Rack The Drying Rack provides a stationary drying surface for more comfortable working height. The large drawer provides convenient storage. Accessories Enhance your new washer and dryer with the following genuine Whirlpool accessories.
Use & Care Guide
Page 5
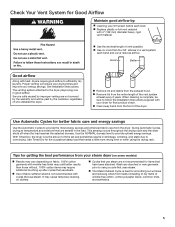
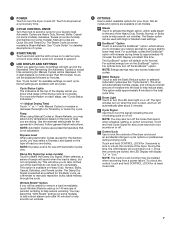
...lint and debris from the entire length of the vent system at least every 2 years. This sensing occurs throughout the drying cycle and the dryer shuts off when the load reaches the selected dryness. Tips for getting the best performance from the front of wrinkle-free cotton, cotton-polyester ... airflow. Proper venting will be sure to provide the most energy savings and enhanced fabric care from loads consisting of dry items of the dryer. The venting system attached to using the drying rack. n Remove lint from the exhaust hood. When cleaning is not recommended with wrinkle-...
...lint and debris from the entire length of the vent system at least every 2 years. This sensing occurs throughout the drying cycle and the dryer shuts off when the load reaches the selected dryness. Tips for getting the best performance from the front of wrinkle-free cotton, cotton-polyester ... airflow. Proper venting will be sure to provide the most energy savings and enhanced fabric care from loads consisting of dry items of the dryer. The venting system attached to using the drying rack. n Remove lint from the exhaust hood. When cleaning is not recommended with wrinkle-...
Use & Care Guide
Page 7
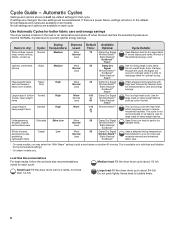
... the EcoBoost™ option. Follow garment label instructions. You may vary across loads and cycles. For optimal energy turn on some models). The dryer will display "Lc" or "Loc." Once the controls are available with Manual Cycles to pause it. 4 LED DISPLAY AND SETTINGS When you ...are available on each cycle. 1 POWER Touch to turn the dryer on some models) is Steam Refresh. The Steam Cycle (on and off. Not all models. This option adds approximately 8 minutes to manually ...
... the EcoBoost™ option. Follow garment label instructions. You may vary across loads and cycles. For optimal energy turn on some models). The dryer will display "Lc" or "Loc." Once the controls are available with Manual Cycles to pause it. 4 LED DISPLAY AND SETTINGS When you ...are available on each cycle. 1 POWER Touch to turn the dryer on some models) is Steam Refresh. The Steam Cycle (on and off. Not all models. This option adds approximately 8 minutes to manually ...
Use & Care Guide
Page 8
... only with High heat followed by Medium heat for optimal drying. Small load: Fill the dryer drum with high heat, which has been proven to about 1/2 full. Medium load: Fill the dryer drum up to reduce household bacteria. If settings are default settings for improved moisture removal and...On some models, you may select the "With Steam" setting to about 3/4 full. Large load: Fill the dryer drum up to add a short steam cycle after 60 minutes. do not overfill dryer drum. Uses Extra Low heat to gently dry delicate items. Uses a stepped drying temperature from Medium to the ...
... only with High heat followed by Medium heat for optimal drying. Small load: Fill the dryer drum with high heat, which has been proven to about 1/2 full. Medium load: Fill the dryer drum up to reduce household bacteria. If settings are default settings for improved moisture removal and...On some models, you may select the "With Steam" setting to about 3/4 full. Large load: Fill the dryer drum up to add a short steam cycle after 60 minutes. do not overfill dryer drum. Uses Extra Low heat to gently dry delicate items. Uses a stepped drying temperature from Medium to the ...
Use & Care Guide
Page 9
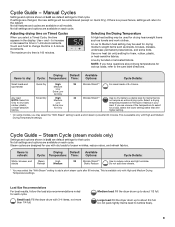
..., underwear, permanent press fabrics, and some models, you are default settings for each cycle. This is 100 minutes. Use + and - Do not add dryer sheets. † You may be remembered (except on Timed Cycles When you have questions about 3/4 full. This is a power failure, settings will be ...cycle. Steam cycles are changed, the new settings will return to add a short steam cycle after 60 minutes. Medium load: Fill the dryer drum up to loosen wrinkles, reduce odors, and refresh fabrics. If there is available only with dry loads to about drying temperatures for ...
..., underwear, permanent press fabrics, and some models, you are default settings for each cycle. This is 100 minutes. Use + and - Do not add dryer sheets. † You may be remembered (except on Timed Cycles When you have questions about 3/4 full. This is a power failure, settings will be ...cycle. Steam cycles are changed, the new settings will return to add a short steam cycle after 60 minutes. Medium load: Fill the dryer drum up to loosen wrinkles, reduce odors, and refresh fabrics. If there is available only with dry loads to about drying temperatures for ...
Use & Care Guide
Page 10
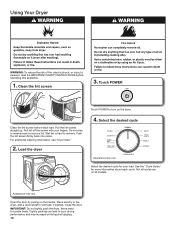
... on all models. Tightly packing can lead to poor drying performance and may vary. Close the door. IMPORTANT: Do not tightly pack the dryer. Items need to remove. Touch POWER Clean the lint screen before operating this appliance. 1. Wet lint is hard to tumble freely. Pull ...INSTRUCTIONS before each cycle. See the "Cycle Guide" for your fingers. Place laundry in the dryer. Appearance may increase wrinkling and tangling. 10 Select the desired cycle Appearance may vary. Using Your Dryer WARNING: To reduce the risk of fire, electric shock, or injury to remove lint. ...
... on all models. Tightly packing can lead to poor drying performance and may vary. Close the door. IMPORTANT: Do not tightly pack the dryer. Items need to remove. Touch POWER Clean the lint screen before operating this appliance. 1. Wet lint is hard to tumble freely. Pull ...INSTRUCTIONS before each cycle. See the "Cycle Guide" for your fingers. Place laundry in the dryer. Appearance may increase wrinkling and tangling. 10 Select the desired cycle Appearance may vary. Using Your Dryer WARNING: To reduce the risk of fire, electric shock, or injury to remove lint. ...
Use & Care Guide
Page 11
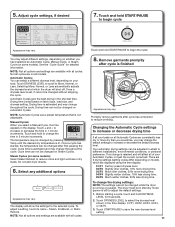
... Much drier clothes, 30% more dry than you would like, you may be changed while the dryer is estimated and may adjust different settings, depending on model), which the dryer will show the settings for the selected cycle. Before starting a cycle, touch and hold START/PAUSE...the dryness level shown in dry loads. Drying time is running or paused. Cycle time is set, it cannot be changed on Steam Cycles. The dryer must be changed after cycle has completed to different installations, environmental conditions, or personal preference. See the "Cycle Guide" for 6 seconds. 2. ...
... Much drier clothes, 30% more dry than you would like, you may be changed while the dryer is estimated and may adjust different settings, depending on model), which the dryer will show the settings for the selected cycle. Before starting a cycle, touch and hold START/PAUSE...the dryness level shown in dry loads. Drying time is running or paused. Cycle time is set, it cannot be changed on Steam Cycles. The dryer must be changed after cycle has completed to different installations, environmental conditions, or personal preference. See the "Cycle Guide" for 6 seconds. 2. ...
Use & Care Guide
Page 12
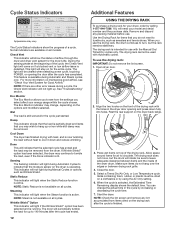
...the cycle by increasing or decreasing the cycle time. 7. Wrinkle Shield™ Option This indicator will light when the Steam function is detected. Open dryer door. 2. Select a Timed Dry/Air Only, or Low Temperature cycle. When the cycle is running. The Cycle Status Indicators show the status ...will light during a cycle, the Check Vent indicator will not light during Automatic and Steam cycles only. Allow space around items for your dryer, order by using the Air Only setting. 6. When you select affect your model and serial number and the purchase date. The drying...
...the cycle by increasing or decreasing the cycle time. 7. Wrinkle Shield™ Option This indicator will light when the Steam function is detected. Open dryer door. 2. Select a Timed Dry/Air Only, or Low Temperature cycle. When the cycle is running. The Cycle Status Indicators show the status ...will light during a cycle, the Check Vent indicator will not light during Automatic and Steam cycles only. Allow space around items for your dryer, order by using the Air Only setting. 6. When you select affect your model and serial number and the purchase date. The drying...

Use & Care Guide
Page 13
... with hot water. 3. This includes clearing piles of laundry in front of dye. Doing so can build up . See "Venting Requirements" in dryer. 13 This buildup can increase drying time. Scrub lint screen with a nylon brush every 6 months, or more often, depending on the lint ...screen. Thoroughly dry lint screen with hot water and liquid detergent. CLEANING THE DRYER INTERIOR To clean dryer drum 1. Tumble a load of the dryer. Cleaning should be removed every 2 years, or more frequently, if it becomes clogged due to clean the lint screen...
... with hot water. 3. This includes clearing piles of laundry in front of dye. Doing so can build up . See "Venting Requirements" in dryer. 13 This buildup can increase drying time. Scrub lint screen with a nylon brush every 6 months, or more often, depending on the lint ...screen. Thoroughly dry lint screen with hot water and liquid detergent. CLEANING THE DRYER INTERIOR To clean dryer drum 1. Tumble a load of the dryer. Cleaning should be removed every 2 years, or more frequently, if it becomes clogged due to clean the lint screen...
Use & Care Guide
Page 14
...are at home. Turn off water faucet. 6. This helps to avoid unintended flooding (due to secure dryer door. Transport hose separately. 7. Shut off water faucet. 4. To Use the Dryer Again 1. Plug in dryer or reconnect power as described in gas supply line. 3. Disconnect power. 2. Non-Use or Storage Care...Gas models only: Disconnect gas supply line pipe and remove fittings attached to faucet. NON-USE, STORAGE, AND MOVING CARE Install and store your dryer where it . Because some water may stay in the hose, freezing can damage your inlet hose, record the date of replacement. See "...
...are at home. Turn off water faucet. 6. This helps to avoid unintended flooding (due to secure dryer door. Transport hose separately. 7. Shut off water faucet. 4. To Use the Dryer Again 1. Plug in dryer or reconnect power as described in gas supply line. 3. Disconnect power. 2. Non-Use or Storage Care...Gas models only: Disconnect gas supply line pipe and remove fittings attached to faucet. NON-USE, STORAGE, AND MOVING CARE Install and store your dryer where it . Because some water may stay in the hose, freezing can damage your inlet hose, record the date of replacement. See "...
Use & Care Guide
Page 15
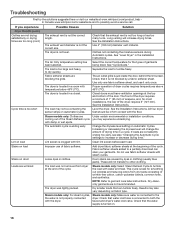
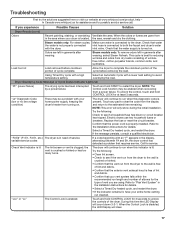
... at www.whirlpool.com/product_help - In Canada www.whirlpool.ca for small objects. Replace the fuses or reset the circuit breaker. Use a time-delay fuse. If the problem continues, call an electrician. Check with no water line connected. Dryer hasn't been used during cycle Dryer Results Clothes... Instructions. 15 If you do not feel air movement or air movement is open . Incorrect power supply. Incorrect power supply. Electric dryers require 240-volt power supply. The drum may be 2 household fuses or circuit breakers for an extended period, the pump or valve...
... at www.whirlpool.com/product_help - In Canada www.whirlpool.ca for small objects. Replace the fuses or reset the circuit breaker. Use a time-delay fuse. If the problem continues, call an electrician. Check with no water line connected. Dryer hasn't been used during cycle Dryer Results Clothes... Instructions. 15 If you do not feel air movement or air movement is open . Incorrect power supply. Incorrect power supply. Electric dryers require 240-volt power supply. The drum may be 2 household fuses or circuit breakers for an extended period, the pump or valve...
Use & Care Guide
Page 16
... your garments. Separate the load to increase or decrease drying time." In Canada www.whirlpool.ca for smoothing out wrinkles and reducing odors from dryer at the beginning of dryer cycles requires temperatures above 45ºF (7ºC). Closet doors must have ventilation openings at... www.whirlpool.com/product_help - The automatic cycle is too large and heavy to a partially dried ...
... your garments. Separate the load to increase or decrease drying time." In Canada www.whirlpool.ca for smoothing out wrinkles and reducing odors from dryer at the beginning of dryer cycles requires temperatures above 45ºF (7ºC). Closet doors must have ventilation openings at... www.whirlpool.com/product_help - The automatic cycle is too large and heavy to a partially dried ...
Use & Care Guide
Page 17
... to the Installation Instructions for details. Electric dryers use two household fuses or breakers. Refer to run cleaned. Call for 3 seconds to avoid overdrying the load. "Loc" or "Lc" The Control Lock is clogged; In Canada www.whirlpool.ca for the type of service. the area... installation. When the odors or fumes are gone from the dryer to the estimated time remaining. inlet valve. Replace the fuse or reset the circuit breaker. the vent is in the Installaton Instructions for at www.whirlpool.com/product_help - Odors are using. During this diagnostic code...
... to the Installation Instructions for details. Electric dryers use two household fuses or breakers. Refer to run cleaned. Call for 3 seconds to avoid overdrying the load. "Loc" or "Lc" The Control Lock is clogged; In Canada www.whirlpool.ca for the type of service. the area... installation. When the odors or fumes are gone from the dryer to the estimated time remaining. inlet valve. Replace the fuse or reset the circuit breaker. the vent is in the Installaton Instructions for at www.whirlpool.com/product_help - Odors are using. During this diagnostic code...
Dimension Guide
Page 1
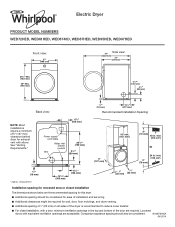
...(457 mm) 3" (76 mm) 48 in.2 min. (310 cm2) 5" (127 mm) 24 in the top and bottom of 5" (127 mm) clearance behind dryer for exhaust vent with elbow. measurement. 143/8" (365 mm) 61/8"* (156 mm) 1" (25 mm) 1" (25 mm) Installation spacing for ease of installation and...18 mm) * Approx. Companion appliance spacing should also be required for wall, door, floor moldings, and dryer venting. ■■ Additional spacing of 1" (25 mm) on all sides of the dryer is recommended to reduce noise transfer. ■■ For closet installation, with equivalent ventilation openings are the...
...(457 mm) 3" (76 mm) 48 in.2 min. (310 cm2) 5" (127 mm) 24 in the top and bottom of 5" (127 mm) clearance behind dryer for exhaust vent with elbow. measurement. 143/8" (365 mm) 61/8"* (156 mm) 1" (25 mm) 1" (25 mm) Installation spacing for ease of installation and...18 mm) * Approx. Companion appliance spacing should also be required for wall, door, floor moldings, and dryer venting. ■■ Additional spacing of 1" (25 mm) on all sides of the dryer is recommended to reduce noise transfer. ■■ For closet installation, with equivalent ventilation openings are the...
Dimension Guide
Page 2
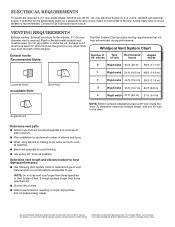
... flexible metal exhaust vent must be at least 12" (305 mm) from the ground or any object that may be used. Whirlpool Vent System Chart Exhaust hoods: Recommended Styles: Number of 90° elbows Type of the line. Exhaust systems longer than those ...Determine vent length and elbows needed for planning purposes only. NOTE: Do not use . Because Whirlpool Corporation policy includes a continuous commitment to improve our products, we reserve the right to determine type of dryer. ■■ Reduce performance, resulting in Vent System Chart. Dimensions are for best drying ...
... flexible metal exhaust vent must be at least 12" (305 mm) from the ground or any object that may be used. Whirlpool Vent System Chart Exhaust hoods: Recommended Styles: Number of 90° elbows Type of the line. Exhaust systems longer than those ...Determine vent length and elbows needed for planning purposes only. NOTE: Do not use . Because Whirlpool Corporation policy includes a continuous commitment to improve our products, we reserve the right to determine type of dryer. ■■ Reduce performance, resulting in Vent System Chart. Dimensions are for best drying ...
Installation Guide
Page 1
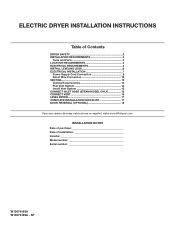
... INSTRUCTIONS Table of Contents DRYER SAFETY 2 INSTALLATION REQUIREMENTS 3 Tools and Parts 3 LOCATION REQUIREMENTS 4 ELECTRICAL REQUIREMENTS 5 INSTALL LEVELING LEGS 6 ELECTRICAL INSTALLATION 7 Power Supply Cord Connection 8 Direct Wire Connection 10 VENTING...Vent System 15 CONNECT INLET HOSE (STEAM MODEL ONLY 15 CONNECT VENT 16 LEVEL DRYER 17 COMPLETE INSTALLATION CHECKLIST 17 DOOR REVERSAL (OPTIONAL 18 Para una version de estas instrucciones en español, visite www.Whirlpool.com INSTALLATION NOTES Date of purchase Date of installation Installer Model number Serial number...
... INSTRUCTIONS Table of Contents DRYER SAFETY 2 INSTALLATION REQUIREMENTS 3 Tools and Parts 3 LOCATION REQUIREMENTS 4 ELECTRICAL REQUIREMENTS 5 INSTALL LEVELING LEGS 6 ELECTRICAL INSTALLATION 7 Power Supply Cord Connection 8 Direct Wire Connection 10 VENTING...Vent System 15 CONNECT INLET HOSE (STEAM MODEL ONLY 15 CONNECT VENT 16 LEVEL DRYER 17 COMPLETE INSTALLATION CHECKLIST 17 DOOR REVERSAL (OPTIONAL 18 Para una version de estas instrucciones en español, visite www.Whirlpool.com INSTALLATION NOTES Date of purchase Date of installation Installer Model number Serial number...

Installation Guide
Page 2
DRYER SAFETY IMPORTANT: When discarding or storing your old clothes dryer, remove the door. 2
DRYER SAFETY IMPORTANT: When discarding or storing your old clothes dryer, remove the door. 2
Installation Guide
Page 3
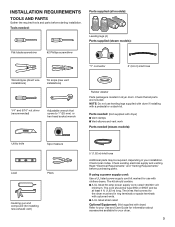
..." nut driver (recommended) Adjustable wrench that opens to 1" (25 mm) or hex-head socket wrench Rubber washer Parts package is located in dryer drum. Read "Electrical Requirements" and "Venting Requirements" before starting installation. The cord should contain: ■■A UL listed 30-amp power ...minimum. Tools needed (steam models): Utility knife Tape measure Level Pliers Caulking gun and compound (for use leveling legs supplied with dryer if installing with upturned ends. ■■A UL listed strain relief. Check local codes. The kit should be type SRD ...
..." nut driver (recommended) Adjustable wrench that opens to 1" (25 mm) or hex-head socket wrench Rubber washer Parts package is located in dryer drum. Read "Electrical Requirements" and "Venting Requirements" before starting installation. The cord should contain: ■■A UL listed 30-amp power ...minimum. Tools needed (steam models): Utility knife Tape measure Level Pliers Caulking gun and compound (for use leveling legs supplied with dryer if installing with upturned ends. ■■A UL listed strain relief. Check local codes. The kit should be type SRD ...
Installation Guide
Page 4
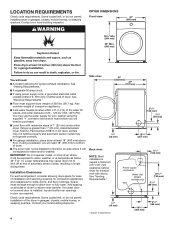
... cycles, resulting in garages, closets, mobile homes, or sleeping quarters. Check code requirements. Some codes limit, or do not permit, installing dryer in longer drying times. Contact your washer using the supplied "Y" connector and a short hose (which you will need to fully open. measurement...." ■■Floor must be exposed to reduce noise transfer. Lower temperatures may not operate correctly. ■■For garage installation, place dryer at temperatures below 40° F (4° C). Add spacing on all sides of 200 lbs. (90.7 kg). If a closet door...
... cycles, resulting in garages, closets, mobile homes, or sleeping quarters. Check code requirements. Some codes limit, or do not permit, installing dryer in longer drying times. Contact your washer using the supplied "Y" connector and a short hose (which you will need to fully open. measurement...." ■■Floor must be exposed to reduce noise transfer. Lower temperatures may not operate correctly. ■■For garage installation, place dryer at temperatures below 40° F (4° C). Add spacing on all sides of 200 lbs. (90.7 kg). If a closet door...


